
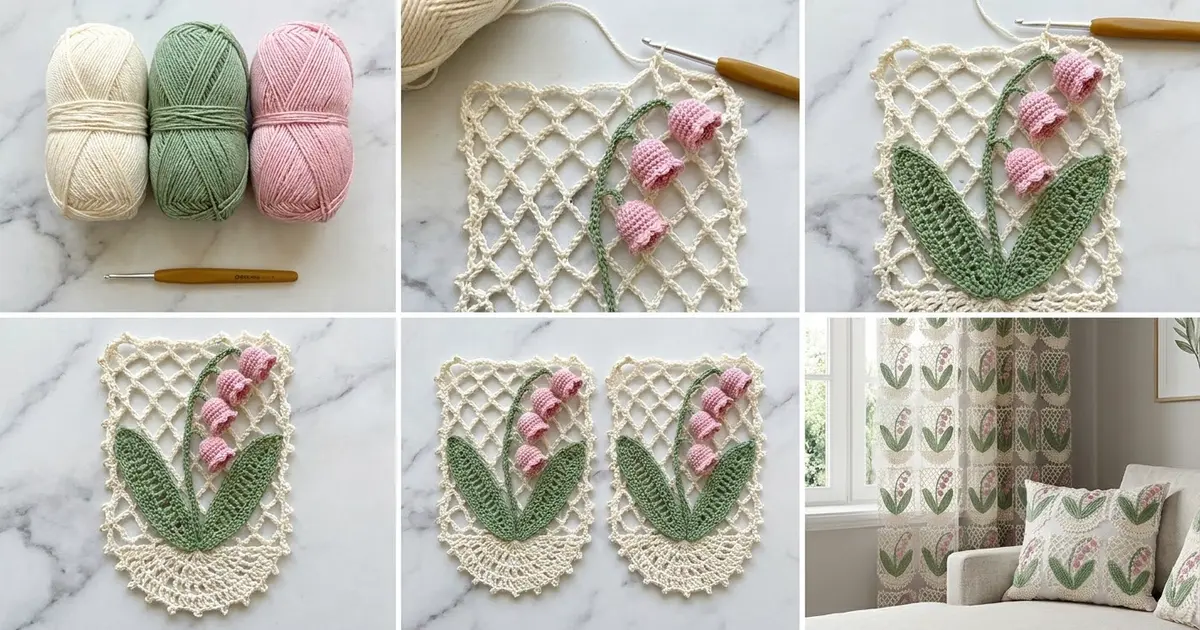
The Valley Bells Lace Motif is a spring lace piece with a vintage feel. A spray of lily of the valley sits on an airy ivory net: two openwork green leaves, an arching stem and five small pink bells that hang down as if they were swaying.
The design uses three colors of cotton crochet thread. Ivory makes the background net and border, sage green makes the leaves and stem, and soft lilac-pink makes the bells. All instructions use US crochet terms.
The finished motif measures 6 × 10 in (15.2 × 25.4 cm). The center fan adds 0.5 in (1.3 cm) at the bottom point, so the total height there is 10.5 in (26.7 cm).
Construction is simple and easy to measure. You work the ivory diamond net in rows, then add a three-round picot border with a centered fan. The leaves, stem and bells are made separately and sewn on top as layered appliqués.
Finished Size and Construction
- Finished size: 6 × 10 in (15.2 × 25.4 cm); 10.5 in (26.7 cm) at the fan point
- Skill level: Intermediate
- Terminology: US
- Yarn weight: Size 3 mercerized cotton crochet thread
- Hook: 2.0 mm steel hook (US steel 4)
- Number of pieces: 1 finished motif (net panel plus 8 sewn-on components: 2 leaves, 1 stem, 5 bells)
- Layout: Single vertical rectangle
- Net panel size: 5 × 9 in (12.7 × 22.9 cm)
- Size before border: 5 × 9 in (12.7 × 22.9 cm)
- Border depth: 0.5 in (1.3 cm) on every side, plus a 0.5 in (1.3 cm) fan drop at the bottom center
Materials
Use a smooth, mercerized cotton thread in size 3, about 280 m per 100 g. Mercerized cotton shows the stitches clearly, blocks crisply and holds the bell shapes well. Avoid fuzzy or acrylic blends, because they blur the net.
- Ivory (net and border): 18 g / 50 m
- Sage green (leaves and stem): 8 g / 22 m
- Lilac-pink (bells): 5 g / 14 m
All quantities include a margin of about 20% for gauge swatches and sewing tails.
Tools:
- 2.0 mm steel crochet hook
- Tapestry needle with a small eye
- Rust-proof pins
- Blocking mat or folded towel
- Spray bottle
- Ruler or tape measure
- Small scissors
Abbreviations (US Terms)
- ch – chain
- sl st – slip stitch
- sc – single crochet
- hdc – half double crochet
- dc – double crochet
- tr – treble crochet
- FPdc – front post double crochet
- sp(s) – space(s)
- MR – magic ring
- st(s) – stitch(es)
Picot: Ch 3, sl st in the 3rd ch from the hook.
Back-bump sl st: Insert the hook under the raised bump on the back of the chain and work a sl st. This makes a firm, rounded cord.
Gauge and Checkpoints
Make the net panel first and measure it before you make any appliqués. The leaves and stem are sized to fit this panel.
- Net gauge: 10 ch-5 loops = 5 in (12.7 cm) wide; 25 rows = 9 in (22.9 cm) tall.
- Chain gauge (green): 8 ch = 1 in (2.5 cm).
- Checkpoint 1: After Row 1, the strip should measure about 5 in (12.7 cm) across.
- Checkpoint 2: After Row 11, the panel should be about 4 in (10.2 cm) tall.
- Checkpoint 3: After Row 25, the panel should measure 5 × 9 in (12.7 × 22.9 cm) when lightly stretched.
If the panel is too big, go down to a 1.75 mm hook. If it is too small, go up to a 2.25 mm hook. Do not change the stitch counts, because the border math depends on them.
Net Panel (Ivory)
Foundation: Ch 42.
Row 1: Sc in the 2nd ch from the hook, *ch 5, skip 3 ch, sc in next ch; rep from * across. Turn. (10 ch-5 loops, 11 sc)
Row 2: Ch 5 (counts as a half loop), sc in the first ch-5 loop, *ch 5, sc in next loop; rep from * across, ch 2, dc in last sc. Turn. (9 full loops plus 2 half loops)
Row 3: Ch 1, sc in the dc, *ch 5, sc in next ch-5 loop; rep from * across, ending ch 5, sc in the 3rd ch of the turning ch-5. Turn. (10 ch-5 loops, 11 sc)
Rows 4–25: Repeat Rows 2 and 3 alternately, ending with a Row 3 repeat. Do not fasten off.
Row 25 has 10 full loops and a sc at each end, so the top edge is straight.
Large Leaf (Green)
Foundation: Ch 41. Number the working chains from the hook: ch 1 is the tip end and ch 40 is the base end.
Rnd 1, side A:
– Sc in the 2nd ch from the hook (#1), hdc in #2, dc in #3.
– (Ch 1, skip 1 ch, dc in next ch) 10 times.
– (Ch 1, skip 1 ch, tr in next ch) 6 times.
– (Ch 1, skip 1 ch, hdc in next ch) 2 times.
– 3 sc in #40.
Rnd 1, side B (along the opposite side of the chain):
– Hdc in #39, ch 1, skip 1 ch, hdc in #37.
– (Ch 1, skip 1 ch, tr in next ch) 6 times.
– (Ch 1, skip 1 ch, dc in next ch) 10 times.
– Ch 1, skip 1 ch, dc in #3, hdc in #2, sc in #1.
– Ch 2, sl st to the first sc.
Rnd 1 count: 45 sts (5 sc, 6 hdc, 22 dc, 12 tr), 36 ch-1 sps and 1 ch-2 tip sp. The bare chain down the center forms the vein. The tr section makes the widest part of the leaf.
Rnd 2 (outline):
– Ch 1. Sc in each st and each ch-1 sp around.
– Work 3 sc in the center sc of the base.
– Work (sc, ch 3, sc) in the ch-2 tip sp.
– Join with a sl st.
Rnd 2 count: 81 sc worked one into each st or sp, plus 4 added (2 at the base, 2 at the tip) = 85 sc and 1 ch-3 tip. Fasten off and leave a 12 in (30.5 cm) tail for sewing.
Size: about 5.25 × 1.25 in (13.3 × 3.2 cm).
Small Leaf (Green)
Foundation: Ch 29. There are 28 working chains, with #1 at the tip.
Rnd 1, side A:
– Sc in the 2nd ch from the hook (#1), hdc in #2, dc in #3.
– (Ch 1, skip 1 ch, dc in next ch) 7 times.
– (Ch 1, skip 1 ch, tr in next ch) 4 times.
– Ch 1, skip 1 ch, hdc in #27.
– 3 sc in #28.
Rnd 1, side B:
– Hdc in #27.
– (Ch 1, skip 1 ch, tr in next ch) 4 times.
– (Ch 1, skip 1 ch, dc in next ch) 7 times.
– Ch 1, skip 1 ch, dc in #3, hdc in #2, sc in #1.
– Ch 2, sl st to the first sc.
Rnd 1 count: 33 sts (5 sc, 4 hdc, 16 dc, 8 tr), 24 ch-1 sps and 1 ch-2 tip sp.
Rnd 2: Work as for the Large Leaf. The count is 57 sc worked one into each st or sp, plus 4 added = 61 sc and 1 ch-3 tip.
Size: about 3.75 × 1 in (9.5 × 2.5 cm).
Stem (Green)
Foundation: Ch 73. There are 72 working chains, with #1 at the arch tip.
Cord:
1. Leave a 6 in (15.2 cm) starting tail. Back-bump sl st in the 2nd ch from the hook and in the next 9 ch (#1–#10).
2. Pedicel 1: Ch 6, back-bump sl st in the 2nd ch from the hook and in the next 4 ch (5 sl st).
3. Back-bump sl st in #11–#20.
4. Pedicel 2: Ch 7, back-bump sl st in the 2nd ch from the hook and in the next 5 ch (6 sl st).
5. Back-bump sl st in #21–#30.
6. Pedicel 3: Ch 8, back-bump sl st in the 2nd ch from the hook and in the next 6 ch (7 sl st).
7. Back-bump sl st in #31–#40.
8. Pedicel 4: Ch 9, back-bump sl st in the 2nd ch from the hook and in the next 7 ch (8 sl st).
9. Back-bump sl st in #41–#72.
Count: 72 sl st on the main stem and 26 sl st on the pedicels. The stem tip and the 4 pedicels give you 5 bell points. The main stem measures 9 in (22.9 cm).
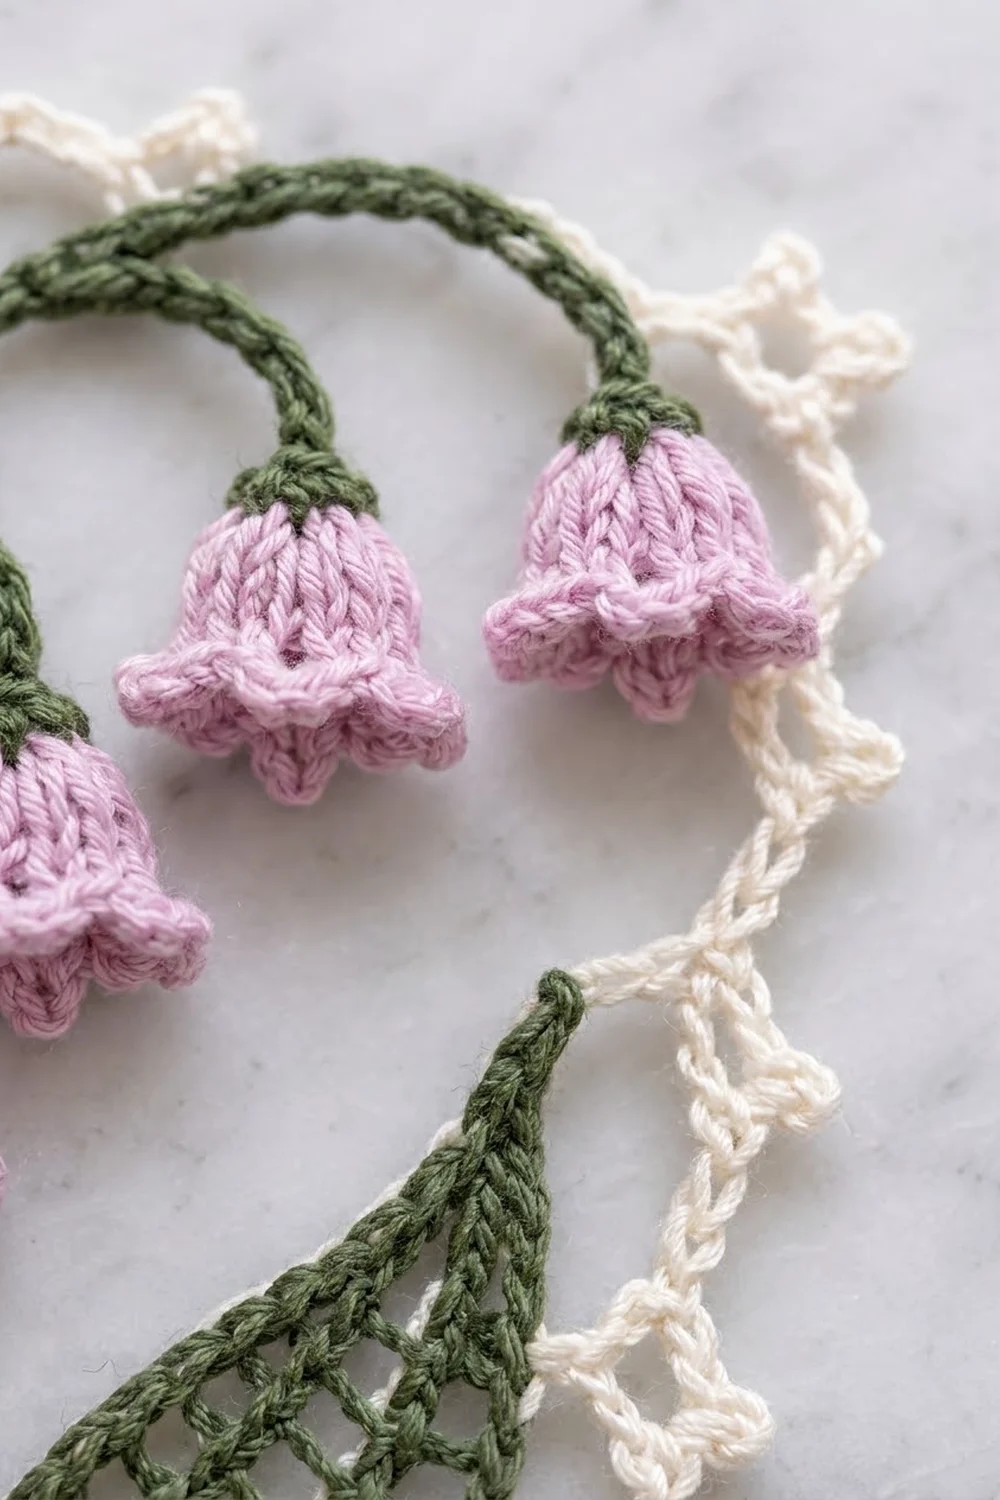
Bells (Pink) – Make 5
Rnd 1: MR, ch 1, 6 sc in the ring, join. (6)
Rnd 2: Ch 2 (does not count), 2 dc in each st, join. (12 dc)
Rnd 3: Ch 2, FPdc around each dc, join. (12 FPdc)
Rnd 4: Ch 2, *FPdc around next st, dc in the sp before the next st; rep from * around, join.
Rnd 4 count: 12 FPdc worked one into each st, plus 12 dc added = 24 sts. This round flares the mouth of the bell.
Rnd 5 (scallops): *Sl st in next st, skip 1 st, (hdc, dc, hdc) in next st, skip 1 st; rep from * 5 more times, join.
Rnd 5 count: 6 scallops (18 sts) and 6 sl st, using all 24 sts of Rnd 4.
Fasten off and leave an 8 in (20.3 cm) tail. Each bell is about 0.75 in (1.9 cm) tall and 0.75 in (1.9 cm) wide at the mouth.
Attach the bells: Sew the top of each bell to the stem tip or to a pedicel end. Wrap the green tail twice around the top of the bell to form a small calyx.
Appliqué Placement
Pin the pieces onto the net panel before adding the border.
- Leaves: Set both leaf bases together at the bottom center, 0.5 in (1.3 cm) above the bottom edge. Angle the Large Leaf up and to the left, with its tip 0.5 in (1.3 cm) from the left edge. Curve the Small Leaf up and outward, with its tip 0.75 in (1.9 cm) from the right edge.
- Stem: Tuck the base of the stem between the two leaf bases. Run it up the left-center of the panel and arch it 1 in (2.5 cm) below the top edge. The tip should finish 1 in (2.5 cm) from the right edge, with the bells hanging downward.
- Sewing: Whipstitch the leaf outlines and the main stem to the net loops with matching green. Tack each bell only at its top and at 2 points of its rim so it keeps a soft, rounded shape.
Border (Ivory)
Border gauge: 8.5–9 sc = 1 in (2.5 cm).
In this border, corners are chain spaces, not stitches. The side counts below are the stitches between the corner spaces.
Rnd 1: Do not turn after Row 25. Ch 1 and rotate the panel to work down the first side.
– Side 1: 4 sc in the first row end, 3 sc in each of the next 23 row ends, 4 sc in the last row end (77 sc). Ch 2.
– Bottom (across the foundation chain): 2 sc in the first sc base, 4 sc in each of the 10 ch-3 groups, 2 sc in the last sc base (44 sc). Ch 2.
– Side 2: Work as for Side 1 (77 sc). Ch 2.
– Top (across Row 25): 2 sc in the first sc, 4 sc in each of the 10 loops, 2 sc in the last sc (44 sc).
– Ch 2 and join with a sl st to the first sc.
Rnd 1 total: 242 sc and 4 ch-2 corners.
Rnd 2: Sl st into the corner sp, ch 1, (sc, ch 3, sc) in the same sp.
– Sides 1 and 2: Ch 3, skip 2 sc, sc in next sc 25 times, then ch 3, skip the last 2 sc (26 loops on each side).
– Top and bottom: Repeat from * 14 times, then ch 3, skip the last 2 sc (15 loops each).
– Work (sc, ch 3, sc) in each corner sp.
– Join with a sl st to the first sc.
Rnd 2 total: 82 side loops and 4 corner loops.
Rnd 3: Sl st into the corner loop, ch 1. Work (2 sc, ch 5, 2 sc) in each corner loop.
– Top: (2 sc, picot, 2 sc) in each of the 15 loops. (60 sc, 15 picots)
– Each side: (2 sc, picot, 2 sc) in each of the 26 loops. (104 sc, 26 picots per side)
– Bottom: (2 sc, picot, 2 sc) in each of loops 1–7, then the fan in loop 8, then (2 sc, picot, 2 sc) in each of loops 9–15. (56 sc, 14 picots)
– Fan: (tr, ch 1) 3 times, tr, picot, (ch 1, tr) 3 times. (7 tr, 6 ch-1 sps, 1 picot)
– Join and fasten off.
Why the math works: Every side count in Rnd 1 equals 3n + 2 (44 = 3 × 14 + 2 and 77 = 3 × 25 + 2). That means each side divides into whole 3-stitch repeats with a 2-stitch skip at the end, so the loops sit evenly from corner to corner. Each short edge has 15 loops, an odd number, so loop 8 has exactly 7 loops on each side of it. That keeps the fan perfectly centered.
Final Blocking
- Weave in all ends along stitches of the same color.
- Soak the motif in cool water for 10 minutes, then press out the water in a towel. Do not wring it.
- Pin the rectangle to 6 × 10 in (15.2 × 25.4 cm), placing one pin in every ch-5 corner loop.
- Pin out each picot and stretch the fan point to 10.5 in (26.7 cm) total height.
- Open the diamond net evenly by pinning the side loops in a straight line.
- Shape the leaves with your fingers and plump each bell from the inside with a pinhead.
- Let it dry completely before unpinning, which takes about 12 hours.
Final Quality-Control Checklist
- The net panel measures 5 × 9 in (12.7 × 22.9 cm) before the border.
- Rnd 1 of the border has 77 / 44 / 77 / 44 sc.
- Rnd 2 has 26 / 15 / 26 / 15 loops.
- The fan sits in loop 8 of the bottom edge.
- There are 5 bells, each with 6 scallops.
- Both leaves show a clear center vein and open mesh.
- The appliqués lie flat and the net does not pucker beneath them.
- The finished motif measures 6 × 10 in (15.2 × 25.4 cm).
Troubleshooting
- The net slants sideways. Make sure every even row ends with ch 2 and a dc, and every odd row ends in the 3rd ch of the turning ch-5.
- The leaf curls. The outline is too tight. Redo Rnd 2 with a 2.25 mm hook, or block the leaf flat on its own before sewing.
- The bells look cupped instead of flared. Check Rnd 4. The dc must go into the spaces between posts, for a total of 24 sts.
- The border ruffles. Your sc are too loose. Rework Rnd 1 with a tighter tension, keeping the counts the same.
- The border pulls in. Make each ch-3 loop a little looser, or block more firmly.
- The fan is off-center. Count the bottom loops again. There should be 15, with the fan in the 8th.
Care
Hand wash in cool water with a mild detergent, roll in a towel, and dry flat, pinning to shape if needed. Do not tumble dry, because heat can flatten the bells.

Final Notes
Every measurement in this pattern builds on the last one. Ten ch-5 loops make a 5 in (12.7 cm) width, and 25 rows make a 9 in (22.9 cm) height. The leaves and the 9 in (22.9 cm) stem are sized to fit that panel. The border’s 3n + 2 counts add 0.5 in (1.3 cm) all around, giving a finished size of 6 × 10 in (15.2 × 25.4 cm), with the fan dropping to 10.5 in (26.7 cm). If you check the panel at each checkpoint, the rest of the pattern will fit.
Happy crocheting!