

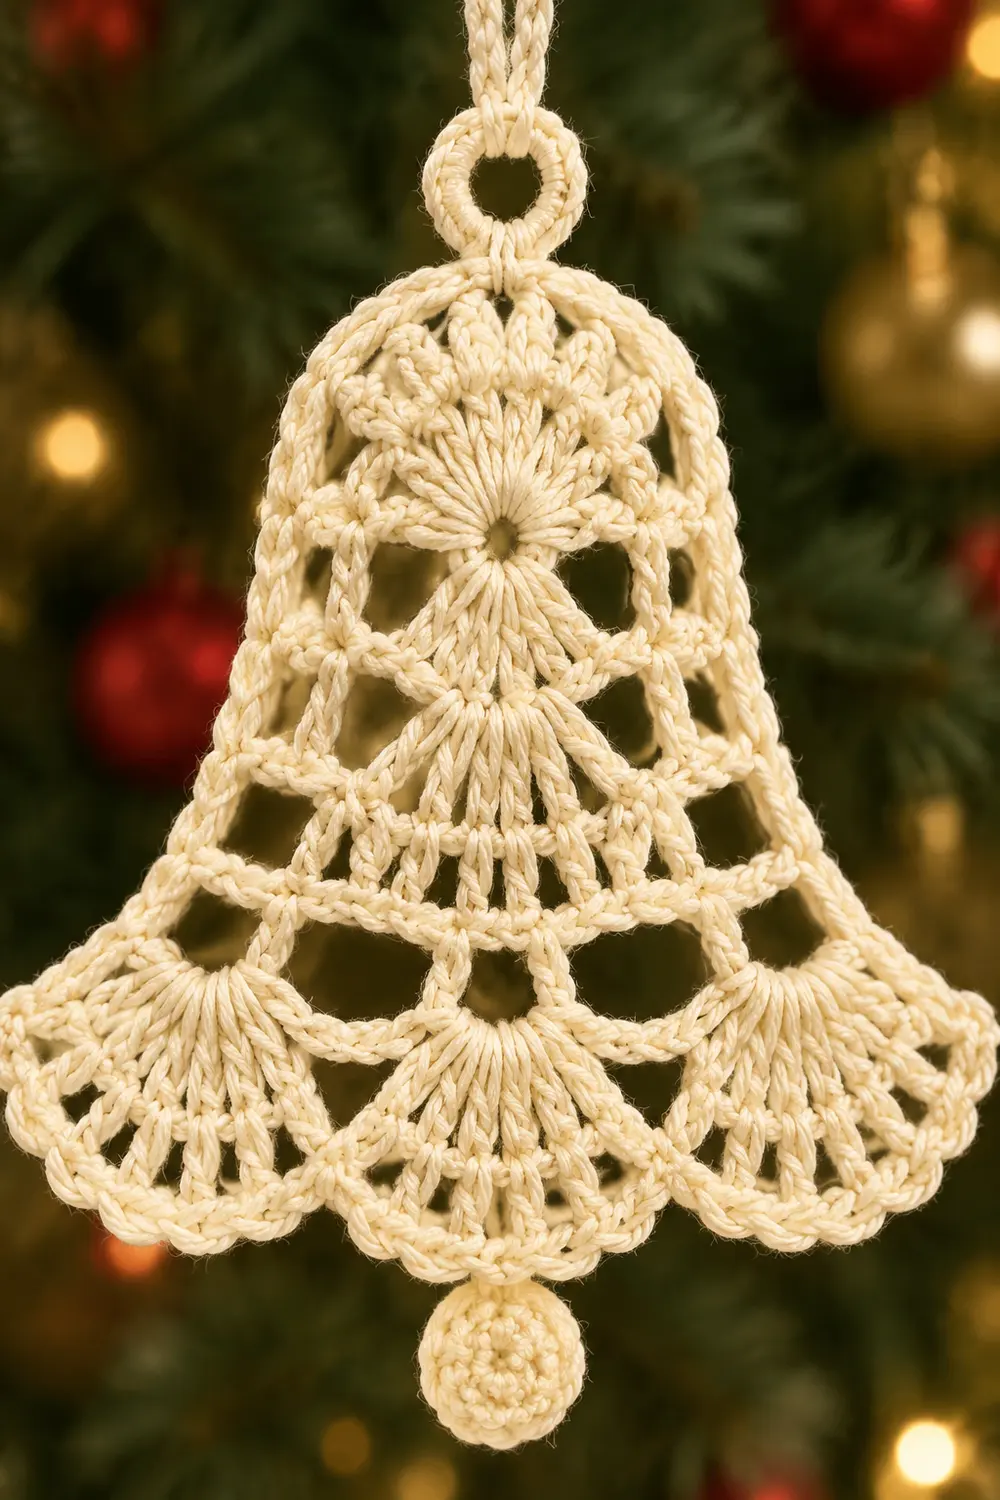
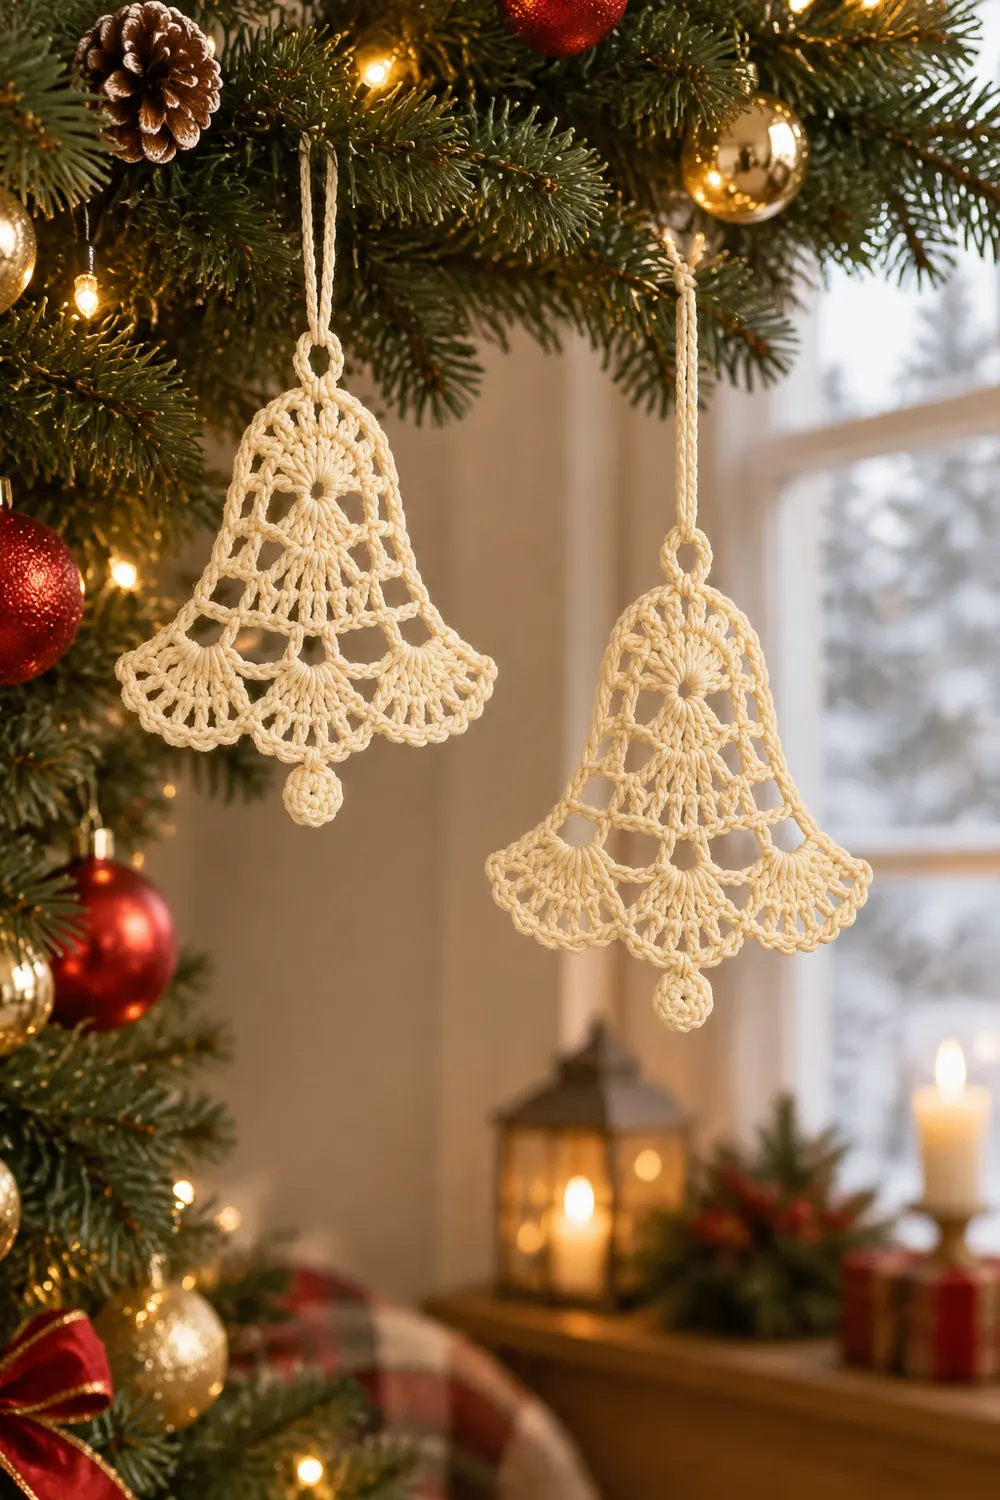
These little bells look like they came off an antique Christmas tree. Each one is a flat, airy lace ornament with a rounded dome of shell fans on top and a flared, scalloped skirt below. A tiny round clapper hangs from the center scallop.
The set shown is two separate bells, worked identically in cream cotton thread. Each hangs from its own thread loop. A single neutral color keeps the focus on the lace, and stiffening makes the shell fans hold their shape.
This pattern uses US crochet terms. Each finished bell measures 2.5 in (6.4 cm) tall and 3 in (7.6 cm) wide at the hem, not counting the clapper or hanging loop. With the clapper, each ornament is about 3.25 in (8.3 cm) long.
You start each bell at the center of a magic ring and work a semicircle upward to form the dome. Then you turn and work the skirt downward across the dome’s straight edge. One sc border round tidies the outline and adds the hanging loop. A small stuffed ball becomes the clapper.
Finished Size and Construction
- Finished size (each bell): 2.5 in (6.4 cm) tall x 3 in (7.6 cm) wide at hem
- Length including clapper: about 3.25 in (8.3 cm)
- Skill level: Intermediate (includes working into row ends)
- Terminology: US crochet terms
- Yarn weight: Size 3 cotton crochet thread (CYC 0 Lace / light fingering)
- Hook: 2.25 mm (US B-1)
- Number of pieces: 2 per ornament (bell body + clapper); the set has 2 ornaments
- Layout: One flat bell per ornament, with the dome on top and the skirt below
- Piece size: 2.5 in (6.4 cm) x 3 in (7.6 cm)
- Size before border: 2.25 in (5.7 cm) tall x 2.75 in (7.0 cm) wide at hem
- Border depth: 0.125 in (0.3 cm) on every edge
Materials
Yarn advice: Choose mercerized cotton crochet thread in size 3. It has crisp stitch definition and takes stiffener well. Avoid fuzzy or acrylic yarns, because they blur the lace windows and won’t hold a starched shape.
- Cream / off-white: 10 g (about 28 m) of size 3 cotton thread. This makes both bells, both clappers, and both hanging strings.
Tools:
- 2.25 mm (US B-1) crochet hook
- Tapestry needle
- Scissors
- 1 stitch marker
- A few thread snips or a pinch of fiberfill for each clapper
- Fabric stiffener or heavy spray starch
- Blocking board, rust-proof pins, and a ruler
The quantities include a safety margin of about 25%. Each ornament uses roughly 4 g (about 11 m).
Abbreviations (US Terms)
- ch = chain
- sl st = slip stitch
- sc = single crochet
- dc = double crochet
- sc2tog = single crochet 2 together
- MR = magic ring
- st(s) = stitch(es)
- sp(s) = space(s)
- tc = turning chain
- RS = right side
Special stitches:
- Shell: 5 dc (dome and Row 7) or 7 dc (Row 9), all worked into the same st.
- Half shell: 4 dc in the same st at the edge of Row 9. When the edge st is a turning chain, the ch-3 counts as the first dc.
Gauge and Checkpoints
Gauge: 8 dc and 4 dc rows = 1 in (2.5 cm).
Test one piece first. Work the dome (Rows 1–4) and measure it before you continue. The dome doubles as your gauge swatch.
Checkpoints (each bell):
- After Row 4 (dome): about 2 in (5.1 cm) across the straight edge and 1 in (2.5 cm) tall at the center.
- After Row 6: 1.5 in (3.8 cm) tall in total.
- After Row 9: 2.25 in (5.7 cm) tall and 2.75 in (7.0 cm) wide at the hem.
- After the border: 2.5 in (6.4 cm) tall and 3 in (7.6 cm) wide.
If the dome is too big, go down to a 2.0 mm hook. If it’s too small, go up to a 2.5 mm hook. Check flatness too. A dome that cups usually means tight tension, and one that ruffles means loose tension.
Bell Body: Dome
The dome is a semicircle worked in turned rows from a magic ring. The ring sits at the center of the dome’s straight bottom edge, and the rows arc upward to form the rounded top.
Row 1: MR, ch 3 (counts as dc), 8 dc in ring. Pull the ring snug, then turn. (9 dc)
Row 2: Ch 4 (counts as dc + ch 1). Dc in next dc, ch 1, repeat from * 6 more times. Dc in top of tc, then turn. (9 dc, 8 ch-1 sps)
These are the radiating spokes at the center of the dome.
Row 3: Ch 3 (counts as dc). Dc in first ch-1 sp, then dc in next dc, dc in next ch-1 sp, repeat from * 6 more times. Dc in 3rd ch of tc, then turn. (17 dc)
Row 4 (dome shells): Ch 1, sc in first dc. Skip 1 dc, 5 dc in next dc, skip 1 dc, sc in next dc, repeat from * 3 more times. Do not turn. (4 shells, 5 sc = 25 sts)
The 13th st of Row 4 is the center sc and sits at the very top of the dome. You’ll place the hanging loop there.
Checkpoint 1: The dome should be about 2 in (5.1 cm) wide and 1 in (2.5 cm) tall, and it should lie flat.
Bell Body: Skirt
Row 5 (shoulder row, worked across the straight edge): Rotate the dome so the straight edge is on top.
- Ch 3 (counts as dc).
- Work 2 dc around the end post of each of Rows 3, 2, and 1.
- Insert your hook through the center of the magic ring and work 3 dc there.
- Work 2 dc around the end post of each of Rows 1, 2, and 3.
- Work 1 dc into the first sc of Row 4.
- Turn.
(1 + 6 + 3 + 6 + 1 = 17 dc)
Row 6 (open mesh): Ch 4 (counts as dc + ch 1). Skip next dc, dc in next dc. Ch 1, skip next dc, dc in next dc, repeat from * 6 more times, working the last dc in the top of the tc. Turn. (9 dc, 8 ch-1 sps)
Checkpoint 2: The piece should measure 1.5 in (3.8 cm) tall.
Row 7 (first fan band): Ch 1, sc in first dc. Skip ch-1 sp, 5 dc in next dc, skip ch-1 sp, sc in next dc, repeat from * 3 more times. The last sc goes in the 3rd ch of the tc. Turn. (4 shells, 5 sc = 25 sts)
This row grows from 17 to 25 sts, and that growth starts the flare.
Row 8 (lattice windows): Ch 5 (counts as dc + ch 2). Sc in center dc of next shell, ch 2, dc in next sc. Ch 2, sc in center dc of next shell, ch 2, dc in next sc, repeat from * 2 more times. Turn. (5 dc, 4 sc, 8 ch-2 sps)
Row 9 (scalloped hem): Work into sts only and skip all ch-2 sps.
- Ch 3 (counts as dc), then 3 dc in the same st. (half shell)
- Sc in next sc, 7 dc in next dc, repeat from * 2 more times.
- Sc in next sc.
- Work 4 dc in the 3rd ch of the tc. (half shell)
Do not fasten off. (4 + 24 + 1 + 4 = 33 sts)
The three 7-dc shells form the scallops. Each one sits over a Row 7 valley, so the fan rows overlap. The half shells flare outward at the hem corners. The middle shell’s 4th dc (st 17) is the exact bottom center.
Checkpoint 3: The bell should measure 2.25 in (5.7 cm) tall and 2.75 in (7.0 cm) wide at the hem.
Clapper (Make 1 per Bell)
Rnd 1: MR, 6 sc in ring. (6 sc)
Rnd 2: 2 sc in each st around. (12 sc)
Rnd 3: Sc in each st around. (12 sc)
Stuff lightly with thread snips or a pinch of fiberfill.
Rnd 4: Sc2tog 6 times. (6 sts)
Ch 3. Fasten off, leaving a 6 in (15.2 cm) tail. Weave the starting tail through the remaining sts to close the hole.
The finished clapper is about 0.5 in (1.3 cm) in diameter. You’ll attach it after blocking.
Border
Border gauge: 8 sc = 1 in (2.5 cm), which matches the body gauge.
Continue from the last st of Row 9. Ch 1 and do not turn.
Side 1 (up the skirt edge): Work 2 sc into each row end of Rows 9, 8, 7, 6, and 5. (10 sc)
Dome edge: Sc in each of the 25 sts of Row 4. In the 13th st (the center sc), work (sc, ch 8, sc) to make the hanging loop. (25 sts + 1 extra sc = 26 sc, plus the ch-8 loop)
Side 2 (down the skirt edge): Work 2 sc into each row end of Rows 5, 6, 7, 8, and 9. (10 sc)
Hem:
- Work 3 sc in the top of the Row 9 tc (corner).
- Sc in each of the next 3 dc.
- Sc in next sc, sc in next 3 dc, 3 sc in next dc (scallop peak), sc in next 3 dc, repeat from * 2 more times.
- Sc in next sc, then sc in next 3 dc.
- Work 3 sc in the last dc (corner).
Sl st to the first sc of the round and fasten off.
Hem count: 33 sts worked 1-per-st, plus 4 extra at the corners (2 each) and 6 extra at the peaks (2 each). That gives 33 + 10 = 43 sc.
Round total: 10 + 26 + 10 + 43 = 89 sc, plus the ch-8 loop.
Why the math works:
- The dome’s outer edge is a half-circle about 1 in (2.5 cm) in radius, so its arc length is about 3.1 in (7.9 cm). At 8 sc per inch, 25 sc fit that arc exactly.
- Each skirt side spans 5 rows, or 1.25 in (3.2 cm). At 8 sc per inch, that’s 10 sc.
- At the hem, the extra sc at the peaks and corners let the border turn sharp points without pulling the scallops flat.
Because the border density matches the body gauge, every edge lies flat. The border adds 0.125 in (0.3 cm) on all sides, which brings the bell from 2.25 x 2.75 in (5.7 x 7.0 cm) to 2.5 x 3 in (6.4 x 7.6 cm).
Final Blocking
- Weave in all ends except the clapper tail.
- Draw a 2.5 in (6.4 cm) x 3 in (7.6 cm) bell outline on paper and cover it with plastic wrap on your blocking board.
- Soak the bell in fabric stiffener (or wet it and spray heavily with starch). Gently squeeze out the excess.
- Pin the dome’s top center first, then the two hem corners.
- Pin each scallop peak and each 7-dc shell into an even fan.
- Use a pin tip to open every ch-1 and ch-2 window.
- Check both measurements with a ruler and adjust the pins as needed.
- Let the bell dry completely, usually overnight.
- Sew the clapper’s ch-3 to the center sc of the middle scallop peak, then weave in the tail.
- Cut an 8 in (20.3 cm) length of thread, pass it through the ch-8 loop, and knot the ends. This makes a hanging loop about 3.5 in (8.9 cm) long.
Repeat all steps for the second bell.
Final Quality-Control Checklist
- [ ] Dome is rounded, flat, and shows 4 even shells
- [ ] Row 5 has 17 dc and the ring center is closed
- [ ] Row 9 has 3 full scallops and 2 flared half shells
- [ ] Border totals 89 sc plus the hanging loop
- [ ] Bell measures 2.5 in (6.4 cm) x 3 in (7.6 cm)
- [ ] Clapper is about 0.5 in (1.3 cm) and hangs at the exact bottom center
- [ ] Both bells match in size and shape
- [ ] Bell is fully dry and stiff, with all ends secured
Troubleshooting
Dome cups upward: Your tension is tight in Rows 3–4. Loosen up or go up one hook size.
Dome ruffles: Your chains in Row 2 are too loose. Tighten them, or go down one hook size.
Gaps along the shoulder (Row 5): Work the dc around the full row-end post, not just one strand.
Skirt doesn’t flare: Check that Row 7 has 25 sts and Row 9 has 33 sts.
Scallops curl inward: Stiffen them again and pin each peak firmly while the bell dries.
Clapper too large: Go down to a 2.0 mm hook, or stuff it less firmly.
Hanging loop stretches: Work the ch-8 tightly, and apply stiffener to the loop itself.
Care
Spot clean only, using a damp cloth. Store the bells flat in a box between seasons so the stiffened shells keep their shape.
Final Notes
Here’s the measurement chain for each bell:
- Gauge: 8 dc and 4 rows = 1 in (2.5 cm)
- Dome: 2 in (5.1 cm) wide and 1 in (2.5 cm) tall
- After Row 6: 1.5 in (3.8 cm) tall
- After Row 9: 2.25 in (5.7 cm) x 2.75 in (7.0 cm)
- After border: 2.5 in (6.4 cm) x 3 in (7.6 cm)
- Clapper: 0.5 in (1.3 cm)
Make the bells one after the other so your tension stays consistent and the pair matches.
Happy crocheting!