

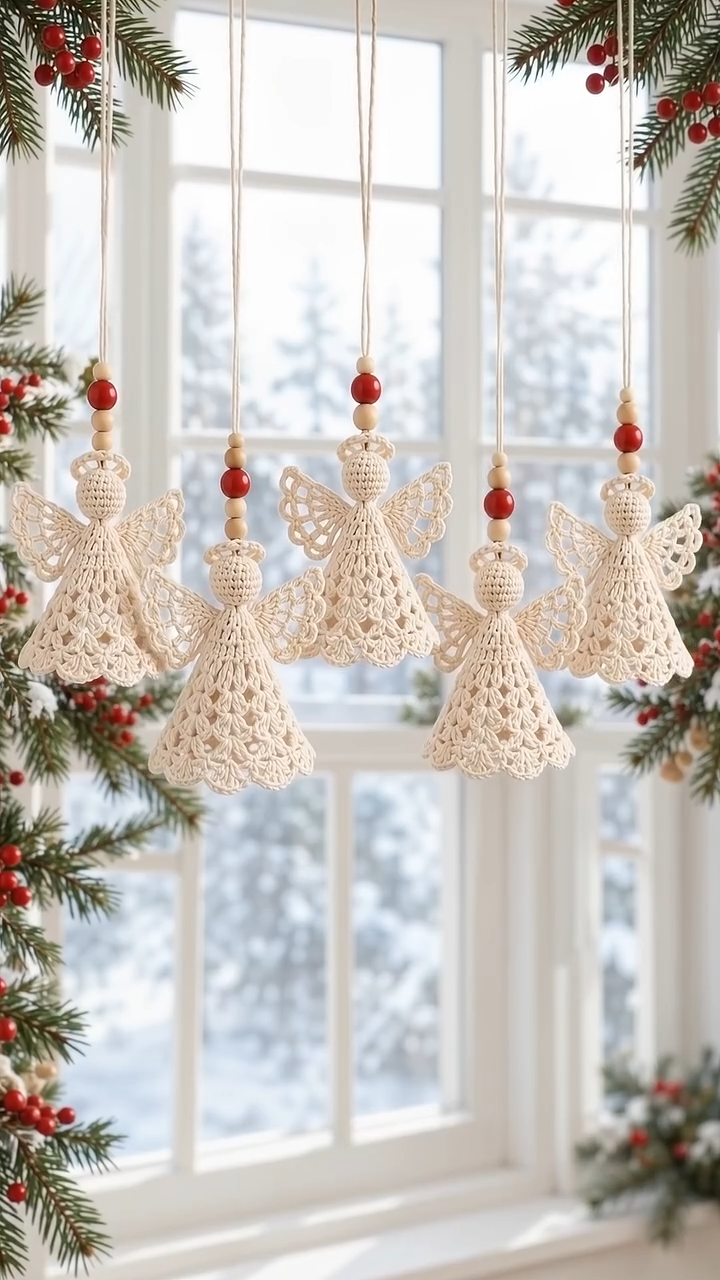
These little cream angels are made to hang in a window and catch the winter light. Each one has a textured, cone-shaped body, a smooth round head, and two openwork lace wings that finish in a scalloped shell edge. A beige twine cord strung with natural wood beads and one red wooden bead completes each ornament.
The look is soft, Scandinavian, and classic. Everything is worked in a single cream cotton, so the texture does the decorative work. The body uses half double crochet in the third loop, which gives a dense, knit-like ribbing. The head is plain single crochet for a smooth finish. The wings are airy V-stitch lace with a shell border.
This pattern makes three identical angels, hung individually at varying heights. It uses US crochet terms throughout. Each finished angel measures about 3.5 in (8.9 cm) tall from the top of the head to the hem, with a cone body about 2.5 in (6.4 cm) tall and a wingspan of about 3 in (7.6 cm).
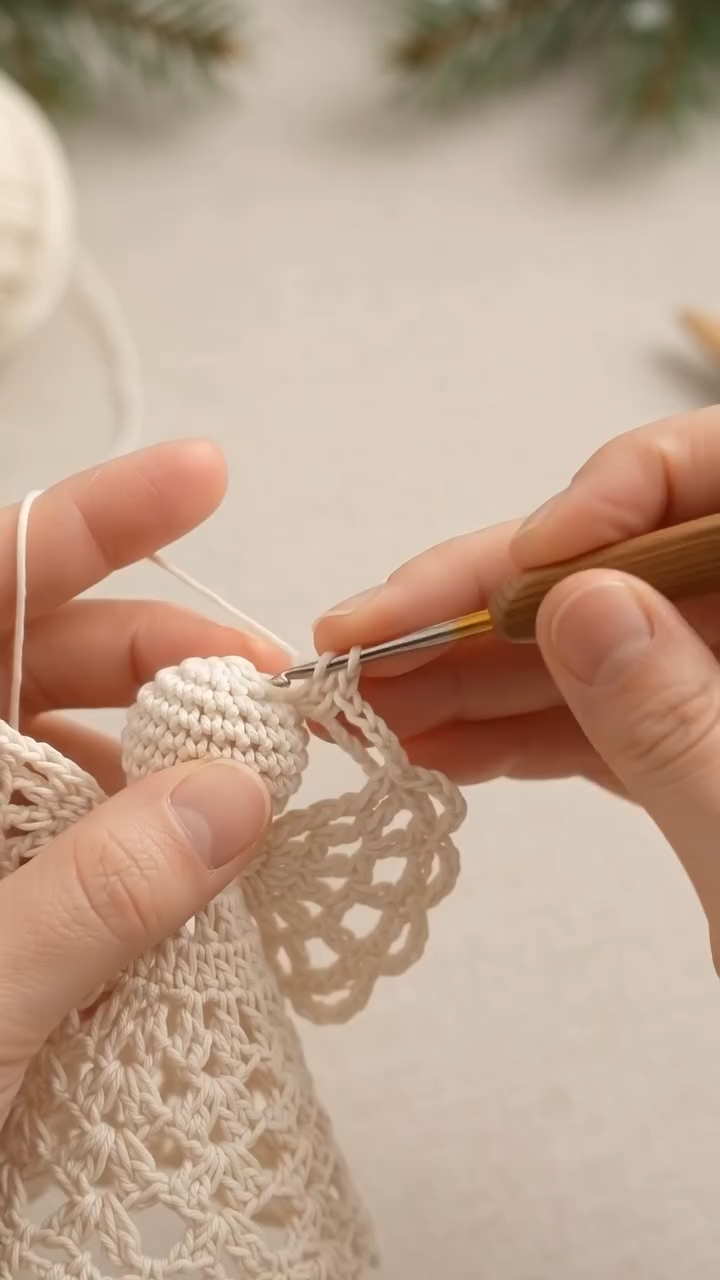
Construction is simple. You crochet the cone from the neck down in joined rounds, crochet the head as a stuffed amigurumi ball, and make two fan-shaped wings flat. Then you thread the hanging cord through the head, sew the head to the neck, and sew the wings to the back of the body.
Finished Size and Construction
- Finished size (each angel): 3.5 in (8.9 cm) tall x 3 in (7.6 cm) wingspan
- Cone body: 2.5 in (6.4 cm) tall, 1.9 in (4.8 cm) base diameter
- Head: about 1 in (2.5 cm) diameter
- Skill level: Intermediate (small scale, lace wings)
- Terminology: US crochet terms
- Yarn weight: #2 fine (sport) cotton
- Hook: 2.75 mm (US C-2)
- Number of pieces: 3 angels, each made from 4 pieces (1 body, 1 head, 2 wings)
- Layout: 3 separate ornaments, each on its own cord, hung at varying heights
- Wing size: 1.5 in (3.8 cm) from point to scallop tip
- Wing size before border: 1.1 in (2.8 cm) from point to edge
- Border depth: about 0.4 in (1.0 cm) of shell edging on each wing
Materials
Yarn advice: Choose a smooth, tightly plied mercerized cotton in sport weight. Cotton gives crisp stitch definition, holds the cone shape, and blocks the lace wings well. Avoid fuzzy or splitty yarns because the third-loop texture and the shells will look blurred.
- Cream cotton, #2 sport weight: 40 g / about 125 m (about 11 g per angel)
- Beige twine (cotton or jute, about 1–1.5 mm): 2.5 m total
Tools and notions:
- 2.75 mm (US C-2) crochet hook
- 9 natural wood beads, 8–10 mm, hole at least 3 mm
- 3 red wooden beads, 12 mm, hole at least 3 mm
- Small amount of polyester fiberfill
- Tapestry needle and a large-eye needle for the twine
- Stitch markers
- Scissors
- Optional: fabric stiffener or spray starch
- Optional: rolled paper cone for blocking
Quantities include a small safety margin for gauge differences and swatching.
Abbreviations (US Terms)
- ch – chain
- sl st – slip stitch
- sc – single crochet
- hdc – half double crochet
- dc – double crochet
- MR – magic ring
- inc – work 2 stitches in the same stitch
- dec – sc2tog (invisible decrease recommended)
- sp – space
- st(s) – stitch(es)
- RS / WS – right side / wrong side
Special stitches:
- hdc3L (hdc in third loop): Yarn over. Insert the hook into the horizontal bar that sits just below the top two loops on the back of the stitch, then complete the hdc as usual. This pushes the top two loops forward and creates a knit-like ridge on the RS.
- V-st: (dc, ch 2, dc) in the same stitch or space.
- Shell: 5 dc in the same space.
Gauge and Checkpoints
Gauge:
- Head, sc in the round: 6 sc and 7 rounds = 1 in (2.5 cm)
- Body, hdc3L in the round: 6 sts and 5 rounds = 1 in (2.5 cm)
Test one piece first. Make one complete head and the first 10 rounds of one body before making all three angels. Measure at each checkpoint below.
Checkpoints:
- Head after Rnd 3: circumference 3 in (7.6 cm)
- Body after Rnd 1: neck circumference 2 in (5.1 cm), diameter about 0.6 in (1.5 cm)
- Body after Rnd 10: circumference 6 in (15.2 cm)
- Body finished: height 2.5 in (6.4 cm), base diameter 1.9 in (4.8 cm)
- Wing after Row 3: 1.1 in (2.8 cm) from point to edge
- Wing after border: 1.5 in (3.8 cm)
If your pieces are too big, go down to a 2.5 mm hook. If they are too small, go up to a 3.0 mm hook. Keep the fabric firm. The body should stand on its own without collapsing.
Head (Make 1 per Angel)
Work in a continuous spiral. Mark the first stitch of each round.
- Rnd 1: 6 sc in MR. (6)
- Rnd 2: inc in each st around. (12)
- Rnd 3: (sc 1, inc) 6 times. (18)
- Rnds 4–6: sc in each st around. (18)
- Rnd 7: (sc 1, dec) 6 times. (12)
Stuff the head firmly with fiberfill. Keep the ball shape round, not lumpy.
- Rnd 8: dec 6 times. (6)
Fasten off and leave a 12 in (30.5 cm) tail. Thread the tail through the front loops of the last 6 sts and pull tight to close. Do not weave in this tail yet. You will use it to sew the head to the body.
The head should measure about 1 in (2.5 cm) across.
Body (Make 1 per Angel)
The cone is worked from the neck down in joined rounds. The ch 1 at the start of each round does not count as a stitch. Work the first stitch of each round into the same stitch as the join.
- Rnd 1: Ch 12. Sl st to the first ch to form a ring, taking care not to twist. Ch 1, hdc in each ch around. Join with sl st to the first hdc. (12)
- Rnd 2: Ch 1, hdc3L in each st around. Join. (12)
- Rnd 3: Ch 1, (hdc3L in next 3 sts, 2 hdc3L in next st) 3 times. Join. (15)
- Rnd 4: Ch 1, (hdc3L in next 4 sts, 2 hdc3L in next st) 3 times. Join. (18)
- Rnd 5: Ch 1, (hdc3L in next 5 sts, 2 hdc3L in next st) 3 times. Join. (21)
- Rnd 6: Ch 1, (hdc3L in next 6 sts, 2 hdc3L in next st) 3 times. Join. (24)
- Rnd 7: Ch 1, (hdc3L in next 7 sts, 2 hdc3L in next st) 3 times. Join. (27)
- Rnd 8: Ch 1, (hdc3L in next 8 sts, 2 hdc3L in next st) 3 times. Join. (30)
- Rnd 9: Ch 1, (hdc3L in next 9 sts, 2 hdc3L in next st) 3 times. Join. (33)
- Rnd 10: Ch 1, (hdc3L in next 10 sts, 2 hdc3L in next st) 3 times. Join. (36)
Checkpoint: The circumference is now 6 in (15.2 cm).
- Rnds 11–12: Ch 1, hdc3L in each st around. Join. (36)
- Rnd 13 (hem): Ch 1, sc in each st around. Join. (36)
Fasten off and weave in the ends.
Each growth round adds exactly 3 stitches, one per repeat. That gentle, even increase forms a straight-sided cone rather than a flat circle or a ruffle. The 12 hdc rounds measure 2.4 in (6.1 cm), and the sc hem brings the height to about 2.5 in (6.4 cm). The final 36 sts give a 6 in (15.2 cm) circumference, which is a 1.9 in (4.8 cm) base diameter.
Wings (Make 2 per Angel)
Each wing is worked flat as a fan from a single point. The MR center becomes the point that attaches to the angel’s back.
- Row 1 (RS): MR, ch 3 (counts as dc), 8 dc in ring. Pull the ring closed. Turn. (9 dc)
- Row 2: Ch 4 (counts as dc + ch 1), (dc in next dc, ch 1) 7 times, dc in top of turning ch. Turn. (9 dc, 8 ch-1 sps)
- Row 3: Ch 3 (counts as dc), V-st in each of the 8 ch-1 sps, dc in 3rd ch of turning ch. Turn. (8 V-sts + 2 edge dc)
Checkpoint: The wing measures 1.1 in (2.8 cm) from the point to the edge. It is roughly a half-circle. Do not fasten off. Continue straight into the border, below.
Make All Pieces
For three angels, make:
- Heads: 3 (cream)
- Bodies: 3 (cream)
- Wings: 6 (cream), finished with the border
- Cords: 3, cut to different lengths for varied hanging heights
Cord lengths (cut length / finished hanging loop):
- Angel A: 22 in (55.9 cm) / about 10 in (25.4 cm)
- Angel B: 26 in (66.0 cm) / about 12 in (30.5 cm)
- Angel C: 24 in (61.0 cm) / about 11 in (27.9 cm)
Hanging layout (left to right):
WINDOW ROW: ANGEL A (HIGH)   ANGEL B (LOW)   ANGEL C (MIDDLE)
BEADS EACH: WOOD  WOOD  RED  WOOD  (head to top)
Joining (Assembly)
Step 1 – Bead the cord. Fold the cut twine in half. Holding both ends together, thread the beads from the top down: 1 natural wood, 1 red, 1 natural wood, 1 natural wood. The red bead now sits near the top of the stack. The fold forms the hanging loop.
Step 2 – Thread the head. Thread both twine ends onto the large-eye needle. Insert it at the center of Rnd 1 of the head, push it straight through the stuffing, and bring it out at the closed center of Rnd 8. Slide the beads down so they rest on top of the head. Tie both ends together in a tight double overhand knot against the bottom of the head. Trim to 0.25 in (0.6 cm).
Step 3 – Sew the head to the body. Seat the head on the neck opening so the knot tucks inside the cone. The neck has 12 sts. Head Rnd 7 also has 12 sts. Using the head tail, whipstitch one neck stitch to one Rnd 7 stitch, all the way around. This one-to-one match keeps the head centered and upright without puckering.
Step 4 – Attach the wings. Place the two wings on the back of the cone with their points at the center back, between Rnds 3 and 5, about 0.25 in (0.6 cm) apart. Angle them so the scallops fan outward and slightly up. Whipstitch the point and the first 2 rows of each wing to the body, about 4 stitches per wing. Leave Row 3 and the border free so the lace stands away from the body.
Tension advice: Pull seams snug but not tight. A tight wing seam bends the cone. A loose head seam lets the head wobble.
Size checkpoint: The assembled angel measures 3.5 in (8.9 cm) tall and about 3 in (7.6 cm) from wingtip to wingtip.
Border (Wing Scallop Edge)
The border is worked straight from Row 3 of each wing, along the curved edge only. The two straight row-end edges stay plain.
Border gauge: about 2 shells per 1 in (2.5 cm) along the curved edge.
- Row 4 (border): Ch 1, sc in first dc. Shell (5 dc) in ch-2 sp of next V-st, sc in the space between this V-st and the next V-st. Repeat from * 6 more times. Shell in ch-2 sp of the last V-st, sc in top of turning ch. Fasten off and weave in the ends.
Curved edge count: 8 shells (40 dc) + 9 sc = 49 sts.
Straight edges: no border stitches. Each straight edge is simply the row ends of Rows 1–3 plus the end sc of Row 4.
Why the math works: Row 3 has 8 V-sts, so each V-st becomes exactly one shell. That gives 8 shells. The sc stitches sit in the 7 gaps between V-sts plus the 2 edge dc, for 7 + 2 = 9 sc. Each shell is anchored into one ch-2 space and separated by one sc, so the scallops sit evenly and lie flat on a half-circle edge of about 4 in (10.2 cm). The border adds about 0.4 in (1.0 cm), bringing each wing from 1.1 in (2.8 cm) to 1.5 in (3.8 cm).
Final Blocking
- Block the wings before sewing them on, if possible. Dampen each wing lightly.
- Pin each wing flat on a blocking mat. Pin each scallop at its center tip and open each V-st and ch-1 space.
- Check that each wing measures 1.5 in (3.8 cm) from point to scallop tip.
- Optional: spray with starch or brush on diluted fabric stiffener for crisper lace.
- For the body, roll a paper cone 2.5 in (6.4 cm) tall with a 1.9 in (4.8 cm) base. Slip the crocheted body over it.
- Mist the body lightly and smooth the hem round so it sits level.
- Let everything dry completely, at least 12 hours, before removing the pins and form.
- If you blocked after assembly, support the wings with folded paper while they dry.
Final Quality-Control Checklist
- Head is round, firm, and about 1 in (2.5 cm) across
- Head sits centered on the neck with no gaps
- Body is 2.5 in (6.4 cm) tall with a 1.9 in (4.8 cm) base and stands straight
- Hem round is level all the way around
- Third-loop ridges run neatly on the RS
- Each wing has 8 shells and 9 sc on the curved edge
- Wings are mirror-placed, with points at center back between Rnds 3 and 5
- Wingspan is about 3 in (7.6 cm)
- Beads read wood, wood, red, wood from head to top
- Cord knot is hidden inside the neck
- All ends are woven in and trimmed
Troubleshooting
- Cone flares like a skirt: Your gauge is loose. Go down a hook size, or check that you add only 3 sts per round.
- Cone looks lumpy or spiraled at the increases: Shift the starting point of the repeats by 1–2 sts on alternate rounds.
- Third-loop ridges are not showing: Make sure you insert the hook under the bar on the back of the stitch, not the back loop.
- Head is pointy: Stuff more firmly before Rnd 8 and shape the ball with your fingers.
- Wing ruffles: Your shells are too full for your tension. Work 4 dc shells instead, or block more firmly.
- Wing cups instead of lying flat: Your ch-2 spaces are too tight. Loosen the chains or go up a hook size for the wings only.
- Beads will not slide over doubled twine: Use beads with larger holes or a thinner twine.
- Angel hangs crooked: Re-center the cord through the head and balance the wing seams.
Care
Spot clean with cool water and mild soap, then reshape and dry flat. Store the angels flat in a box with tissue so the wings keep their shape.
Final Notes
Each angel follows one simple measurement chain. The head is 18 sts at its widest, about 1 in (2.5 cm) across. The body grows from a 12-st, 2 in (5.1 cm) neck to a 36-st, 6 in (15.2 cm) hem, standing 2.5 in (6.4 cm) tall. Each wing grows from 9 dc to 8 V-sts, then 8 shells, reaching 1.5 in (3.8 cm). The neck and head match stitch for stitch at 12, and the whole angel finishes at 3.5 in (8.9 cm) tall with a 3 in (7.6 cm) wingspan.
Optional: you can make extra angels the same way for gift toppers or a fuller window display.
Happy crocheting!