

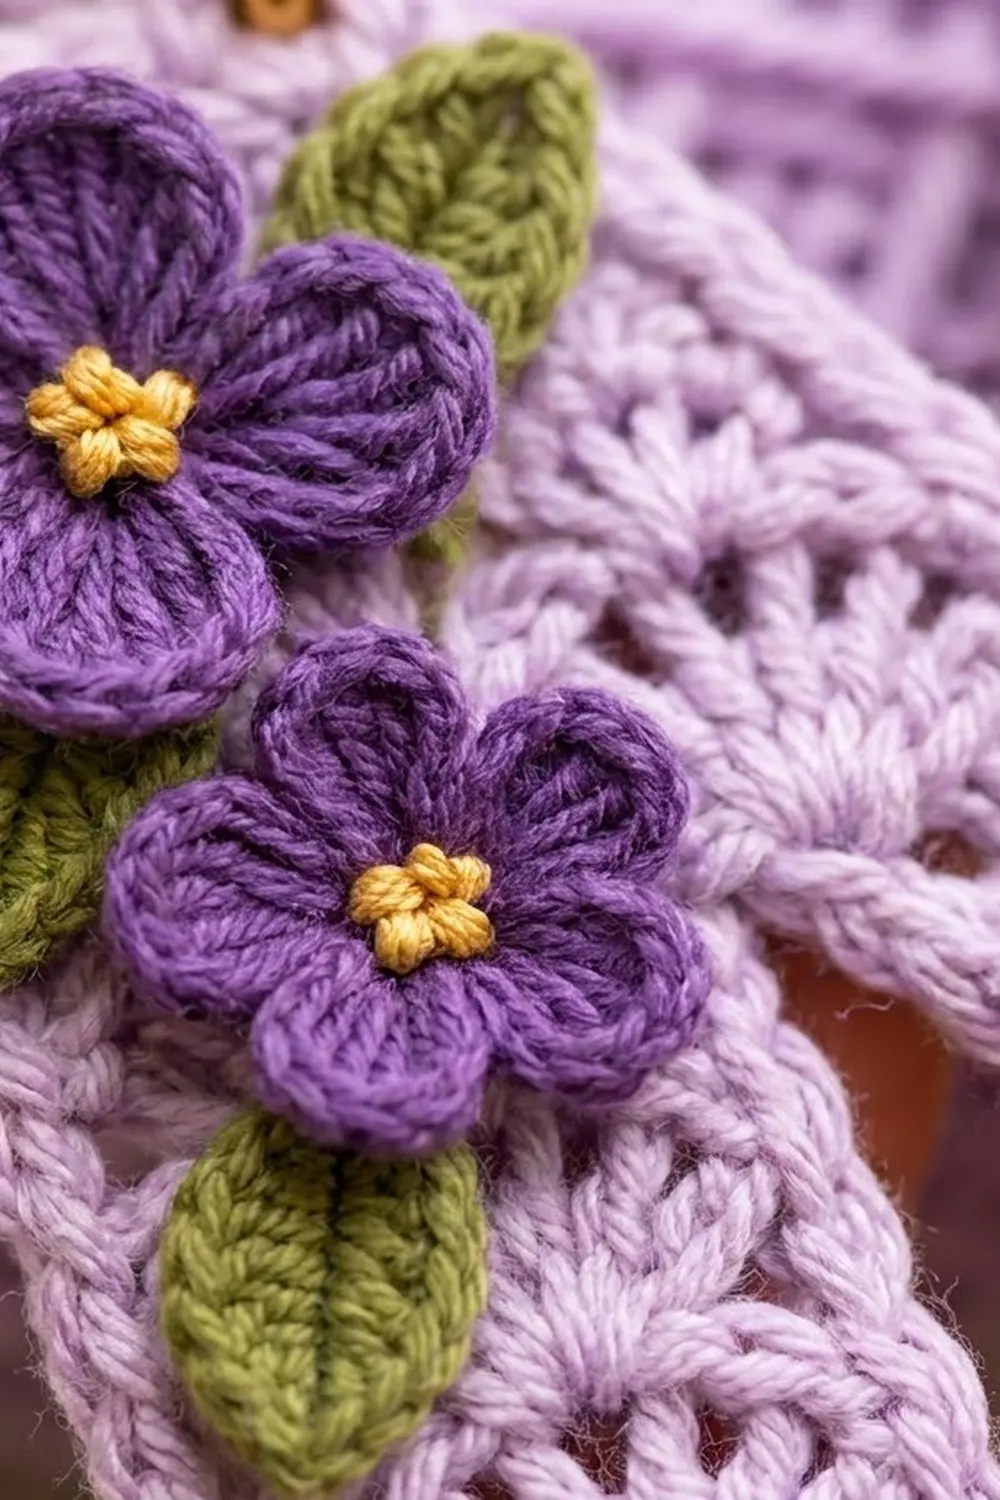
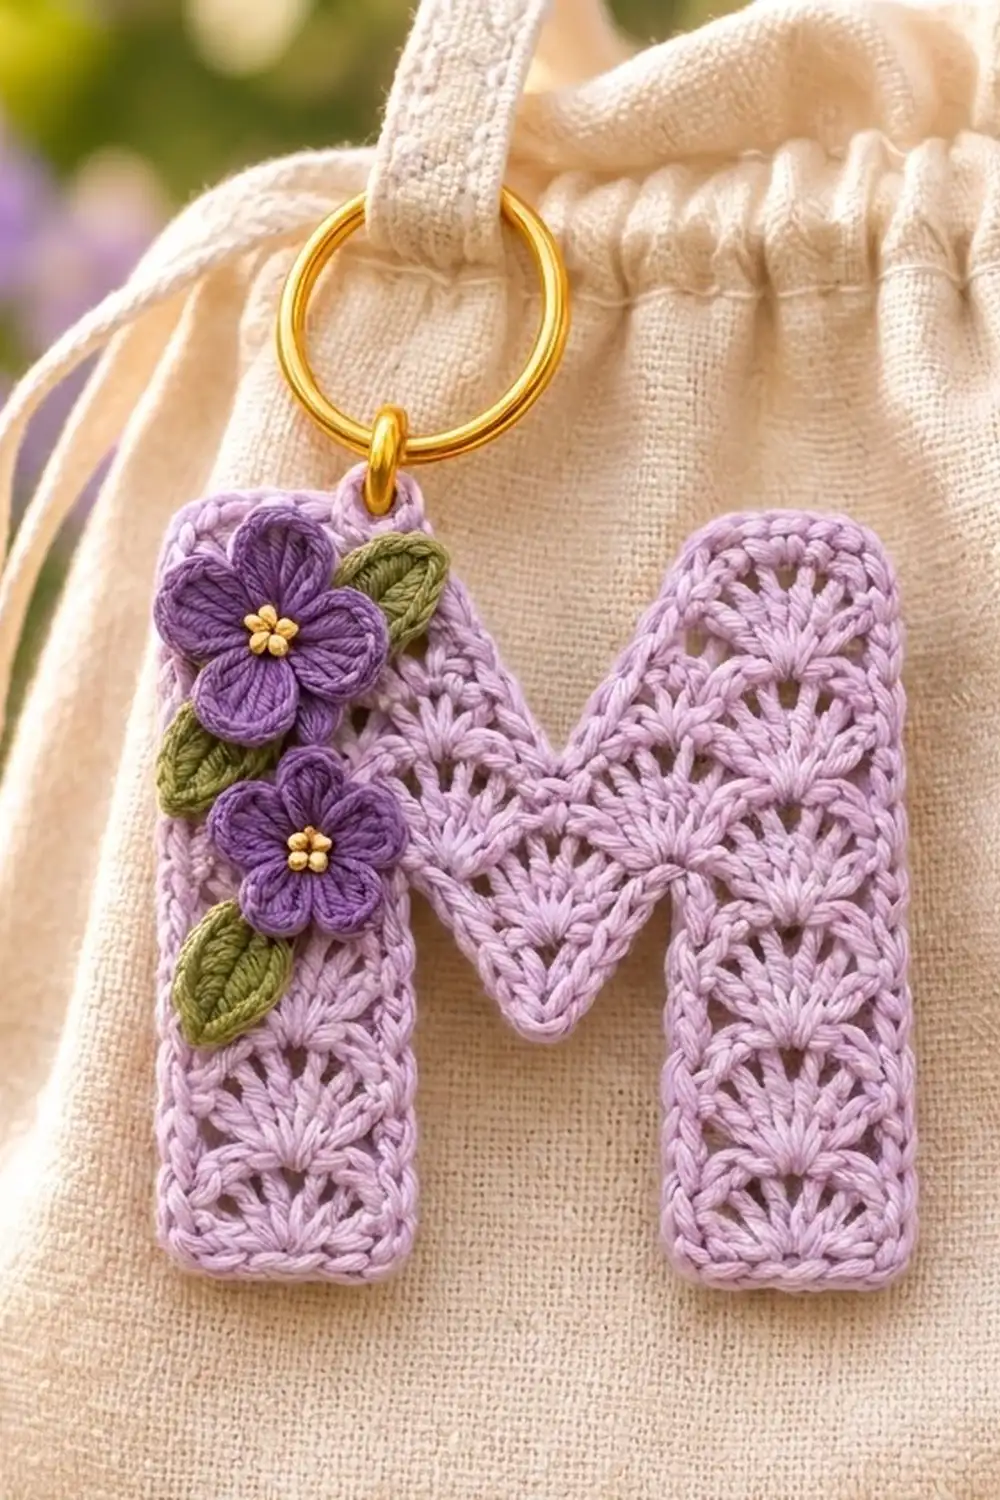
This little letter M keychain is soft, textured and very personal. The lavender body is worked in a staggered shell stitch, so every row shows a neat line of tiny fans. A rope-like rim frames the letter. Two deep violet flowers with golden centers sit on the left leg, tucked between three olive-green leaves.
The colors are gentle and springlike: light lavender for the letter, deep violet for the flowers, olive green for the leaves and a touch of golden yellow for the flower centers. A gold split ring finishes it, so it works on a key set, a zipper pull or a drawstring pouch.
This pattern uses US crochet terms. The finished letter measures 3 in (7.6 cm) wide and 3.75 in (9.5 cm) tall, not counting the hanging tab and ring.
The letter is crocheted flat in one piece from the bottom up. You make the two lower legs separately and join them with a chain bridge. Then you work the upper body across the full width and split it at the center to form the V notch. A two-round border smooths every edge, a short tab holds the ring, and the flowers and leaves are sewn on last.
Finished Size and Construction
- Finished size: 3 in (7.6 cm) wide x 3.75 in (9.5 cm) tall, plus a 0.375 in (1.0 cm) tab
- Skill level: Intermediate (shells, shaping by leaving stitches unworked)
- Terminology: US crochet terms
- Yarn weight: Fingering / super fine (#1) cotton
- Hook: 2.25 mm (US B-1)
- Number of pieces: 1 letter body, plus 2 flowers and 3 leaves sewn on as appliqué
- Layout: a single letter, with the appliqués stacked on the left leg
- Body size before border: 2.75 in (7.0 cm) wide x 3.5 in (8.9 cm) tall
- Leg width before border: 1 in (2.5 cm), 7 stitches
- Border depth: 0.125 in (0.3 cm) on every edge
Materials
Choose a smooth mercerized cotton in fingering weight. It shows the shell texture crisply, keeps its shape on a keychain and wears well. Avoid fuzzy or brushed yarns, because they hide the fans.
- Color A, light lavender: 8 g, about 30 m
- Color B, deep violet: 3 g, about 11 m
- Color C, olive green: 2 g, about 7 m
- Color D, golden yellow: 1 g, about 4 m
All quantities include extra for the gauge check and for weaving in tails.
Tools:
- 2.25 mm (US B-1) crochet hook
- Tapestry needle with a sharp point
- Gold split ring, 1 in (2.5 cm)
- Gold jump ring, 8 mm, and two pairs of flat-nose pliers
- Rust-proof pins and a foam or felt blocking surface
- Spray bottle with water
- Ruler, stitch markers and scissors
Abbreviations (US Terms)
- ch: chain
- sl st: slip stitch
- sc: single crochet
- sc2tog: single crochet 2 together
- hdc: half double crochet
- dc: double crochet
- BL: back loop only
- st(s): stitch(es)
- sk: skip
- rep: repeat
- RS / WS: right side / wrong side
Shell: 5 dc in the same stitch.
Half shell: 3 dc in the same stitch. At the start of a row, ch 3 (counts as the first dc), then work 2 dc in the same stitch.
Pattern rows: The fabric alternates between Row A and Row B. Both rows have the same stitch count, a multiple of 6 + 1.
- Row A: Ch 1, sc in first st, sk 2 sts, shell in next sc, sk 2 sts, sc in next st (the center dc of a shell, or the top of the turning ch at the row end); rep from * across.
- Row B: Ch 3 (counts as dc), 2 dc in first sc, sk 2 dc, sc in next dc (center of shell), sk 2 dc, shell in next sc; rep from * across. End the last rep with a half shell (3 dc) in the last sc instead of a shell.
Each Row A shell sits on a Row B sc, and each Row B shell sits on a Row A sc. This makes the fans stagger like brickwork.
Gauge and Checkpoints
Gauge in shell pattern: 7 sts = 1 in (2.5 cm) wide; 4 rows = 1 in (2.5 cm) tall.
Use the first leg as your gauge test. It is part of the keychain, so no yarn is wasted.
- After Leg Row 6: 1 in (2.5 cm) wide x 1.5 in (3.8 cm) tall
- After Row 7: 2.75 in (7.0 cm) wide
- After Row 10: 2.5 in (6.4 cm) tall
- After Row 11 (V point): 2.75 in (7.0 cm) tall
- After Row 14: 3.5 in (8.9 cm) tall
- After border: 3 in (7.6 cm) x 3.75 in (9.5 cm)
If your leg is too big, go down 0.25 mm in hook size. If it is too small, go up 0.25 mm. Height matters as much as width. If the width is right but the leg is taller than 1.5 in (3.8 cm), make your dc shorter by not lifting the first loop as high.
Letter Body
First Leg
With Color A, ch 8.
Row 1 (RS, Row A): Sc in 2nd ch from hook, sk 2 ch, shell in next ch, sk 2 ch, sc in last ch, turn. (7 sts: 1 sc, 5 dc, 1 sc)
Row 2 (Row B): Ch 3, 2 dc in first sc, sk 2 dc, sc in center dc, sk 2 dc, 3 dc in last sc, turn. (7 sts)
Row 3 (Row A): Ch 1, sc in first dc, sk 2 dc, shell in sc, sk 2 dc, sc in top of ch-3, turn. (7 sts)
Rows 4–6: Rep Rows 2, 3 and 2. (7 sts in each row)
Fasten off. Checkpoint: 1 in (2.5 cm) x 1.5 in (3.8 cm).
Second Leg
Work Rows 1–6 as for the First Leg. Do not fasten off.
Bridge and Upper Body
Lay the First Leg RS up next to the Second Leg so that Row 7 will travel across the Second Leg toward the First Leg. Line up the bottom edges.
Row 7 (RS, Row A, joining row): Ch 1, sc in first dc, sk 2 dc, shell in sc, sk 2 dc, sc in top of ch-3. For the bridge, ch 5. On the First Leg, sc in the edge st of Row 6 nearest the chain, sk 2 dc, shell in sc, sk 2 dc, sc in last st, turn. (19 sts: 7 + 5 ch + 7)
Row 8 (Row B): Ch 3, 2 dc in first sc, sk 2 dc, sc in center dc, sk 2 dc, shell in next sc, sk 2 ch, sc in 3rd (center) ch of bridge, sk 2 ch, shell in next sc, sk 2 dc, sc in center dc, sk 2 dc, 3 dc in last sc, turn. (19 sts: 3 + 1 + 5 + 1 + 5 + 1 + 3)
Row 9 (Row A): Work Row A across. (19 sts: 3 shells)
Row 10 (Row B): Work Row B across. (19 sts)
Checkpoint: 2.75 in (7.0 cm) wide x 2.5 in (6.4 cm) tall. The slot between the legs should be about 0.75 in (1.9 cm) wide and 1.5 in (3.8 cm) deep.
V Notch: First Half
Row 11 (RS, Row A): Ch 1, sc in first dc, sk 2 dc, shell in next sc, sk 2 dc, sc in center dc, sk 2 dc, 3 dc in next sc (the center sc of the row). Turn. (10 sts: 1 sc, 5 dc, 1 sc, 3 dc)
Row 12 (Row B): Sl st loosely in each of the first 3 dc and in the next sc. Ch 3, 2 dc in same sc, sk 2 dc, sc in center dc, sk 2 dc, 3 dc in last sc, turn. (7 sts; the sl sts are not counted)
Row 13 (Row A): Work Row A across. (7 sts)
Row 14 (Row B): Work Row B across. (7 sts)
Fasten off.
V Notch: Second Half
Row 11 (RS): Join A in the same center sc of Row 10 that holds the first half’s 3 dc. Ch 3, 2 dc in same st, sk 2 dc, sc in center dc, sk 2 dc, shell in next sc, sk 2 dc, sc in top of ch-3, turn. (10 sts: 3 dc, 1 sc, 5 dc, 1 sc)
Row 12 (Row B): Ch 3, 2 dc in first sc, sk 2 dc, sc in center dc, sk 2 dc, 3 dc in next sc. Leave the last 3 dc unworked. Turn. (7 sts)
Rows 13–14: Work Row A, then Row B. (7 sts each)
Fasten off. Both half shells of Row 11 share the center stitch, which forms the V point. Leaving 3 stitches unworked on each side in Row 12 opens the notch to 5 stitches, about 0.75 in (1.9 cm) wide. Checkpoint: 3.5 in (8.9 cm) tall, with each leg 1 in (2.5 cm) wide at the top.
Border
Border gauge: 8 sc = 1 in (2.5 cm) on the side edges. Work 2 sc per row end, because every pattern row is dc-tall. Work 1 sc per stitch along the top and bottom edges. A corner stitch counts once in its edge, and its 2 extra sc turn the corner.
Round 1: With RS facing, join A in the outer bottom corner st of either leg. Ch 1 and work sc around in this order:
- Leg bottom: 3 sc in corner st, 5 sc, 3 sc in corner st (11)
- Inner slot side, up: 2 sc per row end over Rows 1–6 (12)
- Slot top: 1 sc in the underside of each bridge ch (5)
- Other inner slot side, down: (12)
- Other leg bottom: 3 sc, 5 sc, 3 sc (11)
- Outer side, up: 2 sc per row end over Rows 1–14 (28)
- Leg top: 3 sc in corner st, 5 sc, 3 sc in corner st (11)
- Notch: 6 sc down Rows 14–12; 2 sc across the half shell; sc2tog over its last dc and the first dc of the other half shell (the V point); 2 sc across; 6 sc up Rows 12–14 (17)
- Leg top: (11)
- Outer side, down: (28)
Sl st to the first sc. (146 sts) On the half shell covered by slip stitches, work through both the dc and the sl st.
Round 2: Ch 1, sl st in BL of each sc around. (146 sts: 146 worked one per stitch + 0 added) Join and fasten off.
Why the math works: The side edges have 14 rows x 2 sc = 28 sc. At 8 sc per inch, 28 sc spans exactly 3.5 in (8.9 cm). Each leg top has 7 stitches plus 4 corner extras, so the corners turn without cupping. The 5 bridge chains get 5 sc, so the slot stays straight. Both rounds add 0.125 in (0.3 cm) per edge, which takes the body from 2.75 in x 3.5 in (7.0 cm x 8.9 cm) to 3 in x 3.75 in (7.6 cm x 9.5 cm).
Tab
Hold the letter RS up. The tab goes on the leg that will carry the flowers, which is the left leg when RS faces you.
Row 1: Join A in the 5th of the 11 border sts across that leg top. Ch 1, sc in same st and in next 2 sts, turn. (3 sc)
Rows 2–4: Ch 1, 3 sc, turn. (3 sc)
Fasten off. The tab is 0.375 in (1.0 cm) square. Open the jump ring with two pliers, pass it through the center of Row 3, add the split ring and close the jump ring fully.
Flowers (make 2)
With Color B, make a magic ring.
Round 1: Ch 1, 5 sc in ring, sl st to first sc. (5 sc)
Round 2: In each sc around: (sl st, ch 2, 3 dc, ch 2, sl st). (5 petals)
Fasten off with a 10 in (25.4 cm) tail. Each flower is about 1 in (2.5 cm) across. With Color D, work 3 French knots (2 wraps each) close together at the center.
Leaves (make 3)
With Color C, ch 6.
Round 1: Sc in 2nd ch from hook, hdc in next ch, dc in next ch, hdc in next ch, sc in last ch, ch 1. Working along the other side of the chain: sc, hdc, dc, hdc and sc in the same 5 ch. Sl st to the first sc. (10 sts + ch-1 tip)
Fasten off with a 8 in (20.3 cm) tail. Each leaf is about 0.75 in (1.9 cm) long.
Assembly of Appliqués
Block the letter first (see below), then sew.
- Upper flower: Center it on the left leg, with its center 0.75 in (1.9 cm) below the top edge.
- Lower flower: Place its center 1 in (2.5 cm) below the first, nudged 0.125 in (0.3 cm) toward the notch.
- Leaves: Tuck one leaf under the upper right edge of the top flower, one on the outer left between the flowers, and one below the lower flower.
- Sewing: Sew around each center and between petals with tiny stitches into the shell fabric. Do not pull the needle through to the back border.
Final Blocking
- Weave in all body tails before blocking, but leave the appliqué tails loose.
- Mist the letter until it is evenly damp, but not dripping.
- Pin it RS up to 3 in (7.6 cm) x 3.75 in (9.5 cm), with one pin at each outer corner.
- Pin each leg to 1.25 in (3.2 cm) wide, and pin the slot and notch edges straight.
- Open each fan gently with your fingertip.
- Let it dry completely, then sew on the appliqués.
Final Quality-Control Checklist
- Each leg is 7 sts wide in every row, and the upper body is 19 sts.
- The bridge has 5 ch, and Row 8 has its sc in the center chain.
- The V point is a single shared stitch, and the notch opens 5 sts wide at Row 12.
- Round 1 has 146 sc, and Round 2 has 146 sl sts.
- The letter measures 3 in (7.6 cm) x 3.75 in (9.5 cm) and lies flat.
- The jump ring is fully closed, and the tab is firm.
- The flowers and leaves are secure, with no stitches showing on the back.
Troubleshooting
- Fans lean or drift: You skipped 1 or 3 sts instead of 2. Count each 6-stitch repeat.
- Bridge sags: Make the chains with the hook shaft, not the tip, and keep the Round 1 slot sc snug.
- Notch looks lopsided: Make sure both Row 11 half shells go into the same center sc.
- Border ruffles: Use 2 sc per row end, never 3. If it still ruffles, go down a hook size for the border only.
- Border cups: Add the corner extras exactly as written, and keep the Round 2 sl sts loose.
- Flowers curl: Steam them lightly and press them flat before sewing.
Care
Hand wash in cool water, press out the moisture in a towel and dry flat. Do not tumble dry, and keep the metal ring away from bleach.
Final Notes
Every measurement depends on the one before it:
- Each leg is 7 sts and 6 rows, which makes 1 in x 1.5 in (2.5 cm x 3.8 cm).
- The bridge brings the body to 19 sts, or 2.75 in (7.0 cm) wide.
- Fourteen rows make the body 3.5 in (8.9 cm) tall.
- A 146-stitch border adds 0.125 in (0.3 cm) per edge, for a finished size of 3 in x 3.75 in (7.6 cm x 9.5 cm).
Check each stage and the finished letter will come out right. Happy crocheting!