

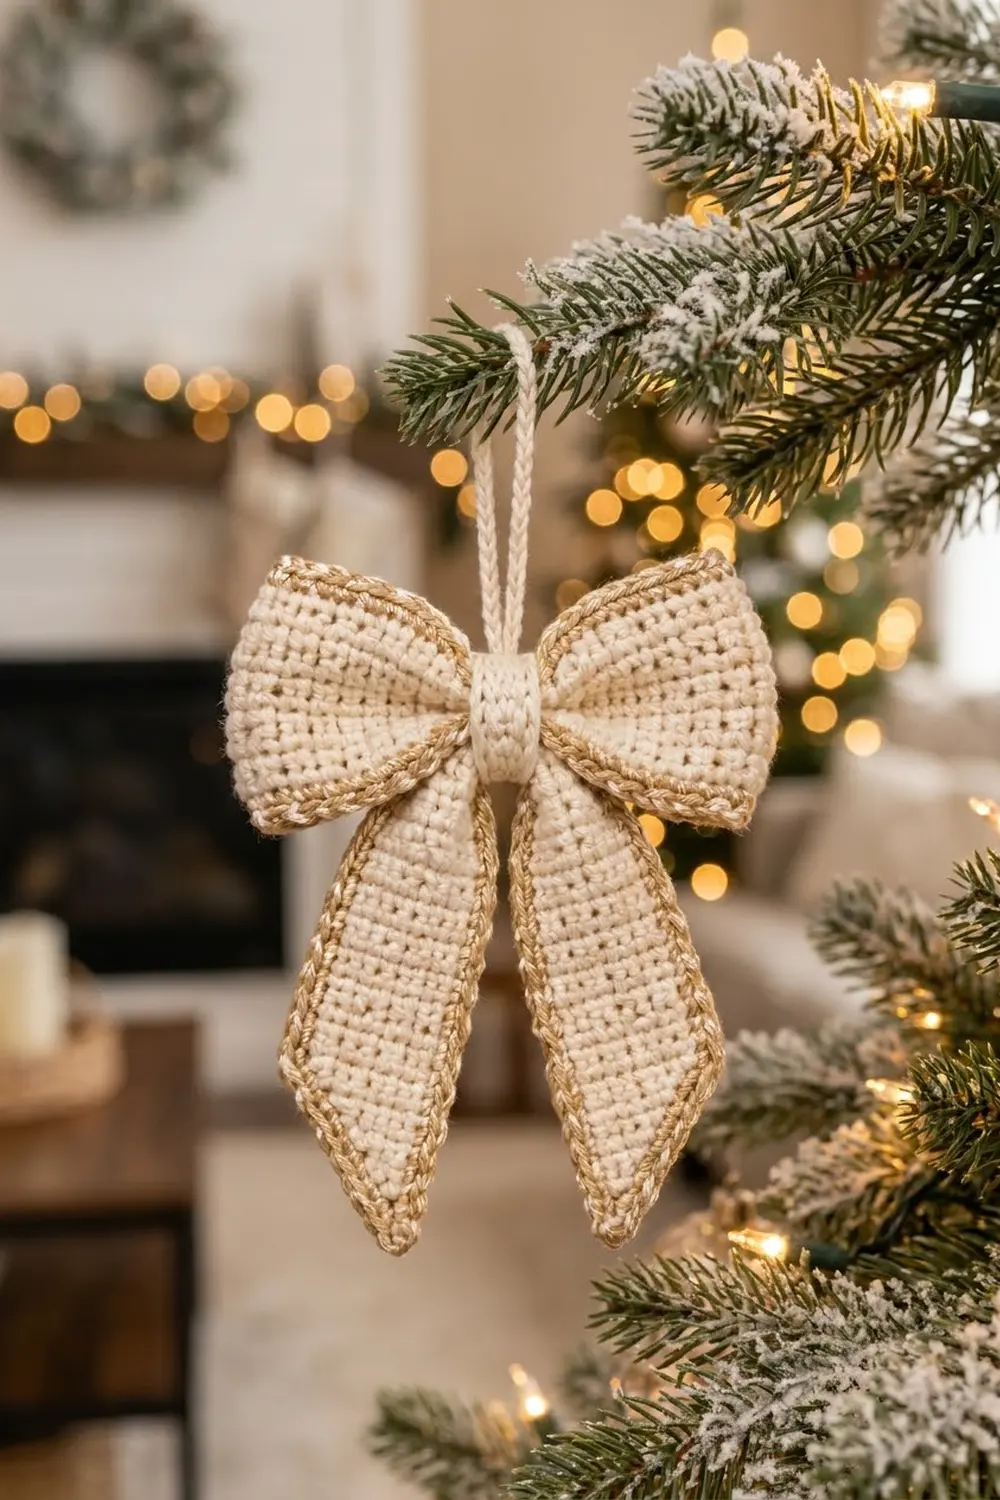
This little bow is a quiet, classic Christmas ornament. Dense cream single crochet gives it a soft, woven look. A corded golden-tan edge traces every outline, so the shape stands out against green branches and warm lights.
The style is simple and timeless: a flat rectangle pinched at the center, a ribbed cream knot, and two long tails with neat V points. It looks good on a tree, tied to a gift, or hung in a window.
This pattern uses US crochet terms. The finished bow measures about 5.5 in (14.0 cm) wide and 6 in (15.2 cm) tall, including the tails.
You crochet a rectangle for the bow body and two tails in rows, then edge each piece with two gold rounds. A small ribbed band wraps the pinched center, and a slip-stitched chain makes the hanging loop.
Finished Size and Construction
- Finished size: about 5.5 in (14.0 cm) wide x 6 in (15.2 cm) tall
- Skill level: Easy
- Terminology: US crochet terms
- Yarn weight: DK (light worsted, weight 3)
- Hook: 3.5 mm (E-4)
- Number of pieces: 5 (1 bow body, 2 tails, 1 center band, 1 hanging loop)
- Layout: tails behind the pinched body in a V, band around the center, loop at the top back
- Bow body size: 5 in x 2.5 in (12.7 cm x 6.4 cm) before border; 5.5 in x 3 in (14.0 cm x 7.6 cm) after border
- Tail size: 1.6 in x 4 in (4.1 cm x 10.2 cm) before border; 2.1 in x 4.5 in (5.3 cm x 11.4 cm) after border
- Border depth: 0.25 in (0.6 cm) on each side
Materials
Choose a smooth DK cotton or cotton blend for the cream. Cotton holds its shape and shows stitches clearly. For the edge, use a DK yarn in golden tan or camel. A yarn with a metallic thread adds sparkle under tree lights.
- Cream (Color A): 15 g, about 35 m
- Golden tan (Color B): 6 g, about 14 m
These quantities include a margin for your gauge check and seaming.
Tools:
- 3.5 mm (E-4) crochet hook
- Tapestry needle
- Scissors
- Stitch markers (2)
- Ruler or tape measure
- Blocking mat and rust-proof pins
- Spray bottle with water
Abbreviations (US Terms)
- ch – chain
- sl st – slip stitch
- sc – single crochet
- sc2tog – single crochet 2 together (decrease of 1 stitch)
- BLO – back loop only
- rev sc – reverse single crochet (crab stitch)
- st(s) – stitch(es)
- RS – right side
Special stitch – reverse single crochet (rev sc): Work from left to right (right-handed). Insert the hook into the next stitch to the right, yarn over, pull up a loop, yarn over, and pull through both loops. This makes the twisted, corded edge seen on the bow.
Gauge and Checkpoints
Gauge: 20 sc and 24 rows = 4 in (10.2 cm) in sc rows with a 3.5 mm hook. That is 5 sts and 6 rows per 1 in (2.5 cm).
Test with the bow body first. It is a plain rectangle, so it doubles as your gauge swatch.
Checkpoints:
- After Row 1 of the bow body, 25 sc should measure 5 in (12.7 cm).
- After Row 15, the body should measure 2.5 in (6.4 cm) tall.
- After the border, the body should be 5.5 in x 3 in (14.0 cm x 7.6 cm).
- Each tail should measure 1.6 in (4.1 cm) wide at Row 1 and 4 in (10.2 cm) long at Row 24.
If your piece is too big, go down to a 3.25 mm (D-3) hook. If it is too small, go up to a 3.75 mm (F-5) hook. Change hooks before making the tails so all pieces match.

Bow Body (make 1)
With Color A, ch 26.
Row 1 (RS): Sc in 2nd ch from hook and in each ch across, turn. (25 sc)
Rows 2–15: Ch 1 (does not count as a st), sc in each st across, turn. (25 sc)
Fasten off Color A. The body measures 5 in x 2.5 in (12.7 cm x 6.4 cm).
Tails (make 2)
Tails are worked from the top down and end in a center point.
With Color A, ch 9.
Row 1: Sc in 2nd ch from hook and in each ch across, turn. (8 sc)
Rows 2–18: Ch 1, sc in each st across, turn. (8 sc)
The tail now measures 3 in (7.6 cm) long.
Row 19: Ch 1, sc2tog, sc in next 4 sts, sc2tog, turn. (6 sts)
Row 20: Ch 1, sc in each st across, turn. (6 sc)
Row 21: Ch 1, sc2tog, sc in next 2 sts, sc2tog, turn. (4 sts)
Row 22: Ch 1, sc in each st across, turn. (4 sc)
Row 23: Ch 1, sc2tog twice, turn. (2 sts)
Row 24: Ch 1, sc2tog. (1 st)
Fasten off. The tail measures 1.6 in (4.1 cm) wide and 4 in (10.2 cm) long, with a 1 in (2.5 cm) taper into a V point.
Center Band (make 1)
With Color A, ch 6.
Row 1: Sc in 2nd ch from hook and in each ch across, turn. (5 sc)
Rows 2–15: Ch 1, sc in BLO of each st across, turn. (5 sc)
Fasten off, leaving a 10 in (25.4 cm) tail for sewing. The band measures 1 in x 2.5 in (2.5 cm x 6.4 cm). Working in back loops makes the small ridges across the knot.
Hanging Loop (make 1)
With Color A, ch 36.
Row 1: Sl st in back bump of 2nd ch from hook and in each ch across. (35 sl st)
Fasten off, leaving an 8 in (20.3 cm) tail. The strip measures about 7 in (17.8 cm). Folded in half, it makes a loop about 3.5 in (8.9 cm) long.
Border
Work the border separately on the bow body and on each tail before assembly, so every outer edge gets the gold trim.
Border gauge: One sc round plus one rev sc round adds 0.25 in (0.6 cm) on each side. That adds 0.5 in (1.3 cm) to each total width and length.
Bow Body Border
Hold the body with RS facing and Row 15 at the top.
Round 1: Join Color B in the first st of Row 15. Ch 1, 3 sc in same st (corner), sc in next 23 sts, 3 sc in last st (corner). Working down the side, sc in the row ends of Rows 14 through 2 (13 sc). Working along the foundation chain, 3 sc in first ch (corner), sc in next 23 ch, 3 sc in last ch (corner). Working up the side, sc in the row ends of Rows 2 through 14 (13 sc). Join with sl st to first sc. (84 sc)
Per-side counts, including both corner center stitches: long sides 27 sts each (1 + 1 + 23 + 1 + 1), short sides 17 sts each (1 + 1 + 13 + 1 + 1).
Round 2: Ch 1, rev sc in each st around. Join with sl st to first st. (84 rev sc)
Fasten off and weave in ends.
Why the math works: Row 15 has 25 sts. The 2 end sts become corners, leaving 23 between them. Corners total 4 x 3 = 12 sts, the long edges add 23 + 23 = 46, and the short edges add 13 + 13 = 26. 12 + 46 + 26 = 84. Checking by sides: 27 + 27 + 17 + 17 = 88, minus 4 corner sts counted twice = 84. Round 2 works one rev sc per stitch, so it adds nothing and keeps the edge flat. The body becomes 5.5 in x 3 in (14.0 cm x 7.6 cm).
Tail Border (work on each tail)
Hold the tail with RS facing and the foundation chain at the top.
Round 1: Join Color B in the first ch of the foundation. Ch 1, 3 sc in same ch (corner), sc in next 6 ch, 3 sc in last ch (corner). Working down the side, sc in the row ends of Rows 2 through 23 (22 sc). Work 3 sc in the single st of Row 24 (tip). Working up the other side, sc in the row ends of Rows 23 through 2 (22 sc). Join with sl st to first sc. (59 sc)
Round 2: Ch 1, rev sc in each st around. Join with sl st. (59 rev sc)
Fasten off and weave in ends.
Why the math works: The top edge has 8 foundation chains. The 2 end chains become corners with 3 sc each, plus 6 sc between them, for 12 sts on top. Each side has one sc per row end for Rows 2–23, which is 22 sts. The tip adds 3. 12 + 22 + 22 + 3 = 59. The 3 sc at the tip keep the V point sharp. The tail becomes 2.1 in x 4.5 in (5.3 cm x 11.4 cm).
Make All Pieces
Before assembly, check that you have:
- Color A + Color B: 1 bow body, bordered (84 sts per round)
- Color A + Color B: 2 tails, bordered (59 sts per round)
- Color A only: 1 center band
- Color A only: 1 hanging loop
Layout (front view):
[ bow body left ][band][ bow body right ]
              /  tail  \ / tail  \
             /   left   V  right  \
            V                      V
The tails sit behind the body. Their tops meet at the center, and they spread out in a V below the bow.
Assembly
Step 1 – Pinch the body. Lay the body RS up. Count 12 sts in from each side along Row 15; the 13th st is the center. Mark it. Pleat the body like an accordion at this column, folding the top and bottom edges toward the middle so the 3 in (7.6 cm) height gathers to about 0.75 in (1.9 cm). Wrap a length of Color A twice around the pinch and tie it tight.
Step 2 – Place the tails. Lay the two tails RS up with their tops touching. Angle them into a V, about 1 in (2.5 cm) apart at the top and about 3 in (7.6 cm) apart at the tips. Set the pinched body on top so its center sits over the tail tops. The tail tops should line up with the body’s center line.
Step 3 – Tack the layers. With Color A, sew through the back of the pinch and the top 0.5 in (1.3 cm) of each tail with 3 or 4 small stitches. Pull just enough to hold; too much tension puckers the tails.
Step 4 – Wrap the band. Place the band across the pinch with RS facing out. Wrap it around the body and the tail tops, then whip stitch the short ends together at the back, row to row, through both loops. The 2.5 in (6.4 cm) band should fit snugly. If it is loose, overlap the ends by one row before sewing.
Step 5 – Add the hanging loop. Fold the strip in half and sew both ends to the back of the band at its top edge. Weave all ends into the band.
Size checkpoint: The bow should measure 5.5 in (14.0 cm) across and about 6 in (15.2 cm) from the top of the body to the tail tips. That is 1.5 in (3.8 cm) above the center line plus 4.5 in (11.4 cm) of tail below it.
Final Blocking
- Lightly mist the bow until damp but not wet.
- Lay it RS up on the blocking mat.
- Pin each tail straight, with a pin at the V point to keep it sharp.
- Gently pull out the four outer corners of the body so the edges sit straight.
- Fluff the bow loops so they puff on each side of the band. Do not flatten them.
- Check that the width is 5.5 in (14.0 cm) and both tails are the same length.
- Let it dry completely, then remove the pins.
Final Quality-Control Checklist
- Bow body measures 5.5 in x 3 in (14.0 cm x 7.6 cm) before pinching
- Each tail measures 2.1 in x 4.5 in (5.3 cm x 11.4 cm)
- Border rounds have 84 sts on the body and 59 sts on each tail
- Corners and tail points are sharp, not rounded
- The gold rev sc edge twists evenly with no gaps
- Band is snug and centered, with the seam hidden at the back
- Tails mirror each other in the V
- Hanging loop is centered and secure
- All ends are woven in and trimmed
Troubleshooting
The edge ruffles. The sc border is too loose or has extra stitches. Recount and try a hook one size smaller for Color B.
The edge cups or pulls in. You skipped row ends or worked the rev sc too tight. Recount Round 1 and loosen up on Round 2.
Tail points look blunt. Make sure you worked 3 sc into the Row 24 stitch, and pin the point during blocking.
The bow looks flat. Pleat the center more tightly and fluff the loops before adding the band.
The band slips. Tack it to the pinch at the back with two small stitches.
Tails are different lengths. Recount the rows. Each tail needs exactly 24 rows.
Care
Spot clean with a damp cloth and mild soap, then reshape and dry flat. Store flat or hanging so the loops keep their shape.
Final Notes
Every size in this bow comes from one measurement chain. At 5 sts and 6 rows per 1 in (2.5 cm), the 25-stitch, 15-row body measures 5 in x 2.5 in (12.7 cm x 6.4 cm). The two-round gold border adds 0.25 in (0.6 cm) per side, so the body becomes 5.5 in x 3 in (14.0 cm x 7.6 cm). The 8-stitch, 24-row tails measure 1.6 in x 4 in (4.1 cm x 10.2 cm) and become 2.1 in x 4.5 in (5.3 cm x 11.4 cm) after the border. Pinched, banded, and hung, the ornament is 5.5 in (14.0 cm) wide and about 6 in (15.2 cm) tall.
If your gauge matches at the first checkpoint, every later number will match too. Make one, then make a whole set for the tree.
Happy crocheting!