

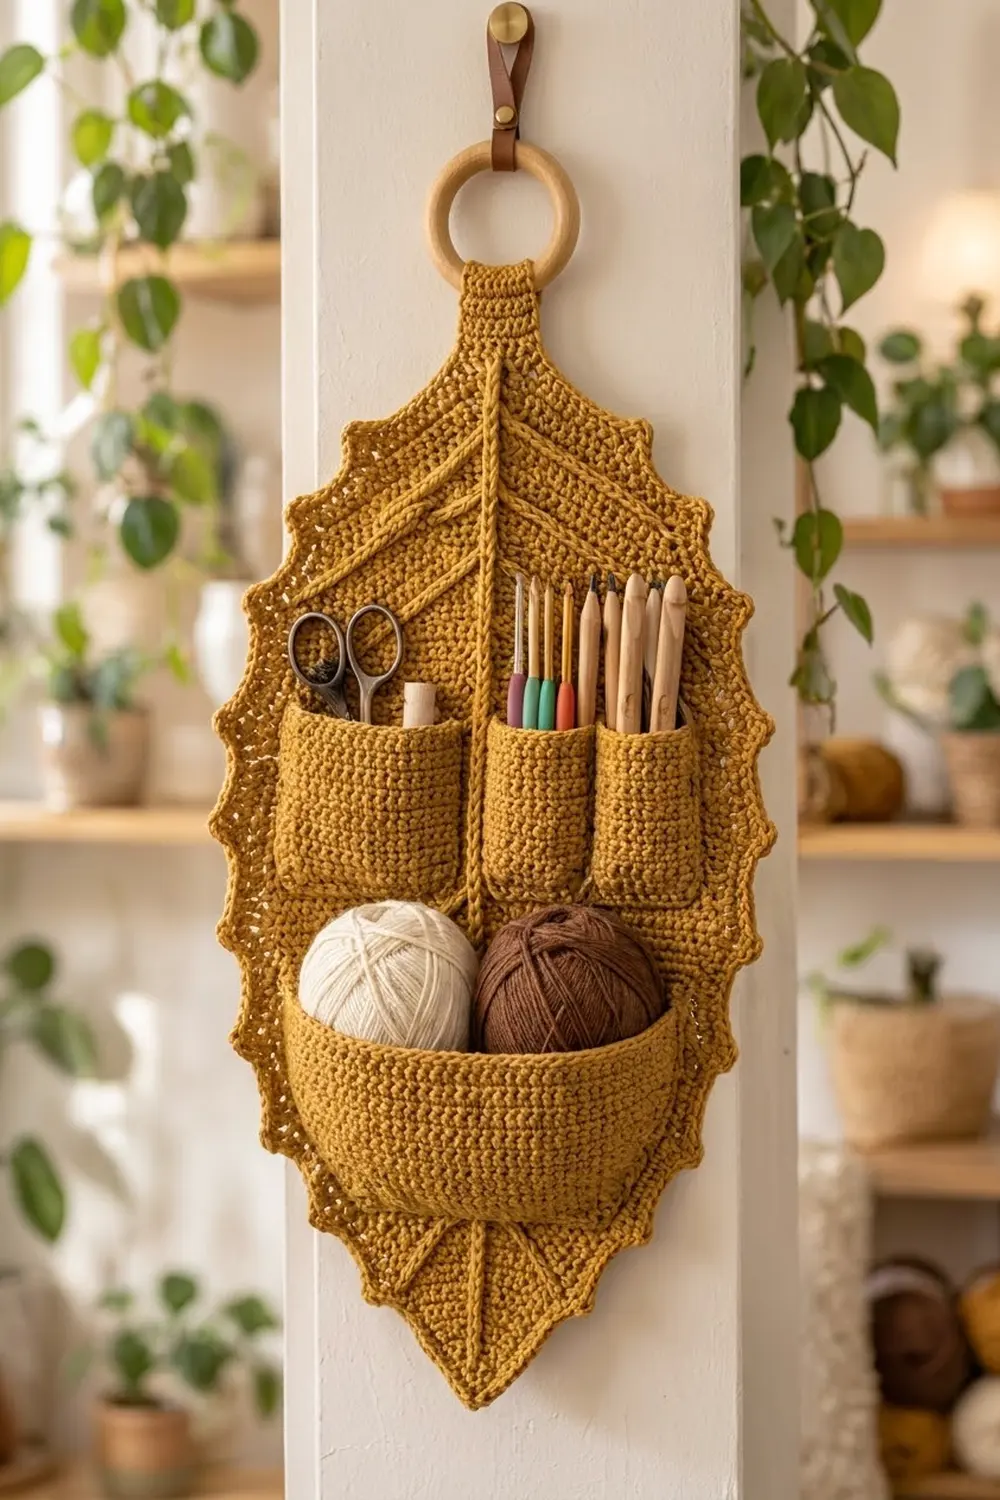
This organizer is shaped like one big golden leaf. A raised midrib runs from tip to tip, slanted side veins branch off it, and a border of small pointed teeth gives it a serrated edge. Three pockets sewn on the front keep hooks, scissors, and a couple of yarn balls within reach.
The whole piece uses one mustard-gold worsted yarn, so all the interest comes from texture. The leaf is dense single crochet, the veins are surface slip stitch, and the border has picot-tipped teeth. It looks warm and natural next to wood, plants, and pale walls.
The pattern uses US crochet terms. The finished leaf measures 11.75 in (29.8 cm) wide by 21.5 in (54.6 cm) tall, not counting the tab and ring.
Here is the order of work:
1. Crochet the leaf panel flat in rows, from the bottom tip to the top tip.
2. Add the veins with surface slip stitch.
3. Make three pockets and sew them on.
4. Work a two-round border.
5. Make a short tab and wrap it around a wooden ring for hanging.
Finished Size and Construction
- Finished size: 11.75 in (29.8 cm) x 21.5 in (54.6 cm), plus the tab and ring
- Skill level: Intermediate
- Terminology: US
- Yarn weight: Worsted (#4)
- Hook: 4.5 mm (US 7)
- Number of pieces: 5 (1 leaf panel, 2 small pockets, 1 large pocket, 1 hanging tab), sewn into one organizer
- Layout: two small pockets side by side across the widest part of the leaf, with one large pocket below them
- Panel size before border: 10.25 in (26.0 cm) x 20 in (50.8 cm)
- Border depth: 0.75 in (1.9 cm) on every edge
- Small pocket: 3.75 in (9.5 cm) wide x about 3.5 in (8.9 cm) tall
- Large pocket: 9.25 in (23.5 cm) wide at the top x about 4.4 in (11.2 cm) deep
Materials
Yarn: Choose a firm worsted-weight cotton or cotton blend. Cotton holds its shape when the pockets are full, and it makes the surface veins stand out clearly. Soft acrylic tends to sag under weight.
- Mustard gold: 150 g / 285 m (about 2 skeins of 100 g / 190 m)
This amount includes about a 25% margin for your gauge swatch and any ripping back.
Tools:
– 4.5 mm (US 7) crochet hook
– Tapestry needle
– 6 locking stitch markers
– Rust-proof pins and a blocking mat
– One wooden ring, 2.75 in (7.0 cm) across
– Measuring tape
– Optional: a leather strap and a wall hook
Abbreviations (US Terms)
- ch – chain
- sl st – slip stitch
- sc – single crochet
- hdc – half double crochet
- dc – double crochet
- sc2tog – single crochet 2 together
- sc3tog – single crochet 3 together
- BLO – back loop only
- st(s) – stitch(es)
- rep – repeat
Special stitches
– Picot: Ch 3, then sl st in the 3rd ch from the hook.
– Surface sl st: Hold the yarn behind the fabric. Put the hook through a gap from the front, pull up a loop, and draw it through the loop on your hook. The stitches form a raised chain on top of the fabric.
Gauge and Checkpoints
Gauge: 16 sc x 18 rows = 4 in (10.2 cm). That is 4 sts and 4.5 rows per inch.
Test before you start: crochet a swatch 20 sts wide and at least 4.5 in (11.4 cm) tall. Block it, then measure the center 4 in (10.2 cm).
Panel checkpoints (measure the panel flat):
– Row 20: 23 sts; about 4.4 in (11.2 cm) tall
– Row 38: 41 sts; 10.25 in (26.0 cm) wide and 8.4 in (21.3 cm) tall
– Row 58: 41 sts; 12.9 in (32.8 cm) tall
– Row 90: 1 st; 20 in (50.8 cm) tall
– After the border: 11.75 in (29.8 cm) x 21.5 in (54.6 cm)
If your fabric is too big, go down 0.5 mm in hook size. If it is too small, go up 0.5 mm. Row gauge matters too, because the pockets are placed by row number.

Leaf Panel
Turn at the end of every row. The ch 1 at the start of a row never counts as a stitch.
Every row has an odd number of stitches, so there is always one center stitch. In the 41-st rows the center is st 21. This center column is where the midrib goes.
Row 1: Ch 2, 3 sc in 2nd ch from hook, turn. (3 sts)
Row 2 (increase): Ch 1, 2 sc in first st, sc in each st to last st, 2 sc in last st, turn. (5 sts)
Row 3: Ch 1, sc in each st across, turn. (5 sts)
Rows 4–38: Rep Rows 2–3 alternately, so every even row is an increase row. (Row 10: 13 sts; Row 20: 23 sts; Row 30: 33 sts; Row 38: 41 sts)
There are 19 increase rows in all, so the count reaches 3 + (19 x 2) = 41.
Rows 39–58: Ch 1, sc in each st across, turn. (41 sts in each of these 20 rows)
Row 59 (decrease): Ch 1, sc2tog, sc in each st to last 2 sts, sc2tog, turn. (39 sts)
Row 60: Ch 1, sc in each st across, turn. (39 sts)
Rows 61–82: Rep Rows 59–60 alternately. (Row 70: 29 sts; Row 82: 17 sts)
That is 12 decrease rows in Rows 59–82, so the count drops to 41 – 24 = 17.
Rows 83–89: Rep Row 59 on every row. (Row 83: 15 sts; Row 85: 11 sts; Row 87: 7 sts; Row 89: 3 sts)
Row 90: Ch 1, sc3tog. (1 st) Fasten off.
Decreasing on every row at the end makes the top tip sharper than the bottom tip, like a real leaf.
Veins
For this section, number the columns 1 to 41 across the widest rows. Every row is centered on column 21.
Midrib: Hold two strands of yarn together. Start at the bottom tip and work surface sl st straight up column 21, 1 stitch per row, all the way to Row 90. That is 90 surface sl sts. Fasten off on the back.
Side veins: Use a single strand. There are 7 pairs. Each pair starts at the midrib on Row 10, 20, 30, 40, 50, 60, or 70.
For each vein, work surface sl st from the midrib upward and outward, moving 1 row up and 2 sts out with each stitch. Stop 2 sts before the edge of whatever row you are on. Work one vein to the left and one to the right from the same starting point.
Weave in all tails on the back. Do this before you sew on any pockets.
Small Pockets (make 2)
Row 1: Ch 16, sc in 2nd ch from hook and in each ch across, turn. (15 sts)
Rows 2–14: Ch 1, sc in each st across, turn. (15 sts)
Rows 15–16: Ch 1, sc in BLO of each st across, turn. (15 sts)
Fasten off. Each pocket is 16 rows tall: 3.75 in (9.5 cm) x about 3.5 in (8.9 cm). The BLO rows make the ridged top band.
Large Pocket
Row 1: Ch 22, sc in 2nd ch from hook and in each ch across, turn. (21 sts)
Rows 2–5 (increase): Ch 1, 2 sc in first st, sc to last st, 2 sc in last st, turn. (Row 2: 23; Row 3: 25; Row 4: 27; Row 5: 29)
Row 6: Ch 1, sc across, turn. (29 sts)
Rows 7–13: Rep the increase row on Rows 7, 9, 11, and 13, and work plain sc on Rows 8, 10, and 12. (Row 7: 31; Row 9: 33; Row 11: 35; Row 13: 37)
Rows 14–18: Ch 1, sc across, turn. (37 sts)
Rows 19–20: Ch 1, sc in BLO across, turn. (37 sts)
Fasten off. The pocket is 20 rows deep, about 4.4 in (11.2 cm). The top edge is 9.25 in (23.5 cm) wide, and each side edge has 20 row-ends.
Hanging Tab
Row 1: Ch 7, sc in 2nd ch from hook and in each ch across, turn. (6 sts)
Rows 2–20: Ch 1, sc across, turn. (6 sts)
Fasten off, leaving a 12 in (30.5 cm) tail. The tab is 1.5 in (3.8 cm) wide x 4.4 in (11.2 cm) long.
Make All Pieces
All pieces use the mustard-gold yarn:
– Leaf panel: 1
– Small pocket: 2
– Large pocket: 1
– Hanging tab: 1
Placement grid (by panel row and column; columns 1–41):
Rows 44–59:  [cols 4–18: left pocket]  cols 19–23 open (midrib)  [cols 24–31 | 31–38: right pocket, divided]
Rows 42–43:  open gap
Rows 22–41:  [large pocket: bottom on cols 11–31 at Row 22, top corners at cols 5 and 37 on Row 41]
Rows 1–21:   open (bottom tip and lower veins visible)
Joining
Use the yarn tail and a tapestry needle. Sew with whipstitch through both loops of each pocket edge stitch and one leg of the panel stitch underneath it.
Small pockets:
1. Pin the bottom edge (Row 1) of each pocket across panel Row 44. Place the left pocket on columns 4–18 and the right pocket on columns 24–38.
2. Sew the 15 bottom sts 1-to-1 onto the 15 panel sts below them.
3. Sew each side edge so the 16 pocket row-ends match panel Rows 44–59, 1 row-end per panel row. Leave the top open.
4. On the right pocket, backstitch straight down its 8th stitch column (panel column 31) through both layers. This makes two narrow slots, each 7 sts wide.
Large pocket:
1. Row 22 of the panel has 25 sts, sitting on columns 9–33. Pin the 21 bottom sts of the pocket onto columns 11–31 and sew them 1-to-1. This leaves 2 sts open on each side.
2. Pin the top corners on panel Row 41, at columns 5 and 37. That puts them 8 in (20.3 cm) apart.
3. Sew each side so the 20 row-ends match panel Rows 22–41, 1 per row, along the slanted line.
The pocket top has 37 sts, but its footprint on the panel is only 33 sts. The extra 4 sts, about 1 in (2.5 cm), are what make the pocket bow out like a bowl. Do not stretch them flat.
Tension: Keep your whipstitches snug but not tight. If the panel starts to cup, your stitches are too tight.
Size checkpoint: The panel should still lie flat at 10.25 in (26.0 cm) x 20 in (50.8 cm).
Border
The border has the same gauge as the panel. Rnd 1 adds 0.25 in (0.6 cm) and Rnd 2 adds 0.5 in (1.3 cm), for a total depth of 0.75 in (1.9 cm).
Rnd 1:
1. Join yarn in the Row 90 st (top tip). Ch 1 and work 3 sc in that same st.
2. Work down the first side. Put 2 sc in each row-end of Rows 90–85 (12 sc), then 1 sc in each row-end of Rows 84–1 (84 sc). That makes 96 sc for this side.
3. Work 3 sc in the foundation ch at the bottom tip.
4. Work up the second side the same way in reverse: 84 sc on Rows 1–84, then 12 sc on Rows 85–90. That makes 96 sc.
5. Sl st to the first sc. Mark the center sc of each 3-sc tip.
Rnd 1 total: 96 + 96 + 3 + 3 = 198 sc.
Rnd 2 (teeth):
1. Join with a sl st in the 3rd sc before the marked center sc of the bottom tip.
2. Make the first tooth: sc in next st, hdc in next st, (dc, picot, dc) in the marked st, hdc in next st, sc in next st.
3. *Sl st in next st, sc in next st, hdc in next st, (dc, picot, dc) in next st, hdc in next st, sc in next st. Rep from * 31 more times.
4. Sl st to the first sl st and fasten off.
Each tooth uses 6 sts and makes 7 sts plus 1 picot. The count is:
– Bottom tip: 1 tooth (7 sts + 1 picot)
– Each side: 16 teeth (112 sts + 16 picots)
– Total: 33 teeth (231 sts + 33 picots)
Why the math works:
– The teeth fit exactly. 198 = 33 x 6, so the teeth repeat evenly with nothing left over.
– The tips line up. The bottom center is the center of a tooth. The top center is 99 sts away, and 99 = (16 x 6) + 3, so it falls on a sl st valley. The tab sits flat in that valley.
– The edges don’t ruffle or pull. On the slanted edges, 2 rows step out 0.25 in (0.6 cm) and rise 0.44 in (1.1 cm). That is about 0.5 in (1.3 cm) of edge, which matches 2 sc. On Rows 85–90 the edge is steeper, so the extra sc keep the point from pulling in.
Attach the tab:
1. Pass the tab through the ring and fold it in half, 10 rows on each side.
2. Lay one end over the front of the top tip, covering Rows 85–90 and the valley sl st. Lay the other end flat on the back.
3. Sew through all layers.
Final Blocking
- Spray the organizer evenly with water until it is damp, or hover a steam iron over it. Never press the veins.
- Lay it face up and pin it to 11.75 in (29.8 cm) x 21.5 in (54.6 cm).
- Pin out each picot so the teeth point outward.
- Stuff the large pocket with a folded towel to set its bowl shape.
- Run a finger along the midrib and veins to straighten them.
- Let it dry completely before you remove the pins.
Final Quality-Control Checklist
- The panel has the right counts at the checkpoints: 41 sts at Rows 38–58 and 1 st at Row 90.
- Rnd 1 has 198 sc, and Rnd 2 has 33 teeth.
- The bottom tip has a centered tooth, and the top tip has a sl st valley.
- The midrib runs straight up column 21.
- The 7 vein pairs mirror each other.
- The pocket tops are open, and the right pocket has its center divider.
- The large pocket bows outward and doesn’t pull on the side seams.
- The finished size is 11.75 in (29.8 cm) x 21.5 in (54.6 cm).
- The tab is secure and the ring hangs straight.
Troubleshooting
- The leaf leans to one side: You missed an increase or decrease on one edge. Count the row against the stitch totals above.
- The veins pucker the fabric: Work the surface sl sts more loosely, or go up 0.5 mm in hook size just for the veins.
- The border ruffles: Your Rnd 1 count is too high. Recount 96 sc per side.
- The border cups: Your Rnd 1 tension is too tight. Redo the round more loosely.
- The large pocket sags forward: Your side seams are too loose. Resew them 1 row-end per panel row.
- The organizer tilts when hung: Re-center the tab over the top valley.
Care
Hand wash in cool water and lay flat to dry, reshaping the teeth and the pocket while it’s damp. Empty the pockets before washing.
Final Notes
The measurements build on each other. A gauge of 16 sc x 18 rows = 4 in (10.2 cm) gives 41 sts across, which is 10.25 in (26.0 cm), and 90 rows tall, which is 20 in (50.8 cm). The pockets are placed by row number, so they land in the same spots on every leaf. A 0.75 in (1.9 cm) border brings the finished leaf to 11.75 in (29.8 cm) x 21.5 in (54.6 cm). Check each step and the finished organizer will hang flat and hold your tools neatly.
Happy crocheting!