

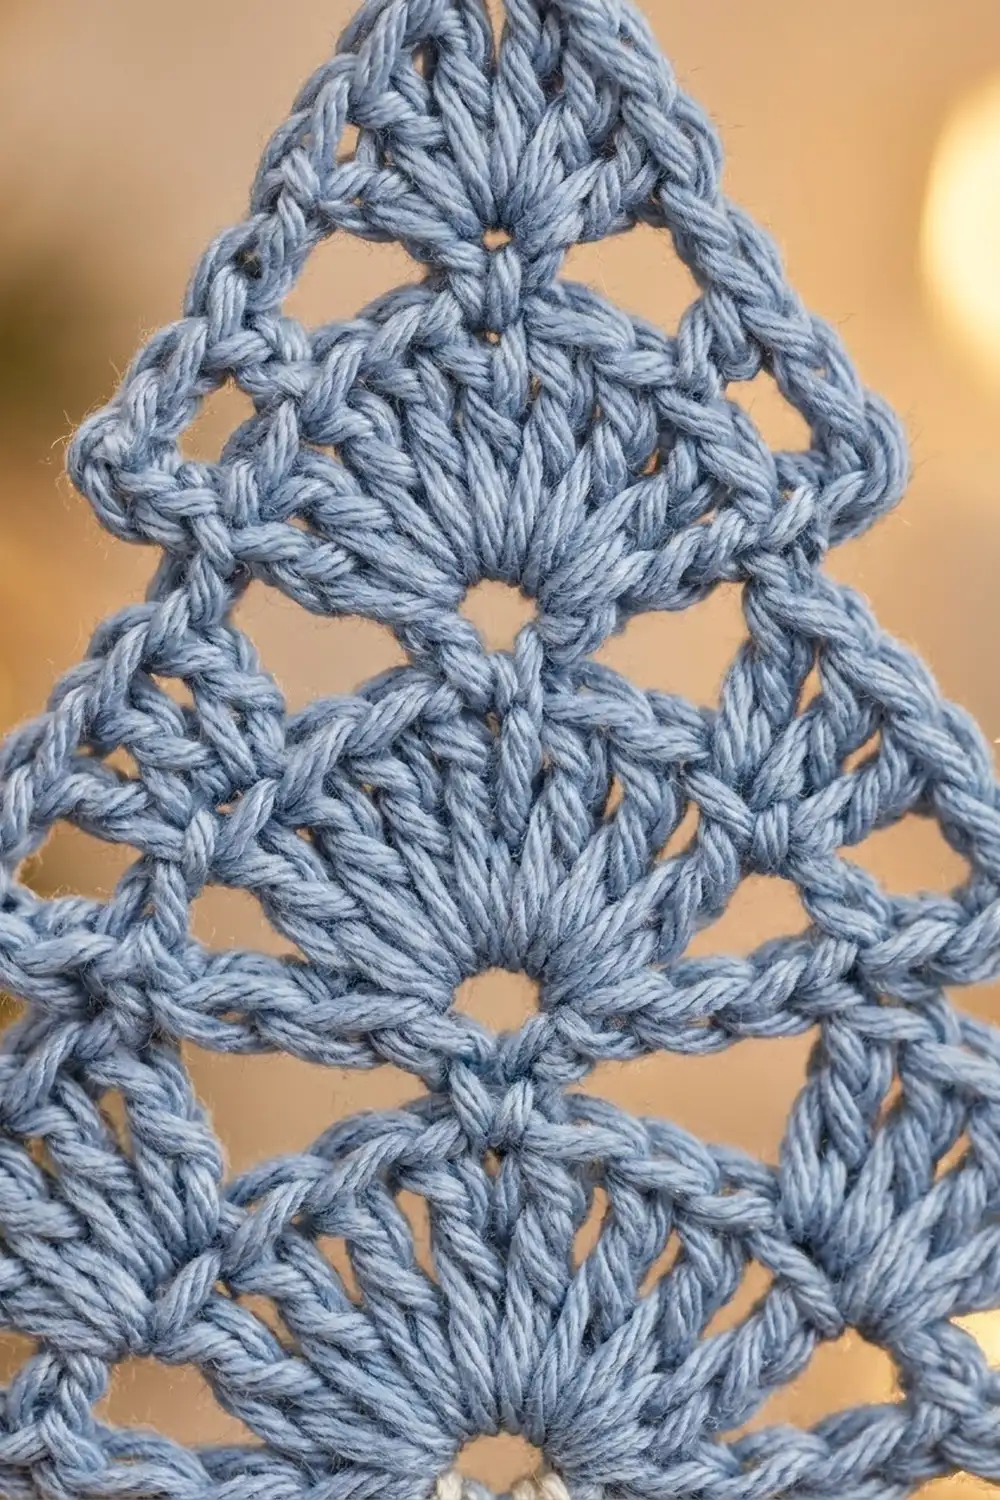
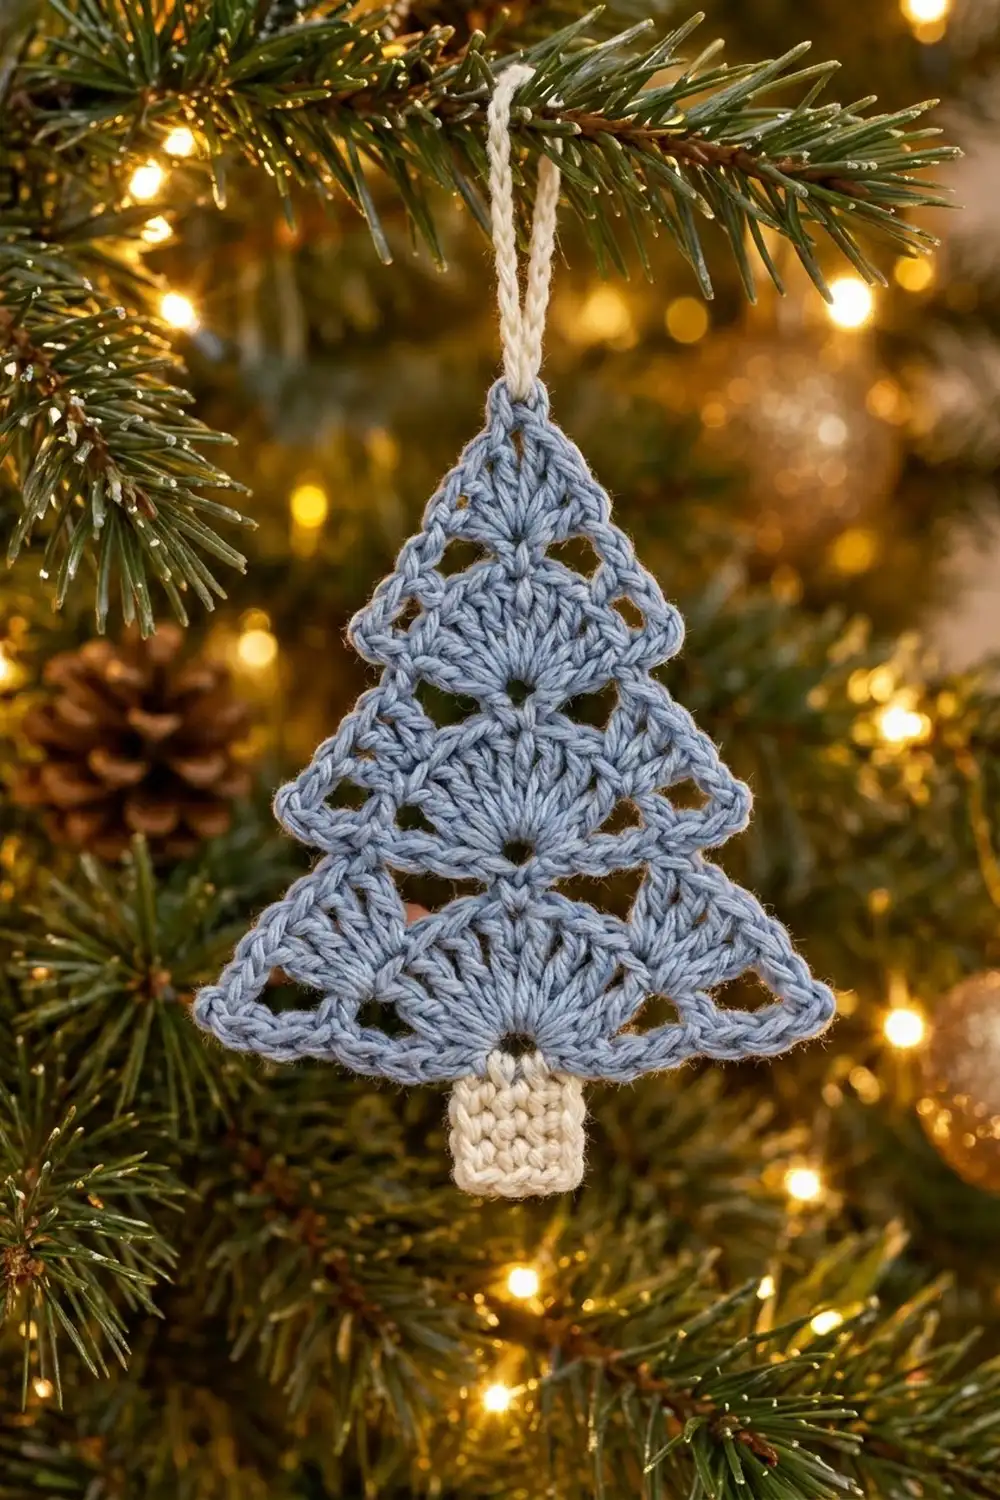
This little tree ornament is made of three lacy tiers in soft dusty blue, set on a tiny cream trunk and hung from a cream loop. Each tier opens from a small center hole into a fan of double crochet. Chain arches outline the fan, open windows sit near the corners, and a crisp single crochet edge finishes the sides with sharp points.
The look is calm and wintry, and it suits both a natural tree and a minimal Scandinavian-style one. Cotton yarn keeps the fans clear and the points sharp after blocking.
This pattern uses US crochet terms. The finished ornament is 3.75 in (9.5 cm) wide and 4.25 in (10.8 cm) tall from the top point to the bottom of the trunk. The hanging loop adds about 1.5 in (3.8 cm).
You crochet three tiers, each worked in turned rows from a magic ring, so the ring sits at the center of each tier’s straight bottom edge. You then crochet a small trunk, stack and sew the tiers, and add the loop.
Finished Size and Construction
- Finished size: 3.75 in (9.5 cm) wide x 4.25 in (10.8 cm) tall, without the loop
- Skill level: Easy-intermediate
- Terminology: US crochet terms
- Yarn weight: Sport weight (#2) cotton
- Hook: 3 mm (US C-2/D-3)
- Number of pieces: 4 (Tier A, Tier B, Tier C, trunk), plus a loop worked straight onto the ornament
- Layout: Three tiers stacked in one vertical column, with the trunk centered below
- Piece sizes: Tier A 2.25 x 1.25 in (5.7 x 3.2 cm); Tier B 2.75 x 1.5 in (7.0 x 3.8 cm); Tier C 3.75 x 1.75 in (9.5 x 4.4 cm); trunk 0.75 x 1 in (1.9 x 2.5 cm)
- Size before border: Tier B and Tier C both measure about 2.5 in (6.4 cm) wide before their last arch row and edging
- Border depth: The edging row adds about 0.125 in (0.3 cm) along each slanted side
Materials
Use a smooth, tightly plied mercerized or combed cotton. Fuzzy or loosely twisted yarn blurs the fans and softens the points.
- Dusty blue: 6 g (about 18 m / 20 yd)
- Cream: 2 g (about 6 m / 7 yd)
These amounts are based on a sport cotton of about 150 m per 50 g. They include a margin for your gauge swatch and weaving in ends.
Tools:
– 3 mm (US C-2/D-3) crochet hook
– Tapestry needle
– Scissors
– Rustproof pins
– Blocking mat or folded towel
– Spray bottle; spray starch is optional
Abbreviations (US Terms)
- ch – chain
- sl st – slip stitch
- sc – single crochet
- dc – double crochet
- sp(s) – space(s)
- st(s) – stitch(es)
- tch – turning chain
- MR – magic ring
- [ ] – repeat the stitches in brackets the number of times stated
Special stitches:
– Apex: (sc, ch 3, sc) in the stated sp. This builds the top point of each tier.
– Tip: (sc, ch 2, sc) in the stated st. This forms the bottom corner points during the edging row.
Gauge and Checkpoints
Swatch gauge: 20 sc and 24 rows = 3 in (7.6 cm) in sc worked in rows.
Test one piece first. Make Tier A completely and pin it out flat. It should measure 2.25 in (5.7 cm) across the bottom edge, from tip to tip, and 1.25 in (3.2 cm) from the center hole to the top point.
Checkpoints:
– After Row 1 of any tier, the fan measures 1 in (2.5 cm) across its bottom edge and 0.5 in (1.3 cm) tall.
– After Row 2, the tier measures about 1.5 in (3.8 cm) across.
– After Row 4 of Tier B or Tier C, the piece measures about 2.5 in (6.4 cm) across.
– Finished tiers should match the piece sizes listed above.
If your piece is too big, go down to a 2.75 mm hook. If it is too small, go up to a 3.25 mm hook. If only the edging ruffles or pulls, see Troubleshooting before you change hooks.
The Tiers
All tiers are worked in turned rows. Every row ends at the bottom edge, so the row ends form each tier’s straight base line. The ring sits at the center of that line.
Rows 1–2 (all three tiers)
Work these two rows the same way for Tier A, Tier B and Tier C.
Row 1: With dusty blue, make an MR. Ch 3 (counts as dc), then work 10 dc in the ring. Pull the tail until the stitches form a half circle with a small hole about 0.125 in (0.3 cm) wide. Don’t close it fully. Turn. (11 dc)
Row 2: Ch 1, sc in the first dc. [Ch 3, skip next dc, sc in next dc] 5 times. The last sc goes in the top of the tch. Turn. (6 sc, 5 ch-3 sps)
The five ch-3 sps are numbered 1 to 5 from the side where this row ends, which is where the next row begins. Sp 3 is the center space, directly above the ring.
Tier A (top tier)
Row 3: Ch 1, sc in the first sc. Ch 4, skip sp 1, sc in sp 2. Ch 4, work an Apex in sp 3. Ch 4, sc in sp 4. Ch 4, skip sp 5, sc in the last sc. Turn. (6 sc, 4 ch-4 sps, 1 ch-3 apex sp)
Skipping sp 1 and sp 5 makes the open windows near the bottom corners. Now work the edging row in the Border section, then fasten off.
Tier B (middle tier)
Row 3: Ch 1, sc in the first sc. [Ch 4, sc in next ch-3 sp] 2 times. Ch 4, Apex in the center ch-3 sp. [Ch 4, sc in next ch-3 sp] 2 times. Ch 4, sc in the last sc. Turn. (8 sc, 6 ch-4 sps, 1 ch-3 apex sp)
Row 4: Ch 1, sc in the first sc. Ch 5, skip the next ch-4 sp, sc in the next ch-4 sp. Ch 5, sc in the next ch-4 sp. Ch 5, Apex in the apex sp. Ch 5, sc in the next ch-4 sp. Ch 5, sc in the next ch-4 sp. Ch 5, skip the next ch-4 sp, sc in the last sc. Turn. (8 sc, 6 ch-5 sps, 1 ch-3 apex sp)
Checkpoint: about 2.5 in (6.4 cm) across. Work the edging row, then fasten off.
Tier C (bottom tier)
Row 3: Work as Tier B Row 3. (8 sc, 6 ch-4 sps, 1 ch-3 apex sp)
Row 4: Ch 1, sc in the first sc. [Ch 5, sc in next ch-4 sp] 3 times. Ch 5, Apex in the apex sp. [Ch 5, sc in next ch-4 sp] 3 times. Ch 5, sc in the last sc. Turn. (10 sc, 8 ch-5 sps, 1 ch-3 apex sp)
Checkpoint: about 2.5 in (6.4 cm) across.
Row 5: Ch 1, sc in the first sc. Ch 6, skip the next ch-5 sp. [Sc in next ch-5 sp, ch 6] 3 times. Apex in the apex sp. [Ch 6, sc in next ch-5 sp] 3 times. Ch 6, skip the next ch-5 sp, sc in the last sc. Turn. (10 sc, 8 ch-6 sps, 1 ch-3 apex sp)
Work the edging row, then fasten off.
Trunk
Foundation: With cream, ch 6.
Row 1: Sc in the 2nd ch from the hook and in each ch across. Turn. (5 sc)
Rows 2–8: Ch 1, sc in each sc across. Turn. (5 sc)
Fasten off and leave a 6 in (15.2 cm) tail for sewing. The trunk measures 0.75 in (1.9 cm) wide x 1 in (2.5 cm) tall.
Make All Pieces
Dusty blue:
– Tier A x 1
– Tier B x 1
– Tier C x 1
Cream:
– Trunk x 1
– Hanging loop, worked onto the assembled ornament
Layout (front view):
        [ loop ]
       [ Tier A ]
     [  Tier B  ]
   [   Tier C    ]
       [trunk]
Each tier is centered on the one below it. Each tier’s base line overlaps the tier below by 0.5 in (1.3 cm), measured at the center.
Joining
Method: Whipstitch from the back with dusty blue yarn.
- Lay Tier C right side up. Place Tier B on top of it, centered, with Tier B’s base line 1.25 in (3.2 cm) above Tier C’s base line. Tier C’s apex is now hidden 0.5 in (1.3 cm) behind Tier B.
- Pin Tier A in the same way, centered, with its base line 1 in (2.5 cm) above Tier B’s base line. Tier B’s apex is hidden 0.5 in (1.3 cm) behind Tier A.
Stitch-to-stitch logic: Sew along each upper tier’s base line. Catch one strand of each row end, then one strand of the arch or stitch directly behind it on the lower tier.
- Tier A’s base has 4 row ends on each side of the ring, so make 4 small stitches on each side.
- Tier B’s base has 5 row ends on each side, so make 5 stitches on each side.
Anchor each ring center with one extra stitch so the holes stay open and level.
Tension: Pull each stitch just snug enough to close the gap. The tiers should lie flat, with no puckering behind the fans.
Trunk: Center the trunk behind Tier C so that its top 2 rows, 0.25 in (0.6 cm), sit behind the ring. Whipstitch the top row and the side edges of those 2 rows with the cream tail. That leaves 0.75 in (1.9 cm) of trunk showing.
Size checkpoint: The tree body is 3.5 in (8.9 cm) from Tier C’s base line to Tier A’s top point. The full ornament is 4.25 in (10.8 cm) tall including the trunk.
Hanging loop: Join cream with a sl st in Tier A’s apex ch-2 sp. Ch 24, sl st in the same sp, then fasten off. The finished loop is about 1.5 in (3.8 cm) tall.
Border
The border is the edging row of each tier. Work it as the last row of each tier, before joining, because the lower tiers’ top points end up hidden. Working it on separate tiers also means there are no seams, so no stitches are added or lost at joins.
Border gauge: Work 1 more sc than the chain count in each chain space: 5 sc in a ch-4, 6 sc in a ch-5, and 7 sc in a ch-6.
The “per side” counts below include the inner sc of the bottom Tip and the first 2 sc of the Apex. They don’t include the ch-2 points. Each row also has 1 outer Tip sc at each end, which sits on the base line.
Tier A, Row 4:
Ch 1, Tip in the first sc. 5 sc in next ch-4 sp, sc in next sc, 5 sc in next ch-4 sp. Skip the next sc. (2 sc, ch 2, 2 sc) in the apex sp. Skip the next sc. 5 sc in next ch-4 sp, sc in next sc, 5 sc in next ch-4 sp. Tip in the last sc.
- Per side: 1 + 5 + 1 + 5 + 2 = 14 sc
- Total: 14 x 2 + 2 outer Tip sc = 30 sc, 3 ch-2 sps
Tier B, Row 5:
Ch 1, Tip in the first sc. [6 sc in next ch-5 sp, sc in next sc] 2 times, then 6 sc in next ch-5 sp. Skip the next sc. (2 sc, ch 2, 2 sc) in the apex sp. Skip the next sc. [6 sc in next ch-5 sp, sc in next sc] 2 times, 6 sc in next ch-5 sp. Tip in the last sc.
- Per side: 1 + 7 + 7 + 6 + 2 = 23 sc
- Total: 23 x 2 + 2 = 48 sc, 3 ch-2 sps
Tier C, Row 6:
Ch 1, Tip in the first sc. [7 sc in next ch-6 sp, sc in next sc] 3 times, then 7 sc in next ch-6 sp. Skip the next sc. (2 sc, ch 2, 2 sc) in the apex sp. Skip the next sc. [7 sc in next ch-6 sp, sc in next sc] 3 times, 7 sc in next ch-6 sp. Tip in the last sc.
- Per side: 1 + 8 + 8 + 8 + 7 + 2 = 34 sc
- Total: 34 x 2 + 2 = 70 sc, 3 ch-2 sps
Why the math works:
- A chain space stretches a little once you fill it, so working one more sc than its chain count lets the edge lie flat without cupping.
- Skipping the 2 sc beside each apex keeps the top sharp. Otherwise those stitches would round it off.
- The ch-2 at each Tip and at the apex gives each point a defined corner for blocking.
- Each tier’s total equals its two side counts plus the 2 outer Tip stitches, so nothing is counted twice.
Final Blocking
- Lightly mist the assembled ornament until it is damp but not wet.
- Lay it right side up on the mat.
- Pin the apex ch-2 sp of Tier A straight above the trunk.
- Pin all six bottom Tip ch-2 sps out sideways and slightly downward. Check that the widest points, on Tier C, are 3.75 in (9.5 cm) apart.
- Pin the center of each ring hole along one vertical line.
- Open each corner window with your fingertip and press each fan into an even half circle.
- Spray with starch if you want a crisp ornament.
- Let it dry completely before you unpin it.
Final Quality-Control Checklist
- Edging counts are 30, 48 and 70 sc, and each tier has 3 points.
- All three ring holes are small, open and lined up vertically.
- Each tier has two open corner windows.
- The tiers overlap by 0.5 in (1.3 cm) and no lower apex shows.
- The trunk shows 0.75 in (1.9 cm) below the bottom tier and is centered.
- The body is 3.5 in (8.9 cm) tall and the whole ornament is 4.25 in (10.8 cm) tall.
- The loop is secure and about 1.5 in (3.8 cm) tall.
- All ends are woven in on the back.
Troubleshooting
- Fan cups instead of lying flat: The ring is pulled too tight. Undo Row 1 and leave a 0.125 in (0.3 cm) hole.
- Edging ruffles: Your chains are loose. Make chain spaces tighter, or work 1 fewer sc in each space.
- Edging pulls inward: Work the chain spaces a little looser, or go up a hook size for the arch rows only.
- Apex is rounded: Check that you skipped the sc on each side of the apex sp during the edging.
- Tiers lean: Re-pin with all the ring centers on one line, then re-sew the base lines.
- Trunk is too wide: Go down a hook size for the trunk only. It should be 0.75 in (1.9 cm) wide.
Care
Hand wash in cool water, roll the ornament in a towel, and reshape and pin it flat to dry. Store it flat or hanging, away from heavy items that could crush the points.
Final Notes
The measurements build on each other from start to finish:
- Row 1 fans measure 1 in (2.5 cm) across.
- Tier B and Tier C measure 2.5 in (6.4 cm) before their last arch row and edging.
- The finished tiers are 2.25 in (5.7 cm), 2.75 in (7.0 cm) and 3.75 in (9.5 cm) wide.
- Overlapping the tiers by 0.5 in (1.3 cm) gives a 3.5 in (8.9 cm) tree body.
- The trunk adds 0.75 in (1.9 cm), for a finished ornament 4.25 in (10.8 cm) tall.
If each checkpoint matches, the finished ornament will too.
Happy crocheting!