

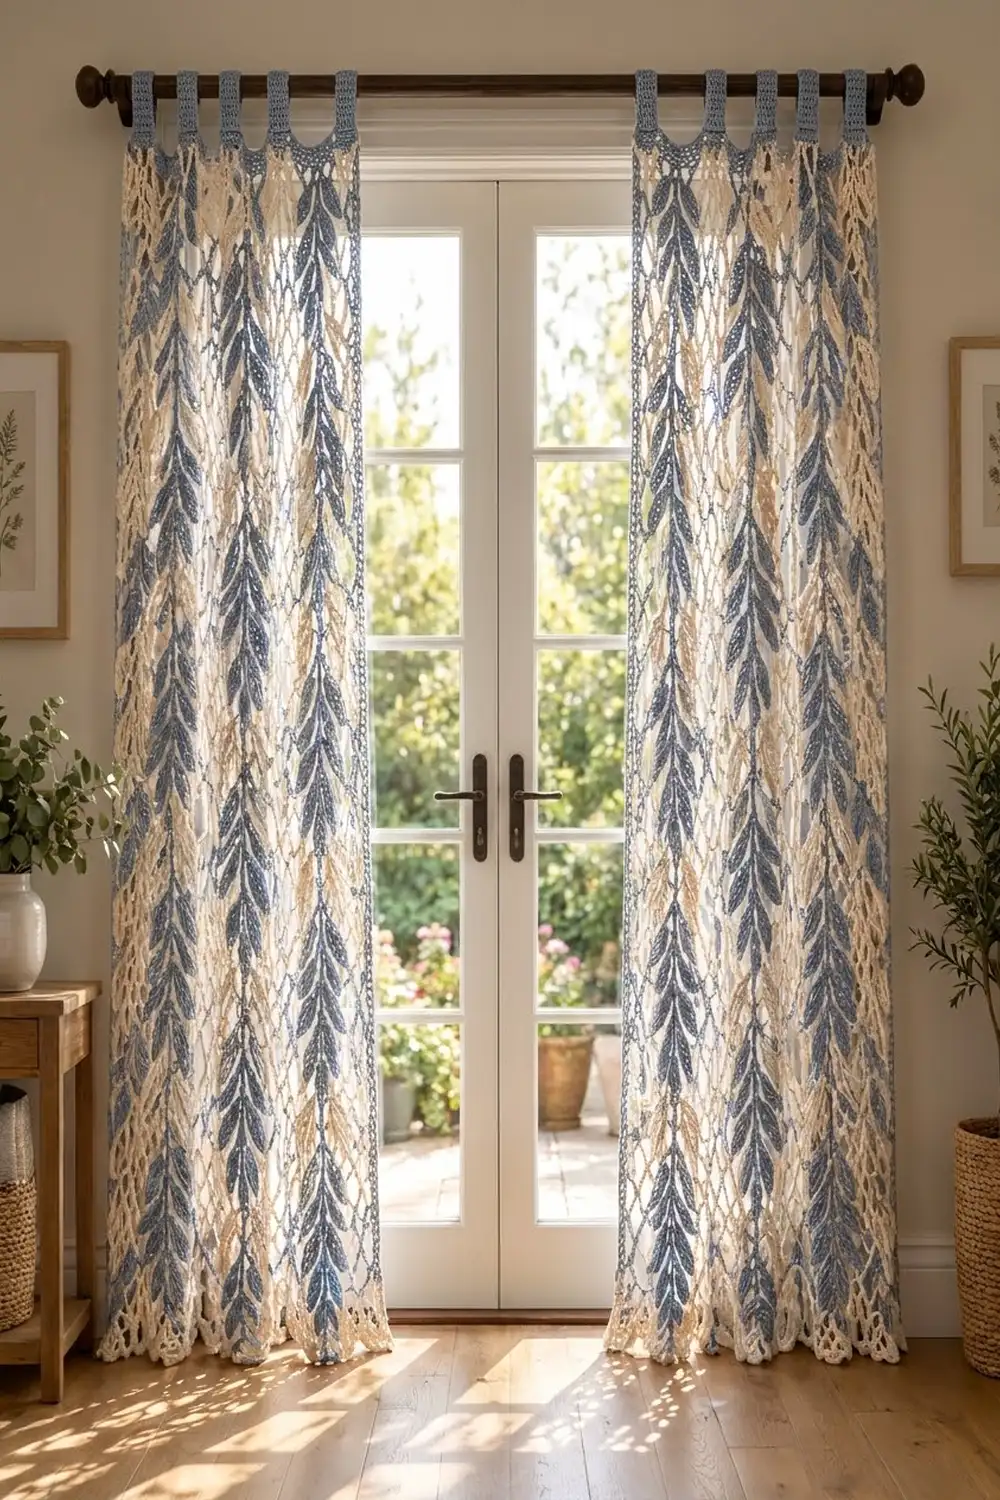
These airy tab-top curtains combine an open cream diamond mesh with long, leafy sprigs that run from header to hem. The blue and cream sprigs alternate across each panel. Light comes through the net while the leaves add texture and a calm cottage look.
The palette is two colors: a soft slate/denim blue and a natural cream. A solid blue header band and five ribbed blue tabs carry the curtain on the rod, and a cream scalloped edge finishes the hem. The pattern uses US crochet terms throughout.
Each finished panel measures 31.75 in (80.6 cm) wide by 77.75 in (197.5 cm) from hem to header top. Measured from the rod to the hem, a hanging panel is about 80.75 in (205.1 cm) long. The pattern makes two panels.
For each panel, you work the mesh body bottom-up in rows, convert it into a solid header, and work the tabs straight up from the header. Next you add the scalloped hem and side edging. Last, you make the leaf sprigs separately and sew them onto the mesh.
Finished Size and Construction
- Finished panel: 31.75 in x 77.75 in (80.6 cm x 197.5 cm), plus 3 in (7.6 cm) tab loops
- Skill level: Intermediate
- Terminology: US
- Yarn weight: DK / light worsted (#3), cotton
- Hook: 4.0 mm (G-6)
- Number of pieces: 2 panels (not joined), plus 10 separate leaf sprigs (5 per panel)
- Layout per panel: 5 vertical sprigs (blue, cream, blue, cream, blue), 6.25 in (15.9 cm) apart
- Mesh body before border: 31.25 in x 75 in (79.4 cm x 190.5 cm)
- Header: 2 in (5.1 cm) deep
- Border depth: side edging 0.25 in (0.6 cm); hem scallops 0.75 in (1.9 cm)
Materials
Choose a smooth, mercerized or combed cotton in DK weight. Cotton holds its shape and makes the leaf veins crisp. Avoid fuzzy or very stretchy yarns, because long mesh panels grow when they hang.
- Color A, slate blue: 450 g / 1035 m (nine 50 g / 115 m balls)
- Color B, cream: 600 g / 1380 m (twelve 50 g / 115 m balls)
These quantities cover both panels and include about a 15% margin for swatching and sewing.
Tools:
– 4.0 mm (G-6) crochet hook
– Tapestry needle
– About 40 locking stitch markers
– Rust-proof pins and blocking space (a floor with towels works)
– Measuring tape
– Spray bottle
Abbreviations (US Terms)
- ch chain
- sl st slip stitch
- sc single crochet
- hdc half double crochet
- dc double crochet
- BLO back loop only
- sp space
- st(s) stitch(es)
- RS right side
- rep repeat
Special technique, surface vein: With the leaf RS facing and the yarn held behind it, insert the hook through the leaf along the center line where the two halves meet. Pull up a loop and draw it through the loop on the hook. Repeat to make a line of slip stitches lying on the surface.
Gauge and Checkpoints
Mesh gauge: 4 ch-5 loops = 5 in (12.7 cm) wide, and 8 rows = 5 in (12.7 cm) tall, measured after blocking. One loop is 1.25 in (3.2 cm) wide and one row is 0.625 in (1.6 cm) tall.
Header gauge: 16 sc x 16 rows = 4 in (10.2 cm).
Chain gauge: 4 ch = 1 in (2.5 cm).
Test first: Before starting a panel, make one swatch and one leaf.
- Mesh swatch: Ch 22 and work Rows 1–8 of the mesh with 5 loops. It should block to 6.25 in x 5 in (15.9 cm x 12.7 cm).
- Test leaf: Make one leaf. It should measure 2.25 in (5.7 cm) long and about 1 in (2.5 cm) wide.
Checkpoints:
– After Row 1: width 31.25 in (79.4 cm)
– After Row 40: 25 in (63.5 cm) long
– After Row 80: 50 in (127 cm) long
– After Row 120: 75 in (190.5 cm) long
– Header: 2 in (5.1 cm) deep
– Tabs: 8 in (20.3 cm) long before folding
If your swatch is too big, go down 0.5 mm. If it is too small, go up 0.5 mm. Keep the stitch counts as written so the sprig spacing still works. Measure the mesh lying flat. Do not let it hang while you measure.
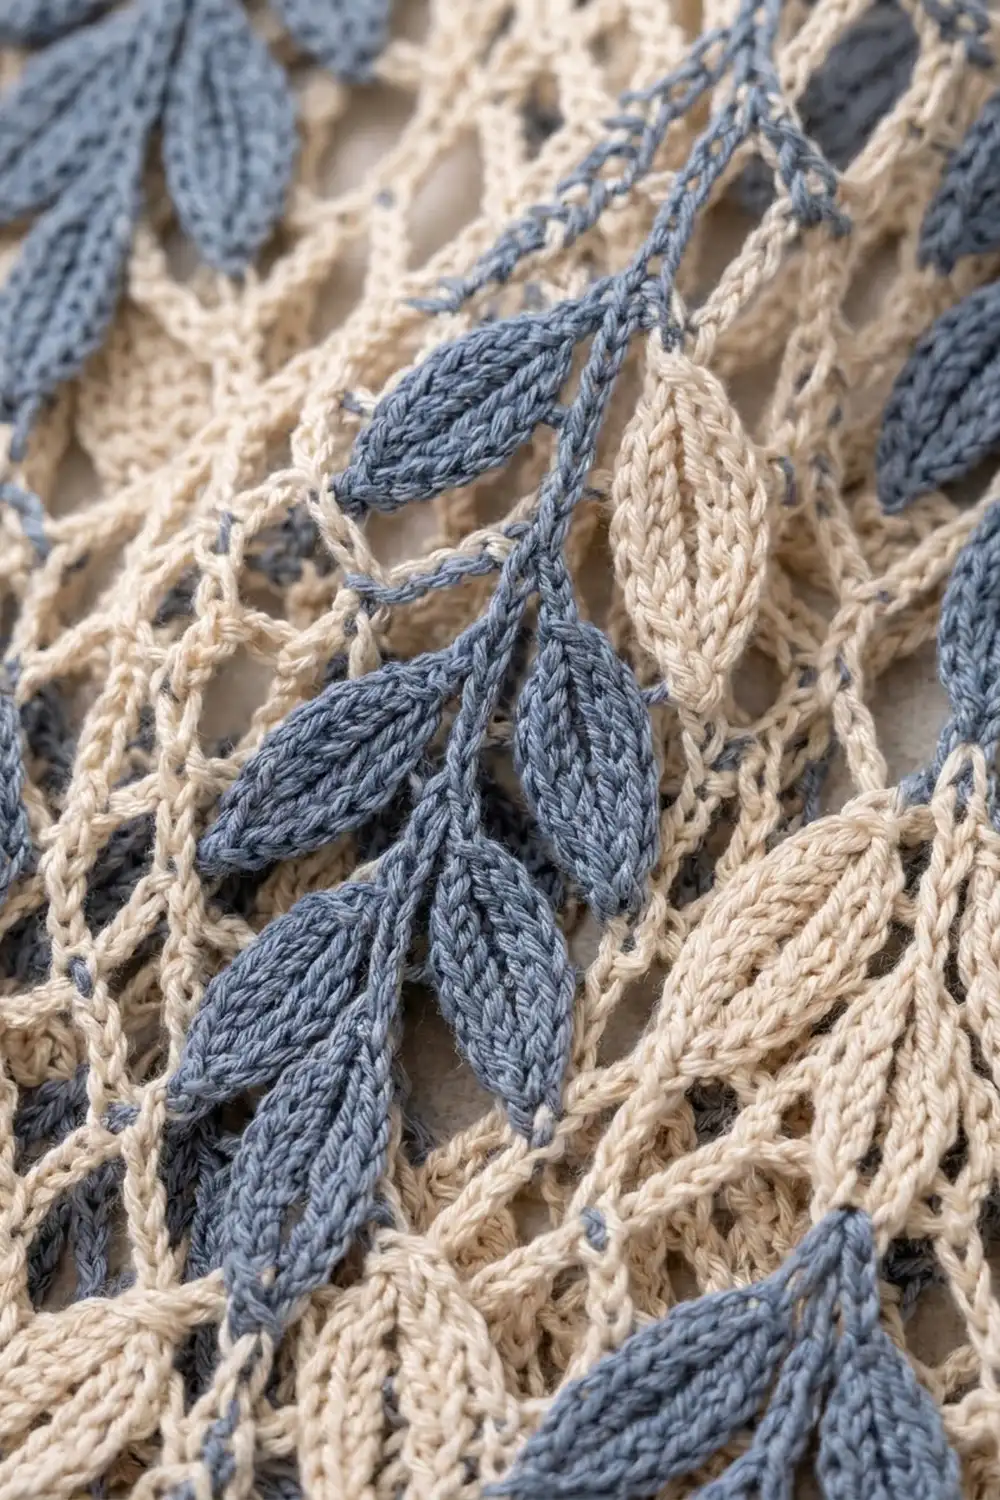
Panel Body (Diamond Mesh)
Use Color B (cream) throughout the body.
Foundation: Ch 102.
Row 1: Sc in 2nd ch from hook. *Ch 5, skip 3 ch, sc in next ch. Rep from * 24 more times. (26 sc, 25 ch-5 loops)
Row 2: Ch 5 and turn (this counts as dc + ch 2). Sc in first ch-5 loop. *Ch 5, sc in next ch-5 loop. Rep from * 23 more times. Ch 2, dc in last sc. (25 sc, 24 ch-5 loops, 2 edge half-loops)
Row 3: Ch 1 and turn. Sc in first dc. *Ch 5, sc in next ch-5 loop. Rep from * 23 more times. Ch 5, sc in 3rd ch of the turning ch. (26 sc, 25 ch-5 loops)
Rows 4–120: Rep Rows 2–3, ending with a Row 2 repeat (Row 120).
Odd rows always have 26 sc and 25 loops. Even rows always have 25 sc, 24 loops and 2 half-loops. Check the length against the checkpoints at Rows 40, 80 and 120. Do not fasten off.
Header
Change to Color A (blue).
Row 1 (conversion row): Ch 1 and turn. Work across Row 120 as follows:
– 1 sc in the dc
– 1 sc in the ch-2 sp
– 1 sc in each sc
– 4 sc in each ch-5 loop
– 1 sc in the last ch-2 sp
– 1 sc in the 3rd ch of the turning ch
That is (27 sts worked one into each existing st: 25 sc + 2 dc) + (98 sts worked into spaces: 96 in the loops + 2 in the half-loops) = 125 sc.
Rows 2–8: Ch 1 and turn. Sc in each st across. (125 sc)
The header should be 2 in (5.1 cm) deep and 31.25 in (79.4 cm) wide, which equals 125 sts at 4 sc per inch. Fasten off.
Tabs (Make 5 per Panel)
With RS facing, count across the top of header Row 8 and place markers:
| Section | Stitches |
|---|---|
| Tab 1 | 1–9 |
| Gap | 10–29 |
| Tab 2 | 30–38 |
| Gap | 39–58 |
| Tab 3 | 59–67 |
| Gap | 68–87 |
| Tab 4 | 88–96 |
| Gap | 97–116 |
| Tab 5 | 117–125 |
Check: 5 tabs x 9 sts + 4 gaps x 20 sts = 125. Tab 3 sits exactly at the center (st 63).
Row 1: Join Color A in the first st of a tab section. Ch 1, sc in the same st and the next 8 sts. (9 sc)
Rows 2–32: Ch 1 and turn. Sc BLO in each st across. (9 sc)
Each tab should be 2.25 in (5.7 cm) wide and 8 in (20.3 cm) long, with a ribbed texture. Fasten off, leaving a 12 in (30.5 cm) tail.
Fold each tab to the back and whipstitch Row 32 to the back of header Row 1, matching all 9 sts. This leaves a 3 in (7.6 cm) loop above the header that fits a rod up to 1.5 in (3.8 cm) across.
Leaf Sprigs
Each sprig is worked top-down in a single color: a chain stem with pairs of leaves at regular intervals.
Leaf:
1. Start: Ch 9.
2. Side 1: Sc in 2nd ch from hook, hdc in next ch, dc in next 4 ch, hdc in next ch, 3 sc in last ch. (10 sts, ending at the base)
3. Side 2: Rotate the leaf. Working in the free loops on the other side of the chain, hdc in next ch, dc in next 4 ch, hdc in next ch, sc in next ch. (7 sts)
4. Tip: (Sc, ch 2, sc) in the skipped tip ch. (Leaf total: 19 sts plus a ch-2 point)
5. Vein: Work 8 surface slip stitches down the center back to the base. Sl st into the last stem ch made.
Sprig:
1. Ch 8 for the stem.
2. Make one leaf (the left leaf), then make a second leaf right away in the same base (the right leaf).
3. Rep Steps 1–2 for a total of 36 stem segments and 36 leaf pairs.
4. After the last pair, make one more leaf as the end tip. Fasten off, leaving a 36 in (91.4 cm) tail for sewing.
Each sprig has 288 stem ch and 73 leaves. The stem measures 72 in (182.9 cm), and the whole sprig measures 74.25 in (188.6 cm) including the end leaf.
Make per panel: 3 sprigs in Color A and 2 sprigs in Color B.
Attaching the Sprigs
Attach the sprigs after the border (below) and a first blocking, so the mesh is at its true size.
- On an odd row, count the ch-5 loops from the right edge and mark the centers of loops 3, 8, 13, 18 and 23. These positions are 6.25 in (15.9 cm) apart, with 2.5 loops of mesh outside each edge sprig.
- Lay the sprigs in this order: blue on loops 3, 13 and 23; cream on loops 8 and 18.
- Tuck the top stem ch just under the lower edge of header Row 1. The end leaf stops about 0.75 in (1.9 cm) above the hem.
- Pin each leaf pair so the leaves angle about 45 degrees down and outward, forming upward-pointing chevrons.
- Using the tail and matching yarn, whipstitch the stem to the mesh at every row. Tack each leaf at its tip and at its widest point.
- Keep the stitches loose enough that the mesh does not pucker.
Make All Pieces
For both panels, make:
- Panels: 2 mesh panels with headers, tabs and border
- Tabs: 10 in Color A (5 per panel)
- Blue sprigs: 6 in Color A (3 per panel)
- Cream sprigs: 4 in Color B (2 per panel)
Layout for one panel, viewed from the RS:
| tab |      | tab |      | tab |      | tab |      | tab |
[================ blue header 125 sc ===================]
 ..BLUE.......CREAM.......BLUE.......CREAM.......BLUE..
 ..loop3......loop8......loop13.....loop18......loop23.
 ~~~~~~~~~~~~~~~ 25 cream scallops ~~~~~~~~~~~~~~~~~~~~
Both panels are identical. Hang them as a mirrored pair, so the outer blue sprigs frame the window or door.
The panels are not joined to each other, so there is no joining step. Each panel hangs on its own tabs.
Border
Border gauge: 4 sc = 1 in (2.5 cm). Five dc worked into one chain spread to 1.25 in (3.2 cm), which is the same width as one mesh loop.
Hem Scallop Row: With RS facing, turn the panel upside down to work along the foundation chain. Join Color B at the base of the first Row 1 sc.
1. Ch 1, sc in the same ch.
2. *Skip 1 ch, 5 dc in the next ch (the center of the 3-ch group), skip 1 ch, sc in the base ch of the next sc.
3. Rep from * 24 more times.
You will have 25 scallops: 26 sc + 125 dc = 151 sts. The scallops are 0.75 in (1.9 cm) deep and span 31.25 in (79.4 cm), one per mesh loop. Fasten off.
Side Edging, first side: With RS facing, join Color B at the end of the scallop row’s first sc. Ch 1 and work up the side as follows:
– 2 sc in the end of each odd row (the sc ends)
– 3 sc around the end of each even row (the dc or turning-ch ends)
That gives 60 x 2 + 60 x 3 = 300 sc over the body. Change to Color A and work 1 sc in the end of each header row. (8 sc)
Total for the side: 308 sc. Fasten off.
Side Edging, second side: Work the same counts from the top down. Start with Color A: 8 sc along the header. Change to Color B and work 300 sc down to the hem, alternating 3 sc around the even-row ends and 2 sc in the odd-row ends. (308 sc)
Why the math works: The mesh is 1.6 rows per inch, so each 2-row pair is 1.25 in tall and gets 5 sc. That matches the 4 sc per inch gauge exactly. Across the full side: 308 sc ÷ 4 = 77 in (195.6 cm), which equals the 75 in (190.5 cm) body plus the 2 in (5.1 cm) header. There are no corner stitches, because the hem and the sides are worked as separate rows. Each side edging adds 0.25 in (0.6 cm), so the finished width is 31.75 in (80.6 cm).
Final Blocking
- Soak the panel in cool water for 15 minutes. Press out the water in towels; do not wring.
- Lay the panel flat, mesh only (before attaching sprigs). Pin the width to 31.25 in (79.4 cm) and the body to 75 in (190.5 cm). Open the diamonds evenly.
- Pin out each scallop and straighten the side edges. Let it dry completely.
- Attach the sprigs as described above.
- Mist the finished panel and pin the leaves flat at their 45 degree angle. Pin each leaf tip to sharpen the points.
- Once dry, hang the panel for 24 hours, then recheck the length. Cotton mesh can drop about 0.5 in (1.3 cm).
Final Quality-Control Checklist
- [ ] Odd rows have 26 sc and 25 loops; even rows have 25 sc and 24 loops plus 2 half-loops
- [ ] Header has 125 sc on every row and is 2 in (5.1 cm) deep
- [ ] 5 tabs of 9 sts each, separated by 20-st gaps, with the center tab exactly in the middle
- [ ] All tabs are the same length and sewn down evenly
- [ ] 25 hem scallops (151 sts)
- [ ] Both side edgings have 308 sc
- [ ] Each sprig has 36 leaf pairs plus an end leaf, and every leaf has a vein
- [ ] Sprigs are straight, 6.25 in (15.9 cm) apart, in the order blue–cream–blue–cream–blue
- [ ] Both panels match in length within 0.5 in (1.3 cm)
Troubleshooting
- Mesh slants or narrows: You probably missed the last sc in the turning ch on an odd row. Count 26 sc on every odd row.
- Header ruffles: You likely worked 5 sc into some loops. Count again for 4 sc per loop and 125 sc total.
- Header pulls the mesh in: Go up 0.5 mm for the header only.
- Leaves curl: Make sure the 3 sc at the base are not worked too tightly, and pin the leaves while blocking.
- Sprig is shorter than the panel: Your chain is tighter than gauge. Add stem segments, or go up a hook size for the stem chains.
- Mesh puckers behind the sprigs: The tacking stitches are too tight. Loosen them, then mist and block again.
- Panels hang at different lengths: Block both panels together to the same pinned measurements.
Care
Hand wash in cool water with mild soap and dry the panels flat, pinned to size. Do not tumble dry, and only steam lightly if needed.
Final Notes
The measurements build on each other: 25 loops at 1.25 in give a 31.25 in (79.4 cm) body. 120 rows at 0.625 in give a 75 in (190.5 cm) length. The 2 in (5.1 cm) header and 0.25 in (0.6 cm) side edging bring the panel to 31.75 in x 77.75 in (80.6 cm x 197.5 cm). The 3 in (7.6 cm) tab loops then give a hanging length of 80.75 in (205.1 cm). If your swatch matches gauge, each stage will match its checkpoint.
Happy crocheting!