

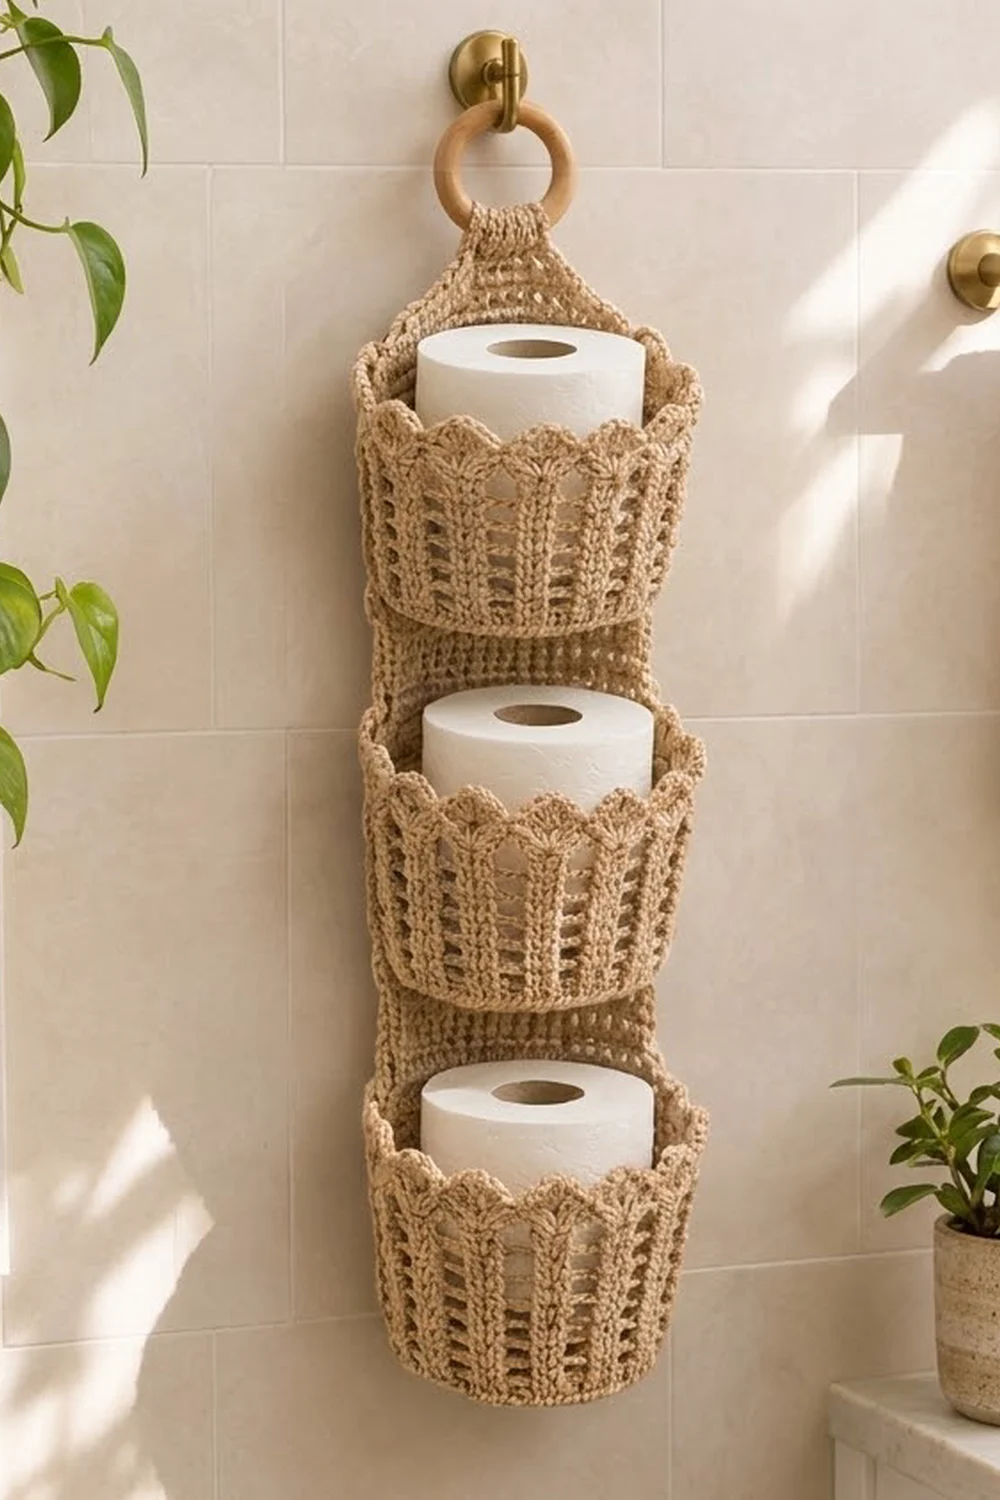
This hanging toilet paper holder stores three spare rolls on one tall panel. Three round baskets are stacked on a tapered back strip, and the strip hangs from a natural wooden ring. Each basket has open, ribbed walls and a scalloped shell rim, so the rolls show through the gaps.
It is worked in a single natural beige cotton that looks like jute. The color suits a spa-style bathroom with neutral towels, pale tile and trailing plants. The texture comes from front-post ribs and open gaps, so it looks like woven basketry but stays soft.
All instructions use US crochet terms. The holder measures about 5.1 in (13.0 cm) wide across the panel and about 21 in (53.3 cm) long when hung, measured to the top of the ring. Each basket is about 5.5 in (14.0 cm) across and 4 in (10.2 cm) tall.
You will crochet one back panel from the bottom up and add a two-round edging. Then you will crochet three identical baskets in joined rounds, sew them to the panel stitch-to-stitch, and wrap the panel’s tab around a wooden ring.
Finished Size and Construction
- Finished size: 5.1 in (13.0 cm) wide × 21 in (53.3 cm) hung length, including the ring
- Skill level: Intermediate
- Terminology: US crochet terms
- Yarn weight: Worsted (#4) cotton
- Hook: 5.0 mm (H-8)
- Number of pieces: 4 crocheted pieces (1 panel, 3 baskets) plus 1 wooden ring
- Layout: 3 baskets stacked vertically on one panel, 1 in (2.5 cm) apart
- Basket size: 5.5 in (14.0 cm) diameter × 4 in (10.2 cm) tall
- Panel size before border: 4.6 in (11.7 cm) × 20 in (50.8 cm)
- Border depth: 0.25 in (0.6 cm) per edge
Materials
Yarn: Use a firm worsted-weight cotton or a cotton/linen blend. Avoid soft acrylic, because the baskets need to hold their shape. A tightly plied, matte yarn gives the jute look shown.
- Natural Beige: 250 g, about 425 m (465 yd), based on a yarn of about 170 m per 100 g
The amount includes a margin of about 20%, so you can make a gauge swatch and won’t run short.
Tools:
– 5.0 mm (H-8) crochet hook
– Wooden ring, 2.5 in (6.4 cm) outer diameter
– Tapestry needle
– 6–8 locking stitch markers
– Scissors
– Measuring tape
– Rust-proof pins and a blocking mat
– One standard toilet roll, for test fitting
Abbreviations (US Terms)
- ch – chain
- sl st – slip stitch
- sc – single crochet
- dc – double crochet
- BLsc – back-loop-only single crochet
- dc2tog – double crochet two together
- sk – skip
- sp – space
- st(s) – stitch(es)
- RS – right side
- FPdc (front post double crochet) – Yarn over and insert the hook from front to back to front around the post of the stitch below. Yarn over, pull up a loop, and finish as a standard dc. This stitch raises the center of each rib.
- Shell – 7 dc worked in the same stitch.
Gauge and Checkpoints
Gauge: 14 sts × 8 rows = 4 in (10.2 cm) in dc rows with a 5.0 mm hook.
Make one basket before you start the panel. A basket tests your gauge, your tension on the post stitches, and the fit around a real roll.
Checkpoints:
– After basket Rnd 5, the flat base is about 5.5 in (14.0 cm) across.
– After Rnd 12, the wall is 3 in (7.6 cm) tall, measured from the ridge.
– After Rnd 14, the wall is 4 in (10.2 cm) tall to the shell tips.
– After panel Row 10, the panel is 4.6 in (11.7 cm) wide and 5 in (12.7 cm) long.
– After panel Row 30, the panel is 15 in (38.1 cm) long.
If your piece is too big: Change to a hook 0.5 mm smaller. A basket that is too wide will let the roll tilt.
If your piece is too small: Change to a hook 0.5 mm larger. A roll should slide in easily with about 0.5 in (1.3 cm) of ease.
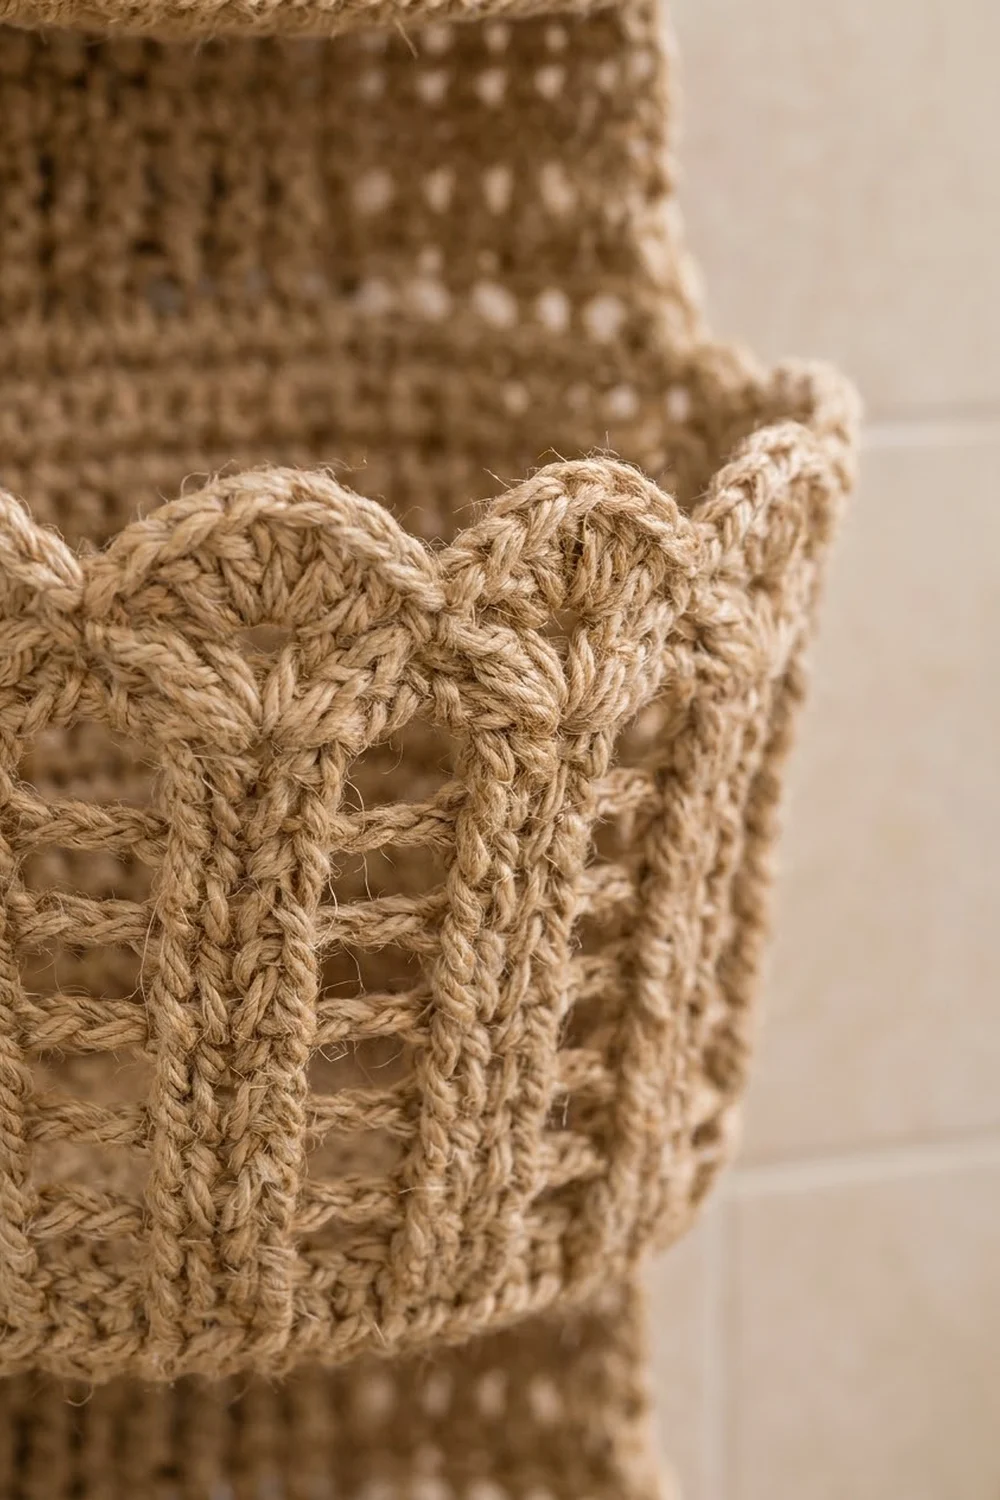
Basket (Make 3)
Each basket is worked in joined rounds with the RS facing. Do not turn.
Base
Rnd 1: Make a magic ring. Ch 3 (counts as dc), then work 11 dc in the ring. Join with a sl st to the top of the ch-3. (12 sts)
Rnd 2: Ch 3 (counts as dc), then dc in the same st. Work 2 dc in each st around. Join. (24 sts)
Rnd 3: Ch 3, then dc in the same st and dc in the next st. 2 dc in the next st, dc in the next st; repeat from * around. Join. (36 sts)
Rnd 4: Ch 3, then dc in the same st and dc in the next 2 sts. 2 dc in the next st, dc in the next 2 sts; repeat from * around. Join. (48 sts)
Rnd 5: Ch 3, then dc in the same st and dc in the next 3 sts. 2 dc in the next st, dc in the next 3 sts; repeat from * around. Join. (60 sts)
Checkpoint: The base should lie flat and measure about 5.5 in (14.0 cm) across. Its circumference is about 17.1 in (43.4 cm).
Walls
Rnd 6 (turning ridge): Ch 1, then BLsc in each st around. Join to the first sc. (60 sts) The unused front loops make a ridge on the outside, and the wall starts to turn upward.
Rnd 7: Ch 1, then sc in each st around. Join. (60 sts)
Rnd 8 (rib set-up): Ch 3 (counts as dc), then dc in the next 2 sts. Ch 2 and sk 2 sts. Dc in the next 3 sts, ch 2, sk 2 sts; repeat from * 10 more times. Join to the top of the ch-3. (36 dc + 12 ch-2 sps = 60 sts)
Rnds 9–12 (ribs): Ch 3 (counts as dc). FPdc around the next dc, then dc in the next dc. Ch 2 and sk the ch-2 sp. Dc in the next dc, FPdc around the next dc, dc in the next dc, ch 2, sk the ch-2 sp; repeat from * 10 more times. Join. (36 sts + 12 ch-2 sps each round)
These rounds stack the groups of 3 into 12 vertical ribs with a raised center. The ch-2 gaps form the open columns between them.
Checkpoint: The wall is 3 in (7.6 cm) tall above the ridge.
Rnd 13 (sc band): Ch 1. Sc in each of the 3 sts of each group and 2 sc in each ch-2 sp. Join. 36 sc in sts + 24 sc in spaces = 60 sts. This band closes the gaps and gives the scallops a firm base.
Rnd 14 (scallops): Ch 1, then sc in the first st. Sk 2 sts and work a Shell in the next st. Sk 2 sts. Sc in the next st, sk 2 sts, Shell in the next st, sk 2 sts; repeat from * 8 more times. Join to the first sc. (10 shells + 10 sc)
The pattern repeat is 6 sts (sc, sk 2, Shell, sk 2), and 60 ÷ 6 = 10 scallops exactly. Fasten off, leaving a 24 in (61.0 cm) tail for sewing.
Checkpoint: The wall is 4 in (10.2 cm) tall to the shell tips. A standard roll, about 4.25 in (10.8 cm) tall, should stand slightly above the rim.
Back Panel
The panel is worked in turned rows from the bottom up. In this section, ch 2 at the start of a row does not count as a stitch.
Foundation: Ch 18.
Row 1: Dc in the 3rd ch from the hook and in each ch across. Turn. (16 sts)
Rows 2–30: Ch 2, then dc in each st across. Turn. (16 sts each row)
Checkpoint: The panel is 4.6 in (11.7 cm) wide and 15 in (38.1 cm) long.
Taper
Row 31: Ch 2, then dc2tog over the first 2 sts. Dc across to the last 2 sts, then dc2tog. Turn. (14 sts)
Row 32: Repeat Row 31. (12 sts)
Row 33: Repeat Row 31. (10 sts)
Row 34: Repeat Row 31. (8 sts)
Row 35: Repeat Row 31. (6 sts)
Row 36: Repeat Row 31. (4 sts)
Checkpoint: The taper adds 3 in (7.6 cm). The panel now measures 18 in (45.7 cm).
Hanging Tab
Rows 37–40: Ch 2, then dc in each st across. Turn. (4 sts each row)
Checkpoint: The panel measures 20 in (50.8 cm). Do not fasten off; continue straight into the border.
Make All Pieces
You need these pieces, all in Natural Beige:
- Back panel: 1, worked in Natural Beige
- Baskets: 3, worked in Natural Beige
- Wooden ring: 1
Layout on the 30 straight rows of the panel, read from top to bottom:
[ Tab Rows 37-40 -> around ring ]
[ Taper Rows 31-36              ]
[ Row 30      top margin        ]
[ Rows 22-29  BASKET 3 (top)    ]
[ Rows 20-21  gap 1 in          ]
[ Rows 12-19  BASKET 2 (middle) ]
[ Rows 10-11  gap 1 in          ]
[ Rows 2-9    BASKET 1 (bottom) ]
[ Row 1       bottom margin     ]
The rows add up as follows: 1 + 8 + 2 + 8 + 2 + 8 + 1 = 30 rows = 15 in (38.1 cm).
Joining
Method: Whipstitch with the yarn tail, working through both loops.
Stitch-to-stitch logic: Pick the 16 back stitches of basket Rnd 7 and mark both ends. Match those 16 sts one-to-one with the 16 dc of the panel row given below. Then repeat the same 16-to-16 match with the 16 back stitches of Rnd 13.
- Basket 1: Sew Rnd 7 to the top of Row 2 and Rnd 13 to the top of Row 8.
- Basket 2: Sew Rnd 7 to the top of Row 12 and Rnd 13 to the top of Row 18.
- Basket 3: Sew Rnd 7 to the top of Row 22 and Rnd 13 to the top of Row 28.
Then tack the back ribs of each basket to the panel, with one stitch at each rib. The remaining 44 sts of each basket curve forward to form the cup.
Tension: Pull each stitch snug, but don’t pucker the panel. The panel should stay flat between the baskets. A fully pulled seam shortens the panel and pushes the baskets together.
Size checkpoint: The gaps between baskets measure 1 in (2.5 cm). The bottom basket sits 0.5 in (1.3 cm) above the panel edge.
Ring: After the border is done, fold the tab over the wooden ring toward the back. Sew Row 40 to the back of Row 35. The ring should turn freely.
Border
Work the border after Row 40, before you attach the ring or the baskets.
Border gauge: On row ends, 2 sc fit along each dc row, which is 0.5 in (1.3 cm). On stitch tops, work 1 sc per st.
Rnd 1: Ch 1, then work sc evenly around the whole panel. Put 3 sc in each tab corner at the start and end. Count each side as follows:
- Tab top: 2 sc in the first st, sc in the next 2 sts, 2 sc in the last st. (6 sc)
- Tab side (Rows 40–37): 2 sc per row end. (8 sc)
- Taper side (Rows 36–31): 2 sc per row end. (12 sc)
- Long side (Rows 30–1): 2 sc per row end. (60 sc)
- Bottom (foundation chain): 2 sc in the first ch, sc in the next 14 ch, 2 sc in the last ch. (18 sc, including corners)
- Work the second long side, taper side and tab side the same way: 60 + 12 + 8 sc
Join to the first sc. Total: 6 + 8 + 12 + 60 + 18 + 60 + 12 + 8 = 184 sts
Count the tab top 6 and the bottom 18 once each. Both counts already include their corner stitches, so do not add extra corner stitches.
Rnd 2: Sl st loosely in each st around. Join and fasten off. (184 sts)
Why the math works: The bottom has 16 sts of fabric plus 1 extra sc at each corner, which lets the corner turn flat. Two sc per row end matches a 0.5 in (1.3 cm) dc row without stretching or ruffling the edge. The two rounds together add 0.25 in (0.6 cm) on every edge. The panel becomes 5.1 in (13.0 cm) wide and 20.5 in (52.1 cm) long.
Final Blocking
- Before you add the baskets, wet the panel and roll it in a towel to squeeze out the water.
- Pin the panel to 5.1 in × 20.5 in (13.0 cm × 52.1 cm) and let it dry.
- Dampen each basket and pull it over a roll or a jar 5 in (12.7 cm) wide.
- Open each shell with your fingers until the scallops are even.
- Let everything dry completely, then sew the pieces together.
Final Quality-Control Checklist
- Each basket has 12 ribs, 12 gaps and 10 scallops.
- The 3 baskets match in height, at 4 in (10.2 cm).
- Each basket’s 16-st seams are centered on the panel.
- The gaps between baskets are 1 in (2.5 cm).
- The border lies flat at 184 sts.
- The ring is firmly enclosed and turns freely.
- Each basket holds a roll without tipping.
- All tails are woven in through 2 in (5.1 cm) of stitches.
Troubleshooting
- The base cups before Rnd 6: Use a hook 0.5 mm larger for Rnds 1–5.
- The ribs lean or spiral: Make sure the ch-3 starts each round at the join point.
- The scallops are crowded: Recount Rnd 13. Each round needs exactly 60 sts.
- A basket sags forward: Add rib tacks at Rnds 9 and 11.
- The panel edge waves: Work fewer border stitches, about 3 sc for every 2 row ends on the long sides, and use a smaller hook.
- The panel stretches when loaded: Use a firmer cotton, or line the back with felt.
Care
Hand wash in cool water, reshape, and dry flat. Don’t put it in the tumble dryer, because heat can shrink cotton unevenly.
Final Notes
Here is the measurement chain from start to finish:
- 14 sts × 8 rows = 4 in (10.2 cm)
- 60-st baskets, 5.5 in (14.0 cm) across and 4 in (10.2 cm) tall
- A 16-st panel, 4.6 in (11.7 cm) wide
- 30 straight rows, 15 in (38.1 cm) long
- A 184-st border, for a finished panel of 5.1 in × 20.5 in (13.0 cm × 52.1 cm)
- A hung length of 21 in (53.3 cm) to the top of the ring
Check each stage as you go, and the finished holder will hang straight with all three rolls in place.
Happy crocheting!