

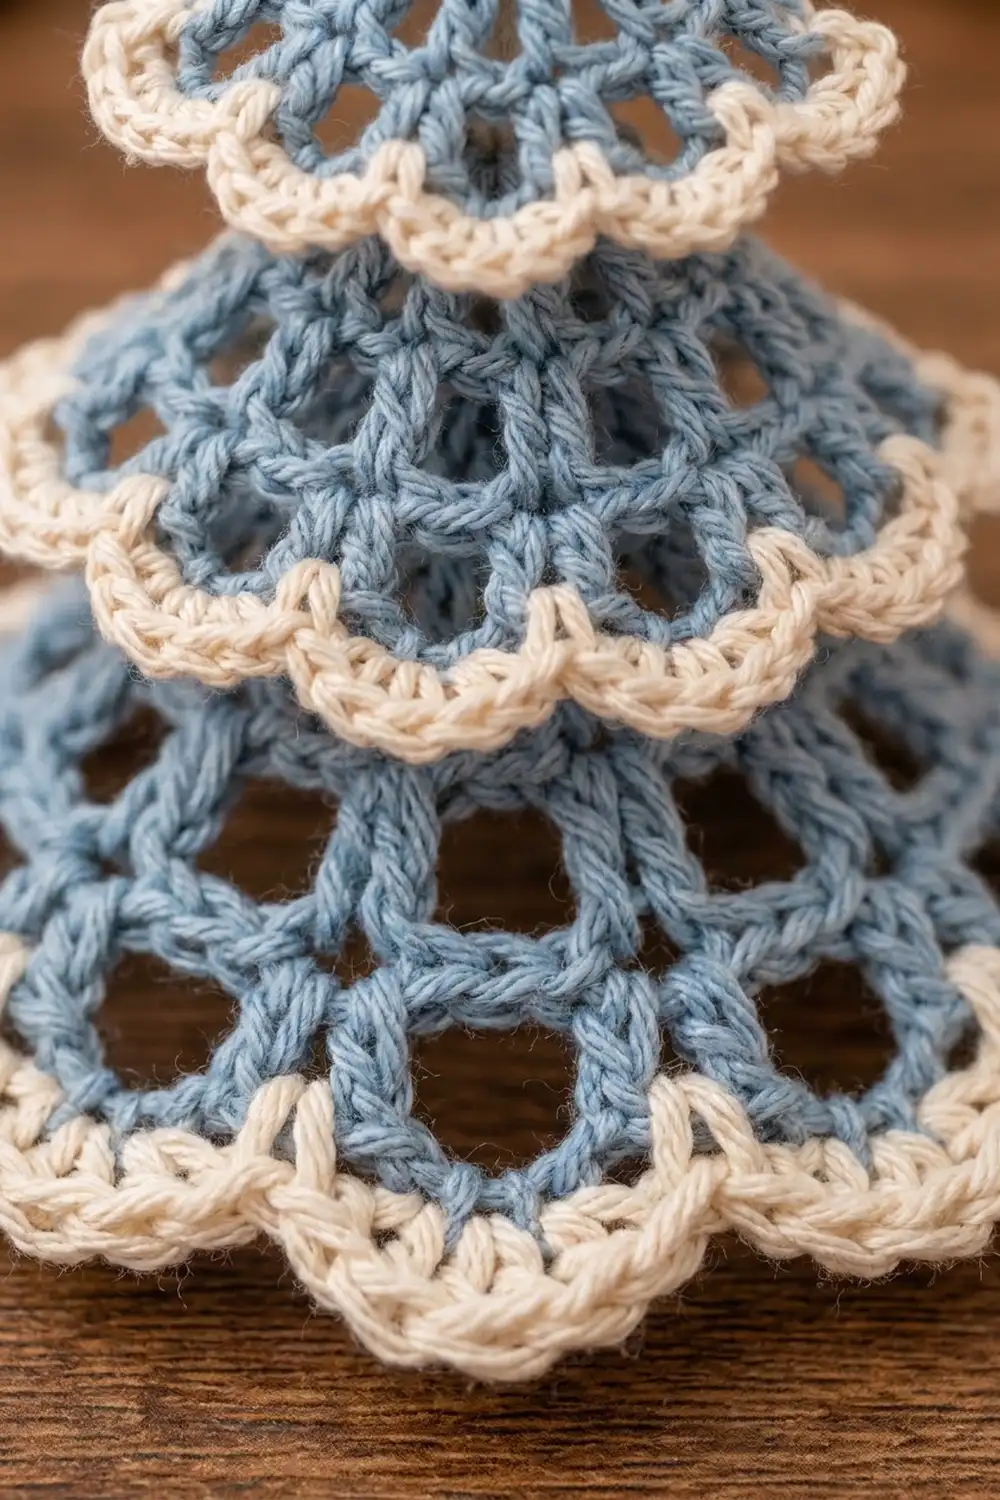
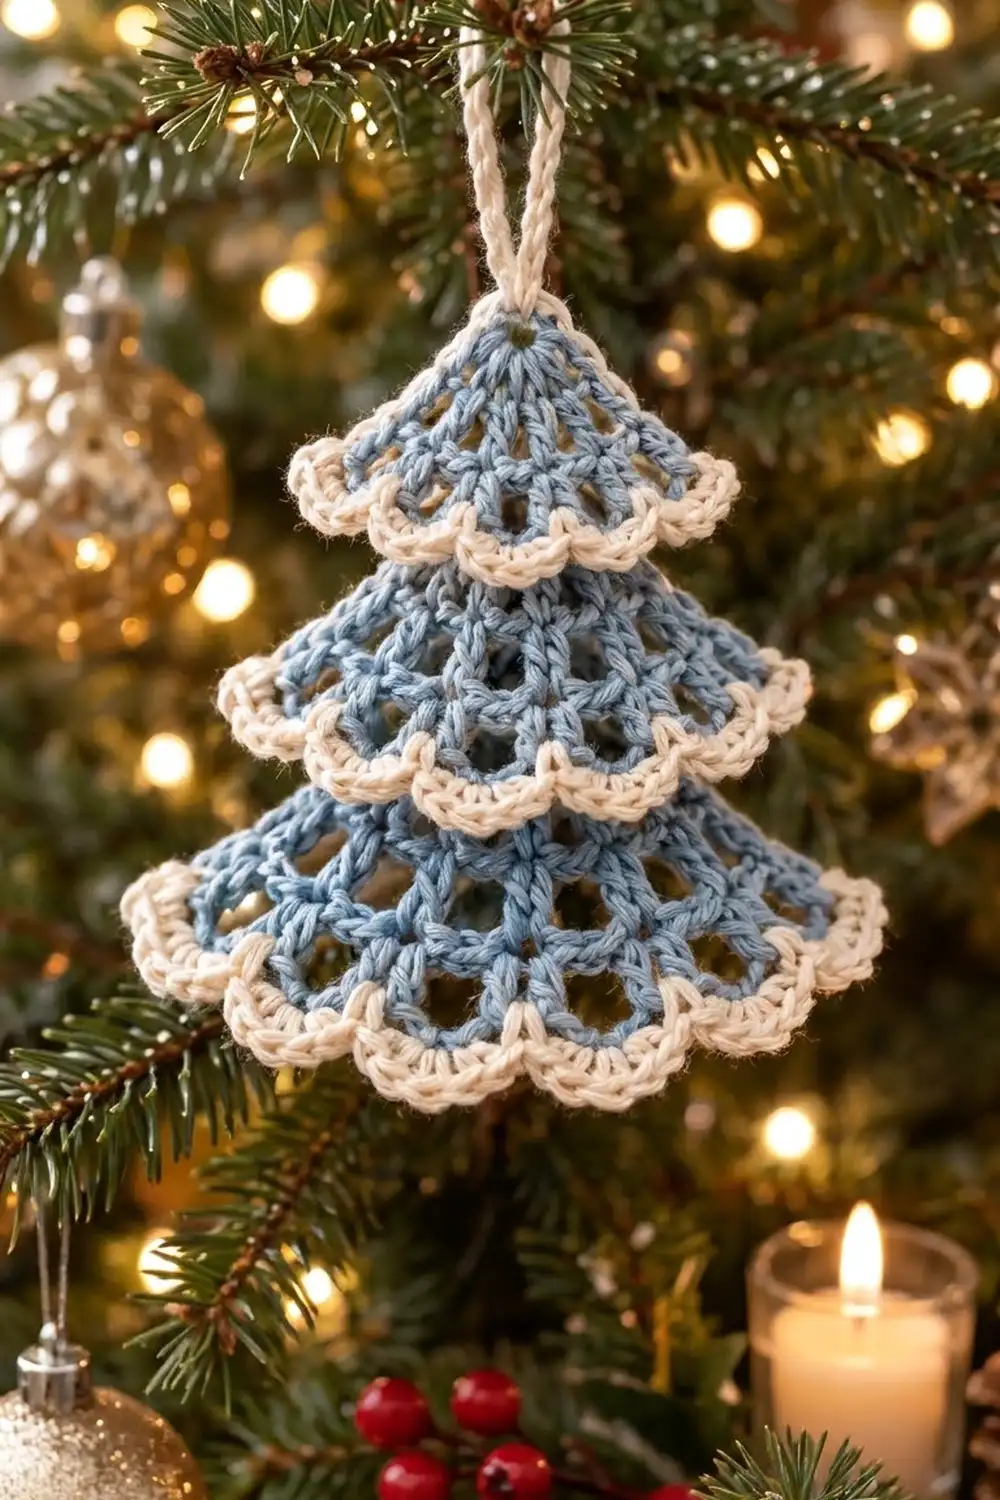
This lacy little tree is made from three fan-shaped wedges in soft powder blue, stacked from small to large. Each wedge opens out from a tiny hole at the top into a light mesh of double-crochet spokes. A cream scalloped edge along the curved bottom of each tier gives it a frosted look.
The finished ornament measures about 4.6 in (11.7 cm) wide and 5.1 in (13.0 cm) tall, not counting the hanging loop. The look is calm and Scandinavian-inspired, so it suits a natural, white, or silver tree. It is light enough for thin branches.
The pattern uses US crochet terms throughout.
Construction is simple. You work each tier flat in rows from a small ring, with the spokes fanning out as you go. Then you add two rows of cream edging along the curved edge only. The three tiers are overlapped and tacked together down the centre, and a cream slip-stitch cord makes the loop.
Finished Size and Construction
- Finished size: 4.6 in (11.7 cm) wide x 5.1 in (13.0 cm) tall, without the loop
- Skill level: Easy+ (you need to be comfortable with chain spaces and turning chains)
- Terminology: US
- Yarn weight: DK / light (3), cotton or cotton blend
- Hook: 3.5 mm (E-4)
- Number of pieces: 4 (3 tiers + 1 hanging cord)
- Layout: 3 tiers in a vertical stack, smallest on top
- Piece sizes (with edging), side length / tip-to-tip width:
- Small: 1.9 in (4.8 cm) / 3.0 in (7.6 cm)
- Medium: 2.3 in (5.8 cm) / 3.8 in (9.7 cm)
- Large: 2.7 in (6.9 cm) / 4.6 in (11.7 cm)
- Side length before edging: small 1.4 in (3.6 cm), medium 1.8 in (4.6 cm), large 2.2 in (5.6 cm)
- Border depth: 0.5 in (1.3 cm)
Materials
Choose a smooth mercerized or matte DK cotton. Cotton keeps the mesh crisp and the scallops well defined. Avoid fuzzy or very stretchy acrylics, which blur the openwork.
- Color A, powder blue: 10 g, about 24 m
- Color B, cream: 6 g, about 14 m
These quantities make one ornament and include a margin for gauge swatching and weaving in ends. They assume a yarn of about 120 m per 50 g.
Tools:
– 3.5 mm (E-4) crochet hook
– Tapestry needle
– 2 stitch markers
– Scissors
– Ruler or tape measure
– Blocking mat and rust-proof pins
– Spray bottle; spray starch (optional)
Abbreviations (US Terms)
- ch – chain
- sl st – slip stitch
- sc – single crochet
- dc – double crochet
- sp(s) – space(s)
- tch – turning chain
- st(s) – stitch(es)
- RS – right side
Special stitch: standing sc. Start with a slip knot on the hook. Insert the hook in the stitch, yarn over and pull up a loop, then yarn over and draw through both loops. This joins the new color without a separate sl st.
Scallop: 5 dc worked into the same sc.
Gauge and Checkpoints
Gauge: 12 sc = 2 in (5.1 cm). One dc row is about 0.4 in (1.0 cm) tall.
Make the small tier first and use it as your test piece, because every size is built from the same rows. Measure the side length straight along a plain blue edge, from the top of the ring to the end of the last row.
- After Row 1: 0.6 in (1.5 cm)
- After Row 2: 1.0 in (2.5 cm)
- After Row 3: 1.4 in (3.6 cm), which is the small tier before edging
- After Row 4: 1.8 in (4.6 cm), which is the medium tier before edging
- After Row 5: 2.2 in (5.6 cm), which is the large tier before edging
- Edging adds 0.5 in (1.3 cm) to each tier
If your tier is too big by more than 0.1 in (0.3 cm), go down to a 3.25 mm hook or pull the chain spaces a little firmer. If it is too small, go up to a 3.75 mm hook. Small differences are fine, as long as all three tiers are made with the same hook and tension.
Tier Pattern
All three tiers follow the same rows. The small tier stops after Row 3, the medium after Row 4, and the large after Row 5. The turning chain counts as a stitch in every row.
Row 1 (Color A)
Ch 4, sl st in first ch to form a ring.
Ch 3 (counts as dc), (ch 1, dc in ring) 3 times. Turn.
Count: 4 dc, 3 ch-1 sps. Only part of the ring is filled, which leaves the small open hole at the top point of the tier.
Row 2
Ch 4 (counts as dc + ch 1), [dc in next ch-1 sp, ch 1, dc in next dc, ch 1] 2 times, dc in next ch-1 sp, ch 1, dc in top of beginning ch-3. Turn.
Count: 7 dc, 6 ch-1 sps. This is a growth row: every stitch and space from Row 1 now has a spoke.
Row 3
Ch 5 (counts as dc + ch 2), [dc in next dc, ch 2] 5 times, skipping the ch-1 sps, dc in 3rd ch of tch. Turn.
Count: 7 dc, 6 ch-2 sps. The spokes stay the same, but the spaces open up. This creates the long open windows near the point.
Small tier: stop here. Fasten off Color A and go to Edging.
Row 4 (medium and large only)
Ch 4 (counts as dc + ch 1), [dc in next ch-2 sp, ch 1, dc in next dc, ch 1] 5 times, dc in next ch-2 sp, ch 1, dc in 3rd ch of tch. Turn.
Count: 13 dc, 12 ch-1 sps. This growth row splits each window with a new spoke, which forms the diamond mesh.
Medium tier: stop here. Fasten off Color A and go to Edging.
Row 5 (large only)
Ch 4 (counts as dc + ch 1), [dc in next dc, ch 1] 11 times, skipping the ch-1 sps, dc in 3rd ch of tch. Turn.
Count: 13 dc, 12 ch-1 sps. Fasten off Color A.
Make All Pieces
For one ornament you need:
- 1 small tier: Rows 1–3 in Color A, edging in Color B
- 1 medium tier: Rows 1–4 in Color A, edging in Color B
- 1 large tier: Rows 1–5 in Color A, edging in Color B
- 1 hanging cord: Color B
Layout, with the top of the ornament at the top:
        (  loop  )
          SMALL
         MEDIUM
          LARGE
Each tier sits with its ring pointing up and its scalloped curve pointing down. Each upper tier overlaps the one below it.
Border: Scalloped Edging
The border goes on the curved bottom edge of each tier only. The two straight sides stay plain blue.
Border gauge: 6 sc per 1 in (2.5 cm) along the curve, the same as the main gauge.
Edging Row 1: Single crochet base (Color B)
With the last row of the tier just finished, turn it so that you work back along the curve. Join Color B with a standing sc in the first st (the last dc you made).
Small tier (on 7 dc, 6 ch-2 sps):
Sc in the same st as the join (2 sc in the first st). Then work [2 sc in next ch-2 sp, sc in next dc] 5 times, 2 sc in last ch-2 sp, and 2 sc in last st.
Count: 21 sc (2 + 15 + 2 + 2). The extra sc at each end keeps the edge from pulling in at the corners.
Medium tier (on 13 dc, 12 ch-1 sps):
After the standing sc, work [sc in next ch-1 sp, sc in next dc, sc in next ch-1 sp, sc in next dc, 2 sc in next ch-1 sp, sc in next dc] 4 times.
Count: 29 sc (1 + 4 x 7). This is 25 sc worked one per existing stitch and space, plus 4 extra sc spread evenly across the edge.
Large tier (on 13 dc, 12 ch-1 sps):
After the standing sc, work [2 sc in next ch-1 sp, sc in next dc] 12 times.
Count: 37 sc (1 + 12 x 3). This is 25 sc worked one per existing stitch and space, plus 12 extra sc (one in each space).
Turn.
Edging Row 2: Scallops
Ch 1, sc in first sc, skip 1 sc, 5 dc in next sc, skip 1 sc, sc in next sc. Repeat from * to the end.
- Small: repeat 5 times = 5 scallops (6 sc, 25 dc)
- Medium: repeat 7 times = 7 scallops (8 sc, 35 dc)
- Large: repeat 9 times = 9 scallops (10 sc, 45 dc)
Fasten off and leave a 6 in (15.2 cm) tail of Color B on the small and medium tiers to use for joining.
Why the Math Works
Each scallop repeat uses exactly 4 sc from the base row: skip 1, scallop in 1, skip 1, sc in 1. The row also needs 1 sc to open it. That means the base row must have (4 x number of scallops) + 1 stitches:
- 21 = 4 x 5 + 1
- 29 = 4 x 7 + 1
- 37 = 4 x 9 + 1
Every row therefore ends on a sc in the last base stitch, so each tier starts and ends with a flat anchor at both corners. The scallop count grows with each tier in step with the tier’s width, so the scallops are the same size on all three tiers.
Hanging Cord
With Color B, ch 36, which is about 6 in (15.2 cm). Sl st in the back bump of the 2nd ch from the hook and in each remaining ch across: 35 sl sts. This gives a firm cord that will not twist out of shape. Fasten off and leave both tails about 6 in (15.2 cm) long.
Joining
Block the three tiers lightly before you join them (see Final Blocking). Flat pieces are much easier to line up.
Method: tacking. You overlap the tiers and sew them along the centre line with short, hidden stitches. You do not sew them all the way around, so the scallops stay free and light.
- Lay the large tier flat, RS up, with the ring pointing up.
- Place the medium tier on top so that its ring sits 1.2 in (3.0 cm) below the large tier’s ring, measured centre to centre on the middle spoke. The medium scallops now overlap the large tier by about 1.1 in (2.8 cm).
- Place the small tier on the medium tier in the same way, with its ring 1.2 in (3.0 cm) below the medium ring. It overlaps by about 0.7 in (1.8 cm).
- Check that the middle spokes of all three tiers line up in one straight vertical line. Pin each tier at its ring.
- Stitch-to-stitch logic: Thread the tail from the medium tier and tack its ring to the centre dc spoke of the large tier, which lies directly beneath it, with 3 small stitches. Then tack the middle scallop of the medium tier to the same spoke of the large tier with 1 stitch through the sc between scallops. Repeat with the small tier’s tail on the medium tier.
- Tack the end sc at each corner of the upper tier’s edging to the nearest side spoke below, so that the tiers do not flip up.
Tension: Pull each tacking stitch only until it touches the fabric. If you pull harder, the mesh puckers and the centre line looks pinched.
- Fold the cord in half. Thread both tails from front to back through the ring of the small tier, then knot them firmly behind the ring. Weave the tails down the back of the centre spoke. The loop should stand about 2.5 in (6.4 cm) above the top point.
Size checkpoint: The joined ornament should measure 5.1 in (13.0 cm) from the top of the small ring to the tip of the large tier’s middle scallop: 1.2 + 1.2 + 2.7 in. It should be 4.6 in (11.7 cm) across the large tier’s outer scallop tips.
Final Blocking
- Weave in all the remaining ends along spokes of the same color. Do not trim them yet.
- Mist the ornament with water until it is damp but not dripping.
- Lay it RS up on the blocking mat.
- Pin the top ring, then pin the two corners of the large tier 4.6 in (11.7 cm) apart.
- Pin the tip of every scallop so that each one is round and evenly spaced along the curve.
- Open each mesh space gently with a fingertip so that the diamonds look even.
- If you want a stiffer ornament, spray lightly with starch.
- Let it dry completely, usually 4–6 hours, then unpin it and trim the ends.
Final Quality-Control Checklist
- [ ] Small tier has 5 scallops, medium has 7, and large has 9
- [ ] Each tier has a clear open hole at its top point
- [ ] Straight sides are plain blue, with no cream showing
- [ ] Middle spokes line up vertically through all three tiers
- [ ] Each tier’s scallops cover the top of the tier below
- [ ] Total size is 4.6 in (11.7 cm) x 5.1 in (13.0 cm)
- [ ] The loop is centred and firmly knotted
- [ ] No ends or tacking stitches show on the front
Troubleshooting
The tier curls into a cone. The chain spaces are too tight. Loosen your chains or go up a hook size, then block the tier flat.
The curved edge ruffles. The chains in Rows 3–5 are too loose. Tighten them, or make sure you are working 1 sc (not 2) where the medium edging calls for it.
The scallops don’t come out even. Recount Edging Row 1. It must have 21, 29, or 37 sc. One stitch too many or too few leaves a partial scallop at the end.
The ring hole closed up. You worked more than 4 dc into the ring. Keep Row 1 at exactly 3 repeats.
The tiers tilt sideways. The middle spokes are not lined up. Remove the tacking, re-align the tiers along one straight line, and re-pin them.
The edging pulls the corners in. On the small tier, check that you worked 2 sc into both the first and the last stitch.
Care
Hand wash in cool water with mild soap, press out water in a towel, and pin flat to dry. Store the ornament flat, wrapped in tissue, so the scallops keep their shape.
Final Notes
The measurement chain is simple to check. Your gauge of 12 sc to 2 in (5.1 cm) and dc rows of 0.4 in (1.0 cm) give side lengths of 1.4 in (3.6 cm), 1.8 in (4.6 cm) and 2.2 in (5.6 cm). The edging adds 0.5 in (1.3 cm) to each, which gives tiers of 1.9 in (4.8 cm), 2.3 in (5.8 cm) and 2.7 in (6.9 cm). When you stack them at 1.2 in (3.0 cm) offsets, the ornament comes out at 5.1 in (13.0 cm) tall and 4.6 in (11.7 cm) wide. If each checkpoint matches, the finished tree will match too.
Make one in blue and cream, or try other colors for a whole tree full of them. Happy crocheting!