

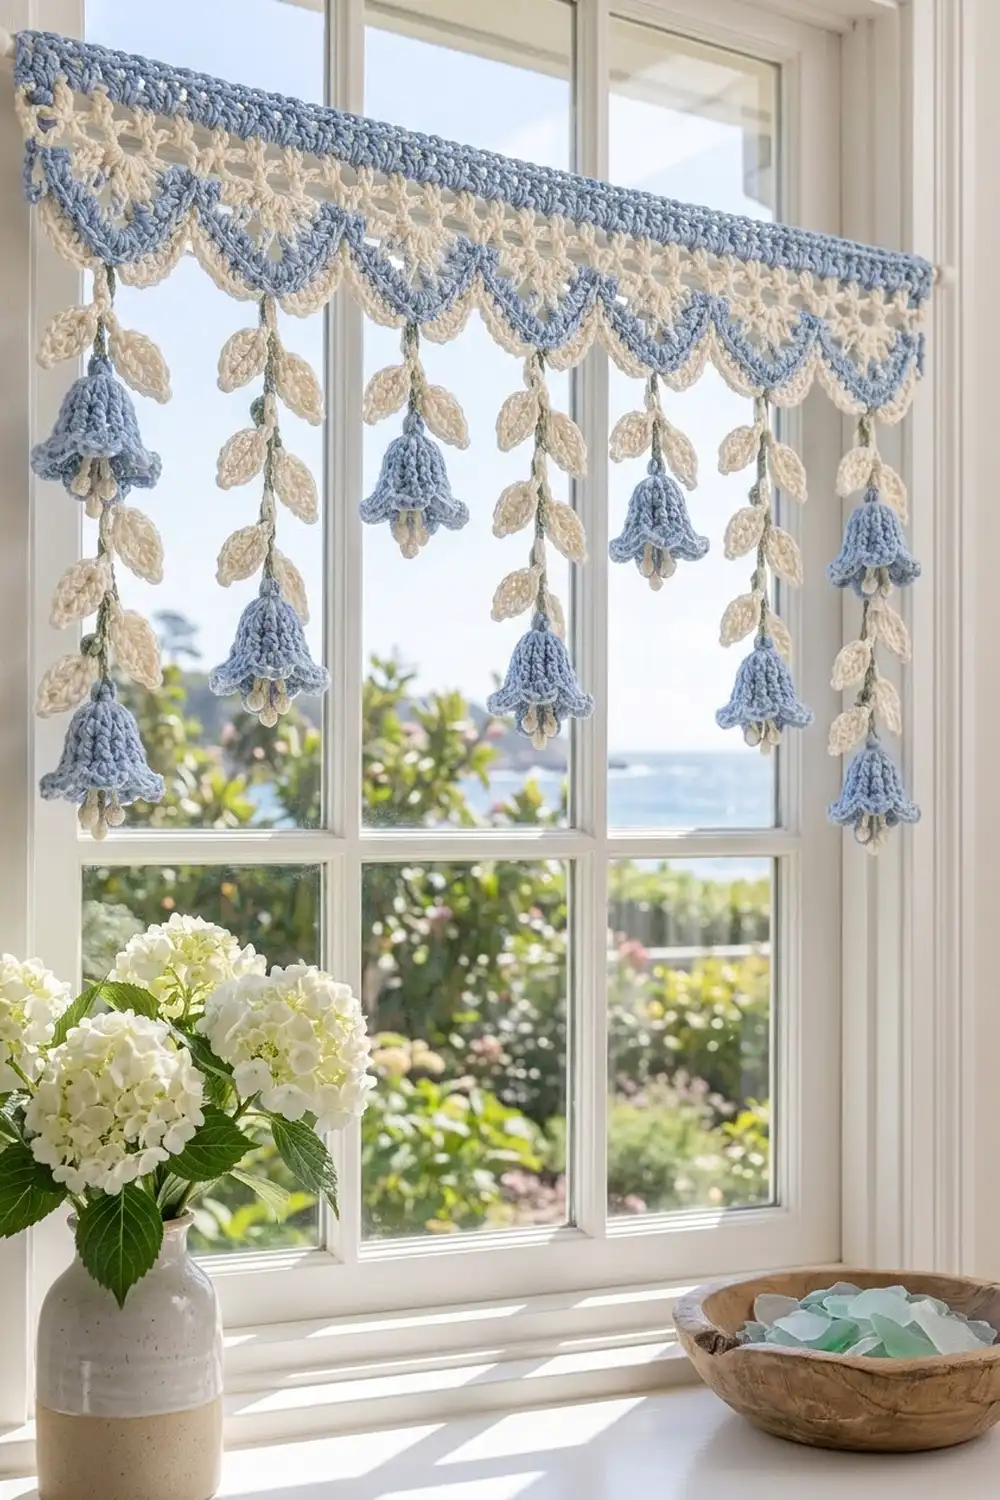
This valance is a light, coastal piece for the top of a window. A lace header band in powder blue and cream runs across the glass, and seven bellflower vines hang from its scalloped edge, alternating short and long.
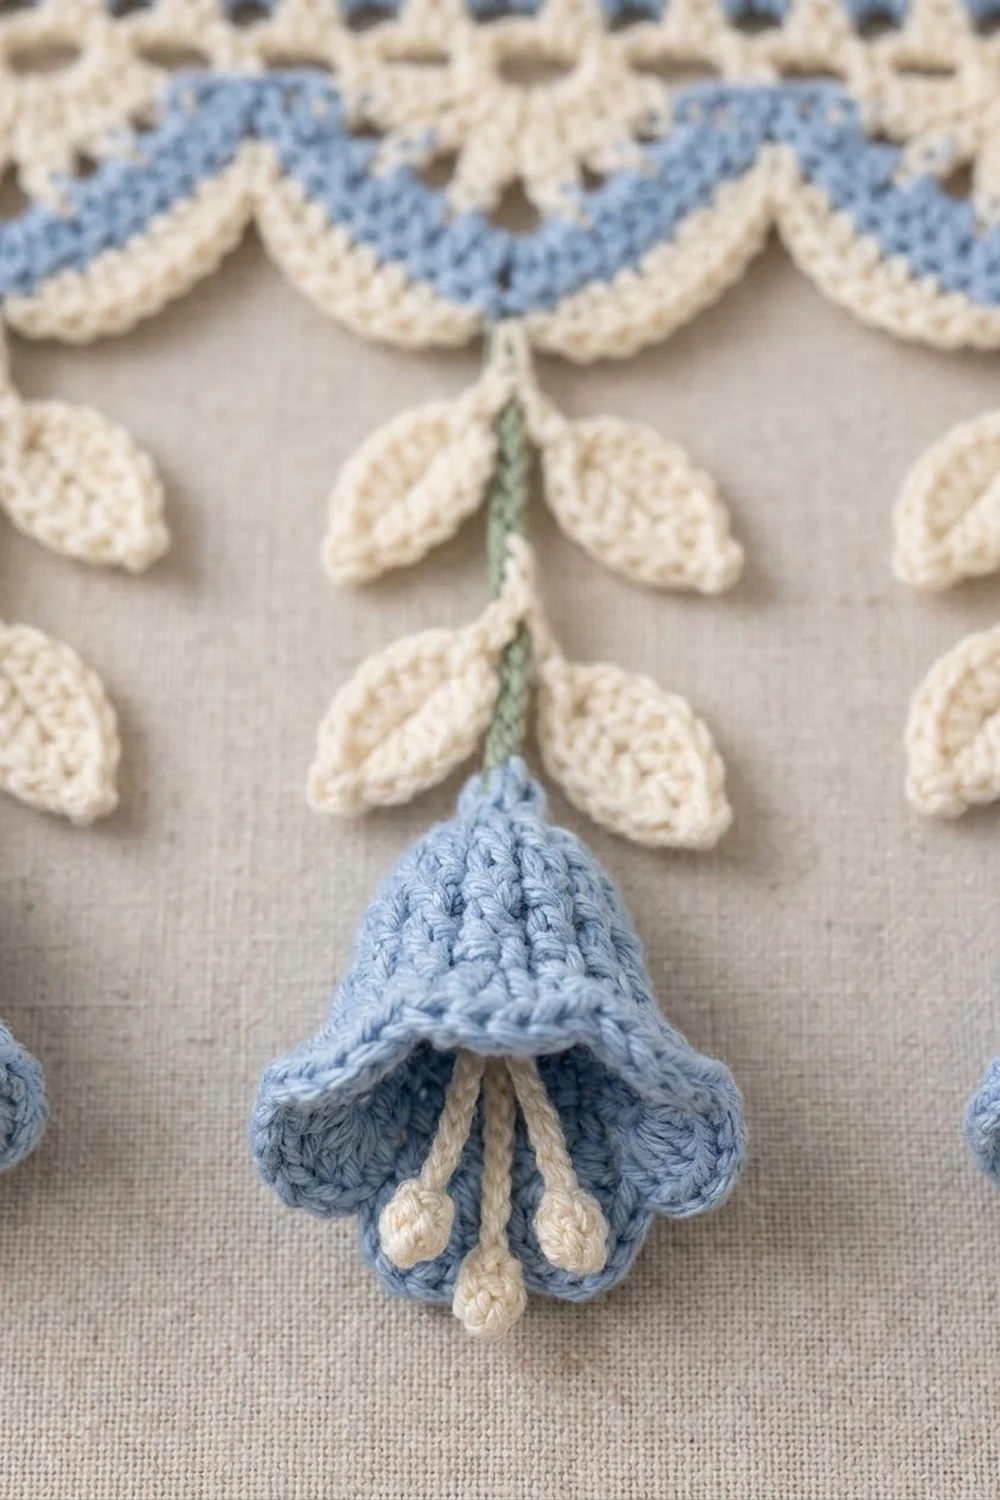
The palette is soft and simple. Powder blue is for the solid top band, the scallop arcs and the bells. Cream is for the lace, the scallop outline, the leaves and the stamens. A thin sage-green line runs down each vine. The style is cottage-meets-seaside, with crisp edges and a gentle lace pattern.
The pattern uses US crochet terms. The finished valance measures 35.5 in (90.2 cm) wide and 4 in (10.2 cm) deep at the band. The long drops reach 14.75 in (37.5 cm) below the top edge and the short drops reach 11.75 in (29.8 cm).
You work the band in long rows, starting with the solid blue top and ending with the cream scallop outline. Then you add a top border with hanging tabs, crochet seven leafy vines and seven bells, and sew each drop to the center of a scallop.
Finished Size and Construction
- Finished size: 35.5 in (90.2 cm) wide × 4 in (10.2 cm) deep at the band, plus drops
- Skill level: Intermediate
- Terminology: US crochet terms
- Yarn weight: Worsted (#4) cotton
- Hook: 4.5 mm (US 7)
- Number of pieces: 15 (1 band, 7 vines, 7 bells)
- Layout: 1 band with 7 drops in a row, alternating short and long
- Piece size: band 35.25 in (89.5 cm) × 3.5 in (8.9 cm); short drop 7.75 in (19.7 cm); long drop 10.75 in (27.3 cm)
- Size before border: 35.25 in (89.5 cm) × 3.5 in (8.9 cm) at the deepest scallop point
- Border depth: 0.5 in (1.3 cm) along the top, plus 1.5 in (3.8 cm) hanging tabs
Materials
Choose a smooth, mercerized or combed worsted cotton. Cotton holds the lace shape, blocks crisply, and does not stretch when it hangs in a sunny window. These amounts assume about 85 m (93 yd) per 50 g.
- Powder blue: 100 g, about 170 m (186 yd)
- Cream: 100 g, about 170 m (186 yd)
- Sage green: 10 g, about 17 m (19 yd)
Tools:
- 4.5 mm (US 7) crochet hook
- Tapestry needle
- Stitch markers
- Scissors
- Measuring tape
- Blocking mat and rust-proof pins
- Curtain rod or tension rod up to 1 in (2.5 cm) thick
All quantities include a margin of about 20% for your gauge swatch and weaving in ends.
Abbreviations (US Terms)
- ch – chain
- sl st – slip stitch
- sc – single crochet
- hdc – half double crochet
- dc – double crochet
- sk – skip
- sp – space
- st(s) – stitch(es)
- yo – yarn over
- Wsc – waistcoat stitch (see below)
Waistcoat stitch (Wsc): Insert your hook through the center of the next sc, between its two vertical legs (below the top V). Yo, pull up a loop, yo, and pull through both loops. This stitch creates the knit-look columns on the bells.
Puff bead (3-hdc puff): [Yo, insert hook in indicated ch, yo, pull up a loop] 3 times, yo, pull through all 7 loops on hook.
Gauge and Checkpoints
Gauge: 16 sc and 18 rows = 4 in (10.2 cm) square. Chain gauge: 16 ch = 4 in (10.2 cm), relaxed.
Test one piece first. Chain 42 and work Rows 1–9 of the band over 41 sts, which is 2 scallop repeats plus 1 st. It should measure 10.25 in (26.0 cm) wide, and each scallop should be 5 in (12.7 cm) wide. Then make 1 bell.
Checkpoints:
- After Row 1: 141 sc = 35.25 in (89.5 cm).
- After Row 4: the blue band is about 7/8 in (2.2 cm) deep.
- After Row 9: the band is 3.5 in (8.9 cm) deep at each scallop point and 2.75 in (7.0 cm) deep where the scallops meet.
- Bell after Rnd 8: about 1.75 in (4.4 cm) across the opening.
- Finished bell: 2.25 in (5.7 cm) long and 2.25 in (5.7 cm) across the petals.
If your swatch is too big, go down to a 4.0 mm hook. If it’s too small, go up to a 5.0 mm hook. Don’t change the stitch counts, because the scallop and tab positions depend on the 20-st repeat.
Header Band
Work the band in rows, starting at the top. Turn at the end of every row. The beginning ch-1 does not count as a stitch. The beginning ch-4 in Row 5 counts as dc + ch 1.
Row 1 (blue): Ch 142. Sc in 2nd ch from hook and in each ch across. Turn. (141 sc)
Rows 2–4 (blue): Ch 1, sc in each st across. Turn. (141 sc) Fasten off blue.
Row 5 (cream, mesh): Join cream in the first st. Ch 4, sk next st, dc in next st. Ch 1, sk next st, dc in next st. Repeat from * across. Turn. (71 dc + 70 ch-1 sps = 141 sts)
Row 6 (cream, loops): Ch 1, sc in first dc. Ch 3, sk next ch-1 sp, next dc and next ch-1 sp, sc in next dc. Repeat from * across, ending with sc in 3rd ch of turning ch. Turn. (36 sc + 35 ch-3 loops)
This gives you 5 loops per repeat, with 7 repeats across.
Row 7 (cream, fans): Ch 1, sc in first sc. [Ch 3, sc in next loop] twice, ch 1, 7 dc in next loop, ch 1, [sc in next loop, ch 3] twice, sc in next sc. Repeat from * 6 more times. Turn. (85 sts: 36 sc + 49 dc, with 7 fans, 28 ch-3 loops and 14 ch-1 sps)
Each repeat has 5 sc + 7 dc = 12 sts, so 1 + (7 × 12) = 85. Fasten off cream.
Row 8 (blue, arcs): Join blue in the first sc. Ch 1, sc in same sc. 3 hdc in next ch-3 loop, sk next sc, 3 hdc in next ch-3 loop, sk next sc and ch-1 sp. Dc in first dc of fan, 2 dc in each of next 2 dc, (dc, ch 2, dc) in center dc, 2 dc in each of next 2 dc, dc in last dc. Sk next ch-1 sp and sc, 3 hdc in next ch-3 loop, sk next sc, 3 hdc in next ch-3 loop, sc in next sc. Repeat from * 6 more times. Turn. (176 sts + 7 ch-2 points)
Each repeat has 12 hdc + 12 dc + 1 sc = 25 sts, so 1 + (7 × 25) = 176. The extra dc over each fan make the arc curve downward into a scallop. Fasten off blue.
Row 9 (cream, outline): Join cream in the first sc. Ch 1, sc in same sc. Sc in each of next 6 hdc, hdc in each of next 6 dc, (2 hdc, ch 2, 2 hdc) in ch-2 sp, hdc in each of next 6 dc, sc in each of next 6 hdc, sl st in next sc. Repeat from * 6 more times. On the last repeat, work sc instead of sl st in the final sc. (204 sts + 7 ch-2 points)
Each repeat has 12 sc + 16 hdc + 1 sl st = 29 sts, so 1 + (7 × 29) = 204. The sl sts pull in where the scallops meet. The ch-2 points mark the center of each scallop, which is where the drops hang. Fasten off.
Vines
Work all vines in cream from the top (attachment end) down. Each leaf is worked back along its own chain, so it ends right at the stem.
Leaf: Ch 7, sc in 2nd ch from hook, hdc in next ch, dc in each of next 2 ch, hdc in next ch, sl st in last ch. (6 sts) Each leaf is about 1.25 in (3.2 cm) long.
Leaf pair: Work 1 leaf, then work a second leaf from the same base, so the two leaves point out on either side of the stem.
Short vine (make 4): Leave an 8 in (20.3 cm) tail. Ch 4. Work 1 leaf pair, ch 6. Repeat from * 2 more times. Fasten off, leaving a 6 in (15.2 cm) tail. (22 stem ch, 3 leaf pairs; stem 5.5 in / 14.0 cm)
Long vine (make 3): Leave an 8 in (20.3 cm) tail. Ch 4. Work 1 leaf pair, ch 6. Repeat from * 4 more times. Fasten off, leaving a 6 in (15.2 cm) tail. (34 stem ch, 5 leaf pairs; stem 8.5 in / 21.6 cm)
Green stem line: Join sage green in the back bump of the bottom stem ch. Sl st loosely in the back bump of each stem ch up to the top, passing behind the leaf bases. You’ll have 22 sl sts on a short vine and 34 on a long vine. Fasten off and weave in the ends.
Bells
Make 7 in blue. Work in continuous rounds, moving a marker up each round.
Rnd 1: Make a magic ring, 6 sc in ring. Pull the ring closed. (6 sc)
Rnd 2: 2 sc in each st. (12 sc)
Rnd 3: Wsc in each st. (12 Wsc)
Rnd 4: Wsc in next st, 2 Wsc in next st. Repeat 6 times. (18 Wsc)
Rnds 5–6: Wsc in each st. (18 Wsc)
Rnd 7: Wsc in each of next 2 sts, 2 Wsc in next st. Repeat 6 times. (24 Wsc)
Rnd 8: Wsc in each st. (24 Wsc) Checkpoint: about 1.75 in (4.4 cm) across.
Rnd 9 (flare): Hdc in next st, 2 dc in each of next 2 sts, hdc in next st. Repeat 6 times. (36 sts)
Each 4-st section becomes 6 sts, so 6 × 6 = 36.
Rnd 10 (petals): Sl st in next hdc, sc in next dc, (hdc, dc) in next dc, (dc, hdc) in next dc, sc in next dc, sl st in next hdc. Repeat 6 times. Join with sl st. (48 sts, 6 petals)
Each 6-st section becomes 8 sts, so 6 × 8 = 48. Fasten off, leaving a 10 in (25.4 cm) blue tail.
Stamens (cream, 3 per bell): Join cream inside the bell at the center of Rnd 1. Ch 13, puff bead in 3rd ch from hook, sl st in each of the remaining 10 ch. Repeat from * 2 more times, working each stamen from the same spot. Fasten off. Each stamen hangs about 3/8 in (1.0 cm) below the petal hem.
Make All Pieces
- Blue: 1 band (Rows 1–4 and 8) and 7 bells
- Cream: band lace and outline (Rows 5–7 and 9), 4 short vines, 3 long vines and 21 stamens
- Sage green: 7 stem lines
Drop layout, left to right, one under each scallop:
SCALLOP: 1     2     3     4     5     6     7
DROP:    SHORT LONG  SHORT LONG  SHORT LONG  SHORT
Joining
Bell to vine: Thread the 6 in (15.2 cm) cream tail at the bottom of the vine through the center of the bell’s magic ring from the outside. Pull the last stem ch just inside the top of the bell. Using the blue bell tail, whipstitch the stem to Rnds 1–2 with 4–5 small stitches. Weave in both tails inside the bell.
Vine to band: Line up each vine with a Row 9 ch-2 point (scallop center). Thread the 8 in (20.3 cm) top tail through the ch-2 sp. Whipstitch the first 2 stem ch to the ch-2 sp and the 2 hdc on each side, stitch to stitch, with 3 passes.
Keep your tension snug but not tight. The drop should hang straight down from the point without puckering the scallop.
Size checkpoint: Measure down from the top of the band. Before the border, short drops should end at 11.25 in (28.6 cm) and long drops at 14.25 in (36.2 cm). The border adds the last 0.5 in (1.3 cm).
Border
The border uses the band gauge: 16 sc = 4 in (10.2 cm). Rotate the band so the foundation chain is at the top.
Border Row A (blue): Join blue in the first foundation ch. Ch 1, sc in each foundation ch across. Turn. (141 sc)
Border Row B (cream, tabs): Join cream. Ch 1, then work 1 sc in each sc across, but in sts 1, 36, 71, 106 and 141 work (sc, ch 14, sc). (141 + 5 = 146 sc, plus 5 ch-14 tabs)
End edging (cream): Work 13 sc evenly down each short end:
- 1 sc in each row end of Border Rows A–B and Rows 1–4 (6 sc)
- 2 sc in the end of Row 5
- 1 sc in each of Rows 6 and 7
- 2 sc in Row 8
- 1 sc in Row 9
(13 sc per end)
Why the math works: The band is 7 repeats of 20 sts plus 1 st = 141, so Border Row A keeps exactly 141 sts. The tabs sit 35 sts apart, and 4 gaps × 35 = 140 sts from st 1 to st 141. That puts each tab 8.75 in (22.2 cm) from the next. St 71 is the exact center, right above the middle scallop’s point. Each tab hangs about 1.5 in (3.8 cm) and fits a rod up to 1 in (2.5 cm) thick. The end edging adds about 0.125 in (0.3 cm) per side, so the width goes from 35.25 in (89.5 cm) to 35.5 in (90.2 cm).
Final Blocking
- Weave in all remaining ends along stitches of the same color.
- Soak the valance in cool water for 10 minutes. Gently squeeze out the water without wringing.
- Roll it in a towel to remove extra moisture.
- Lay the band flat on the blocking mat with the top edge straight. Pin it to 35.5 in (90.2 cm) wide.
- Pin each ch-2 scallop point 4 in (10.2 cm) below the top edge. Pin each scallop junction 3.25 in (8.3 cm) below it.
- Lay each vine straight, fan the leaves out in pairs, and pin each leaf tip.
- Stuff each bell lightly with a small plastic bag so it keeps its shape, and pull the 6 petals outward.
- Let it dry completely, usually about 24 hours.
Final Quality-Control Checklist
- The band is 35.5 in (90.2 cm) wide and 4 in (10.2 cm) deep at the scallop points.
- There are 7 scallops, each 5 in (12.7 cm) wide and all the same depth.
- There are 5 tabs, evenly spaced 8.75 in (22.2 cm) apart.
- The drops alternate SHORT–LONG across the width, one under each scallop center.
- Short drops end 11.75 in (29.8 cm) below the top; long drops end 14.75 in (37.5 cm) below.
- Every bell has 6 petals and 3 stamens.
- The green line is continuous on every stem.
- No ends show on the front.
Troubleshooting
Band ripples or waves: Your tension in Row 8 or Row 9 is too loose. Redo the row with a smaller hook.
Band curves into a C-shape: Your foundation chain is too tight. Redo Row 1 with a hook one size larger, then switch back.
Scallops look flat: Check that you worked 7 dc in the fan loop in Row 7, and 2 dc in the correct fan sts in Row 8.
Bells are too narrow or stiff: Waistcoat stitch is dense. Keep your loops relaxed, or use a hook 0.5 mm larger for Rnds 3–8 only.
Drops twist when hanging: Block the vines straight, and check that the green sl sts are in the back bumps on the same side.
Stamens are hidden inside the bell: Add 2 ch to each stamen.
Care
Hand wash in cool water with mild soap, dry flat, and reshape the bells while they’re damp. Don’t put it in the dryer, or the vines may stretch.
Final Notes
Everything starts with gauge: 16 sc = 4 in (10.2 cm). The 141-st foundation gives a band 35.25 in (89.5 cm) wide with seven 5 in (12.7 cm) scallops, and it is 3.5 in (8.9 cm) deep after Row 9. The border adds 0.5 in (1.3 cm), bringing the band to 4 in (10.2 cm) deep and 35.5 in (90.2 cm) wide. The short drops add 7.75 in (19.7 cm) and the long drops add 10.75 in (27.3 cm), so they end 11.75 in (29.8 cm) and 14.75 in (37.5 cm) below the top edge. If you check your size at each step, the scallops and bells will hang evenly across your window.
Happy crocheting!