

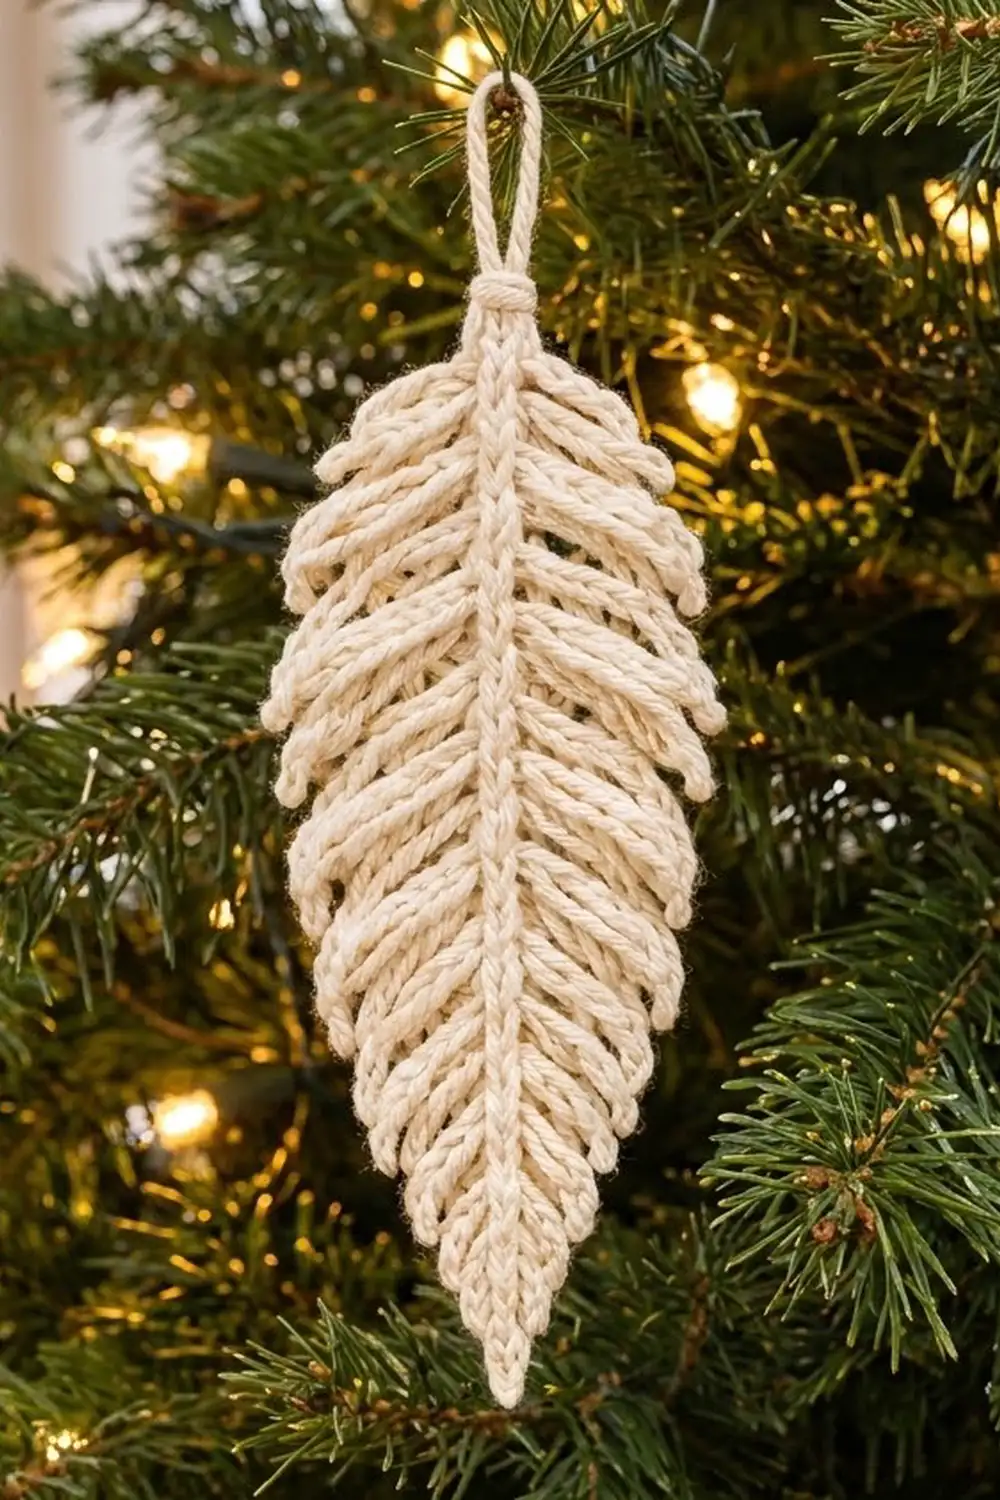
The Winter Plume is a single crocheted feather ornament in soft cream cotton. A raised spine runs down the center from top to tip, and corded barbs fan out on both sides, angling down toward a pointed tip. A small hanging loop with a wrapped collar finishes the top, so you can hang it straight on a tree branch.
It has a natural, boho look with a macramé feel, but it is all crochet. Each barb is a short chain worked back with slip stitches, which gives it a rounded, rope-like edge. It uses one color and is one piece, so the only sewing is weaving in ends.
This pattern uses US crochet terms. The feather body measures about 5.5 in (14.0 cm) long and 2.25 in (5.7 cm) wide at its widest point. With the hanging loop, the total length is about 6.75 in (17.1 cm).
The construction is simple. You chain the hanging loop and the spine. Then you work up one side of the spine adding barbs, and back down the other side adding matching barbs. To finish, you wrap the base of the loop and lightly block the feather to set the barb angle.
Finished Size and Construction
- Finished size: body 5.5 in (14.0 cm) long x 2.25 in (5.7 cm) wide; total length with loop 6.75 in (17.1 cm)
- Skill level: Easy
- Terminology: US crochet terms
- Yarn weight: Worsted (#4) cotton
- Hook: 4.0 mm (US G-6)
- Number of pieces: 1 (a single feather, worked in one continuous strand)
- Layout: vertical feather, loop at the top, point at the bottom
- Piece size: 5.5 in x 2.25 in (14.0 cm x 5.7 cm)
- Size before border (spine only): 28 chains, about 5.6 in (14.2 cm)
- Border depth (how far the barbs reach on each side): about 1 in (2.5 cm)
Materials
Yarn: Choose a smooth, tightly plied worsted-weight cotton or cotton blend. Cotton holds the barb shape crisply and shows off the corded texture. Acrylic also works, but it looks fuzzier and may need firmer blocking. Avoid fuzzy or brushed yarns because they hide the stitch definition.
- Cream (natural / ecru): 8 g, about 16 m (17.5 yd)
One feather uses roughly 5 g and 9 m (9.8 yd). The amount listed above includes a generous margin for your gauge swatch, your tails, and any stitches you need to redo.
Tools:
- 4.0 mm (US G-6) crochet hook
- Tapestry needle
- Small scissors
- Ruler or tape measure
- Blocking mat or folded towel, plus rustproof pins
- Spray bottle with water
- Optional: diluted fabric stiffener for extra-crisp barbs
Abbreviations (US Terms)
- ch: chain
- sl st: slip stitch
- st(s): stitch(es)
- BB: back bump of the chain (the horizontal bar on the back of a chain)
Special stitch – Barb (Barb-N): Ch N. Skip the first ch from the hook. Then sl st in the BB of the next ch and in the BB of each remaining ch back to the spine (N − 1 sl sts). This makes one corded barb that is N chains long with a rounded tip. Example: Barb-7 = ch 7, then 6 sl sts back.
Working into the back bump keeps the “V” side of the chain facing out, so both faces of the barb look neat and rope-like.
Gauge and Checkpoints
Gauge: 5 ch = 1 in (2.5 cm), worked loosely and evenly with a 4.0 mm hook.
Gauge matters here because the barbs create the feather’s shape. Always make one test feather first and compare it to these checkpoints.
Checkpoint 1 – chain swatch: Ch 10. It should measure 2 in (5.1 cm).
Checkpoint 2 – hanging loop: Fold the 12-ch ring flat. It should measure about 1.25 in (3.2 cm) tall.
Checkpoint 3 – spine: Before you work either side, the 28-ch spine should measure about 5.6 in (14.2 cm).
Checkpoint 4 – longest barb: A Barb-7 should measure about 1.4 in (3.6 cm) from end to end.
Checkpoint 5 – finished body: After both sides are worked and blocked, the body should be 5.5 in (14.0 cm) long and 2.25 in (5.7 cm) wide.
If your feather is too big: Switch to a 3.75 mm (US F-5) hook or tighten your chains. Don’t remove barbs, because that changes the shape.
If your feather is too small: Switch to a 4.5 mm (US 7) hook or relax your chain tension. Slip stitches that are too tight are the usual cause.

Pattern
Before you start: Keep your slip stitches as loose as your chains. Tight slip stitches pull the spine shorter and make the barbs cup instead of lying flat. If it’s hard to insert the hook, pull up a slightly taller loop on each sl st.
Leave an 8 in (20.3 cm) starting tail. You will use it later to wrap the collar under the loop.
Hanging Loop
Ch 12, then sl st in the first ch to form a ring.
Count: 12 ch in the ring. Folded flat, the loop measures about 1.25 in (3.2 cm).
Spine
Continue from the loop join. Ch 28.
Count: 28 spine ch. The spine measures about 5.6 in (14.2 cm).
Number the spine chains from the hook back toward the loop. Ch 1 is the chain nearest the hook and becomes the feather tip. Ch 28 sits next to the loop.
Side A (worked up the spine, tip to top)
On this side, work into the BB of each spine ch.
Tip: Skip ch 1 (it forms the point). Sl st in ch 2.
Barbs: Repeat the following 12 times, using the barb lengths below in order:
[Sl st in next 2 spine ch, work Barb-N.]
Barb lengths from tip to top: 3, 4, 5, 6, 7, 7, 7, 7, 6, 5, 4, 3
Each barb sits on an even-numbered spine chain: ch 4, 6, 8, 10, 12, 14, 16, 18, 20, 22, 24, and 26.
Top gap: Sl st in the next 2 spine ch (ch 27 and 28). You are now at the base of the hanging loop.
Side A counts:
- Spine sl sts: 1 (tip) + 24 (12 repeats x 2) + 2 (top) = 27
- Barbs: 12
- Barb chains: 3 + 4 + 5 + 6 + 7 + 7 + 7 + 7 + 6 + 5 + 4 + 3 = 64
- Barb sl sts: 64 − 12 = 52
As you work, let each finished barb fall down toward the tip. The barbs should angle at roughly 45 degrees from the spine and overlap slightly, like layered feather fibers. Finishing a barb at the spine before the next 2 spine sl sts holds its base snugly in place.
Side B (worked down the spine, top to tip)
Rotate the work so the unworked loops of the spine chain face up. Work into the free front loops of each spine ch.
Top gap: Sl st in ch 28 and ch 27.
Barbs: Repeat the following 12 times, using the same barb lengths in order:
[Sl st in next spine ch, work Barb-N, sl st in next spine ch.]
Barb lengths from top to tip: 3, 4, 5, 6, 7, 7, 7, 7, 6, 5, 4, 3
These barbs land on ch 26, 24, 22, 20, 18, 16, 14, 12, 10, 8, 6, and 4, directly opposite the Side A barbs. The list reads the same from either end, so each Side B barb matches the Side A barb across from it.
Tip: Sl st in ch 2, using the free loop opposite the Side A tip sl st. Ch 1, then sl st around the skipped ch 1 to close the point. Fasten off, leaving a 6 in (15.2 cm) tail.
Side B counts:
- Spine sl sts: 2 (top) + 24 (12 repeats x 2) + 1 (tip) = 27
- Barbs: 12
- Barb chains: 64
- Barb sl sts: 52
Whole-feather totals: 24 barbs, 128 barb chains, 104 barb sl sts, and 54 spine sl sts on the 28-ch spine.
Working both sides into the same chain pushes the spine up into a raised center ridge. That ridge forms the visible quill running down the middle of the feather.
Wrapped Collar
Thread the 8 in (20.3 cm) starting tail onto the tapestry needle. Wrap it tightly 3 times around the base of the hanging loop, just above the first spine stitches. Pass the needle up under the wraps and out the top, then trim the tail close so the end hides inside the wraps.
This forms the small knotted collar between the loop and the feather body.
Border (Feather Edge)
This feather has no separate border round because the barbs form the edge. When you check your work, treat them as the border.
Border gauge: A Barb-7 measures 1.4 in (3.6 cm) from end to end. Angled at 45 degrees, it reaches about 1 in (2.5 cm) out from the spine.
Per side:
- Side A: 12 barb tips, with 64 ch + 52 sl sts in the barbs
- Side B: 12 barb tips, with 64 ch + 52 sl sts in the barbs
Edge profile per side (barb lengths): 3, 4, 5, 6, 7, 7, 7, 7, 6, 5, 4, 3. The four Barb-7s sit in the middle of the feather and form its widest point. Toward each end, the barbs get 1 ch shorter at a time, which creates a gentle taper to the tip and toward the loop.
Why the math works: The spine has 28 ch, divided like this:
- 1 ch is skipped to form the tip point.
- 1 ch takes the tip sl st.
- 24 ch hold the 12 barbs, at 2 ch per barb.
- 2 ch form the top gap.
That adds up to 1 + 1 + 24 + 2 = 28. Each side works the same 27 spine sl sts, one in every chain except the skipped tip ch, so the two sides can’t drift out of alignment. For the width, each side reaches 1 in (2.5 cm), and the raised spine adds about 0.25 in (0.6 cm): 1 in + 1 in + 0.25 in = 2.25 in (5.7 cm).
Final Blocking
- Weave the remaining tail up the back of the spine, hiding it inside the spine sl sts. Trim.
- Mist the feather with water until it is damp but not soaking.
- Lay it face up on the blocking mat.
- Pin the tip point and the base of the loop so the spine lies straight and measures 5.5 in (14.0 cm).
- Fan each barb downward at about 45 degrees. Pin the longest barbs so the width measures 2.25 in (5.7 cm).
- Gently roll each barb between your fingers so its tip curves slightly and overlaps the barb below.
- Optional: brush on diluted fabric stiffener for extra-crisp barbs.
- Let the feather dry completely, about 12 to 24 hours, before you unpin it.
Final Quality-Control Checklist
- The body is 5.5 in (14.0 cm) long and 2.25 in (5.7 cm) wide.
- The total length with the loop is 6.75 in (17.1 cm).
- There are 12 barbs on each side, 24 in total.
- The Side A and Side B barbs sit directly opposite each other.
- The longest barbs are in the middle and the shortest are at the tip and top.
- The center spine is raised and straight.
- The hanging loop is closed, measures 1.25 in (3.2 cm), and has a neat 3-wrap collar.
- The tip comes to a clean point.
- All ends are woven in and can’t be seen from the front.
Troubleshooting
The spine curls or twists: Your spine chains are tighter than your sl sts. Chain more loosely, then block with the spine pinned straight.
The barbs stick straight out: Dampen the feather and re-pin the barbs at 45 degrees. Stiffener helps them hold.
The barbs look thin and stringy: Check that you’re working into the BB and not the top loop of the chain.
The feather is lopsided: Count the spine stitches between barbs. Each barb needs exactly 2 spine ch after the one before it.
One side has an extra barb: You most likely skipped or doubled a spine sl st. Pull back to the last correct barb and recount.
The tip looks blunt: Make sure you skipped ch 1 on Side A and closed it with the ch 1, sl st on Side B.
The loop is too small for a branch: Start with ch 16 instead of ch 12 for a 1.6 in (4.1 cm) loop. This doesn’t change the feather body.
Care
Hand wash in cool water with mild soap, press out the water in a towel, and reshape the feather flat to dry. Store it flat or hanging so the barbs keep their angle.
Final Notes
The measurements build on each other and are easy to check. At a gauge of 5 ch per 1 in (2.5 cm), the 12-ch loop measures 1.25 in (3.2 cm) and the 28-ch spine measures 5.6 in (14.2 cm). Each side has 12 barbs that grow from Barb-3 to Barb-7 and back down. They reach 1 in (2.5 cm) out from the spine, for a width of 2.25 in (5.7 cm). After blocking, the feather body settles at 5.5 in (14.0 cm), so the total length with the loop is 6.75 in (17.1 cm).
Make one feather and check it against the checkpoints. It’s a quick, repeatable ornament that works up in about 20 minutes.
Happy crocheting!