

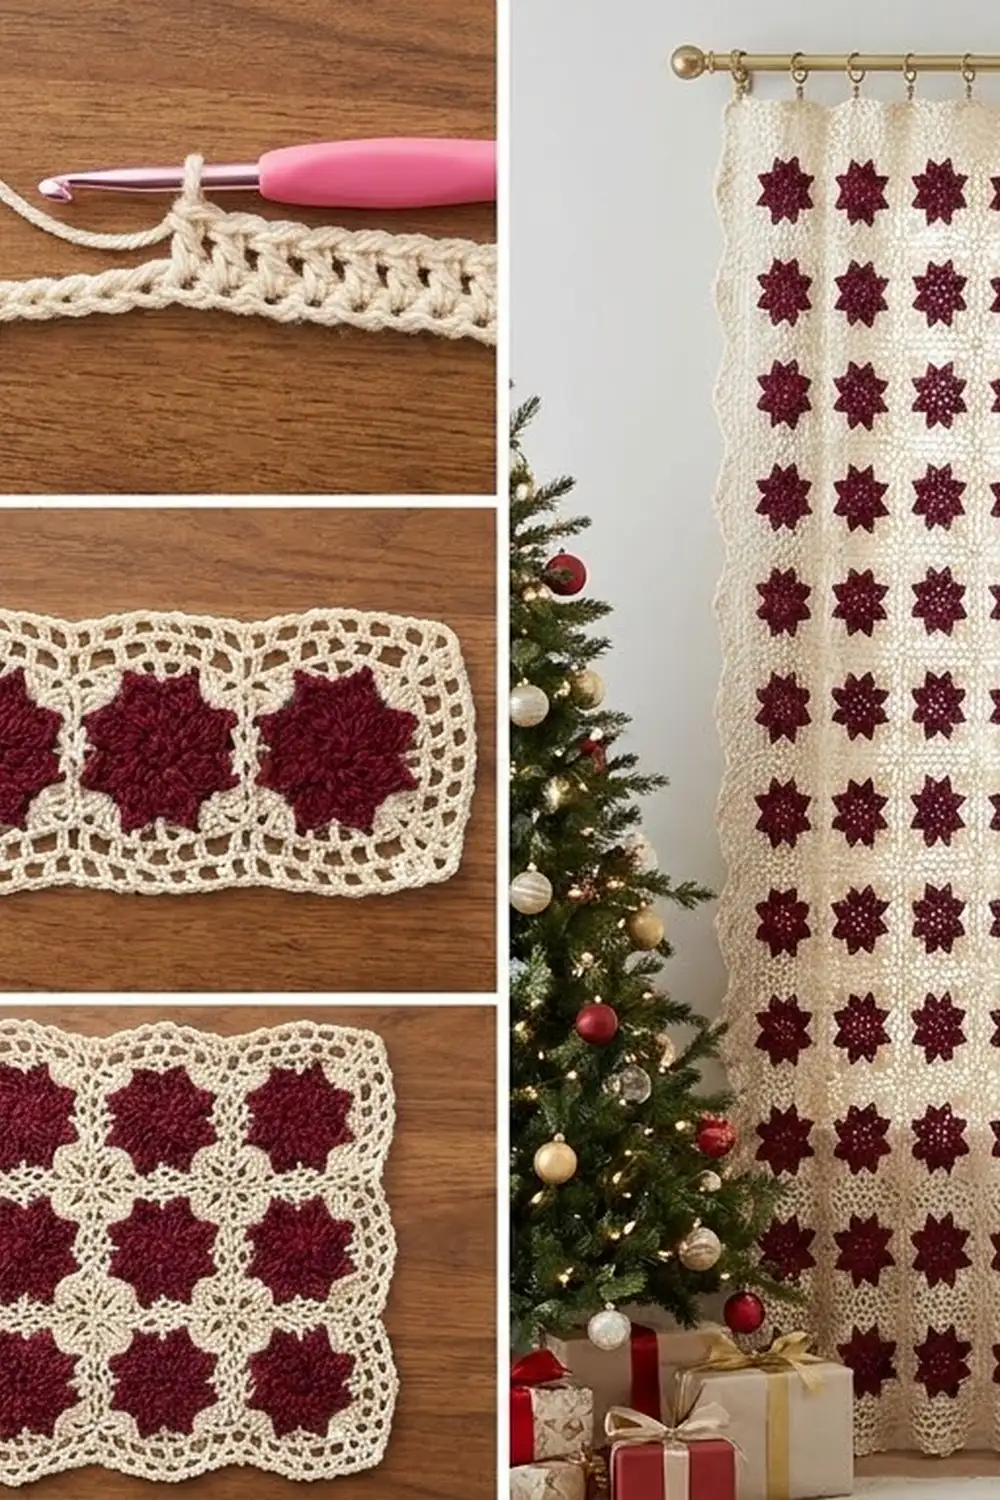
The Winter Poinsettia Lace Curtain gives a window a soft holiday glow. Burgundy eight-point stars sit in a grid of open cream lace, so daylight comes through the mesh and the stars stand out against the glass.
Two colors make up the whole design: deep burgundy for the poinsettia stars and warm cream for the mesh, the joining and the border. The look is traditional, with a light, modern repeat. The pattern uses US crochet terms throughout.
One finished panel measures 29 x 83 in (73.7 x 210.8 cm), border included. The curtain in the photo is a pair, so make two identical panels.
Each panel is built from 108 small square motifs. You crochet the burgundy star first, then add three cream rounds to square it off. Join the squares into a grid of 6 across by 18 down, then add a three-round border with a scalloped edge.
Finished Size and Construction
- Finished panel size: 29 x 83 in (73.7 x 210.8 cm)
- Skill level: Intermediate
- Terminology: US crochet terms
- Yarn weight: Sport (2), cotton or cotton blend
- Hook: 3.5 mm (E-4)
- Number of pieces: 108 motifs per panel (216 for the pair)
- Layout: 6 motifs across x 18 motifs down
- Motif size: 4.5 x 4.5 in (11.4 x 11.4 cm)
- Panel size before border: 27 x 81 in (68.6 x 205.7 cm)
- Border depth: 1 in (2.5 cm) on every side
Materials
Yarn: Use a smooth sport-weight cotton or cotton blend of about 250 m per 100 g. Cotton hangs straight, holds the star points well and handles window sunlight better than most acrylics.
Per panel:
- Color A, Burgundy: 320 g / 800 m
- Color B, Cream: 800 g / 2000 m
For the pair:
- Color A, Burgundy: 640 g / 1600 m
- Color B, Cream: 1600 g / 4000 m
All quantities include a margin of about 10–15% for gauge differences and the swatch.
Tools:
- 3.5 mm (E-4) crochet hook
- Tapestry needle
- Stitch markers
- Measuring tape
- Blocking mats, rust-proof pins and a spray bottle
- 12 curtain clip rings per panel (24 for the pair)
Abbreviations (US Terms)
- ch – chain
- sl st – slip stitch
- sc – single crochet
- hdc – half double crochet
- dc – double crochet
- tr – treble crochet
- sp – space
- st(s) – stitch(es)
- BLO – back loop only
Special stitch – Petal: Ch 6. Working back along the chain: sc in 2nd ch from hook, hdc in next ch, dc in next ch, tr in last 2 ch. The skipped chain at the end becomes the petal tip.
Gauge and Checkpoints
Gauge: One finished motif (Rounds 1–5) measures 4.5 x 4.5 in (11.4 x 11.4 cm), with 23 sc per side on Round 5. That works out to about 5.1 sc per inch (2.5 cm).
Make one complete motif before starting production. Lightly wet block it and pin it square, then measure. Check it against these sizes as you go:
- After Round 1: center disc 1 in (2.5 cm) across
- After Round 2: star 3 in (7.6 cm) from tip to opposite tip
- After Round 4: square 4.25 in (10.8 cm) per side
- After Round 5: square 4.5 in (11.4 cm) per side
If the motif is too big, go down to a 3.25 mm (D-3) hook. If it is too small, go up to a 3.75 mm (F-5) hook. A change of 0.25 in (0.6 cm) per motif adds up to 1.5 in (3.8 cm) across the width and 4.5 in (11.4 cm) down the length, so get the gauge right before you go further.
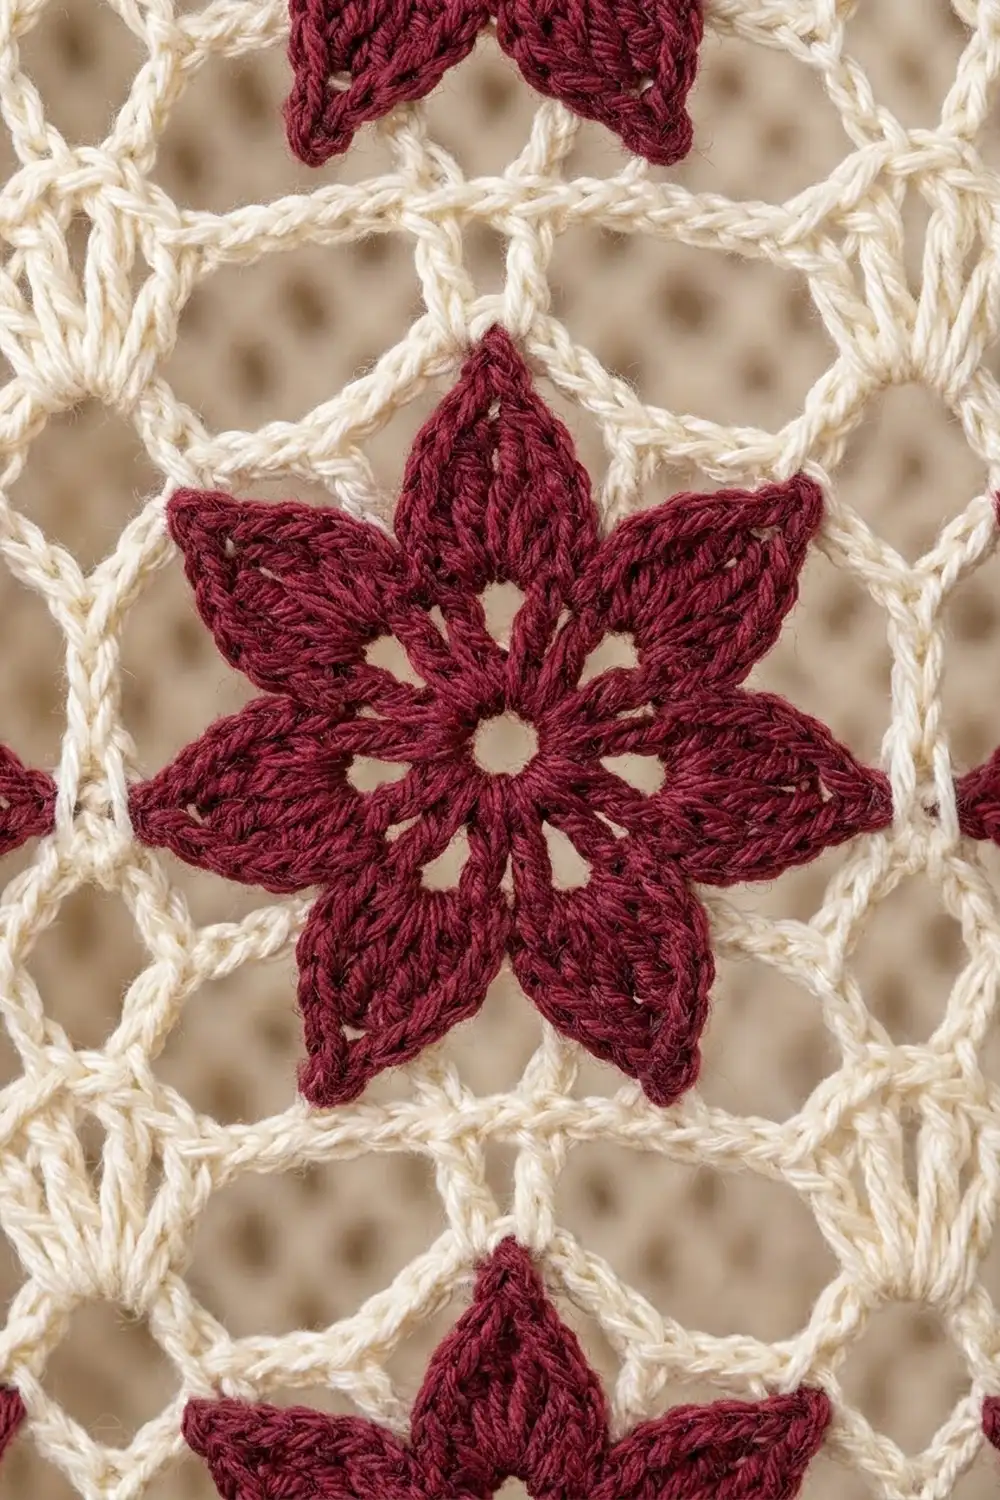
Motif Pattern
Star (Color A, Burgundy)
Round 1: Make a magic ring. Ch 3 (counts as first dc), work 15 dc in the ring, and sl st to the top of the beginning ch-3. Pull the ring snug but leave a small open center. (16 dc)
Round 2: Work 1 Petal, skip the next dc, sl st in the following dc. Repeat from * 7 more times. The last sl st lands in the top of the beginning ch-3. Fasten off. (8 petals)
Each petal uses 2 stitches of Round 1, and 8 petals x 2 stitches = 16 stitches. That is why the star closes evenly with no gap.
Pinch each tip to a point. The tr stitches at the base and the sc at the tip give each petal its tapered poinsettia shape.
Frame (Color B, Cream)
Round 3: Join cream with a sc in the tip chain of any petal. Ch 6, sc in the tip of the next petal. Repeat from * 6 more times, then ch 6 and sl st to the first sc. (8 sc, 8 ch-6 sps)
Petal tips 1, 3, 5 and 7 become the corners. Petal tips 2, 4, 6 and 8 become the mid-side points.
Round 4: Sl st into the first sc if you are not already there; this is a corner tip. Ch 3 (counts as dc), then work (2 dc, ch 2, 3 dc) in the same sc.
Then work this side sequence: ch 3, sc in the next ch-6 sp, ch 3, dc in the next sc (mid-side tip), ch 3, sc in the next ch-6 sp, ch 3, (3 dc, ch 2, 3 dc) in the next sc (corner tip).
Repeat from * 2 more times. Then repeat from * to ** once more, and sl st to the top of the beginning ch-3.
Each side has 3 dc + 3 ch + 1 sc + 3 ch + 1 dc + 3 ch + 1 sc + 3 ch + 3 dc = 21 stitches and chains, not counting the corner ch-2.
(84 stitches and chains in total = 4 sides x 21, plus 4 corner ch-2 sps)
Round 5: Ch 1. Work the side stitches as follows:
- 1 sc in each dc and each sc
- 3 sc in each ch-3 sp, which equals 1 sc per chain
At each corner ch-2 sp, work (sc, ch 2, sc). Sl st to the first sc and fasten off, leaving a 6 in (15.2 cm) tail.
This round has 21 sc along each side, worked 1 per existing stitch or chain, plus 2 corner sc added at each corner. (92 sc, 4 ch-2 sps)
Stitches per side: 23 sc. This includes the 2 corner sc of that side (21 side sc + 2 corner sc). The ch-2 corner spaces are not counted.
Weave in the ends and block each motif to 4.5 in (11.4 cm) square.
Make All Pieces
Per panel:
- Color A: 108 stars (Rounds 1–2)
- Color B: frames (Rounds 3–5) on all 108 stars
For the pair, make 216 complete motifs.
Every motif is identical (S = one motif). Each panel uses the same layout:
Column:   1  2  3  4  5  6
Row 1:    S  S  S  S  S  S
Row 2:    S  S  S  S  S  S
Row 3:    S  S  S  S  S  S
  ...     (repeat the same line)
Row 18:   S  S  S  S  S  S
That is 6 motifs across x 18 motifs down = 108 motifs.
Block the motifs in batches of 12 as you finish them. Joining is much easier when every square is already the same size.
Joining
Method: Use a cream slip-stitch seam worked through the back loops of both motifs, with the wrong sides facing each other. This leaves a neat raised ridge on the back and a flat, clean line on the front.
Stitch-to-stitch logic: Each side has 23 sc. Match them one to one:
- Insert the hook in the corner ch-2 sp of both motifs.
- Sl st in the BLO of each of the 23 matched pairs of sc.
- Finish in the next corner ch-2 sp.
No stitches are added or skipped, so the seams add no width.
Order:
- Join 6 motifs side by side to make a horizontal strip. Make 18 strips.
- Checkpoint: each strip should measure 27 x 4.5 in (68.6 x 11.4 cm).
- Join the strips along their long edges. Each strip has 6 x 23 = 138 sts per long edge, so match them stitch for stitch.
- Where four corners meet, work 1 sl st through the corner ch-2 spaces to anchor the intersection.
Tension: The seams should be exactly as loose as the motif stitches. If a seam puckers, switch to a hook one size larger for the joining only. Keep your hand relaxed: a tight seam multiplied over 18 rows shortens the panel noticeably.
Size checkpoint: The joined panel should measure 27 x 81 in (68.6 x 205.7 cm). Measure it laid flat, not hanging.
Border
Border gauge: Same as the motifs, about 5.1 sc per inch (2.5 cm). Work all three rounds in Color B with the right side facing.
Starting counts:
- Short edge (top and bottom): 6 motifs x 23 sts = 138 sts
- Long edge (sides): 18 motifs x 23 sts = 414 sts
These counts follow the rule above: they are the pieces along that edge times each piece’s own per-side count, with nothing added at the seams. At the internal seams, the corner ch-2 sps are not worked into; work straight from one motif’s corner sc to the next motif’s corner sc.
Round 1 (sc): Join yarn in any outer corner ch-2 sp. Work (sc, ch 2, sc) in each of the 4 outer corner ch-2 sps, and 1 sc in each st along the edges.
| Edge | Per-edge count |
|---|---|
| Short edge | 138 + 2 corner sc = 140 sc |
| Long edge | 414 + 2 corner sc = 416 sc |
(Total 1112 sc, 4 ch-2 sps)
Round 2 (filet mesh): Sl st into the corner ch-2 sp and ch 6 (counts as dc + ch 3). Work dc in the same sp to complete the corner. Ch 1, skip the next sc, dc in the next sc. Repeat along the edge.
| Edge | Repeats | Count |
|---|---|---|
| Short edge | 70 | 70 dc + 70 ch-1 sps (uses all 140 sc) |
| Long edge | 208 | 208 dc + 208 ch-1 sps (uses all 416 sc) |
Work (dc, ch 3, dc) in each corner sp. Sl st to the 3rd ch of the beginning ch-6.
Because 140 and 416 are both even, every edge comes out to whole repeats.
Round 3 (scallops): Sl st into the corner ch-3 sp and work 7 dc in it. Sc in the next ch-1 sp, 5 dc in the next ch-1 sp. Repeat along the edge.
| Edge | Repeats | Count |
|---|---|---|
| Short edge | 35 | 35 scallops (uses all 70 ch-1 sps) |
| Long edge | 104 | 104 scallops (uses all 208 ch-1 sps) |
Work 7 dc in each corner ch-3 sp. Sl st to the first dc and fasten off.
The last scallop on each edge sits beside the corner fan and makes a fuller double-fan corner.
Why the math works: Each round uses whole units of the round below it: 2 sc per mesh repeat and 2 ch-1 spaces per scallop. That means 140 and 416 must be even and 70 and 208 must be even, and all four are. The border adds 1 in (2.5 cm) per side, so the panel finishes at 27 + 2 = 29 in (73.7 cm) by 81 + 2 = 83 in (210.8 cm).
Final Blocking
- Lay the panel on blocking mats; for a piece this long, a clean floor covered with towels works too.
- Mist it evenly with water until it is damp all the way through.
- Pin the four corners to 29 x 83 in (73.7 x 210.8 cm).
- Pin along each edge every 4.5 in (11.4 cm), placing a pin at each seam line so the grid stays straight.
- Pin the tip of every scallop to open the fans.
- Gently pinch each star point to define it.
- Leave it to dry completely, usually 24–48 hours.
- Unpin, then clip 12 rings evenly across the top edge, about 2.5 in (6.4 cm) apart.
Final Quality-Control Checklist
- [ ] All 108 motifs measure 4.5 in (11.4 cm) square
- [ ] Every star has 8 pointed, even petals
- [ ] Round 5 has 23 sc per side on every motif
- [ ] Seams lie flat on the front, with ridges on the back only
- [ ] Grid lines run straight horizontally and vertically
- [ ] Border Round 1 has 140 / 416 sc per edge
- [ ] 35 scallops on each short edge and 104 on each long edge
- [ ] Panel measures 29 x 83 in (73.7 x 210.8 cm)
- [ ] All ends are woven in securely
- [ ] The second panel matches the first
Troubleshooting
Petals curl or lean. Ch 6 more loosely, and make sure you skip exactly 1 dc between petals.
Center hole too big. Pull the magic ring tighter before you join Round 1.
Motif cups instead of lying flat. Your Round 3 chains are too tight. Chain more loosely or use a hook one size up for Round 3 only.
Motif ruffles. Check that you work 3 sc per ch-3 space, not 4.
Panel shorter than expected. The seams are too tight. Rip back and rejoin with a larger hook.
Border waves or flares. Recount Round 1 against the 140 / 416 targets. Extra stitches usually creep in at the seam corners.
Corner fans don’t lie flat. Block the corners firmly with 3 pins each.
Care
Hand wash in cool water with a mild detergent, roll in a towel to remove water, and dry flat, reshaping to size. Do not tumble dry or hang the panel while wet, because the weight will stretch the lace.
Final Notes
The measurement chain is the heart of this curtain:
- Each motif is 4.5 in (11.4 cm) with 23 sc per side.
- Six motifs across make 27 in (68.6 cm), and eighteen motifs down make 81 in (205.7 cm).
- A 1 in (2.5 cm) border brings each panel to 29 x 83 in (73.7 x 210.8 cm).
Check your first motif carefully and every other measurement follows from it. Make two panels for the pair.
Happy crocheting!