

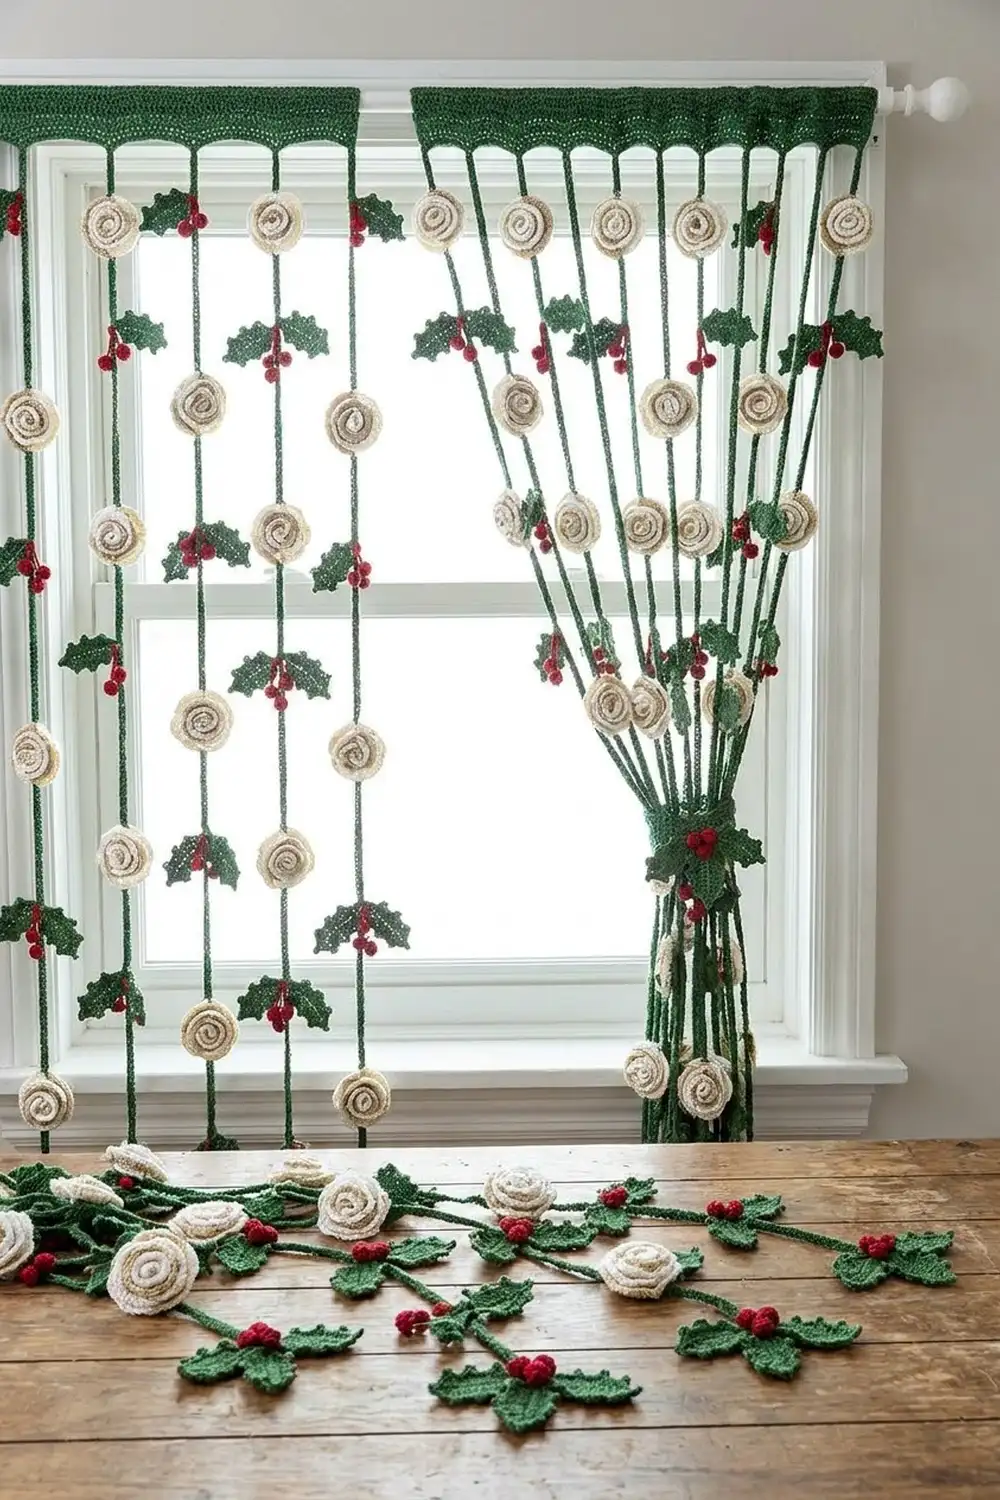
This curtain is made of soft cream and white roses climbing down slim green cords, with a pair of holly leaves and three red berries under every bloom. It hangs as separate strands, so light still comes through the window. One side can be gathered with a matching tieback.
The palette is classic winter: forest green, cream, bright white and deep berry red. The style is cottage Christmas, textured but still airy. All instructions use US crochet terms.
The finished curtain is 10 strands spaced across a 36 in (91.4 cm) rod. Each strand drops 60 in (152.4 cm) and holds 10 rose clusters. Each rose is about 3 in (7.6 cm) across. The finished tieback measures 13 × 3 in (33.0 × 7.6 cm).
Here is how it comes together: for each strand you crochet a slip-stitch cord with a built-in hanging ring, then make the roses, leaves and berries separately and sew them on. The tieback is a small single-crochet rectangle with a three-round border.
Finished Size and Construction
- Curtain width: 36 in (91.4 cm), 10 strands
- Strand drop: 60 in (152.4 cm), measured from the base of the hanging ring
- Skill level: Easy-intermediate
- Terminology: US
- Yarn weight: DK (3), cotton or cotton blend
- Hook: 3.5 mm (E-4)
- Number of pieces: 10 strands (each with 1 cord, 10 roses, 20 leaves and 30 berries), plus 1 tieback
- Layout: 10 strands hung side by side, 4 in (10.2 cm) apart, not joined to each other
- Piece sizes: Rose 3 in (7.6 cm); leaf 2 in (5.1 cm) long; berry 0.6 in (1.5 cm)
- Tieback size before border: 12 × 2 in (30.5 × 5.1 cm)
- Border depth: 0.5 in (1.3 cm) per side
Materials
Use a smooth, mercerized or matte DK cotton. Cotton holds the petal shapes and the picot points crisply and doesn’t stretch much while hanging. Avoid fuzzy yarns, which blur the spiral.
- Forest green: 250 g / 575 m (cords, leaves, tieback)
- Cream: 125 g / 288 m (50 roses)
- Bright white: 125 g / 288 m (50 roses)
- Deep red: 125 g / 288 m (303 berries)
All quantities include a margin of about 15%.
Tools:
– 3.5 mm (E-4) crochet hook
– Tapestry needle
– Stitch markers
– Measuring tape
– Rust-proof pins
– A small amount of fiberfill (or red yarn scraps) for the berries
– One 0.75 in (1.9 cm) button for the tieback
Abbreviations (US Terms)
- ch – chain
- sl st – slip stitch
- sc – single crochet
- hdc – half double crochet
- dc – double crochet
- tr – treble crochet
- sk – skip
- sp – space
- st(s) – stitch(es)
- sc2tog – single crochet 2 together
- picot – ch 3, sl st in 3rd ch from hook
Back-bump sl st: Insert the hook under the bump on the back of the chain, then complete a slip stitch. Working back along a chain this way makes a firm, round cord that shows the chain “V”s on the front.
Gauge and Checkpoints
Gauge: 20 sc and 24 rows = 4 in (10.2 cm), which is 5 sc and 6 rows per 1 in (2.5 cm).
Make one complete cluster (1 rose, 2 leaves, 3 berries) and 10 in (25.4 cm) of cord before you start production.
Checkpoints:
1. Rose strip before rolling: Row 1 (49 sc) measures 9.8 in (24.9 cm).
2. Rolled rose: 3 in (7.6 cm) across.
3. Leaf: 2 in (5.1 cm) from stem to tip.
4. Berry: 0.6 in (1.5 cm) across.
5. Cord: 50 ch, after the back-bump sl sts, measure 10 in (25.4 cm).
If your pieces are too big, go down 0.5 mm in hook size. If they’re too small, go up 0.5 mm. If only the cord is off, keep your hook and adjust the chain count at a rate of 5 ch per 1 in (2.5 cm).
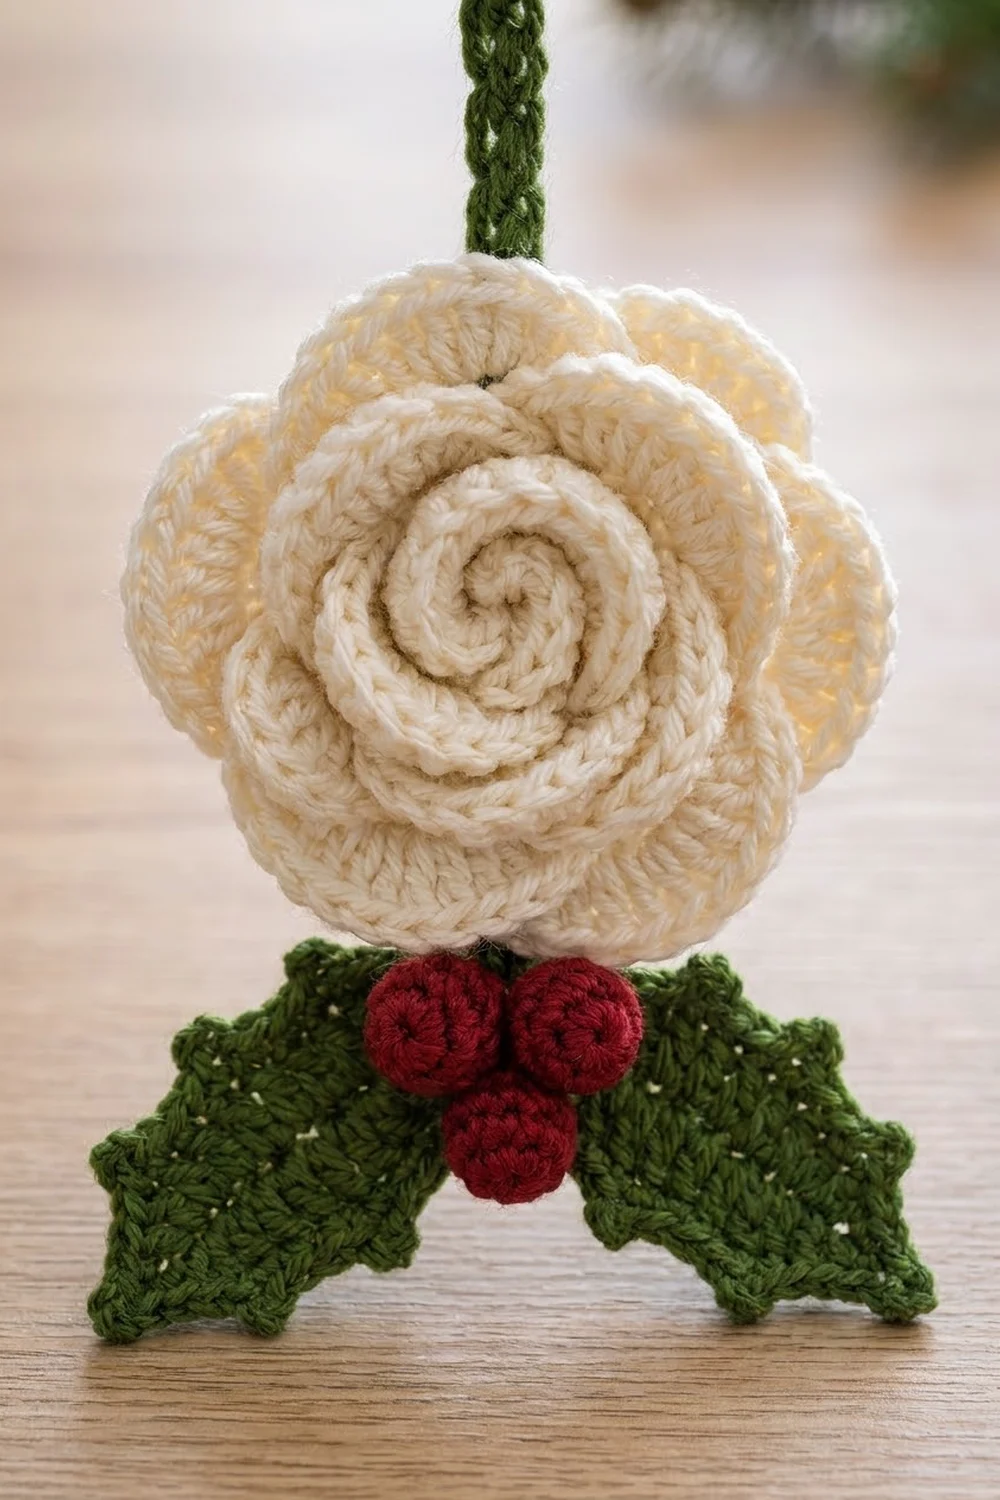
Strand Cord (make 10)
With green:
- Hanging ring: Ch 24, then sl st in the first ch to form a ring (24 ch). The ring is 4.8 in (12.2 cm) around and fits rods up to 1.375 in (3.5 cm) in diameter.
- Cord chain: Ch 300 from the ring. Do not twist.
- Return: Sl st in the back bump of the 2nd ch from the hook and in each back bump to the ring (299 sl st). Sl st into the ring at the join.
- Fasten off and weave in the ends.
The cord is now 60 in (152.4 cm) from the base of the ring.
Rose (make 50 cream, 50 white)
Foundation: Ch 50.
Row 1: Sc in the 2nd ch from the hook and in each ch across. Turn. (49 sc)
Row 2 (petal row): Ch 1, sc in the first sc, then work three groups of petals:
– Small petals: [sk 2, 5 hdc in next st, sk 2, sc in next st] 3 times.
– Medium petals: [sk 2, 7 dc in next st, sk 2, sc in next st] 3 times.
– Large petals: [sk 2, (2 dc, 5 tr, 2 dc) in next st, sk 2, sc in next st] 2 times.
Count for Row 2: 8 petals; 9 sc + 15 hdc + 21 dc + 18 large-petal sts = 63 sts. Row 2 uses all 49 sts of Row 1 (1 + 8 repeats × 6 sts).
Fasten off, leaving an 18 in (45.7 cm) tail.
Rolling: Start at the end with the small petals. With the sc base at the bottom, roll the strip tightly for the first two petals to form the bud. Then roll more loosely so the medium and large petals flare out. After every half turn, pass the tail through all layers of the base. Finish with several stitches across the bottom, and keep the tail for sewing the rose to the cord.
Checkpoint: The rose is 3 in (7.6 cm) across.
Holly Leaf (make 202)
With green, ch 11.
Side 1: Sc in the 2nd ch from the hook, hdc in the next ch, picot, dc in the next 2 ch, picot, dc in the next 2 ch, picot, hdc in the next 2 ch, sc in the next ch.
Tip: Work (sc, picot, sc) in the last ch.
Side 2: Working along the opposite side of the foundation chain: sc in the next ch, hdc in the next 2 ch, picot, dc in the next 2 ch, picot, dc in the next 2 ch, picot, hdc in the next ch, sc in the last ch. Sl st to the first sc.
Count: 9 sts on each side + 2 tip sc = 20 sts, plus 7 picots. The picots form the pointed holly edge.
Fasten off, leaving a 10 in (25.4 cm) tail.
Berry (make 303)
With red:
- Rnd 1: 6 sc in a magic ring. (6)
- Rnd 2: 2 sc in each st. (12)
- Rnd 3: Sc in each st. (12)
- Rnd 4: Sc2tog 6 times. (6)
Stuff with a pinch of fiberfill or red scraps. Cut the yarn, leaving an 8 in (20.3 cm) tail. Weave the tail through the front loops of the 6 sts and pull it closed. The berry is 0.6 in (1.5 cm) across.
Make All Pieces
Per strand:
– 1 cord
– 5 cream roses + 5 white roses
– 20 leaves
– 30 berries
Whole curtain:
– 10 cords
– 50 cream roses + 50 white roses
– 200 leaves + 2 for the tieback
– 300 berries + 3 for the tieback
Layout grid (C = cream, W = white). Columns are strands 1–10 from left to right; rows are clusters 1–10 from top to bottom.
       S1 S2 S3 S4 S5 S6 S7 S8 S9 S10
Cl 1   C  W  C  W  C  W  C  W  C  W
Cl 2   W  C  W  C  W  C  W  C  W  C
Cl 3   C  W  C  W  C  W  C  W  C  W
Cl 4   W  C  W  C  W  C  W  C  W  C
Cl 5   C  W  C  W  C  W  C  W  C  W
Cl 6   W  C  W  C  W  C  W  C  W  C
Cl 7   C  W  C  W  C  W  C  W  C  W
Cl 8   W  C  W  C  W  C  W  C  W  C
Cl 9   C  W  C  W  C  W  C  W  C  W
Cl 10  W  C  W  C  W  C  W  C  W  C
The two colors alternate in a checkerboard, so no two roses of the same color sit side by side.
Joining (Attaching Clusters to Each Cord)
Placement: Lay one cord flat. Measuring from the base of the hanging ring, place a marker at 3 in (7.6 cm), then one every 6 in (15.2 cm) after that: 3, 9, 15, 21, 27, 33, 39, 45, 51 and 57 in (7.6, 22.9, 38.1, 53.3, 68.6, 83.8, 99.1, 114.3, 129.5 and 144.8 cm). That gives 10 cluster centers.
Stitch-to-stitch method:
1. Rose: Center the rose on the marker with its base flat against the cord. Using the rose tail, stitch through the back-bump sl st ridge of the cord, catching one cord sl st for every 2 base stitches of the rose. Work around the base 1 in (2.5 cm) wide.
2. Leaves: Butt the stem ends of the leaves together on the cord just below the rose, angled down and out at about 45°. Tack each stem through 3 cord sl sts, then tack each leaf’s center back to the cord once.
3. Berries: Sew 2 berries side by side over the point where the stems meet, and 1 berry centered below them. Pass each tail through the cord and knot it at the back.
Tension: Pull each stitch snug but not tight. If the cord puckers or shortens behind a cluster, loosen it. Check the back: the stitches should hide in the sl st ridge.
Checkpoint: The finished strand still drops 60 in (152.4 cm), the cluster centers sit 6 in (15.2 cm) apart, and the bottom rose clears the cord end by 3 in (7.6 cm), minus half the rose’s width.
Border (Tieback)
Tieback body: With green, ch 61.
– Row 1: Sc in the 2nd ch from the hook and in each ch across. Turn. (60 sc)
– Rows 2–12: Ch 1, sc in each st. Turn. (60 sc)
Before the border: 12 × 2 in (30.5 × 5.1 cm).
Border gauge: 6 rounds = 1 in (2.5 cm), so 3 rounds = 0.5 in (1.3 cm). The corner ch-2 spaces are not counted as stitches.
- Rnd 1: Ch 1. Along the top edge, sc in each st (60 sc), then ch 2. Down the side, work 1 sc in each row end (12 sc), then ch 2. Along the foundation edge, sc in each ch (60 sc), then ch 2. Up the other side, 12 sc, then ch 2. Sl st to the first sc. (Long sides 60 sc, short sides 12 sc; 144 sc total)
- Rnd 2: Ch 1. Sc in each sc, and work (sc, ch 2, sc) in each corner sp. (Long sides 62 sc, short sides 14 sc; 152 sc total)
- Rnd 3: Repeat Rnd 2. (Long sides 64 sc, short sides 16 sc; 160 sc total)
Before fastening off, ch 6 at the middle of one short end and sl st back into the same stitch to make a button loop.
Why the math works: Each round adds 1 sc on each side of every corner, which is +2 per side and +8 per round (144, 152, 160). Each round also adds 1/6 in (0.4 cm) of depth on every edge, so 3 rounds add 0.5 in (1.3 cm) per side:
– Width: 12 + 0.5 + 0.5 = 13 in (33.0 cm)
– Height: 2 + 0.5 + 0.5 = 3 in (7.6 cm)
Finishing the tieback: Sew the button at the opposite short end. Sew 2 leaves and 3 berries to the center front, arranged like the strand clusters.
Final Blocking
- Lightly mist each rose, reshape the outer petals so they flare, and let them dry face-up.
- Pin each leaf flat with a pin through every picot point. Mist it and let it dry.
- Hang the finished strands from a rod and mist the cords. Their own weight will straighten any twists as they dry.
- Pin the tieback to 13 × 3 in (33.0 × 7.6 cm), mist it and let it dry fully.
- Never press the roses with an iron, because it flattens the spiral.
Final Quality-Control Checklist
- All 10 cords drop 60 in (152.4 cm) from the base of the ring.
- Every strand has 10 clusters with centers 6 in (15.2 cm) apart.
- Colors follow the layout grid.
- Each rose is 3 in (7.6 cm) across, with no loose layers at the base.
- Every leaf has 7 picots, with all points crisp.
- Berries are firm, round and tightly closed.
- No sewing stitches show on the front of the cords.
- The tieback measures 13 × 3 in (33.0 × 7.6 cm) and buttons securely.
Troubleshooting
- The rose looks flat: Roll the first two petals tighter, and tack through every layer.
- The rose is too floppy: Go down a hook size, or add extra tacking stitches across the base.
- The cord twists: Make sure each sl st goes into the back bump, then hang the strand and mist it.
- The picots curl under: Pin each point while blocking.
- Stuffing shows through a berry: Use red scraps instead of fiberfill.
- The strand has shortened: Your sewing is too tight. Re-sew the clusters with looser stitches.
- The tieback ripples: Re-count the border corners. Each round should add exactly 8 sc.
Care
Hand wash in cool water with mild soap and roll in a towel to remove water. Rehang the strands to dry and reshape the roses by hand.
Final Notes
The measurement chain is simple:
– Gauge: 5 sc and 6 rows per 1 in (2.5 cm).
– Cord: 300 ch for a 60 in (152.4 cm) drop.
– Clusters: 10 roses of 3 in (7.6 cm) per strand, 6 in (15.2 cm) apart.
– Curtain: 10 strands spaced 4 in (10.2 cm) apart across 36 in (91.4 cm).
– Tieback: 12 × 2 in (30.5 × 5.1 cm), growing to 13 × 3 in (33.0 × 7.6 cm) with its 0.5 in (1.3 cm) border.
Check each stage against its checkpoint and the finished curtain will hang evenly.
Happy crocheting!