

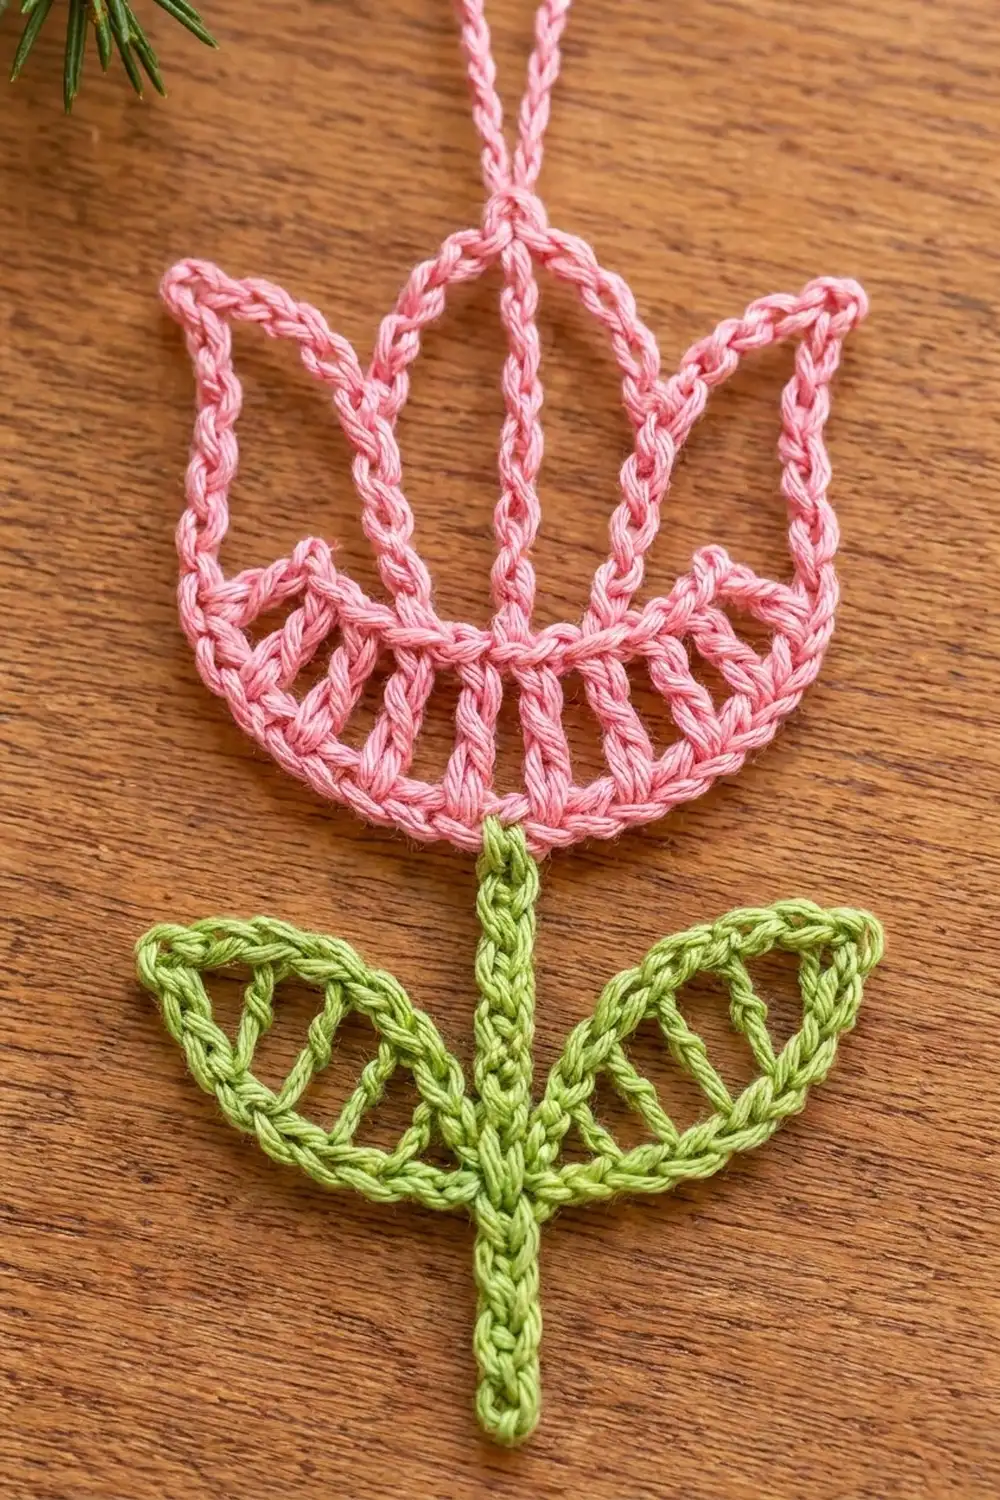
The Winter Tulip is a small openwork ornament that looks like it was drawn in yarn. It has a crescent-shaped flower bowl filled with airy spokes and three pointed petals outlined in corded single crochet. A slim green stem with two lacy leaves hangs below.
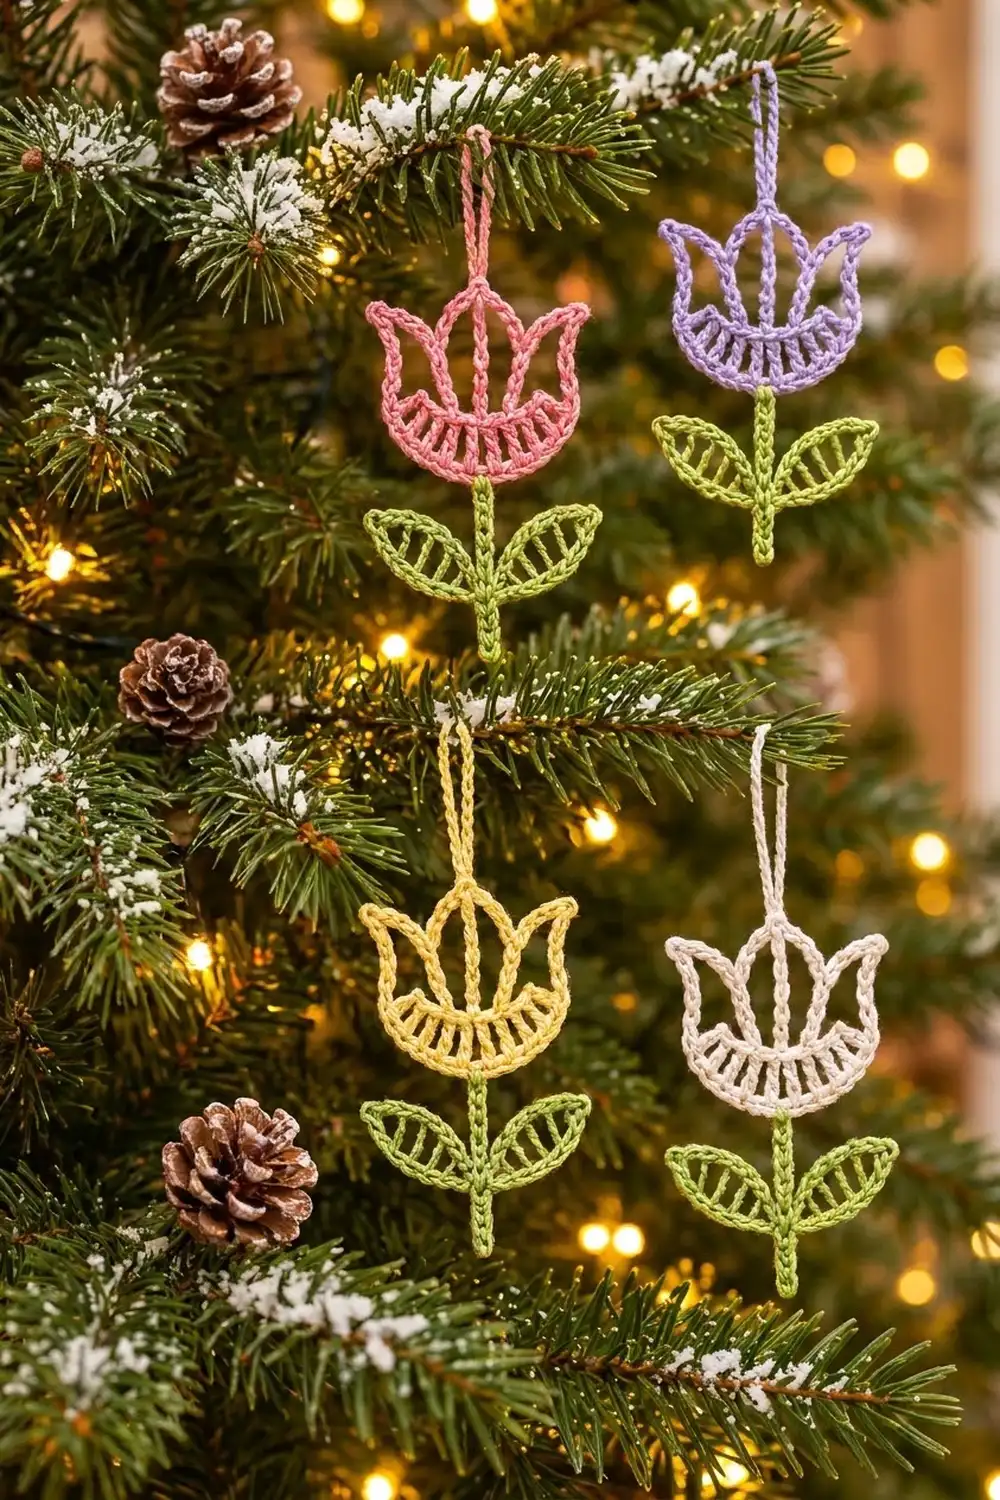
The sample is worked in soft pink with a fresh leaf green. It also looks lovely in lavender, butter yellow or cream, so you can make a whole set for the tree in one evening. The style is light and graphic, so it reads clearly against dark branches and twinkle lights.
This pattern uses US crochet terms. The finished ornament measures about 3 in (7.6 cm) wide and 4 in (10.2 cm) tall, plus a 2.75 in (7.0 cm) hanging loop.
Construction is simple and all in one piece. You work the bowl in three short rows, chain the three petal frames along the bowl’s top rim, then outline every petal with single crochet. The hanging loop and center spine are added in that same outline row. Finally you join green at the bottom of the bowl and work the stem and both leaves without fastening off.
Finished Size and Construction
- Finished size: about 3 in (7.6 cm) wide x 4 in (10.2 cm) tall, not including the loop
- Hanging loop: about 2.75 in (7.0 cm) tall
- Skill level: Easy / Advanced Beginner
- Terminology: US crochet terms
- Yarn weight: Sport (#2 fine) cotton
- Hook: 3.0 mm (US C/D)
- Number of pieces: 1 (worked continuously, with one color change)
- Layout: single standalone ornament
- Flower head size: about 3 in (7.6 cm) wide x 2 in (5.1 cm) tall
- Head size before outline (border): about 2.75 in (7.0 cm) x 1.75 in (4.4 cm)
- Outline (border) depth: about 1/8 in (0.3 cm)
Materials
Choose a smooth, tightly plied mercerized cotton in sport weight. Mercerized cotton gives the crisp, corded stitch definition shown in the photo and holds its shape on the tree. Avoid fuzzy or very soft acrylics, because the open spokes will look blurry.
- Color A, Pink (flower): 5 g, about 15 m
- Color B, Leaf Green (stem and leaves): 3 g, about 9 m
For the colorway variations, swap Color A for lavender, butter yellow or cream in the same amounts. Color B stays green.
Tools:
- 3.0 mm (US C/D) crochet hook
- Tapestry needle
- Scissors
- Stitch marker (optional, for the tip chains)
- Foam blocking mat and rust-proof pins
- Spray bottle with water, or light spray starch
All yarn quantities include a margin of about 30 percent for gauge differences and tails.
Abbreviations (US Terms)
- ch – chain
- sl st – slip stitch
- sc – single crochet
- hdc – half double crochet
- dc – double crochet
- sk – skip
- sp – space
- st(s) – stitch(es)
Special technique – free loops of the foundation chain: After Row 1, turn the work so the starting chain faces up. Each chain now has one or two loops not used by Row 1. These are the “free loops.” Number them 1 to 19, starting at the end where Row 1 finished.
Gauge and Checkpoints
Gauge: 7 sc = 1 in (2.5 cm), and 8 ch = 1 in (2.5 cm). One dc row is about 0.45 in (1.1 cm) tall.
Make one complete ornament first and measure it at each checkpoint before starting a set.
- After Row 1: the strip is about 2.75 in (7.0 cm) long.
- After Row 3: the bowl is about 0.75 in (1.9 cm) tall at the center and curves gently.
- After Row 7: the flower head is about 3 in (7.6 cm) wide x 2 in (5.1 cm) tall.
- After the stem and leaves: total height is about 4 in (10.2 cm), and each leaf is about 1.5 in (3.8 cm) long.
If your piece is too big, go down to a 2.75 mm hook. If it is too small, go up to a 3.25 mm hook. If only the chains are loose, keep the hook and chain a little more firmly.
Part 1: Flower Bowl (Color A)
Row 1 (top rim): With Color A, ch 20. Sc in the 2nd ch from the hook and in each ch across. Turn. (19 sc)
Row 2 (spokes): Ch 4 (counts as dc + ch 1), sk next sc, [dc in next sc, ch 1, sk next sc] 8 times, dc in last sc. Turn. (10 dc, 9 ch-1 sps)
Check: the ch-4 sits on sc 1, the repeats place dc on sc 3 through sc 17, and the last dc lands on sc 19.
Row 3 (bottom edge, conversion row): Ch 1, 2 sc in first dc, [2 sc in next ch-1 sp, sc in next dc] 8 times, 2 sc in next ch-1 sp, 2 sc in 3rd ch of turning ch. Do not turn. (30 sc = 10 sc worked 1 per dc + 18 sc worked 2 per ch-1 sp + 2 extra sc at the ends)
The bottom edge now has 30 sts against the rim’s 19. That difference curves the bowl into its crescent shape.
Row 4 (first side edge): Ch 1, work up the short side edge: 1 sc in the end of Row 3 and 2 sc around the turning-ch post of Row 2. Rotate the work so the foundation chain faces up, and sl st in free loop 1. (3 sc)
Part 2: Petal Frames (Color A)
Row 5 (petal frames): Continue along the free loops of the foundation chain.
- First side petal: Ch 13, sl st in free loop 7.
- Center petal: Ch 17, sl st in free loop 13.
- Second side petal: Ch 13, sl st in free loop 19.
(3 chain arches: 13 ch, 17 ch, 13 ch)
Each side petal spans 6 free loops, and so does the center petal. The center petal has 4 more chains, so it stands taller.
Row 6 (second side edge): Work 2 sc around the post of the end dc of Row 2, then 1 sc in the end of Row 3. Ch 1, turn. Sl st in each of these 3 sc, then sl st in free loop 19. (3 sc, 3 sl st)
Both short sides of the bowl are now edged, and your yarn is back at the top rim, ready to outline.
Part 3: Petal Outline, Spine and Hanging Loop (Border)
This round is the ornament’s border. It turns the thin chain frames into the corded petal outlines shown in the photo.
Border gauge: 1 sc per chain, about 8 sc per 1 in (2.5 cm) along the chain.
Row 7 (outline):
- Second side petal (13 ch): Working into each chain of the arch, sc in the next 6 ch, (sc, ch 2, sc) in the next ch (tip), sc in the next 6 ch. Sl st in free loop 13. (14 sc = 12 sc worked 1 per ch + 2 sc in the tip ch)
- Center petal (17 ch): Sc in the next 8 ch. In the tip ch work (sc, ch 44, sc). The ch 44 is the hanging loop.
- Spine: Ch 7, sl st in free loop 10, then sl st back up in each of the 7 ch to the tip.
- Center petal, second side: Sc in the next 8 ch. Sl st in free loop 7. (18 sc = 16 sc worked 1 per ch + 2 sc in the tip ch)
- First side petal (13 ch): Sc in the next 6 ch, (sc, ch 2, sc) in the tip ch, sc in the next 6 ch. Sl st in free loop 1. (14 sc)
Fasten off and weave in the ends.
Row 7 totals: 14 + 18 + 14 = 46 sc, 2 ch-2 tips, 1 ch-44 loop, and a 7-ch spine.
Why the math works: Working exactly one sc per chain gives the outline the same length as its frame, so it lies flat without ruffling or pulling. Working the tip chain twice, with a ch-2 between, adds just enough turn to make a sharp point. Free loop 10 is the exact center of the 19-loop rim, so the spine falls straight down the middle of the center petal.
The loop of 44 chains measures about 5.5 in (14.0 cm) and folds to about 2.75 in (7.0 cm).
Part 4: Stem and Leaves (Color B)
Join: With the bowl’s bottom edge facing up, join Color B with a sl st in the 15th sc of Row 3 (the center of the 30-sc edge).
Stem: Ch 18. Sl st in the 2nd ch from the hook and in each of the next 10 ch. (11 sl st, 6 ch left unworked)
You are now at the leaf junction, about 0.75 in (1.9 cm) below the bowl.
Left leaf, Row L1 (spokes): Ch 14. Sl st in the 2nd ch from the hook (tip). Then work:
- ch 1, sk 1 ch, hdc in next ch
- [ch 1, sk 1 ch, dc in next ch] 3 times
- ch 1, sk 1 ch, hdc in next ch
- ch 1, sk 1 ch, sc in last ch
Sl st in the same stem st. (5 spokes: hdc, 3 dc, hdc; 6 ch-1 sps)
Left leaf, Row L2 (outline): Ch 1, turn.
- Sc in the sc, [sc in next ch-1 sp, sc in next spoke] 5 times, sc in the last ch-1 sp. (12 sc)
- In the turning ch at the tip, work (sc, ch 2, sc).
- Working along the free loops on the other side of the leaf chain, sc in each of the 12 free loops.
- Sl st in the same stem st.
(26 sc = 12 + 2 + 12, plus a ch-2 tip)
Right leaf: Rotate the work so the stem’s other side faces you. Repeat Rows L1 and L2, ending with a sl st in the same stem st. (26 sc)
Finish the stem: Sl st in each of the 6 remaining stem ch. Sl st in the joining sc of Row 3. Fasten off and weave in the ends along the stem.
The stem is 17 sts long, or about 2.1 in (5.3 cm), which brings the total height to about 4 in (10.2 cm).
Final Blocking
- Lightly mist the ornament with water or spray starch until it is damp, not soaked.
- Lay it right side up on the blocking mat.
- Pin the bowl first. Curve the bottom edge into a smooth smile and keep the rim straight across at 2.75 in (7.0 cm).
- Pin the center petal tip straight up, so the spine runs vertically.
- Pin each side petal tip up and outward, so the outer edges flare about 0.125 in (0.3 cm) past the bowl.
- Pin the stem straight down from the bowl’s center.
- Angle each leaf upward at about 45 degrees and pin its ch-2 tip so the leaf is about 1.5 in (3.8 cm) long.
- Pin the hanging loop straight up so it dries without twisting.
- Let it dry completely, then unpin.
Final Quality-Control Checklist
- Bowl rim has 19 sc, the spoke row has 10 dc, and the bottom edge has 30 sc.
- Both short sides of the bowl have 3 sc.
- Petal outlines count 14, 18 and 14 sc.
- The spine runs from the center tip to free loop 10.
- Each leaf has 5 spokes and 26 outline sc.
- Head measures about 3 in (7.6 cm) x 2 in (5.1 cm).
- Total height is about 4 in (10.2 cm), plus the loop.
- All ends are woven in invisibly.
Troubleshooting
- Bowl is flat, not curved: You probably skipped the extra sc at the ends of Row 3, or worked only 1 sc per space. Recount to 30.
- Petal outline ruffles: You worked more than 1 sc into some chains. Work exactly one sc per chain.
- Petal outline puckers: Your chains were tighter than your sc. Chain more loosely, or use a hook 0.25 mm larger for Row 5 only.
- Spine sags: Pull the sl sts snug, or chain 6 instead of 7 if your chains run long.
- Leaves curl: Block them damp with starch, and pin the tip and both edges.
- Stem twists: Work every sl st into the same loop of the chain, and block it straight.
Care
Hand wash in cool water with mild soap, press out the water in a towel, and reshape it flat to dry. Store the ornament flat between sheets of tissue paper so the petals keep their points.
Final Notes
The measurement chain is simple:
- 19 rim sc give a 2.75 in (7.0 cm) bowl.
- The 30-sc bottom edge creates the curve.
- 13-17-13 chain frames anchored every 6 loops make the petals.
- The one-sc-per-chain outline (14, 18 and 14 sc) brings the head to 3 in (7.6 cm) wide.
- A 17-st stem with two 26-sc leaves completes the 4 in (10.2 cm) ornament.
Check your gauge on the first tulip, then make one in every color for the tree.
Happy crocheting!