

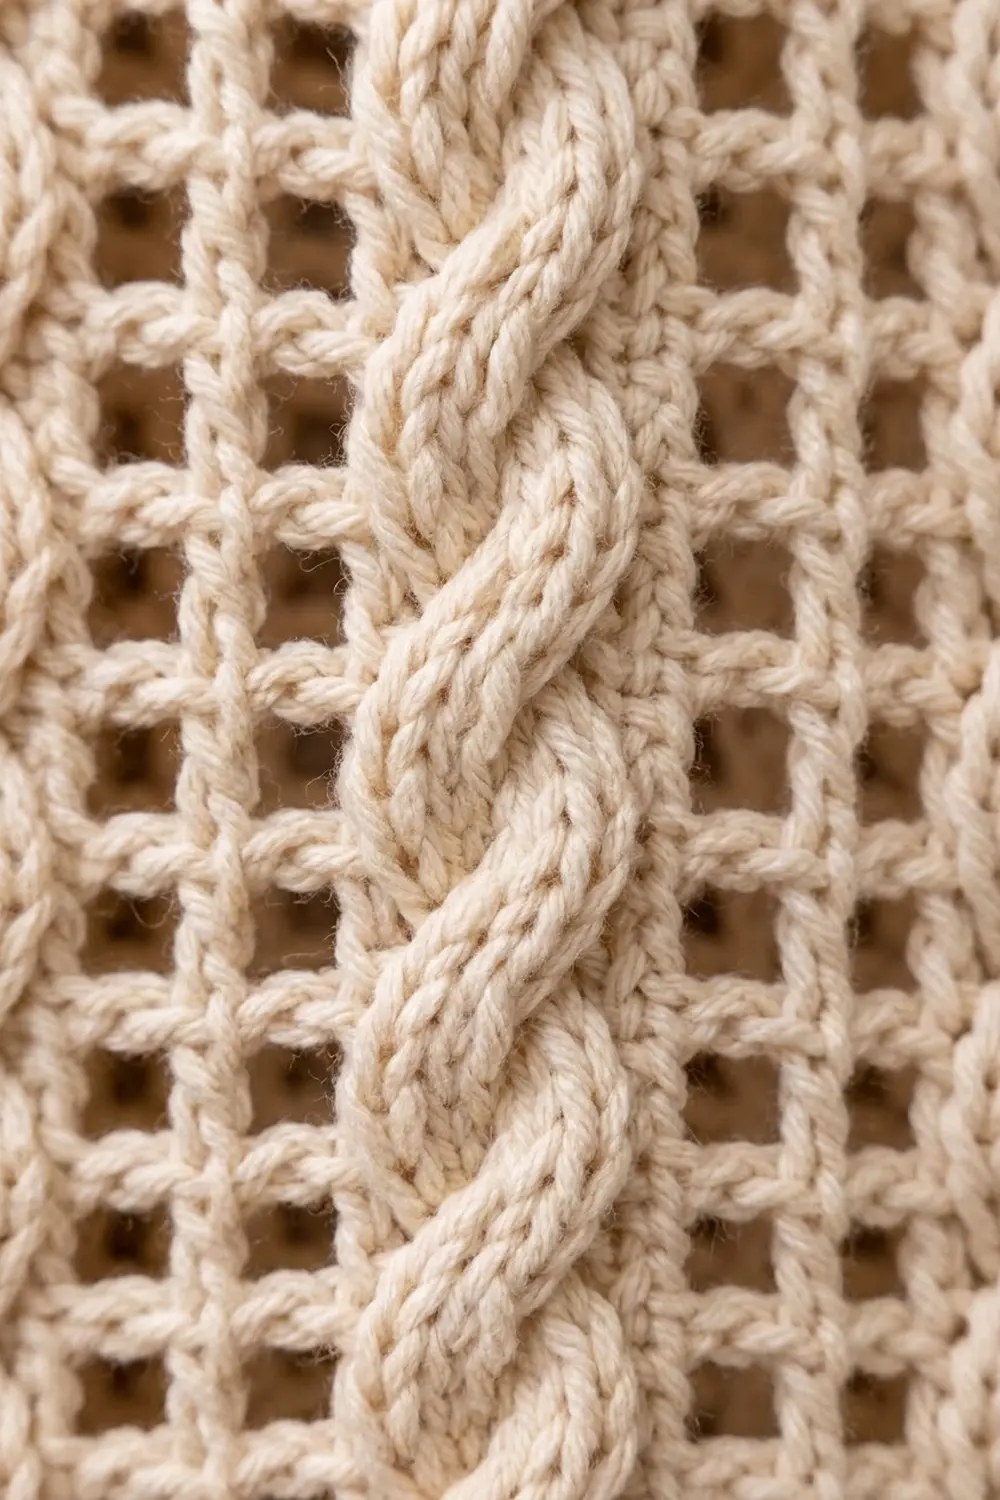
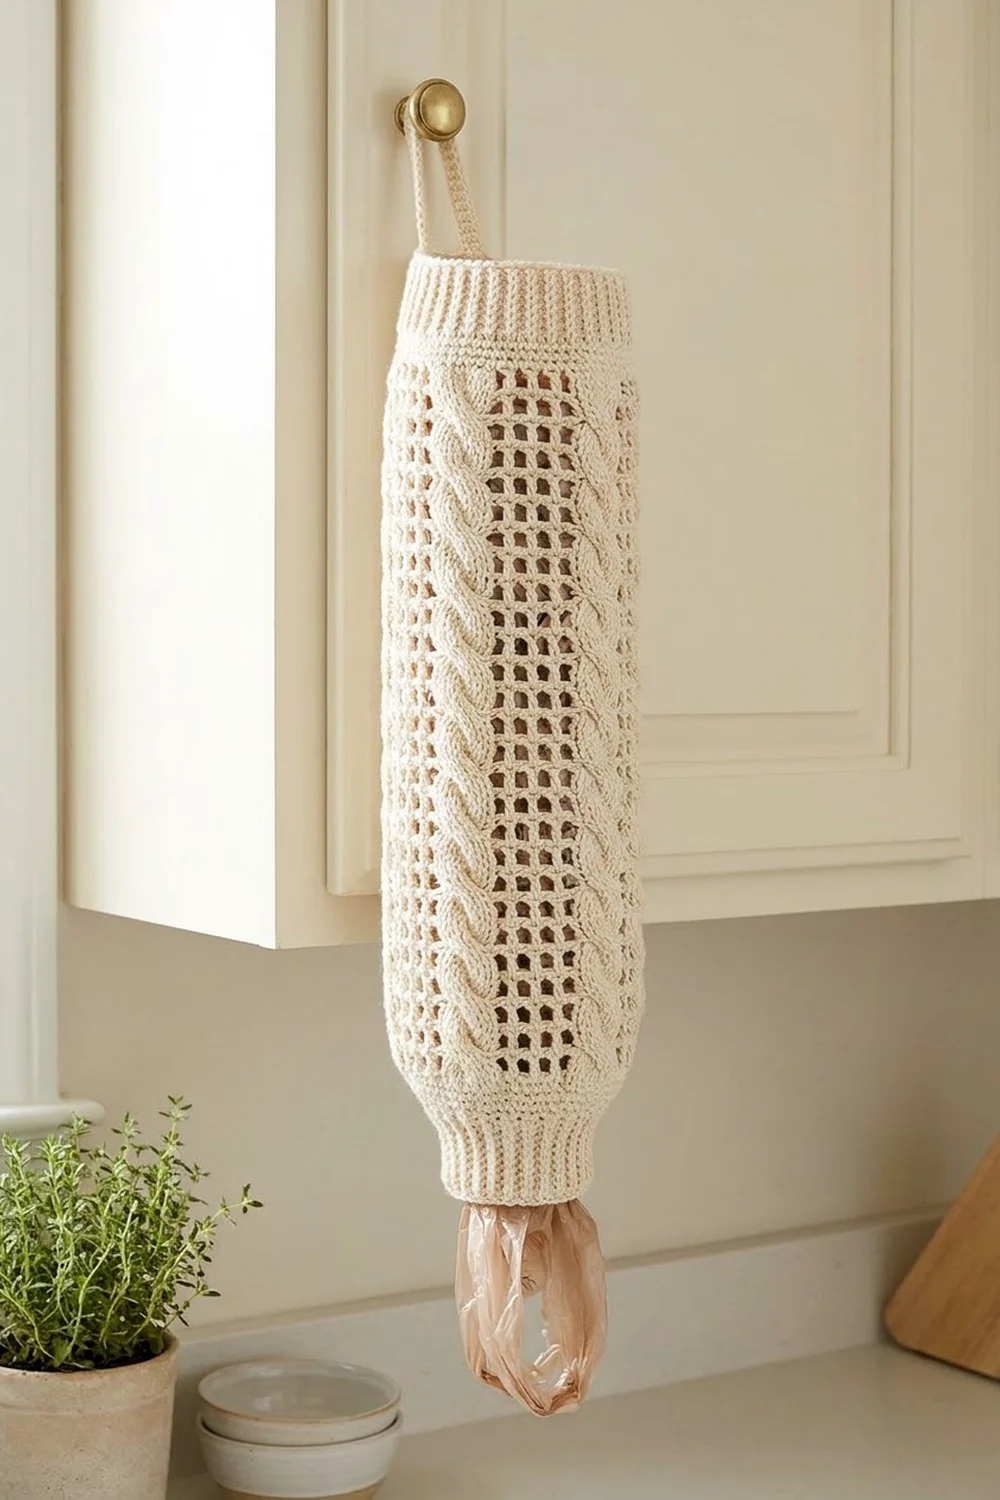
The Ivory Rope Plastic Bag Holder is a tall, textured tube that keeps grocery bags tidy and looks good doing it. Raised rope cables run the full length of the body, and narrow columns of open filet mesh sit between them. The mesh adds airy contrast to the cables and lets you see when the holder needs refilling.
The sample is worked in a soft cream cotton, which gives it a calm, farmhouse-kitchen look. It also works well in a light taupe or any neutral that suits your cabinets. Both ends finish with snug ribbed cuffs that look like knitting. You push bags in through the top and pull them out one at a time through the narrower bottom cuff.
This pattern uses US crochet terms. The finished holder measures 7 in (17.8 cm) wide when laid flat and 20.5 in (52.1 cm) long, not counting the hanging loop. The loop adds about 3.5 in (8.9 cm).
Construction is simple. You crochet one flat rectangular panel in rows, seam it into a tube, add a ribbed cuff to each opening in joined rounds, and finish with a sturdy hanging loop at the center back.
Finished Size and Construction
- Finished size: 7 in (17.8 cm) wide flat × 20.5 in (52.1 cm) long, plus a 3.5 in (8.9 cm) loop
- Circumference: 14 in (35.6 cm) at the body
- Skill level: Intermediate (front post cables, filet mesh, seaming)
- Terminology: US crochet terms
- Yarn weight: Worsted (#4), cotton or cotton blend
- Hook: 5.0 mm (H-8)
- Number of pieces: 1 (single panel, seamed into a tube)
- Layout: Vertical cable and mesh columns, seam at center back
- Panel size before seaming: 14 in (35.6 cm) wide × 16 in (40.6 cm) tall
- Size before border: 7 in (17.8 cm) flat × 16 in (40.6 cm) tube
- Border depth: 2.25 in (5.7 cm) ribbed cuff at each end
Materials
Yarn: Use a smooth worsted-weight cotton or cotton blend. Cotton shows crisp cable definition, holds its shape when packed with bags, and washes well. Avoid fuzzy or very splitty yarns, because post stitches will look blurry.
- Cream (main color): 180 g / approx. 320 m (350 yd)
- Optional alternate colorway: light taupe, same amount, if you want a matching second holder
These quantities include a margin of about 10% for your gauge swatch and small differences in tension.
Tools:
– 5.0 mm (H-8) crochet hook
– Tapestry needle
– Stitch markers (at least 3)
– Measuring tape
– Scissors
– Spray bottle or steamer for blocking
– Rolled towel or a 4.5 in (11.4 cm) diameter tube (a cardboard core or rolled magazine) for shaping
Abbreviations (US Terms)
- ch – chain
- sl st – slip stitch
- sc – single crochet
- dc – double crochet
- sk – skip
- sp – space
- sc2tog – single crochet 2 together
- FPdc – front post double crochet
- BPdc – back post double crochet
- FPtr – front post treble crochet
- RS / WS – right side / wrong side
- tch – turning chain
Special stitch – 2/2 Cable Cross (CC): Skip the next 2 stitches. FPtr around each of the next 2 stitches. Then, working in front of the 2 FPtr you just made, FPtr around each of the 2 skipped stitches. This uses 4 stitches and makes 4 stitches.
Mesh unit (M): Ch 1, sk next st or sp, dc in next dc, ch 1, sk next st or sp, dc in next dc, ch 1, sk next st or sp. This covers 5 stitches and gives 3 square holes.
Gauge and Checkpoints
Pattern gauge: One 9-stitch repeat (4 cable sts + 5 mesh sts) = 2.25 in (5.7 cm) wide. 8 rows = 4 in (10.2 cm) tall.
Test one piece first: Ch 22. Work Rows 1–3 of the pattern using 2 repeats instead of 6 (20 sts), then repeat Rows 4–7 once more and work 1 more Row 6. That makes 8 rows. Your swatch should measure 5 in (12.7 cm) wide × 4 in (10.2 cm) tall: 2 repeats of 2.25 in (5.7 cm) plus 2 edge dc of 0.25 in (0.6 cm) each.
Checkpoints:
– After Row 3: panel width is 14 in (35.6 cm).
– After Row 16: panel height is 8 in (20.3 cm).
– After Row 32: panel is 14 in × 16 in (35.6 cm × 40.6 cm).
– After seaming: tube is 7 in (17.8 cm) wide flat.
– After the top cuff: cuff is 6 in (15.2 cm) wide flat, 2.25 in (5.7 cm) deep.
– After the bottom cuff: cuff is 5.25 in (13.3 cm) wide flat, 2.25 in (5.7 cm) deep.
If your swatch is too big: go down to a 4.5 mm hook. If it is too small: go up to a 5.5 mm hook. Change hooks rather than adding or removing stitches. The 9-stitch repeat and the cuff decreases depend on the 56-stitch count.
Main Panel
The panel is worked flat in rows from the bottom up. The ch 3 at the start of each row counts as a dc. The cables are always worked as front post stitches on RS rows and back post stitches on WS rows, so they stay raised on the outside.
Foundation: Ch 58.
Row 1 (WS): Dc in 4th ch from hook (the skipped 3 ch count as the first dc) and in each ch across. Turn. (56 sts)
Row 2 (RS, set-up): Ch 3 (counts as dc), FPdc around each of next 4 sts, M (ch 1, sk 1, dc in next st, ch 1, sk 1, dc in next st, ch 1, sk 1). Repeat from * to * 5 more times (6 repeats total). Dc in top of tch. Turn. (56 sts: 2 edge dc + 6 × 9 sts)
Row 3 (WS): Ch 3, ch 1, sk ch-1 sp, dc in next dc, ch 1, sk ch-1 sp, dc in next dc, ch 1, sk ch-1 sp, BPdc around each of next 4 sts. Repeat from * to * 5 more times. Dc in top of tch. Turn. (56 sts)
On WS rows the order is reversed (mesh first, then cable). This keeps the mesh above mesh and the cables above cables.
Row 4 (RS, cable row): Ch 3, CC over next 4 sts, M. Repeat from * to * 5 more times. Dc in top of tch. Turn. (56 sts: 6 cables crossed)
Row 5 (WS): Work as Row 3. (56 sts)
Row 6 (RS, straight row): Ch 3, FPdc around each of next 4 sts, M. Repeat from * to * 5 more times. Dc in top of tch. Turn. (56 sts)
Row 7 (WS): Work as Row 3. (56 sts)
Rows 8–31: Repeat Rows 4–7 six more times. That gives 7 cable crossings in total, one every 4 rows. (56 sts every row)
Row 32 (RS): Work as Row 6. Fasten off, leaving a 24 in (61 cm) tail for seaming. (56 sts)
Measure here. The panel should be 14 in (35.6 cm) wide × 16 in (40.6 cm) tall, with 7 crossings in each of the 6 cable columns.
Seaming the Tube
Fold the panel with the WS together and line up the edge dc columns, keeping the rows matched one to one. Using the long tail and a tapestry needle, use mattress stitch to join the two edge dc posts. Take 2 passes per row end, for 64 passes over 32 rows.
Pull each pass just snug so the seam lies flat and doesn’t pucker. When it’s done, the two edge dc sit side by side as one slightly wider column at the center back. The loop will cover this later. Weave in the end.
Checkpoint: The tube is 7 in (17.8 cm) wide flat, which is a 14 in (35.6 cm) circumference.
Border: Ribbed Cuffs
The cuffs are worked in joined rounds with the RS facing. Do not turn. The ch 2 at the start of each rib round does not count as a stitch. Place a marker in the first stitch of each round.
Border gauge: 8 rib sts = 2 in (5.1 cm) slightly relaxed. 2 rib rounds = 1 in (2.5 cm).
Top Cuff
Rnd 1 (decrease): Join cream at the seam, in the top of Row 32. Ch 1. Working into Row 32, sc in each of next 5 sts (dc, post sts, and ch-1 sps all count as sts), sc2tog. Repeat from * to * 7 more times. Sl st to first sc.
Count: 56 existing sts worked as 48 sc. That is 8 groups of 7 sts, each becoming 6 sc. (48 sts: 24 on the front half, 24 on the back half)
Rnd 2: Ch 2, FPdc around next sc, BPdc around next sc. Repeat from * to * around (24 times). Sl st to first FPdc. (48 sts: 24 FPdc + 24 BPdc)
Rnds 3–5: Ch 2, FPdc around next FPdc, BPdc around next BPdc. Repeat from * to * around. Sl st to first FPdc. (48 sts each round)
Fasten off and weave in the end.
Checkpoint: The cuff is 6 in (15.2 cm) wide flat (12 in / 30.5 cm around) and 2.25 in (5.7 cm) deep: 0.25 in (0.6 cm) sc round plus 4 rib rounds at 0.5 in (1.3 cm) each.
Bottom Cuff
Turn the tube upside down. You will work into the base of the 56 stitches of Row 1, counting the base of the tch as a stitch.
Rnd 1 (decrease): Join cream at the seam. Ch 1. Sc in base of each of next 2 sts, sc2tog over next 2 bases. Repeat from * to * 13 more times. Sl st to first sc.
Count: 56 existing sts worked as 42 sc. That is 14 groups of 4 sts, each becoming 3 sc. (42 sts: 21 on the front half, 21 on the back half)
Rnd 2: Ch 2, FPdc around next sc, BPdc around next sc. Repeat from * to * around (21 times). Sl st to first FPdc. (42 sts)
Rnds 3–5: Ch 2, FPdc around next FPdc, BPdc around next BPdc. Repeat from * to * around. Sl st to first FPdc. (42 sts each round)
Fasten off and weave in the end.
Checkpoint: The cuff is 5.25 in (13.3 cm) wide flat (10.5 in / 26.7 cm around) and 2.25 in (5.7 cm) deep.
Why the Math Works
The body has 56 stitches, which divides evenly by 7 and by 4. At the top, removing 1 stitch from every 7 gives 48. At the bottom, removing 1 from every 4 gives 42. Both numbers are even, so FPdc/BPdc pairs go all the way around with no partial rib.
At 4 sts per inch, 48 sts is 12 in (30.5 cm) around, so the top cuff closes in gently. 42 sts is 10.5 in (26.7 cm) around, which grips the bags enough that they come out one at a time. The total length is 16 in (40.6 cm) of body plus two 2.25 in (5.7 cm) cuffs, which makes 20.5 in (52.1 cm).
Hanging Loop
Lay the holder flat with the seam centered on the back. Join cream with a sl st in the top edge of the last top-cuff round, directly above the seam.
Ch 26. Sl st in the same st and in the next st to anchor the loop. Without turning, sl st into the back bump of each of the 26 ch to make a firm, double-thick cord. Sl st into the st before the first anchor point.
Fasten off, and weave the end down through the cuff and back up twice for strength. The loop stands about 3.5 in (8.9 cm) above the cuff.
Final Blocking
- Weave in all remaining ends along the seam or inside the cuffs.
- Lightly mist the whole holder with water until it is damp but not soaked.
- Slide a rolled towel or a 4.5 in (11.4 cm) diameter tube inside the body.
- Smooth the cables so the columns run straight up and down, with no spiral twist.
- Gently open the mesh squares with your fingertips so the holes are even.
- Pat the body to 16 in (40.6 cm) long and 7 in (17.8 cm) wide flat.
- Leave the cuffs relaxed. Don’t stretch them, or they will lose their grip.
- Let it dry completely on the form, turning it once so both sides dry evenly.
- Remove the form and hang the holder on its loop.
Final Quality-Control Checklist
- [ ] Every body row has 56 sts.
- [ ] 6 cable columns, each with 7 crossings, all crossing in the same direction
- [ ] Each mesh column has 3 holes across and lines up straight from bottom to top.
- [ ] The seam is flat and centered at the back.
- [ ] Top cuff: 48 sts, 4 rib rounds, 6 in (15.2 cm) flat
- [ ] Bottom cuff: 42 sts, 4 rib rounds, 5.25 in (13.3 cm) flat
- [ ] Total length is 20.5 in (52.1 cm), plus a 3.5 in (8.9 cm) loop.
- [ ] The loop is anchored above the seam and holds firm when pulled.
- [ ] All ends are woven in securely.
Troubleshooting
Cables lean or cross in different directions: Always skip the first 2 stitches and work the second pair first, with the skipped pair in front. Mark the first crossing row as a reminder.
Cable columns drift sideways: On WS rows, you may be working BPdc into the wrong stitches. Check that each cable starts directly above the previous one, and count 5 mesh sts between cables.
Mesh holes close up: Your ch-1 is too tight. Make the chain a little looser, or replace each ch 1 with a ch 1 worked on a hook one size larger.
Panel is wider than 14 in (35.6 cm): Post stitches pull in less when tension is loose. Go down one hook size and swatch again.
Top cuff flares: Pull your FPdc a little tighter. If it still flares, work Rnd 1 with a hook one size smaller.
Bags fall out of the bottom: Add one more rib round to the bottom cuff using a 4.5 mm hook to tighten the opening.
Bags won’t pull out: Leave out the sc2tog in every other group on bottom Rnd 1. That gives 49 sts, so add 1 more sc2tog to get an even 48. Then work the cuff to 48 sts.
Seam ridge is bulky: Mattress-stitch through the outer loops of the posts only, and don’t pull the yarn tight.
Care
Machine wash cold on a gentle cycle inside a laundry bag, or hand wash. Reshape it over a rolled towel and air dry flat. Don’t tumble dry, or the cables may shrink and the cuffs may distort.
Final Notes
Here is the full measurement chain. One 9-stitch repeat is 2.25 in (5.7 cm), so 6 repeats plus 2 edge stitches make a 56-stitch panel 14 in (35.6 cm) wide. 32 rows make it 16 in (40.6 cm) tall. Seamed, that becomes a tube 7 in (17.8 cm) wide flat. The top decreases to 48 stitches for a 6 in (15.2 cm) cuff, and the bottom decreases to 42 stitches for a 5.25 in (13.3 cm) cuff, each 2.25 in (5.7 cm) deep. Together they bring the holder to 20.5 in (52.1 cm) long, plus the 3.5 in (8.9 cm) loop.
If you check the swatch first and measure at each checkpoint, the finished holder will match.
Happy crocheting!