

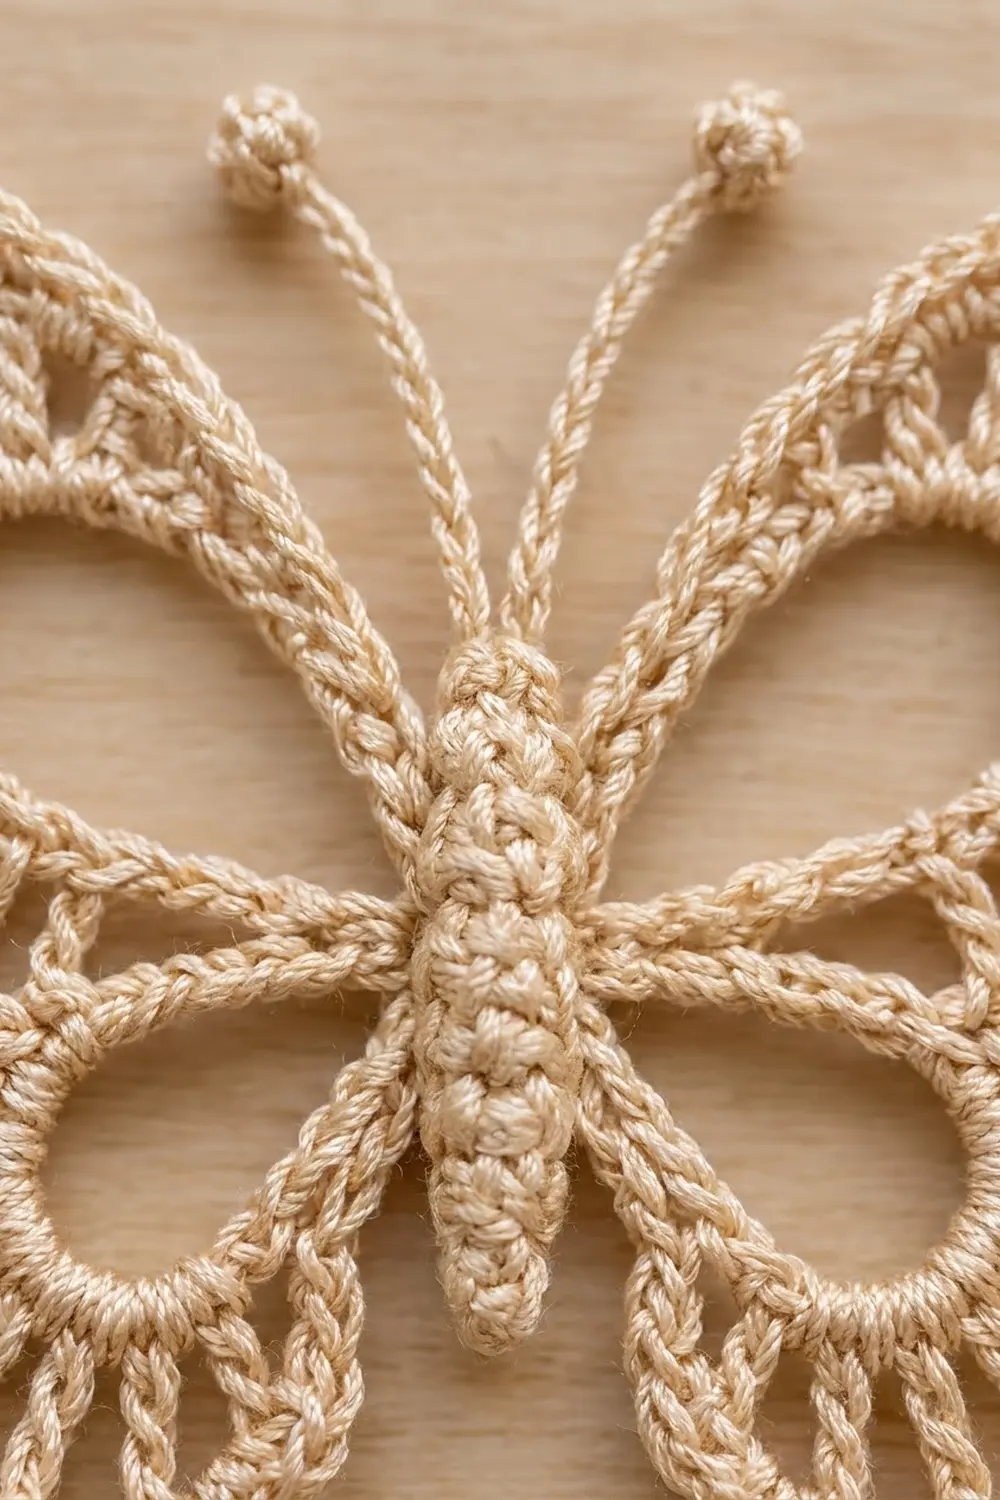
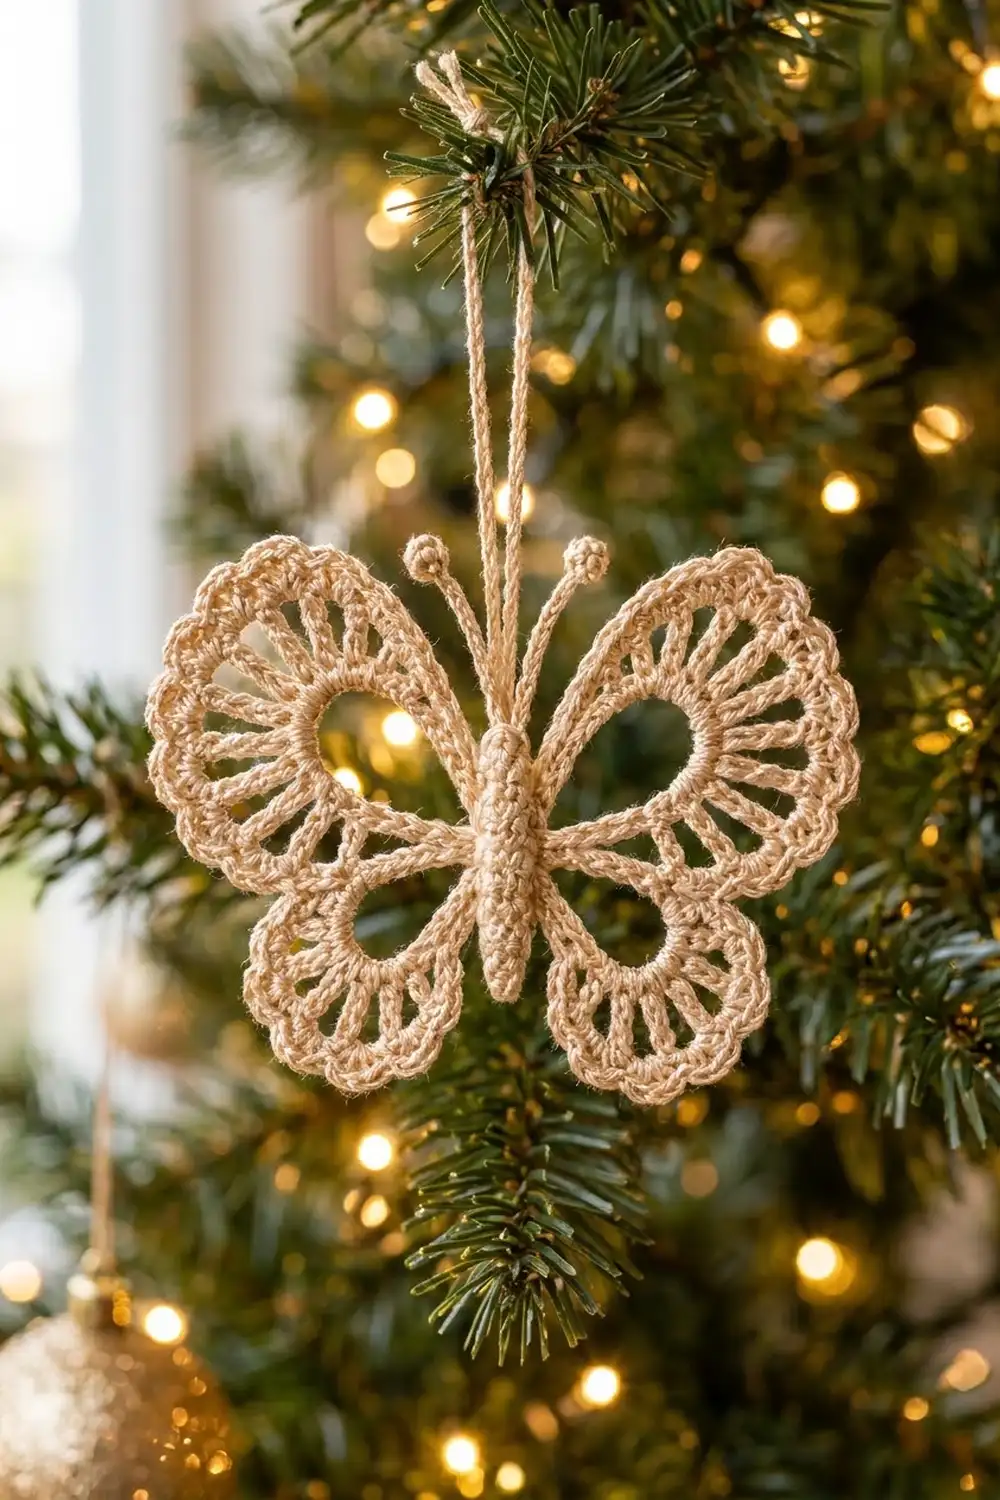
This delicate butterfly ornament has open teardrop windows in each wing, fine spokes radiating outward, and a soft scalloped edge. A padded, ridged body and two beaded antennae finish it off, so it looks as good flat on a table as it does catching the light on a Christmas tree.
The sample is worked in a single shade of cream cotton thread. Using one color keeps the focus on texture and on the shadows the open lace creates. It also looks lovely in soft gold, pale blush, or crisp white.
This pattern uses US crochet terms. The finished butterfly measures 4.75 in (12.1 cm) wide by 3.75 in (9.5 cm) tall.
Construction is simple. You chain four loops off a small center ring and work around all four wings in continuous rounds: a single crochet outline, a spoke round, a solid edge round, and a scalloped border. Then you make the body separately in the round, add the antennae, and sew the body over the center of the wings.
Finished Size and Construction
- Finished size: 4.75 in (12.1 cm) wide x 3.75 in (9.5 cm) tall
- Skill level: Intermediate
- Terminology: US crochet terms
- Yarn weight: Size 3 crochet thread (Super Fine / #1)
- Hook: 2.25 mm (US B-1)
- Number of pieces: 1 finished butterfly, made from 2 components (wing panel + body) sewn together
- Layout: Single motif. No grid and no joining of multiple pieces.
- Piece size (bordered): 4.75 in x 3.75 in (12.1 cm x 9.5 cm)
- Size before border: 4.25 in x 3.25 in (10.8 cm x 8.3 cm)
- Border depth: 0.25 in (0.6 cm) on every outer edge
Materials
Yarn: Choose a smooth, mercerized cotton crochet thread in size 3. Mercerized cotton gives crisp stitch definition and holds its shape well after blocking. Avoid fuzzy or very soft fibers, because the lace spokes will blur.
- Cream / Ivory: 10 g (about 45 m / 49 yd)
The quantity includes a margin for your gauge swatch, the antennae, the hanging loop, and sewing tails.
Tools:
- 2.25 mm (US B-1) crochet hook
- Tapestry needle
- Scissors
- 1 stitch marker
- A small pinch of fiberfill or thread scraps (for the body)
- Rustproof pins and a blocking board or foam mat
- Spray bottle; spray starch (optional)
Abbreviations (US Terms)
- ch – chain
- sl st – slip stitch
- sc – single crochet
- hdc – half double crochet
- dc – double crochet
- tr – treble crochet
- sc2tog – single crochet 2 together
- sk – skip
- sp – space
- st(s) – stitch(es)
- MR – magic ring
- BLO – back loop only
Special stitch – Bobble (4-dc cluster): *Yarn over, insert hook in the stitch indicated, yarn over and pull up a loop, yarn over and pull through 2 loops; repeat from * 3 more times in the same stitch (5 loops on hook). Yarn over and pull through all 5 loops, then ch 1 to close.
Gauge and Checkpoints
Gauge: 8 sc and 9 rows = 1 in (2.5 cm).
Swatch: Ch 17. Sc in the 2nd ch from hook and in each ch across (16 sc). Work 17 more rows of 16 sc, for 18 rows in total. The swatch should measure 2 in (5.1 cm) square.
Before committing to the full wing panel, work Rounds 1–2 as a test and check the loop sizes. These checkpoints keep the whole measurement chain on track:
- After Round 2: Each upper loop measures about 1.25 in (3.2 cm) from the ring to the tip. Each lower loop measures about 1 in (2.5 cm).
- After Round 3: Each treble spoke stands about 0.4 in (1.0 cm) tall.
- After Round 4: The wing panel measures 4.25 in x 3.25 in (10.8 cm x 8.3 cm) when gently flattened.
- After Round 5 (border): The panel measures 4.75 in x 3.75 in (12.1 cm x 9.5 cm).
- Body: 2 in (5.1 cm) long and about 0.4 in (1.0 cm) wide.
Too big? Change to a 2.0 mm hook and pull each sc of Round 2 snug.
Too small? Change to a 2.5 mm hook.
Measure again after Round 2 every time you change hooks.
Wing Panel
The wings are worked in continuous rounds around four chain loops that all start from one small center ring. Join each round with a sl st to its first stitch. Do not turn.
Ring: Ch 6, then sl st in the first ch to form a ring.
Round 1 (chain loops): Ch 24, sl st in ring. This is the upper right loop. Ch 18, sl st in ring (lower right loop). Ch 18, sl st in ring (lower left loop). Ch 24, sl st in ring (upper left loop). You now have 4 chain loops: two of 24 ch and two of 18 ch.
Lay the piece flat. Arrange the two long loops pointing up and outward and the two short loops pointing down and outward, like a four-petal flower.
Round 2 (outline): Ch 1. Working into the space of each loop so the chain is fully encased, work as follows:
- 32 sc around the upper left loop
- 24 sc around the lower left loop
- 24 sc around the lower right loop
- 32 sc around the upper right loop
Join with sl st to the first sc. Total: 112 sc (32 + 24 + 24 + 32).
Push the stitches together as you go so each loop is firmly packed. The open center of each loop forms the teardrop window.
Round 3 (spokes): In this round each wing has a short graduated section at each end and treble spokes across the outer curve. Count stitches carefully.
Upper wing (worked into its 32 sc):
- Sc in st 1, hdc in st 2, dc in st 3.
- Work (tr in next st, ch 2, sk 1 st) 13 times, using sts 4–29.
- Dc in st 30, hdc in st 31, sc in st 32.
Each upper wing has 19 sts + 13 ch-2 sps.
Lower wing (worked into its 24 sc):
- Sc in st 1, hdc in st 2, dc in st 3.
- Work (tr in next st, ch 2, sk 1 st) 9 times, using sts 4–21.
- Dc in st 22, hdc in st 23, sc in st 24.
Each lower wing has 15 sts + 9 ch-2 sps.
Begin the round with ch 1 and work the sc in the same st as the join. Then work the wings in order: upper left, lower left, lower right, upper right. The last sc of one wing sits right next to the first sc of the next wing; no extra stitches go between them. Join with sl st to the first sc.
Round 3 totals: 68 sts (19 + 15 + 15 + 19) + 44 ch-2 sps (13 + 9 + 9 + 13).
Round 4 (solid edge, conversion round): Ch 1.
Upper wing:
- Sc in the sc, sc in the hdc, sc in the dc.
- Work (sc in tr, 3 sc in ch-2 sp) 13 times.
- Sc in the dc, sc in the hdc, sc in the sc.
Each upper wing has 19 sts worked 1-per-stitch + 39 extra sc in spaces (13 x 3) = 58 sc.
Lower wing: Work the same way, with the repeat 9 times.
Each lower wing has 15 sts worked 1-per-stitch + 27 extra sc in spaces (9 x 3) = 42 sc.
Join with sl st to the first sc. Round 4 total: 68 + 132 = 200 sc (58 + 42 + 42 + 58).
Checkpoint: The panel should now measure 4.25 in x 3.25 in (10.8 cm x 8.3 cm). Do not fasten off.
Body
The body is worked in continuous spiral rounds. Place a marker in the first stitch of each round.
- Round 1: 6 sc in MR. (6)
- Round 2: (Sc in next st, 2 sc in next st) 3 times. (9)
- Rounds 3–4: Sc in each st around. (9)
- Round 5: (Sc2tog, sc in next st) 3 times. (6) This forms the neck.
- Round 6: Working in BLO, (sc in next st, 2 sc in next st) 3 times. (9)
- Rounds 7–14: Working in BLO, sc in each st around. (9) The BLO rounds create the horizontal segment ridges.
Stuff the body lightly with a pinch of fiberfill or thread scraps. It should be padded but still flat enough to lie against the wings.
- Round 15: (Sc in next st, sc2tog) 3 times. (6)
- Round 16: Sc in each st around. (6)
- Round 17: Sc2tog 3 times. (3)
Fasten off, leaving a 12 in (30.5 cm) tail for sewing. Weave the tail through the 3 remaining stitches and pull them closed.
Checkpoint: The body should be 2 in (5.1 cm) long and about 0.4 in (1.0 cm) wide.
Antennae (make 2): Join the thread to a stitch on the top of the head (Round 2).
- Ch 15.
- Work a Bobble in the 4th ch from the hook. The 3 skipped chains wrap around the base of the bobble and form the round tip.
- Sl st in each of the remaining 11 ch, working back toward the head.
- Sl st in the head stitch.
Fasten off. Make the second antenna 2 stitches over from the first. Each antenna should be about 1.25 in (3.2 cm) long. The slip stitches worked back along the chain give the antennae their twisted, cord-like look.
Border
Border gauge: One scallop (a sl st plus 3 hdc) covers 4 stitches of Round 4 and adds 0.25 in (0.6 cm) of depth.
Round 5 (scallop border): Continue from the Round 4 join. Do not ch 1.
Upper wing (58 sts):
- Sl st in the same st as the join and in each of the next 2 sts (3 sl st).
- Work (sl st in next sc, which sits above a tr; sk 1 sc; 3 hdc in next sc; sk 1 sc) 13 times.
- Sl st in each of the last 3 sts.
Each upper wing has 3 + (13 x 4) + 3 = 58 sts and 13 scallops.
Lower wing (42 sts): Work the same way, with the repeat 9 times.
Each lower wing has 3 + (9 x 4) + 3 = 42 sts and 9 scallops.
Work all four wings in the same order as before. Join with sl st to the first sl st and fasten off. Total: 200 sts and 44 scallops.
Why the math works: In Round 4, each spoke repeat produced exactly 4 sc: 1 above the tr and 3 in the ch-2 space. Each scallop uses exactly those 4 stitches. That places the 3 hdc on the center sc of each space, so every scallop sits neatly between two spokes. The 3 graduated stitches at each end of a wing (sc, hdc, dc) get flat sl sts, which keeps the inner wing edges smooth where the body will sit.
Checkpoint: The panel should now measure 4.75 in x 3.75 in (12.1 cm x 9.5 cm).
Assembly
- Lay the wing panel right side up.
- Center the body vertically over the ring. Place the neck (Round 5 of the body) level with the point where the upper wings meet, so the head sits just above the wing junction.
- Using the body tail and a tapestry needle, whipstitch the underside of the body to the ring and to the inner sc of Round 2 at each wing junction.
- Keep your stitches on the underside of the body so they stay hidden.
- Hanging loop: Join thread at the back of the neck. Ch 40, then sl st in the same stitch. Fasten off. The loop hangs about 2 in (5.1 cm) above the head.
- Weave in all ends through solid sc areas, never through the spokes.
Final Blocking
- Wet the butterfly in cool water, then press it gently in a towel to remove excess water.
- Pin the panel to your blocking board at 4.75 in x 3.75 in (12.1 cm x 9.5 cm).
- Place one pin in each teardrop window to open it into a smooth shape.
- Pin each scallop point so the spokes fan out evenly.
- Shape both antennae into gentle outward curves and pin the bobble tips in place.
- Spray lightly with starch if you want a stiff ornament.
- Let the butterfly dry completely, about 12 hours, before unpinning.
Final Quality-Control Checklist
- Round 2 totals 112 sc (32, 24, 24, 32).
- Each upper wing has 13 spokes and each lower wing has 9.
- Round 4 totals 200 sc (58, 42, 42, 58).
- There are 44 scallops, each sitting between two spokes.
- The panel measures 4.75 in x 3.75 in (12.1 cm x 9.5 cm).
- The body is 2 in (5.1 cm) long, with visible ridges.
- Both antennae match in length, about 1.25 in (3.2 cm) each.
- All ends are woven in, with no tails showing through the lace.
Troubleshooting
- Teardrop windows close up: Your Round 2 is too tight or overpacked. Check that you have exactly 32 or 24 sc per loop, and block with a pin in each window.
- Wings ruffle: The spokes are too tall or the ch-2 spaces too long. Go down a hook size, or work ch 1 instead of ch 2 and only 2 sc per space in Round 4. Note that this changes all the later counts.
- Wings cup: Your tension is tight. Go up a hook size for Rounds 3–5 only.
- Scallops don’t line up between spokes: You lost count in Round 4. Each spoke repeat must be exactly 4 sc.
- Body twists: Stuff more lightly, and steam it straight before sewing.
- Antenna tips are flat: Tighten the bobble’s closing ch 1 and pull the 3 skipped chains around the bobble.
Care
Hand wash in cool water with mild soap, press out water in a towel, and dry flat with the butterfly pinned to shape. Re-starch as needed to keep it crisp as an ornament.
Final Notes
This butterfly relies on a short, dependable measurement chain:
- Gauge: 8 sc = 1 in (2.5 cm).
- Round 2 sets the windows: 112 sc.
- Round 3 builds 44 spokes.
- Round 4 converts them into 200 sc and a 4.25 in x 3.25 in (10.8 cm x 8.3 cm) panel.
- The scallop border adds 0.25 in (0.6 cm) on every outer edge, for 4.75 in x 3.75 in (12.1 cm x 9.5 cm).
Check each stage and the finished ornament will block crisp and symmetrical. Make one for a gift tag, or a whole flutter for your tree.
Happy crocheting!