

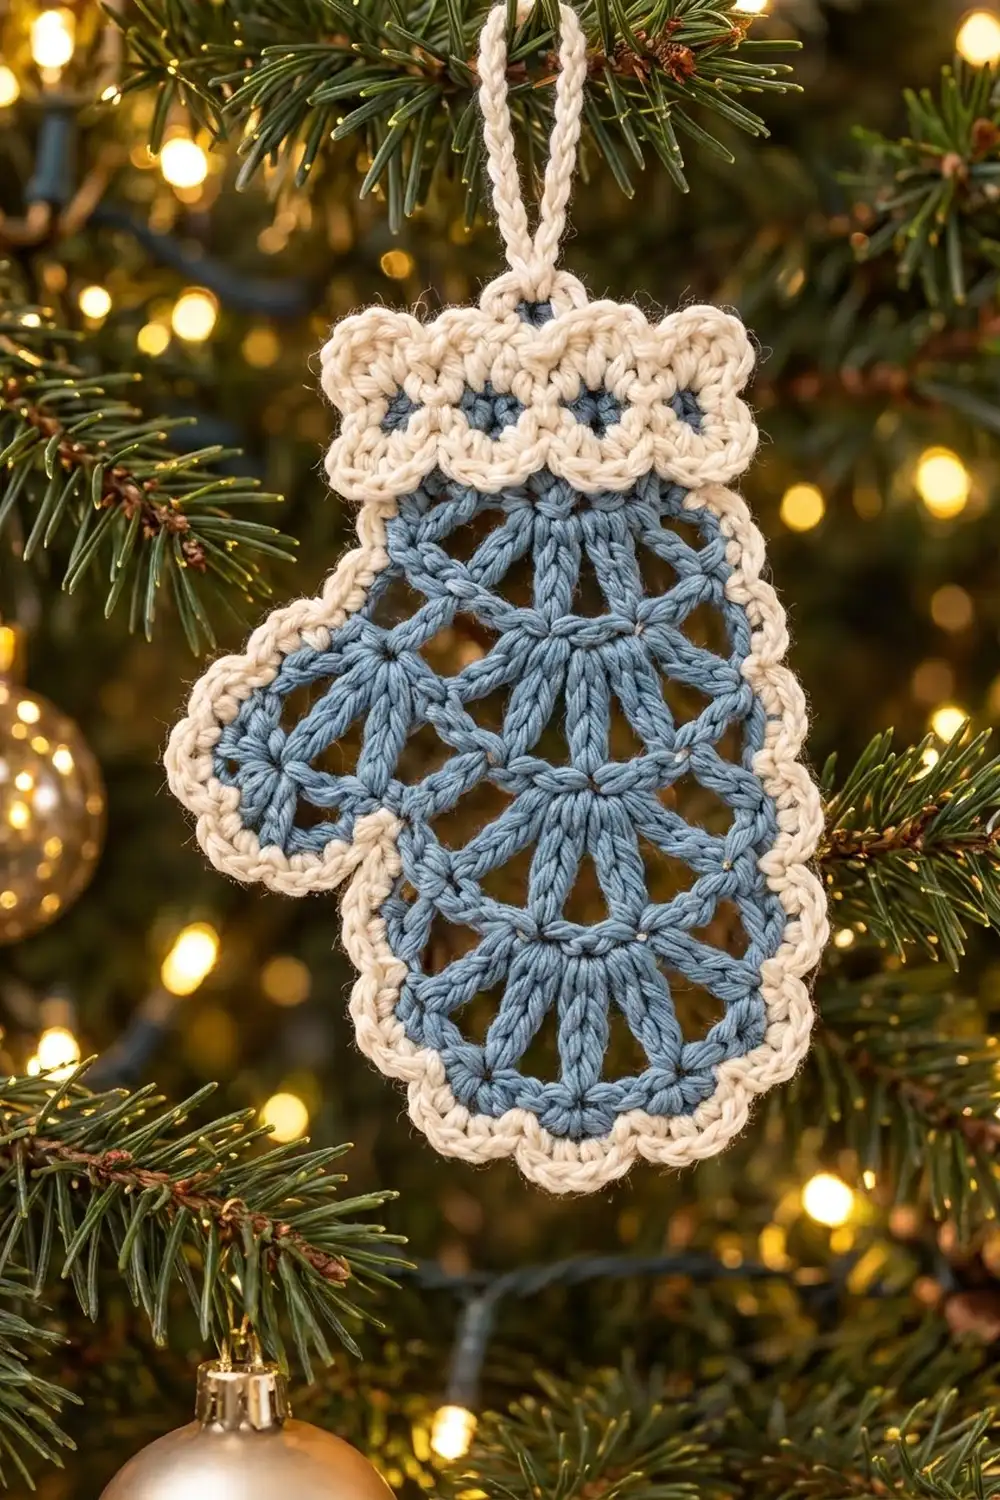
The Frosted Fan Mitten is a small, flat, lacy ornament. It is shaped like a single mitten, with a thumb on one side and a cream cuff at the top. The body is worked in dusty blue in rows of open fans, so each tier of fans spreads toward the fingertips. Gaps between the fans catch the tree lights.
The palette has two colors. Dusty blue is used for the lace body and thumb. Cream is used for the cuff, the scalloped outer border, and the hanging loop. Along the cuff runs a row of small eyelets that sit right on top of the blue, so a little blue shows through each one. The style is soft, wintry, and a bit vintage, and it looks equally good on a tree, a gift package, or a garland hook.
This pattern uses US crochet terms. The finished ornament measures 3.75 in (9.5 cm) wide across the thumb and 4.875 in (12.4 cm) tall, not counting the hanging loop.
Here is the construction. The body is crocheted flat in 10 blue rows, working from the cuff line down to the fingertips. The thumb is worked out from the right edge in 3 short rows. The cream cuff is worked into the free loops of the foundation chain. A two-row cream border with scallops then goes around the sides, thumb, and fingertips, and a crocheted loop goes on last. All of this makes one single piece.
Finished Size and Construction
- Finished size: 3.75 in (9.5 cm) wide x 4.875 in (12.4 cm) tall, loop not included
- Skill level: Easy-Intermediate
- Terminology: US crochet terms
- Yarn weight: DK (#3 light), cotton or cotton blend
- Hook: 3.5 mm (E-4)
- Number of pieces: 1
- Layout: a single flat mitten ornament with the thumb on the right (RS facing, cuff at the top)
- Piece size before border: 3 in (7.6 cm) wide x 4.5 in (11.4 cm) tall
- Body alone: 2.25 in (5.7 cm) wide x 3.75 in (9.5 cm) tall
- Cuff depth: 0.75 in (1.9 cm)
- Border depth: 0.375 in (1.0 cm)
Materials
Pick a smooth, mercerized or combed cotton in DK weight. Cotton keeps the fans crisp and holds its shape after blocking. Avoid fuzzy yarns, because the openwork is the whole look and fuzz fills in the gaps.
- Color A, dusty blue: 10 g, about 23 m (body and thumb)
- Color B, cream: 6 g, about 14 m (cuff, border, hanging loop)
Both quantities already include a margin for your gauge swatch and weaving in ends.
Tools:
- 3.5 mm (E-4) crochet hook
- Tapestry needle
- Scissors
- Blocking mat or folded towel
- Rust-proof pins
- Spray bottle with water
- Ruler or measuring tape
Abbreviations (US Terms)
- ch – chain
- sl st – slip stitch
- sc – single crochet
- dc – double crochet
- sp(s) – space(s)
- st(s) – stitch(es)
- RS / WS – right side / wrong side
Special stitch – Open Fan: (dc, ch 1, dc, ch 1, dc, ch 1, dc) all worked into the same stitch. One open fan has 4 dc and 3 ch-1 sps. The center ch-1 sp is the second of the three.
Half Fan: (dc, ch 1, dc) at the edge of a row. See Row 4 for exactly how it is worked.
Gauge and Checkpoints
Gauge: 23 sc = 4 in (10.2 cm) with a 3.5 mm hook. Crochet one full ornament before you commit to a batch, and measure at each of these points:
- After Row 1: 13 sc measure 2.25 in (5.7 cm) across.
- After Row 5: the body measures 1.75 in (4.4 cm) tall from the foundation edge.
- After Row 10: the body measures 3.75 in (9.5 cm) tall to the tips of the fans.
- After the thumb: it sticks out 0.75 in (1.9 cm) from the body edge and is 1 in (2.5 cm) wide at the base.
- After the cuff: 0.75 in (1.9 cm) deep. The whole piece measures 3 in x 4.5 in (7.6 x 11.4 cm).
- After the border: 3.75 in x 4.875 in (9.5 x 12.4 cm).
If Row 1 comes out wider than 2.25 in (5.7 cm), go down a half size to 3.25 mm. If it is narrower, go up to 3.75 mm. Fix the hook size now, because each later section is measured against this first row.

Body (Color A, Blue)
Work flat in rows and turn at the end of each row. In this section, a turning ch-1 does not count as a stitch. A ch-4 or ch-5 at the start of a row does count, as noted in each row.
Row 1: Ch 14. Sc in 2nd ch from hook and in each ch across. Turn. (13 sc)
Row 2 (fan row): Ch 1, sc in first sc, skip 2 sc, open fan in next sc, skip 2 sc, sc in next sc; repeat from * once more. Turn. (2 open fans, 3 sc)*
How the count works: sc (st 1), skip sts 2–3, fan (st 4), skip sts 5–6, sc (st 7), skip sts 8–9, fan (st 10), skip sts 11–12, sc (st 13). That uses all 13 stitches.
Row 3 (arc row): Ch 5 (counts as dc + ch 2), sc in center ch-1 sp of next fan, ch 2, dc in next sc, ch 2, sc in center ch-1 sp of next fan, ch 2, dc in last sc. Turn. (3 dc including turning ch, 2 sc, 4 ch-2 sps)
Row 4 (offset fan row): Ch 4 (counts as dc + ch 1), dc in first dc to make a half fan. Sc in next sc, open fan in next dc, sc in next sc, (dc, ch 1, dc) in 3rd ch of turning ch-5 to make the second half fan. Skip all ch-2 sps. Turn. (1 open fan + 2 half fans = 8 dc, 5 ch-1 sps, 2 sc)
Row 5 (arc row): Ch 1, sc in first dc, ch 2, dc in next sc, ch 2, sc in center ch-1 sp of the open fan, ch 2, dc in next sc, ch 2, sc in 3rd ch of turning ch-4. Turn. (3 sc, 2 dc, 4 ch-2 sps)
Row 6 (fan row): Ch 1, sc in first sc, open fan in next dc, sc in next sc, open fan in next dc, sc in last sc. Skip all ch-2 sps. Turn. (2 open fans, 3 sc), which is the same as Row 2.
Rows 7–10: Repeat Rows 3–6 once. Row 10 is a fan row with 2 open fans and 3 sc. Its fans make the rounded fingertip edge. Fasten off.
Check: the edges should be even. In each pair of rows, a short sc at one end sits under a tall dc at the same end in the next row, so neither side climbs faster than the other. The body measures 2.25 x 3.75 in (5.7 x 9.5 cm).
Thumb (Color A, Blue)
Hold the body RS facing (the side facing you as you worked Row 2), with the foundation edge at the top. Rows 4–6 form the right-hand edge.
Row T1: Join blue at the end of Row 4. Ch 1, then work 3 sc in the end of Row 4, 2 sc in the end of Row 5, and 2 sc in the end of Row 6. Turn. (7 sc)
Row T2: Ch 1, sc in first sc, skip 2 sc, open fan in next sc, skip 2 sc, sc in last sc. Turn. (1 open fan, 2 sc)
Row T3: Ch 1, sc in first sc, ch 2, sc in center ch-1 sp of the fan, ch 2, sc in last sc. (3 sc, 2 ch-2 sps) Fasten off.
The single fan curves the thumb tip, and it sticks out 0.75 in (1.9 cm). For a left-hand mitten, work the thumb along the left edge across the same three rows.
Cuff (Color B, Cream)
Turn the body so the foundation chain is at the top. You’ll work into the 13 free loops on the underside of the chain.
Row C1 (eyelet row): Join cream in the first free loop. Ch 1, sc in same loop, ch 3, skip 2 loops, sc in next loop; repeat from * 3 more times. Turn. (5 sc, 4 ch-3 sps)*
Each ch-3 bridges two skipped loops, which leaves a small diamond-shaped eyelet right above the blue Row 1. That is how the blue peeks through the cuff.
Row C2 (conversion row): Ch 1, sc in first sc, 2 sc in next ch-3 sp, sc in next sc; repeat from * 3 more times. Turn. (5 sc worked 1-per-sc + 8 sc added in the spaces = 13 sc)*
Row C3 (shell row): Ch 1, sc in first sc, skip 1 sc, 5 dc in next sc, skip 1 sc, sc in next sc; repeat from * 2 more times. (3 shells, 4 sc = 19 sts)* Fasten off.
Check: the cuff is 0.75 in (1.9 cm) deep, and the whole piece now measures 3 x 4.5 in (7.6 x 11.4 cm).
Border (Color B, Cream)
The border goes around the open edges from one top corner of the cuff to the other: down the left side, across the fingertips, then up the right side and around the thumb. The cuff’s own shell row is the top edge, so the border doesn’t cross it.
Border gauge: about 5 sc per 1 in (2.5 cm) along row ends. Row-end rule: work 1 sc in the end of each row that has an sc at its edge, and 3 sc in the end of each row that has a dc at its edge.
Border Row 1 (RS): With RS facing, join cream at the top-left corner of the cuff (end of Row C3). Ch 1, then:
- Left side (20 sc): 1 sc in each end of C3, C2 and C1 (3 sc). Then along body Rows 1–9: 1 sc in each end of Rows 1, 2, 5, 6 and 9 (5 sc) and 3 sc in each end of Rows 3, 4, 7 and 8 (12 sc).
- Fingertip edge (21 sc): Along the top of Row 10, 3 sc in the first sc (corner). Then 1 sc in each st and each ch-1 sp across, 15 sc. Finish with 3 sc in the last sc (corner).
- Right side (28 sc):
- Work 1 + 3 + 3 = 7 sc in the ends of Rows 9, 8 and 7.
- Thumb, 13 sc in all: 1 sc in each end of Rows T1, T2 and T3 (3 sc). Across the top of T3, sc in the sc, 2 sc in the ch-2 sp, sc in the center sc, 2 sc in the ch-2 sp, sc in the last sc (7 sc). Then 1 sc in each end of T3, T2 and T1 (3 sc).
- Work 3 + 1 + 1 = 5 sc in the ends of Rows 3, 2 and 1.
- Finish with 1 sc in each end of C1, C2 and C3 (3 sc).
Turn. (20 + 21 + 28 = 69 sc)
Border Row 2 (scallops): Ch 1, sc in first sc, skip 1 sc, 5 dc in next sc, skip 1 sc, sc in next sc; repeat from * 16 more times. (17 scallops: 18 sc + 85 dc = 103 sts)* Fasten off.
Why the math works: each scallop uses 4 stitches, plus 1 sc to close the row, so Row 1 needs a multiple of 4 plus 1. Since 69 = (4 x 17) + 1, the last repeat ends exactly in the last sc at the top-right cuff corner. If your count is off, fix Row 1 before you start the scallops. The border depth is 0.375 in (1.0 cm).
Hanging loop: Join cream in the center dc of the middle shell of Row C3. Ch 20, sl st in the same dc. Work 20 sc into the loop, then sl st in the base. Fasten off. The finished loop is about 2 in (5.1 cm) tall.
Weave in every end inside the cream stitches, where it won’t show through the blue lace.
Final Blocking
- Wet the ornament in cool water, then press it in a towel until it is just damp.
- Lay it RS up on the blocking mat.
- Pin the cuff top corners 3 in (7.6 cm) apart.
- Pin the fingertip edge so the body is 4.875 in (12.4 cm) tall from the cuff shells to the outermost scallop.
- Pin the thumb out so the overall width is 3.75 in (9.5 cm).
- Open every fan with a pin through the center ch-1 sp, and point it toward the fingertips.
- Pin each border scallop at its center dc.
- Mist with water and leave until completely dry. For an extra-crisp ornament, spray it lightly with fabric stiffener before it dries.
Final Quality-Control Checklist
- Row 1 has 13 sc and measures 2.25 in (5.7 cm).
- The body has 5 fan rows with all fans opening toward the fingertips.
- The thumb has 1 fan and sticks out 0.75 in (1.9 cm).
- Cuff Row C1 shows 4 eyelets with blue visible at their base.
- The cuff has 3 shells across its top.
- Border Row 1 totals 69 sc, and Row 2 has 17 scallops.
- The ornament measures 3.75 x 4.875 in (9.5 x 12.4 cm).
- The loop is centered and all ends are hidden.
Troubleshooting
Body edges ripple: Your turning chains are too tight. Loosen the ch-4 and ch-5 so they match the height of a dc.
Fans overlap and cup: You are working too loosely. Go down a hook size, or pin each fan flat while blocking.
Border flares: You worked more than 1 sc in short row ends. Recount against the row-end rule.
Border pulls in: The fingertip corners are tight. Make sure each corner stitch has 3 sc in it.
Scallops don’t end evenly: Border Row 1 isn’t 69 sc. Recount each section (20, 21, 28).
Thumb leans: Check the 3-2-2 sc spread across Rows 4–6 in Row T1.
Care
Hand wash in cool water and lay flat to dry, reshaping the fans and scallops while damp. Store flat in tissue so the lace and loop don’t crush.
Final Notes
The measurement chain is simple. Row 1 sets the width at 2.25 in (5.7 cm), and 10 rows bring the body to 3.75 in (9.5 cm). The thumb adds 0.75 in (1.9 cm) and the cuff adds 0.75 in (1.9 cm), so the piece measures 3 x 4.5 in (7.6 x 11.4 cm) before the border. The 69-stitch border adds 0.375 in (1.0 cm) on each open edge, giving a finished ornament of 3.75 x 4.875 in (9.5 x 12.4 cm). Check each link as you go, and every mitten will match.
Happy crocheting!