

The Harbor Grid Drawer Organizer is a firm, square crochet tray with a removable nine-compartment insert. It fits in a dresser drawer and keeps rolled socks, watches, ties, or small accessories in separate cubbies.
The outer tray is deep navy with a rolled rim made in reverse single crochet. The insert is warm cream, so the grid of compartments stands out against the dark base and walls. Dense single crochet gives both pieces a firm, woven look that holds its shape without plastic canvas.
This pattern uses US crochet terms. The finished tray is about 12.5 in (31.8 cm) square and 3.5 in (8.9 cm) tall. Each compartment is about 3.4 in (8.6 cm) square inside.
You’ll crochet the navy base in rows, edge it, then turn the walls up in rounds. The cream insert is a tube-shaped frame plus eight flat dividers, sewn into a 3 x 3 grid. The insert slides in and out of the tray.
Finished Size and Construction
- Finished size (tray): 12.5 in (31.8 cm) square, 3.5 in (8.9 cm) tall
- Base: 12 in x 12 in (30.5 cm x 30.5 cm)
- Skill level: Easy-intermediate
- Terminology: US
- Yarn weight: Bulky (#5) cotton or cotton blend
- Hook: 5.0 mm (H-8)
- Number of pieces: 10 total: 1 navy tray, 1 cream frame, 2 long cream dividers, 6 short cream dividers
- Layout: 3 x 3 compartments
- Piece sizes: frame 11.7 in (29.7 cm) per side x 2.75 in (7.0 cm) tall; long divider 11.1 in x 2.75 in (28.2 cm x 7.0 cm); short divider 3.4 in x 2.75 in (8.6 cm x 7.0 cm)
- Tray size before border: 12.5 in (31.8 cm) square, 3 in (7.6 cm) tall
- Border depth: 0.5 in (1.3 cm), 2 rounds
Materials
Choose a firm, smooth bulky cotton or cotton blend, about 98 yd (90 m) per 3.5 oz (100 g). Cotton holds its structure and won’t stretch out under the weight of the contents. Avoid fluffy or very soft acrylics, which make floppy walls.
- Navy (Color A): 300 g, about 270 m
- Cream (Color B): 250 g, about 225 m
These amounts include roughly 15–20% extra for gauge swatches and sewing.
Tools:
- 5.0 mm (H-8) crochet hook
- Tapestry needle
- 8 locking stitch markers
- Measuring tape
- Scissors
- Spray bottle and pins for blocking
Abbreviations (US Terms)
- ch: chain
- sc: single crochet
- sl st: slip stitch
- st(s): stitch(es)
- BLO: back loop only
- rnd(s): round(s)
- rev sc: reverse single crochet
Special stitch: reverse single crochet (rev sc). Work from left to right (if you crochet right-handed). Insert your hook into the next stitch to the right, yarn over, pull up a loop, yarn over, and pull through both loops. This makes the twisted, rope-like rim.
Gauge and Checkpoints
Gauge: 14 sc x 16 rows = 4 in (10.2 cm) in sc, worked firmly.
That’s 3.5 stitches and 4 rows per inch (2.5 cm). Every measurement in this pattern depends on it.
Test one piece first. Make one short divider before anything else. It should measure 3.4 in (8.6 cm) long and 2.75 in (7.0 cm) tall. If it matches, your gauge is right and you can use it in the insert.
Checkpoints:
- Base after Row 24: 12 in (30.5 cm) wide and 6 in (15.2 cm) tall
- Finished base: 12 in x 12 in (30.5 cm x 30.5 cm)
- Walls after Rnd 13: 3 in (7.6 cm) tall
- Frame after Rnd 11: 2.75 in (7.0 cm) tall
- Long divider: 11.1 in (28.2 cm) long
If your piece is too big, use a hook 0.5 mm smaller. If it’s too small, use a hook 0.5 mm larger. Don’t change stitch counts, because the insert and tray are sized to fit each other.
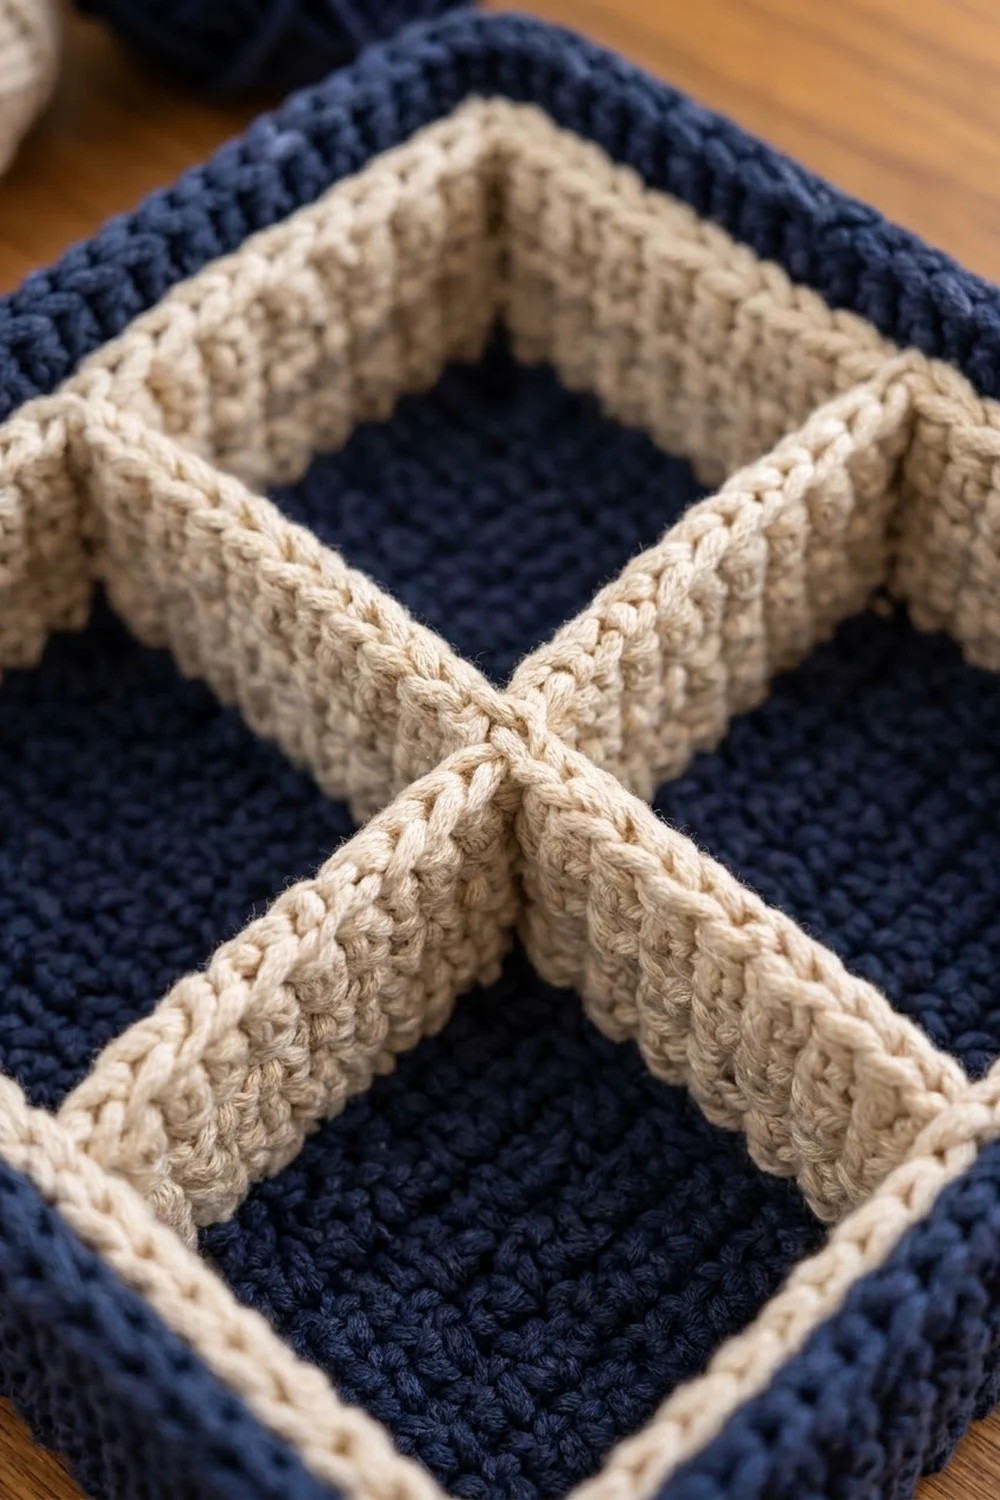
Navy Tray
Base
With Color A, ch 43.
Row 1: Sc in 2nd ch from hook and in each ch across, turn. (42 sc)
Rows 2–48: Ch 1, sc in each st across, turn. (42 sc)
The base now measures 12 in x 12 in (30.5 cm x 30.5 cm). Don’t fasten off.
Base Edging
Rnd 1: Ch 1, don’t turn. Rotate the work so you can go down the side. Sc in each of the next 7 row ends, skip 1 row end; repeat from * 5 more times (42 sc along the side). Work 1 corner sc in the corner. Work 42 sc across the foundation chain (1 per ch). Work 1 corner sc. Work the next side the same way as the first (42 sc). Work 1 corner sc. Sc in each of the 42 sts of Row 48, then work 1 corner sc. Join with sl st to the first sc.
Count: 42 sc per side + 4 corner sc = 172 sts.
In this pattern, each side counts as 42 side sts + 1 corner st = 43 sts, so 4 x 43 = 172. Place a marker in each corner sc and move it up as you go.
Walls
Rnd 2 (turning round): Ch 1, working in BLO, sc in each st around. Join. (172 sc)
The unused front loops form a crisp ridge on the outside, and the work naturally turns up to become the walls.
Rnds 3–13: Ch 1, sc in both loops of each st around. Join. (172 sc)
You now have 12 wall rnds (Rnds 2–13), about 3 in (7.6 cm) tall. Pinch each corner as you work so the walls stand straight. Don’t fasten off; you’ll keep going with the border later.
Cream Insert
Frame
The frame is a tube with no bottom that lines the inside of the tray.
With Color B, ch 164. Join with sl st to the first ch, taking care not to twist the chain.
Rnd 1: Ch 1, sc in each ch around. Join. (164 sc)
Rnds 2–11: Ch 1, sc in each st around. Join. (164 sc)
Fasten off and weave in the ends. The frame is 2.75 in (7.0 cm) tall.
Corners: Place markers in sts 1, 42, 83, and 124. Each side counts as 1 corner st + 40 side sts = 41 sts, so 4 x 41 = 164. Each side measures 11.7 in (29.7 cm).
Divider positions: On each side, number the 40 side sts 1–40, counting forward from that side’s corner marker in the direction you worked. Mark side st 14 and side st 27 on all four sides. This splits each side into 13 sts, 1 divider st, 12 sts, 1 divider st, and 13 sts. The two outer sections lose a little width to the frame wall, so all three compartments end up the same size inside. Because the numbering runs all the way around the tube, side st 14 on one side sits directly across from side st 27 on the opposite side.
Long Dividers (make 2)
With Color B, ch 40.
Row 1: Sc in 2nd ch from hook and in each ch across, turn. (39 sc)
Rows 2–11: Ch 1, sc in each st across, turn. (39 sc)
Fasten off, leaving a 16 in (40.6 cm) tail. Each long divider measures 11.1 in x 2.75 in (28.2 cm x 7.0 cm). That’s 1 st shorter than the frame side at each end, which makes room for the thickness of the frame wall.
On each long divider, place markers at sts 13 and 26. These line up with the frame’s divider positions.
Short Dividers (make 6)
With Color B, ch 13.
Row 1: Sc in 2nd ch from hook and in each ch across, turn. (12 sc)
Rows 2–11: Ch 1, sc in each st across, turn. (12 sc)
Fasten off, leaving a 12 in (30.5 cm) tail. Join in a second tail at the other end. Each short divider measures 3.4 in x 2.75 in (8.6 cm x 7.0 cm).
Make All Pieces
- Color A (navy): 1 tray
- Color B (cream): 1 frame, 2 long dividers, 6 short dividers
Layout grid (seen from above; F = frame, L = long divider, S = short divider):
F F F F F F F F F F F F F
F  [1]  L  [2]  L  [3]  F
F S S S L S S S L S S S F
F  [4]  L  [5]  L  [6]  F
F S S S L S S S L S S S F
F  [7]  L  [8]  L  [9]  F
F F F F F F F F F F F F F
The 2 long dividers run from top to bottom. The 6 short dividers form two horizontal lines of three. Each one sits between the frame and a long divider, or between the two long dividers.
Joining
Method: Whipstitch with the cream tails, going through both loops on each edge.
Stitch-to-stitch logic: Every divider has 11 rows, and the frame has 11 rnds. Join the 11 row ends of each divider end to the 11 rnds of the frame column at a marked divider st. Match one row end to one rnd, top to bottom, without skipping or doubling any stitches.
- Long dividers: Sew one end of a long divider to the frame column at side st 14 on the top side. Stretch it across and sew the other end to the marker directly opposite on the bottom side. Repeat with the second long divider at the top side’s st 27.
- Short dividers, outer columns: Sew one end to the frame at the left side’s st 14 and the other end to the nearest long divider at the matching marker. Repeat at the left side’s st 27. Do the same on the right side.
- Short dividers, middle column: Sew each end to a long divider, matching the st 13 markers for the first line and the st 26 markers for the second.
Tension: Pull each whipstitch snug but not tight. Seams that are too tight pucker the frame, and seams that are too loose let the dividers lean.
Size checkpoint: The finished insert should measure 11.7 in (29.7 cm) square and 2.75 in (7.0 cm) tall. Each compartment should be about 3.4 in (8.6 cm) square inside.
Border
The border goes on the navy tray rim only. The cream insert has no border; its top edge stays a plain sc edge that sits just below the navy rim.
Border gauge: Same as the main gauge, 3.5 sts per inch (2.5 cm), worked firmly.
With Color A, continue from Rnd 13 of the walls.
Rnd 14: Ch 1, sc in each st around. Join. (172 sc: 42 side sts + 1 corner st on each of 4 sides)
Rnd 15: Ch 1, rev sc in each st around. Join. (172 rev sc, 43 per side as defined above)
Fasten off and weave in the ends.
Why the math works: The walls never increase or decrease, so the rim has the same 172 sts as the base edge. That keeps the rim at the same 12.5 in (31.8 cm) outer size as the base. Extra stitches at the corners would make the rim flare, and skipped stitches would pull it in. The two rnds add 0.5 in (1.3 cm), so the tray ends up 3.5 in (8.9 cm) tall.
Final Blocking
- Lightly mist the navy tray and the cream insert with water until damp, not soaked.
- Fill the tray with a folded towel or a box of the right size to square up the walls.
- Pinch each corner into a sharp 90-degree angle.
- Shape the insert by sliding small boxes or folded cloth into each compartment.
- Check that the insert measures 11.7 in (29.7 cm) square and the tray 12.5 in (31.8 cm) square.
- Let both pieces dry completely, for at least 24 hours.
- Remove the fillers and slide the insert into the tray.
Final Quality-Control Checklist
- Base measures 12 in x 12 in (30.5 cm x 30.5 cm)
- Every wall and rim rnd has 172 sts
- Tray is 3.5 in (8.9 cm) tall with an even rev sc rim
- Insert is 11.7 in (29.7 cm) square and 2.75 in (7.0 cm) tall
- All 8 dividers stand straight and are sewn 11 rows to 11 rnds
- All 9 compartments are about 3.4 in (8.6 cm) square
- Insert slides in snugly without bulging the tray walls
- All ends are woven in securely
Troubleshooting
Walls lean outward. Your tension is loose. Use a smaller hook for the walls, or switch to a firmer cotton.
Base isn’t square. Check that you skipped 1 row end in every 8 along the sides. Block it again over a box.
Insert is too tight to fit. Your cream gauge is larger than your navy gauge. Remake the frame with a smaller hook.
Insert slides around. The frame is too small. Use a larger hook for the frame only.
Dividers sag in the middle. The seams are loose, or the yarn is too soft. Sew them again more snugly and block with fillers.
Rim ruffles. You worked extra stitches at the corners. Keep exactly 172 sts.
Care
Hand wash in cool water with mild soap, press out the water with a towel, and dry flat, reshaped over a box. Don’t tumble dry.
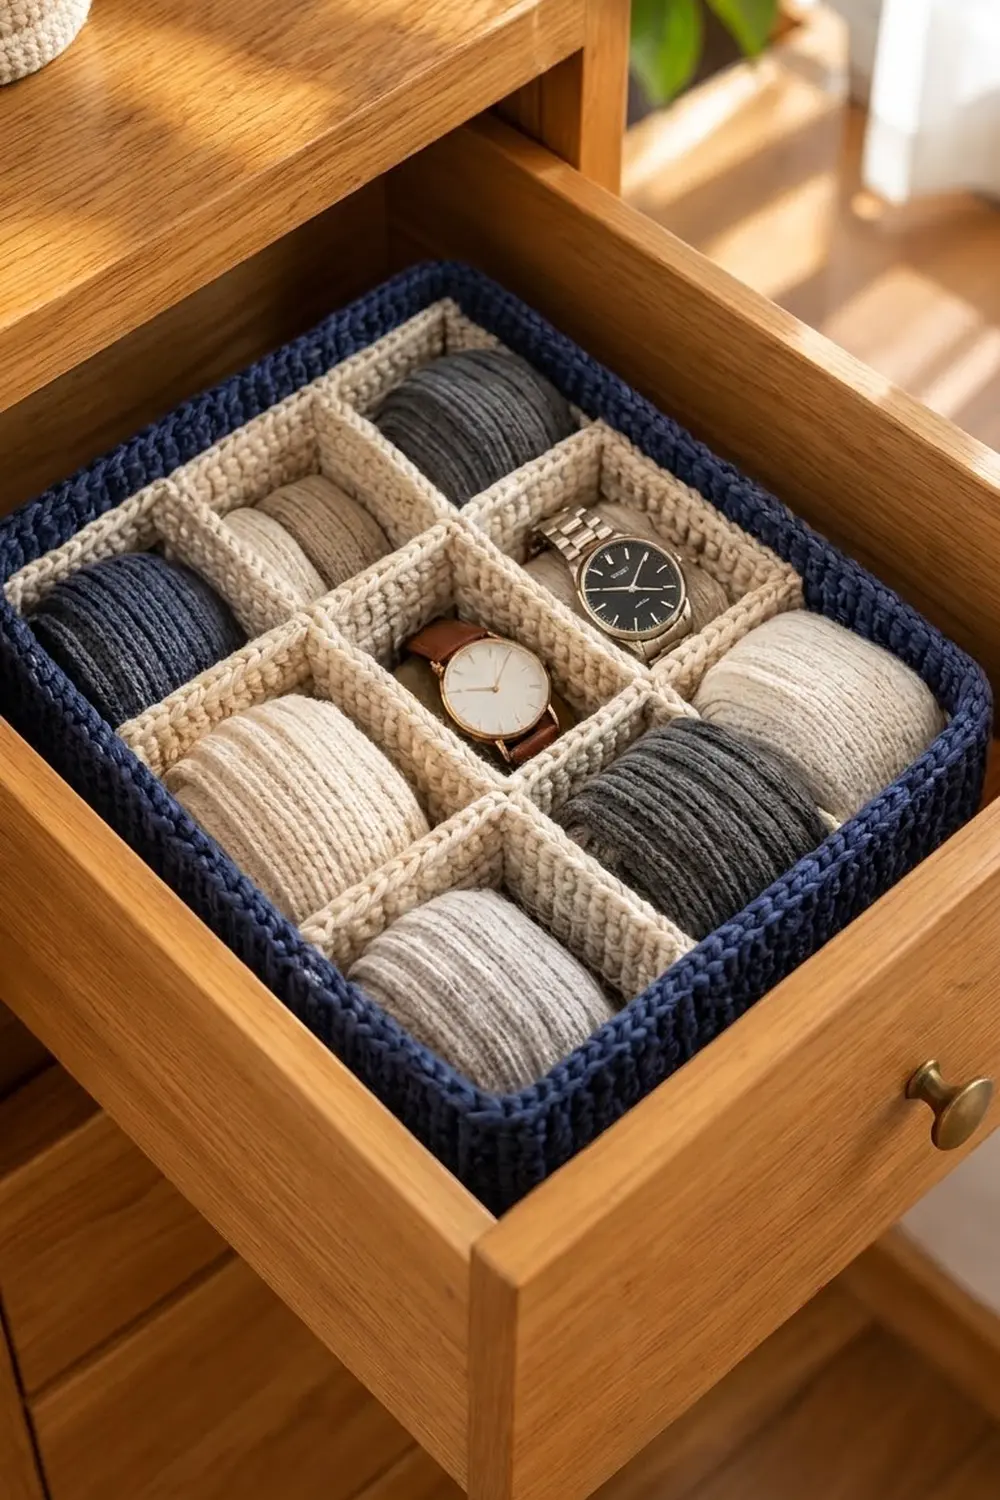
Final Notes
The measurements build on each other. A gauge of 14 sc = 4 in (10.2 cm) gives a 42-st base of 12 in (30.5 cm). The 172-st edge carries straight up through the walls and rim without changes, so the tray stays 12.5 in (31.8 cm) square and 3.5 in (8.9 cm) tall. The 164-st cream frame, at 11.7 in (29.7 cm) per side, fits just inside. Every divider has 11 rows to match the 11 frame rnds, so the seams line up cleanly. Check your gauge once, trust the counts, and your drawer will stay tidy for years.
Happy crocheting!