

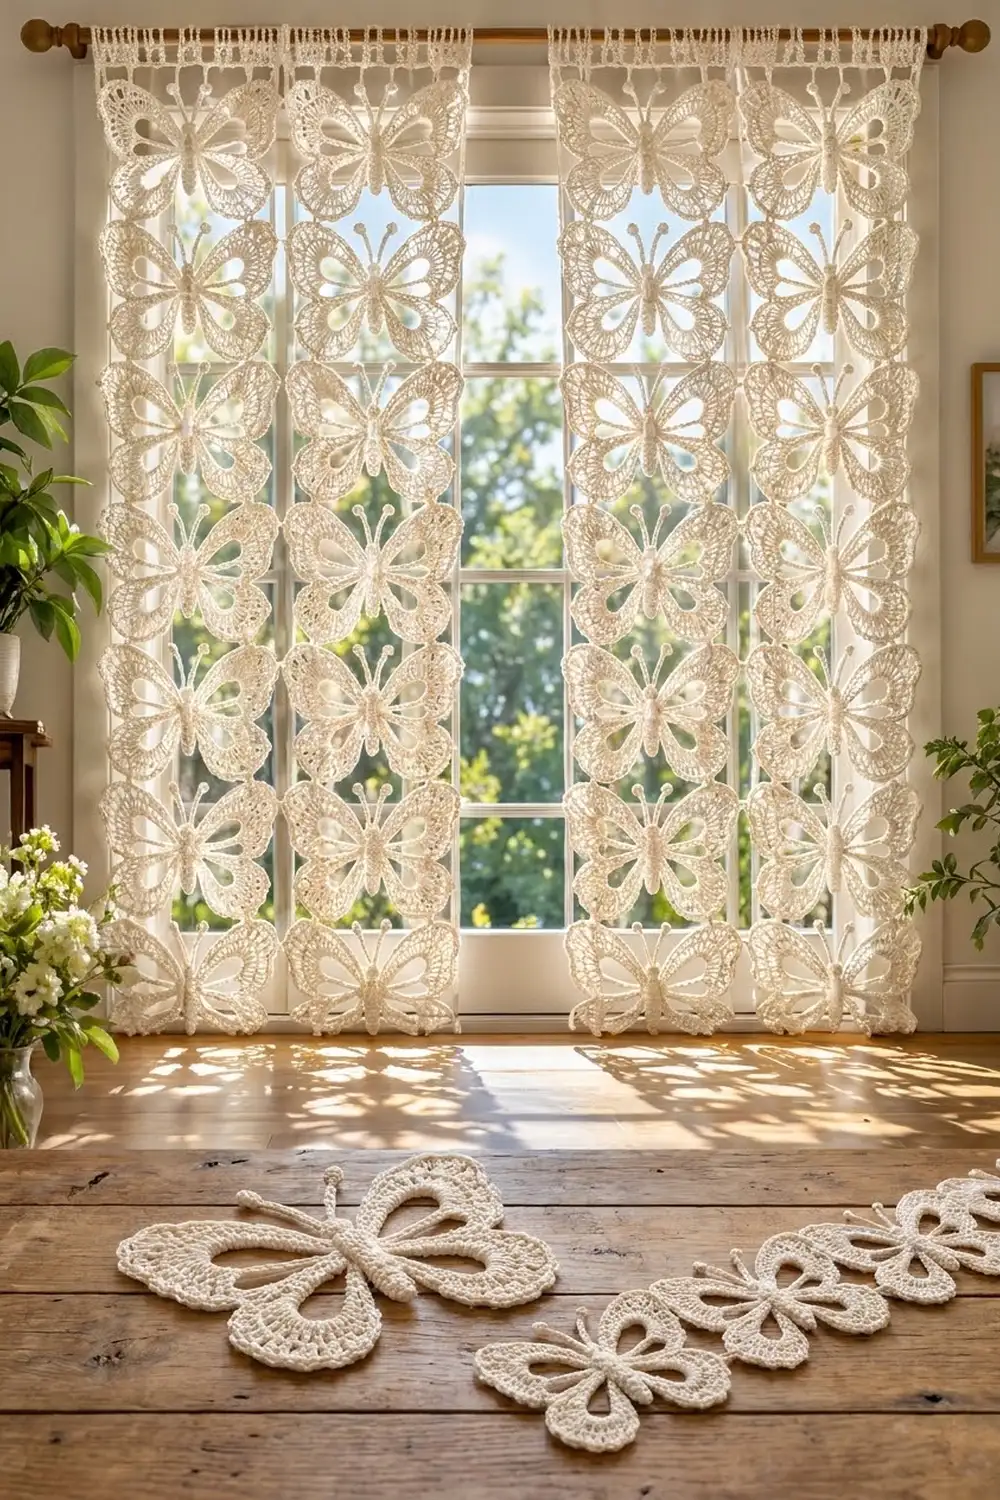
This curtain is a soft wall of cream lace butterflies. Each motif has two large upper wings and two smaller lower wings. Every wing has an open teardrop window, a wide band of double crochet, and a fine picot edge. A raised, segmented body and two knobbed antennae run down the center.
The whole curtain is one color: ivory or natural cream cotton. That keeps the look calm and lets the texture show, especially with light coming through the wing windows. The style is romantic cottage lace, but each motif works up quickly in sport-weight cotton.
This pattern uses US crochet terms. Each finished panel measures 28 in x 61 in (71.1 cm x 154.9 cm), including the heading band. The hanging loops add about 1 in (2.5 cm). The pattern makes two panels.
You crochet each butterfly in the round from a small center ring, then sew on a separate stuffed body. The motifs are joined on their last round as you go. Finally, you work a straight heading band with hanging loops across the top of each panel.
Finished Size and Construction
- Finished panel size: 28 in x 61 in (71.1 cm x 154.9 cm), plus 1 in (2.5 cm) of loops
- Skill level: Intermediate
- Terminology: US crochet terms
- Yarn weight: Sport-weight (#2) mercerized cotton
- Hook: 3.0 mm
- Number of pieces: 80 butterfly motifs and 80 bodies (40 of each per panel)
- Layout: 2 panels, each 4 motifs across x 10 motifs down
- Motif size: 7 in x 6 in (17.8 cm x 15.2 cm)
- Panel size before border: 28 in x 60 in (71.1 cm x 152.4 cm)
- Border depth: a 1 in (2.5 cm) heading band on the top edge only; the sides and bottom keep their picot butterfly edges
Materials
Choose a smooth mercerized cotton in sport weight. It keeps the picots crisp and doesn’t stretch much while the curtain hangs. Avoid fuzzy or very soft yarns, because they blur the open windows.
- Ivory/cream: 650 g, about 1,950 m (thirteen 50 g balls of about 150 m each)
Tools:
- 3.0 mm crochet hook
- Yarn needle
- About 20 g of fiberfill for the bodies
- Stitch markers
- Rust-proof pins, blocking mats, and a spray bottle
- Measuring tape
- Curtain rod, up to 3/4 in (1.9 cm) in diameter
The yarn quantity includes a margin of about 15 percent for your test motif, joining, and weaving in ends.
Abbreviations (US Terms)
- ch – chain
- sl st – slip stitch
- sc – single crochet
- hdc – half double crochet
- dc – double crochet
- sc2tog – single crochet 2 together
- st(s) – stitch(es)
- sk – skip
- MR – magic ring
- BLO – back loop only
- Rnd – round
- RS – right side
Special stitches:
- Picot: ch 3, sl st in 3rd ch from hook.
- Joining picot: ch 1, sl st in the matching picot of the finished neighbor motif, ch 1, sl st in the sc just worked.
- Bobble: (yarn over, insert hook in st, pull up a loop, yarn over, pull through 2 loops) 4 times in the same st, then yarn over and pull through all 5 loops on hook.
Gauge and Checkpoints
Gauge: 22 sc and 24 rows = 4 in (10.2 cm). Also, 22 dc = 4 in (10.2 cm) wide.
Make one complete butterfly first, block it lightly, and measure it. This motif is your real gauge test, because the wing windows depend on your chain tension.
Checkpoints, measured flat:
- After Rnd 3: about 4.5 in (11.4 cm) wide
- After Rnd 4: about 6.25 in (15.9 cm) wide
- After Rnd 5: 7 in (17.8 cm) wide x 6 in (15.2 cm) tall
- Body: 3 in (7.6 cm) long, not counting the antennae
If the motif is too big, change to a 2.75 mm hook. If it is too small, change to a 3.25 mm hook. If only the windows look wrong, adjust your chain tension on Rnd 2.
Small errors multiply. Being off by 0.25 in (0.6 cm) per motif changes the panel by 1 in (2.5 cm) across and 2.5 in (6.4 cm) down.
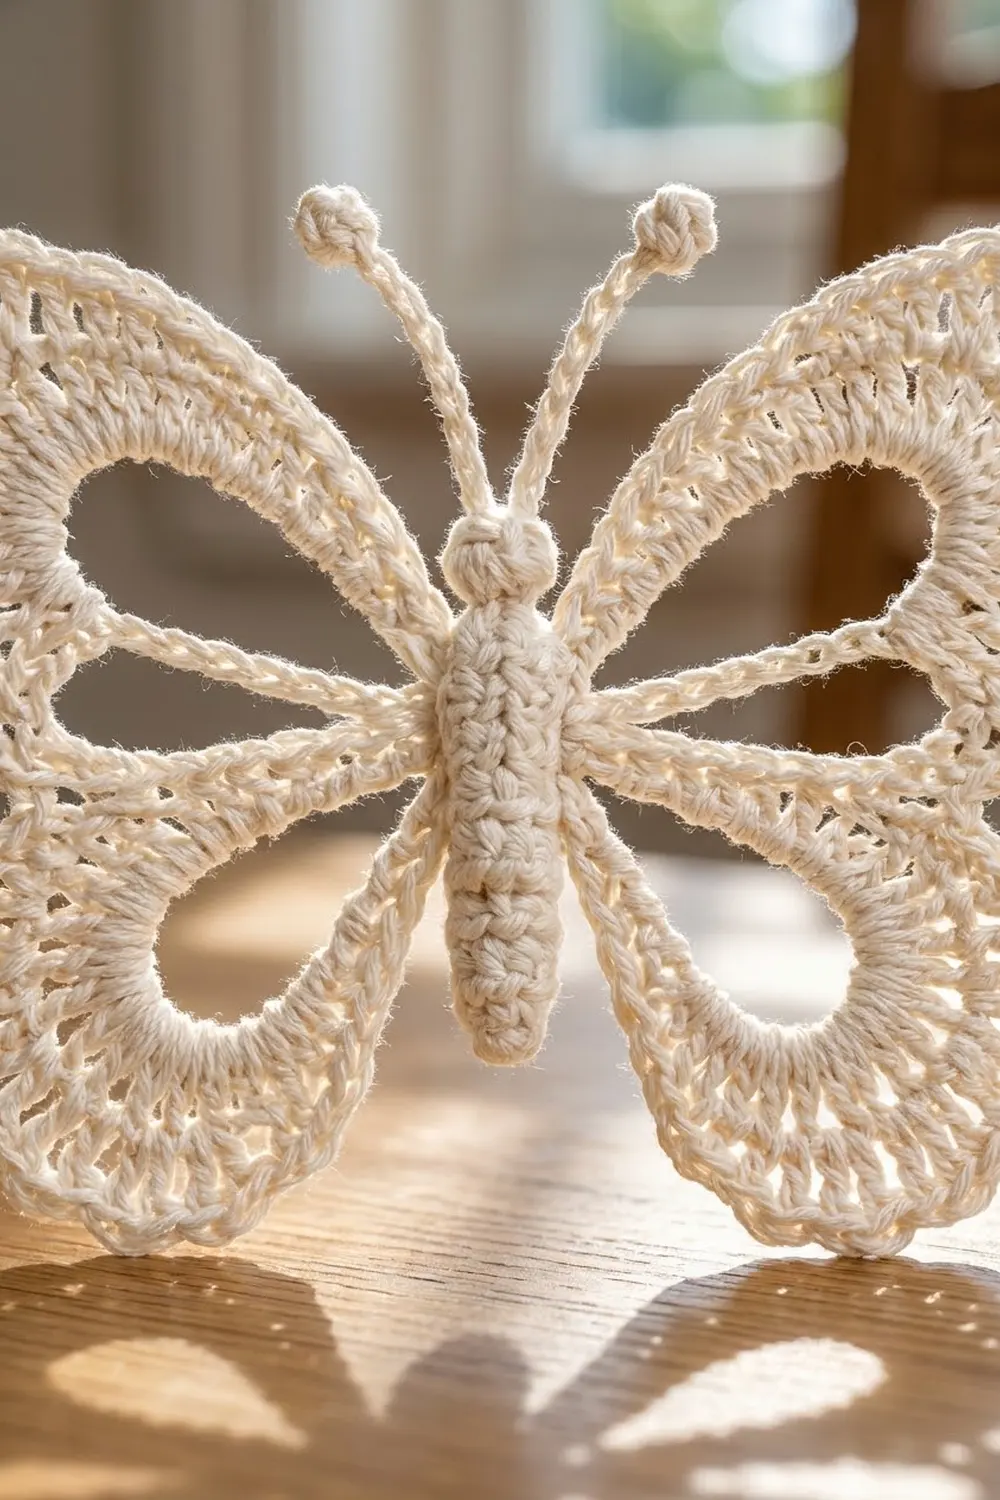
Butterfly Motif
Work in rounds with the RS facing. Do not turn.
Rnd 1: Ch 4, sl st in first ch to form a ring. Ch 1, 8 sc in ring, sl st in first sc. (8 sc)
Number these sts 1 to 8:
- Sts 1 and 7 hold the upper wings.
- Sts 3 and 5 hold the lower wings.
- St 8 is the top center and st 4 is the bottom center.
- Sts 2 and 6 are the sides.
Rnd 2 (wing loops): Ch 1, then:
- In st 1: sc, ch 28, sc (upper right loop). Sc in st 2.
- In st 3: sc, ch 20, sc (lower right loop). Sc in st 4.
- In st 5: sc, ch 20, sc (lower left loop). Sc in st 6.
- In st 7: sc, ch 28, sc (upper left loop). Sc in st 8.
Sl st in first sc. (12 sc, two ch-28 loops, two ch-20 loops)
Keep these chains even and relaxed, because they become the open windows.
Rnd 3 (inner wing band): Work into the chains themselves, not into the space inside the loop, so the window stays open. Skip the pair of anchor sc under each loop.
- Upper right wing (ch-28 loop): Sc in first 2 ch, hdc in next 2 ch, dc in next 4 ch, 2 dc in each of next 12 ch, dc in next 4 ch, hdc in next 2 ch, sc in next 2 ch. (40 sts) Sc in the side sc.
- Lower right wing (ch-20 loop): Sc in first 2 ch, hdc in next ch, dc in next 3 ch, 2 dc in each of next 8 ch, dc in next 3 ch, hdc in next ch, sc in next 2 ch. (28 sts) Sc in the bottom sc.
- Lower left wing: Work as the lower right wing. (28 sts) Sc in the side sc.
- Upper left wing: Work as the upper right wing. (40 sts) Sc in the top sc.
Sl st in first sc.
Rnd 3 total: 40 + 28 + 28 + 40 wing sts + 4 connector sc = 140 sts.
Rnd 4 (outer wing band): Sl st into first st of the upper right wing.
- Each upper wing (40 sts): Sc in next 2 sts, hdc in next 3, dc in next 5, (2 dc in next st, dc in next st) 10 times, dc in next 5, hdc in next 3, sc in next 2. (50 sts)
- Each lower wing (28 sts): Sc in next 2 sts, hdc in next 2, dc in next 3, (2 dc in next st, dc in next st) 7 times, dc in next 3, hdc in next 2, sc in next 2. (35 sts)
Work a sc in each connector sc between wings. Sl st in first st.
Rnd 4 total: 50 + 35 + 35 + 50 wing sts + 4 connector sc = 174 sts.
Rnd 5 (picot edge): Use plain picots on the first motif. For the other motifs, see Joining.
- Each upper wing (50 sts): Sc in next st, (picot, sc in next 2 sts) 24 times, sc in next st. (50 sc, 24 picots)
- Each lower wing (35 sts): Sc in next st, (picot, sc in next 2 sts) 17 times. (35 sc, 17 picots)
Work a sl st in each connector sc. Sl st in first sc and fasten off.
Rnd 5 total: 170 sc, 82 picots, 4 sl sts.
Veins: On the back, join yarn in the anchor sc of a wing loop. Ch 9, reach across the window, and sl st into the base of a Rnd 3 st on the far edge. Sl st back along the 9 ch. Make two ch-9 veins in each upper window and one ch-7 vein in each lower window.
Body and Antennae
Work in a continuous spiral and mark the first st of each round.
Rnd 1: 6 sc in MR. (6)
Rnd 2: 2 sc in each st. (12)
Rnds 3–4: Sc in each st. (12)
Rnd 5: Sc2tog 6 times. (6) Stuff the head lightly.
Rnd 6: (Sc in next st, 2 sc in next st) 3 times. (9)
Rnds 7–18: Sc in each st. Work Rnds 8, 10, 12, 14, 16, and 18 in BLO to form the segment ridges. (9 sts each round) Stuff lightly as you go.
Rnd 19: (Sc in next st, sc2tog) 3 times. (6)
Rnd 20: Sc2tog 3 times. (3)
Fasten off, leaving a 12 in (30.5 cm) tail.
Antennae (make 2): Join yarn at the top of the head. Ch 14, work a bobble in 4th ch from hook, sl st in each of the remaining 10 ch, then sl st into the head. (3 skipped ch + 1 bobble + 10 sl sts = 14 ch)
Attach: Center the body vertically over the motif’s ring, with the head just above the top connector and the tail between the lower wings. Sew it down along its full length.
Make All Pieces
All pieces are ivory.
- Per panel: 40 motifs, 40 bodies, 80 antennae
- Whole curtain: 80 motifs, 80 bodies, 160 antennae
Layout per panel (row 1 is at the top):
     A    B    C    D
 1  [B]  [B]  [B]  [B]
 2  [B]  [B]  [B]  [B]
 3  [B]  [B]  [B]  [B]
 ...
10  [B]  [B]  [B]  [B]
Place every butterfly with its head up.
Joining
Join as you go on Rnd 5. At each contact point, work a joining picot instead of a plain picot.
- Left neighbor: Join the outermost tip picot of the new motif’s upper left wing to the tip picot of the neighbor’s upper right wing. Join the outermost lower-wing picots the same way.
- Neighbor above: Join the top-center picot of each upper wing to the bottom-center picot of the lower wing directly above it.
Stitch logic: each join connects one picot to one picot, so no stitches are added or lost. The motifs meet tip to tip, so the grid spacing stays at 7 in (17.8 cm) across and 6 in (15.2 cm) down. Each panel has 60 side joins and 72 vertical joins.
Tension: work the joining ch-1s at the same tension as your plain picots. Tight joins pucker the wings, and loose joins let the motifs sag.
Size checkpoint: the first row of 4 motifs should measure 28 in (71.1 cm) wide. After 10 rows, the panel should be 60 in (152.4 cm) long, measured flat.
Border: Heading Band
Work the heading band across the top edge only. Use the same gauge: 22 sc = 4 in (10.2 cm). With the RS facing, join yarn at the top right corner.
Row 1 (straight edge): Ch 1. On each motif, find the 6 highest picots along the top of each upper wing, then work across the motif:
- First wing: sc in each of its 6 picots, with ch 2 between them. (6 sc + 10 ch = 16 sts)
- Head dip: ch 4.
- Second wing: work as the first wing. (16 sts)
That gives 36 sts per motif. Between motifs, ch 3 across the side join.
Row 1 total: (4 motifs x 36) + (3 seams x 3 ch) = 144 + 9 = 153 sts. Turn.
Tuck the top-row antennae under the band, or tack them down flat.
Rows 2–6: Ch 1, sc in each st and ch across. Turn. (153 sc)
Row 7 (hanging loops): Ch 1, sc in first st, (ch 24, sk 7 sts, sc in next st) 19 times. Turn. (1 + 19 x 8 = 153 sts used; 20 sc and 19 loops)
Row 8: Ch 1, sc in first sc, (30 sc in next ch-24 loop, sc in next sc) 19 times. Fasten off. (1 + 19 x 31 = 590 sc)
Why the math works: 153 sts at 22 sts per 4 in (10.2 cm) equals 27.8 in (70.6 cm). That is within blocking range of the 28 in (71.1 cm) panel, so the band won’t ruffle or pull in. The loops are spaced about every 1.5 in (3.8 cm). The band adds 1 in (2.5 cm), which brings the panel to 61 in (154.9 cm).
Final Blocking
- Weave in the ends along the backs of stitches, never across the windows.
- Lay the panel face down and smooth it to 28 in x 61 in (71.1 cm x 154.9 cm).
- Pin the heading band straight first.
- Pin each window open into a teardrop, and pin each joined picot at its join point.
- Pin the outer wing edges into curves without stretching the picots.
- Mist the panel thoroughly, avoiding pressure on the bodies.
- Let it dry completely, at least 24 hours.
- Repeat with the second panel.
Final Quality-Control Checklist
- Each motif measures 7 in x 6 in (17.8 cm x 15.2 cm) and has 82 picots.
- All four windows are open and have their veins.
- The bodies are centered and straight, and each has two knobbed antennae.
- Each panel is a 4 x 10 grid of 40 motifs.
- Heading Row 1 has 153 sts, and Row 7 has 19 loops.
- Both panels measure 28 in x 61 in (71.1 cm x 154.9 cm).
- No ends show on the front.
Troubleshooting
- Windows pucker: The Rnd 2 chains are too tight. Chain the loops with a larger hook.
- Wings ruffle: Check the Rnd 4 counts (50 and 35), then go down a hook size.
- Wings cup: Go up a hook size for Rnds 3–4.
- Gaps between motifs: Tighten the joining ch-1s.
- Heading band flares: Reduce the ch 4 at each head dip to ch 3.
- Bodies flop: Stuff them more firmly and sew along their full length.
Care
Hand wash in cool water with mild soap, roll in a towel to remove the water, and dry flat, pinned to shape. Never hang the curtain while it is wet.
Final Notes
The measurement chain is simple. A 7 in x 6 in (17.8 cm x 15.2 cm) motif in a 4 x 10 grid makes a 28 in x 60 in (71.1 cm x 152.4 cm) panel. A 153-stitch heading band adds 1 in (2.5 cm), for 61 in (154.9 cm), with 19 loops on top. If the first motif, the first row of four, and heading Row 1 all measure correctly, the rest of the curtain will too.
Happy crocheting!