

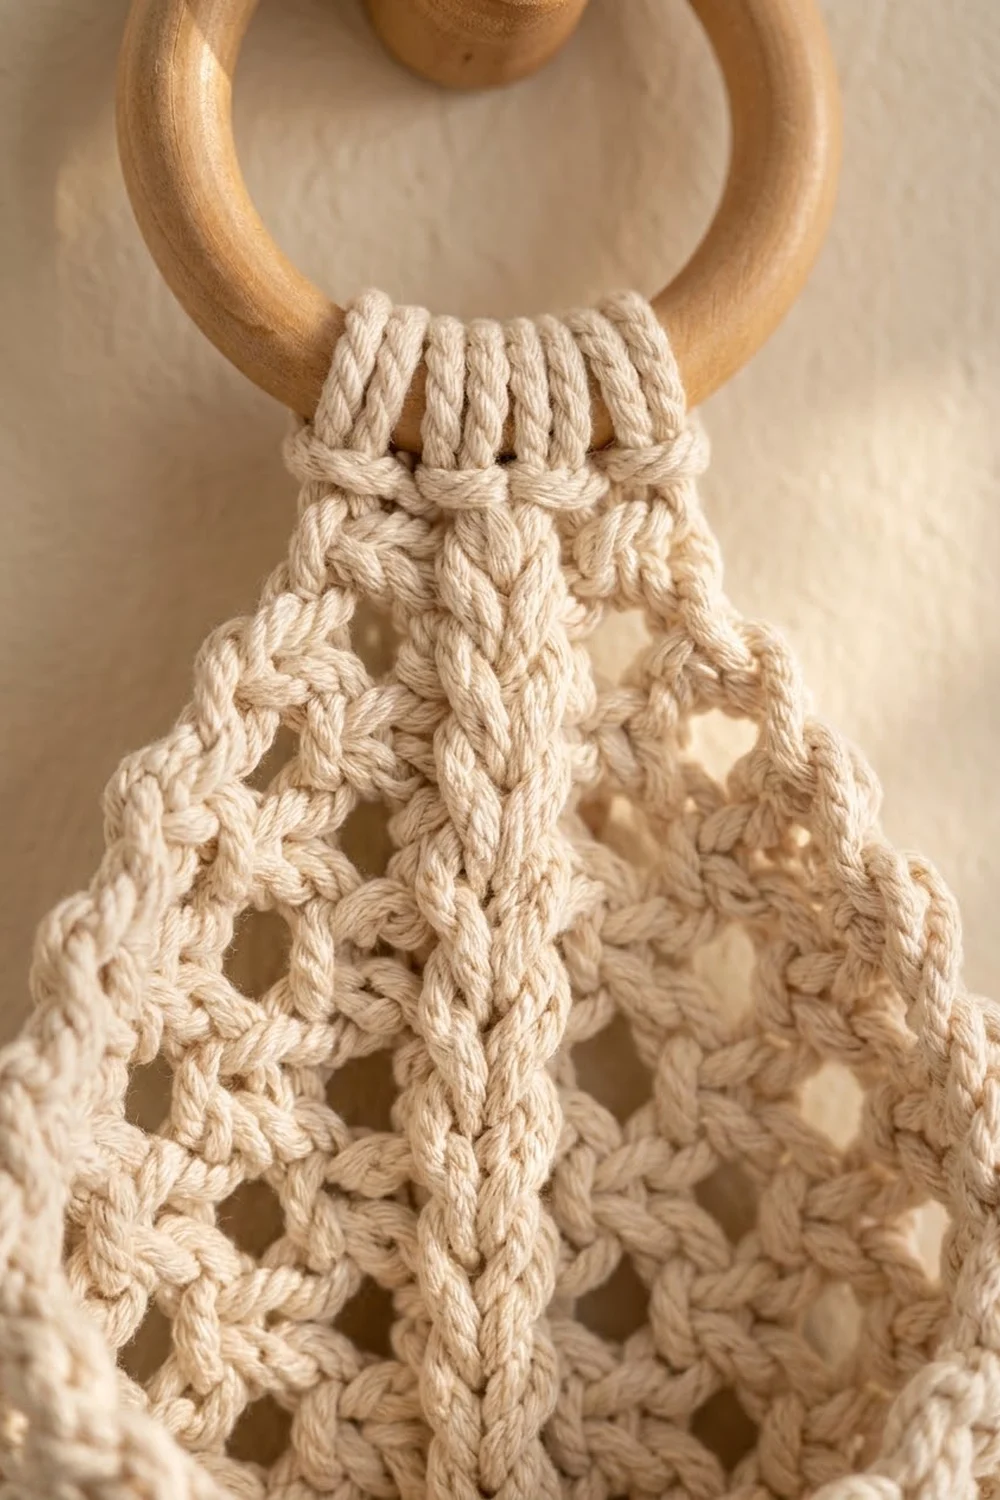
The Willow Leaf Wall Pocket is a leaf-shaped hanger for rolled hand towels, a small plant, or bath brushes. It is made from soft cream cotton cord. The panels are an open mesh, a raised braid-like spine runs up the center, and the top edge of the pocket dips into a shallow V, so the front looks like two leaf halves folding together.
It is a single hanger with two crocheted panels: a full leaf-shaped back and a shorter front pocket in the same mesh. The panels are joined with the first border round. A narrow neck band wraps around a wooden ring, and a wrapped tassel finishes the bottom tip.
The finished leaf measures 8.2 in (20.8 cm) wide and 10.5 in (26.7 cm) tall, not counting the ring and tassel. The pattern uses US crochet terms throughout.
Construction overview: You work the back panel in rows from the bottom tip upward, increasing, holding the width, and then decreasing. The pocket starts the same way and stops at Row 9 with a shaped V edge. One sc border round joins both layers. Then you work the neck, add a crab-stitch edge, and attach the ring and tassel.
Finished Size and Construction
- Finished size: 8.2 in × 10.5 in (20.8 cm × 26.7 cm), excluding ring and tassel
- Skill level: Intermediate (post stitches, reverse single crochet)
- Terminology: US
- Yarn weight: 3 mm single-twist cotton cord (macramé cord)
- Hook: 6 mm (J-10)
- Number of pieces: 2 crocheted panels (back + pocket), plus neck, tassel, and ring
- Layout: Pocket stacked on the lower part of the back, edges aligned
- Piece size: Back 7.7 in × 10 in (19.6 cm × 25.4 cm); pocket 7.7 in wide × 6 in tall at the sides (19.6 cm × 15.2 cm)
- Size before border: 7.7 in × 10 in (19.6 cm × 25.4 cm)
- Border depth: 0.25 in (0.6 cm) on every edge
Materials
Yarn: Use 3 mm single-twist cotton cord. It is firm enough to hold the leaf shape and soft enough for post stitches. Avoid 3-ply macramé rope, which is stiff and splits when you post around it. A smooth cotton cord also makes the spine stand out clearly.
- Cream / natural: 180 g, about 90 m (98 yd) in total
- Back panel: about 70 g (35 m)
- Pocket panel: about 45 g (22 m)
- Border and neck: about 25 g (12 m)
- Tassel: about 20 g (10 m)
These quantities include a margin of roughly 10–15% for gauge differences and the tassel trim.
Tools:
– 6 mm (J-10) crochet hook
– Wooden ring, 2.5 in (6.4 cm) diameter
– Large-eye tapestry needle
– Stitch markers (4)
– Sharp scissors
– Rustproof pins and a blocking board
– Spray bottle
– Measuring tape
Abbreviations (US Terms)
- ch – chain
- sl st – slip stitch
- sc – single crochet
- hdc – half double crochet
- dc – double crochet
- sk – skip
- sp – space
- st(s) – stitch(es)
- RS / WS – right side / wrong side
- FPdc – front post double crochet: yo, insert hook from front to back to front around the post of the stitch below, complete as a dc
- BPdc – back post double crochet: yo, insert hook from back to front to back around the post of the stitch below, complete as a dc
- rev sc (crab stitch) – reverse single crochet: working left to right, insert the hook into the next stitch to the right, yo, pull up a loop, yo, pull through both loops
Special stitch – Spine: The 3 center stitches of every row from Row 2 on. Work FPdc on RS rows and BPdc on WS rows so the column always stands raised on the RS.
Stitch counting: Each ch-1 space counts as 1 stitch. A turning ch-3 counts as 1 dc. A turning ch-4 counts as 1 dc plus 1 ch-1 space (2 stitches).
Gauge and Checkpoints
Mesh gauge: 12 sts and 6 rows = 4 in (10.2 cm) in mesh pattern.
Sc gauge: 3 sc and 3 rows = 1 in (2.5 cm).
Make the back panel first. It is your gauge piece.
- After Row 1: 7 sts measure 2.3 in (5.8 cm) wide.
- After Row 6: width 7.7 in (19.6 cm); height 4 in (10.2 cm).
- After Row 12: height 8 in (20.3 cm).
- After Row 15: height 10 in (25.4 cm).
If your piece is too big, go down to a 5.5 mm hook. If it is too small, go up to a 6.5 mm hook. Don’t add or remove stitches, because the border math and pocket alignment depend on these exact counts. If only the height is off, adjust how tall you pull up your dc loops rather than changing hooks.
Back Panel
Each row’s mesh follows one layout: dc, (ch 1, dc) repeated, ch 1, Spine of 3 sts, ch 1, (dc, ch 1) repeated, dc. The row total is 7 + 4k, where k is the number of (ch 1, dc) repeats on each side.
Row 1 (RS): Ch 9, dc in 4th ch from hook and in each ch across. Turn. (7 sts)
Row 2 (WS): Ch 4 (counts as dc + ch-1), dc in first st, ch 1, sk next st, BPdc around each of next 3 sts, ch 1, sk next st, (dc, ch 1, dc) in top of turning ch. Turn. (11 sts)
Row 3 (RS): Ch 4 (counts as dc + ch-1), dc in first st, ch 1, sk next ch-1 sp, dc in next dc; rep from * until 1 ch-1 sp remains before the Spine, ch 1, sk ch-1 sp, FPdc around each of next 3 sts, ch 1, sk next ch-1 sp, dc in next dc, ch 1, sk next ch-1 sp; rep from ** until only the turning ch remains, (dc, ch 1, dc) in 3rd ch of turning ch. Turn. (15 sts)*
Row 4 (WS): Work as Row 3, using BPdc for the Spine. Turn. (19 sts)
Row 5 (RS): Work as Row 3. Turn. (23 sts)
Place a marker on each edge of Row 5. The panel is now at full width.
Rows 6–11 (straight rows): Ch 3 (counts as dc), ch 1, sk next ch-1 sp, dc in next dc; rep from * until 1 ch-1 sp remains before the Spine, ch 1, sk ch-1 sp, post st around each of next 3 Spine sts (BPdc on WS rows 6, 8, 10; FPdc on RS rows 7, 9, 11), ch 1, sk next ch-1 sp, dc in next dc, ch 1, sk next ch-1 sp; rep from ** to turning ch, dc in top of turning ch. Turn. (23 sts each row)*
That is 6 rows. Each row has 4 (ch 1, dc) repeats per side.
Row 12 (WS, decrease): Sl st in first dc, sl st in next ch-1 sp, sl st in next dc, ch 3 (counts as dc). Work in pattern with BPdc Spine to the last 3 sts, ending with dc in the dc before the last ch-1 sp. Leave the last ch-1 sp and the turning ch unworked. Turn. (19 sts)
The slip stitches are not counted. Each side loses 2 stitch positions.
Row 13 (RS): Work as Row 12 with FPdc Spine. Turn. (15 sts)
Row 14 (WS): Work as Row 12. Turn. (11 sts)
Row 15 (RS): Work as Row 12 with FPdc Spine. (7 sts) The row reads dc, ch 1, 3 FPdc, ch 1, dc. Fasten off and weave in the ends.
The back panel should measure 7.7 in × 10 in (19.6 cm × 25.4 cm).
Front Pocket Panel
Rows 1–5: Work exactly as Back Panel Rows 1–5. (7, 11, 15, 19, 23 sts)
Rows 6–8: Work as Back Panel straight rows (BPdc Spine on Rows 6 and 8, FPdc on Row 7). (23 sts each row)
The pocket should measure 5.3 in (13.5 cm) tall.
Row 9 (RS, V edge): Work 1 st into each dc and each ch-1 sp across:
Ch 3 (counts as dc), dc in next 4 sts, hdc in next 3 sts, sc in next 2 sts, sl st in each of next 3 Spine sts, sc in next 2 sts, hdc in next 3 sts, dc in next 4 sts, dc in top of turning ch. (23 sts: 5 dc + 3 hdc + 2 sc + 3 sl st + 2 sc + 3 hdc + 5 dc)
The stitch heights step down toward the center, which creates the V. The pocket is 6 in (15.2 cm) tall at the sides and dips to about 5.4 in (13.7 cm) at the Spine. Fasten off and weave in the ends.
Make All Pieces
| Piece | Quantity | Color |
|---|---|---|
| Back panel | 1 | Cream |
| Front pocket panel | 1 | Cream |
Layout (RS facing you):
        [ neck / ring ]
   +---------------------+
   |  BACK  Rows 10–15   |
   |---------------------|
   | POCKET Rows 1–9     |  <- stacked on BACK Rows 1–9
   |  (V dip at center)  |
   +---------------------+
         [ tassel ]
Joining
The pocket is joined by the first border round, which is worked through both layers along the bottom and lower sides.
- Lay the back panel RS up. Place the pocket RS up on top so the two foundation chains match exactly.
- Match the panels row by row: pocket Row 1 on back Row 1, and so on up to Row 9. The shapes are identical through Row 8, so the stepped edges line up.
- Pin both side edges at Row 5 (your markers) and at Row 9. Line up the two Spines in a straight vertical column.
- Stitch logic: On the joined section, insert the hook through the matching edge stitch or row-end of both layers for every sc. Never work through one layer only.
- Tension: Keep the joining sc slightly looser than usual. Cotton cord has no stretch, and tight joins pull the pocket flat so it cannot hold anything.
Size checkpoint: Before you start Round 1, the stacked panels should measure 7.7 in (19.6 cm) across at Row 5 on both layers.
Border
Border gauge: 2 sc per dc row-end. A dc row is 0.67 in tall, so 2 sc per row-end gives 3 sc per inch, which matches the sc gauge. This keeps the edges from ruffling or puckering.
Round 1 (sc, joining round): With RS facing, join cord at the top right corner of back Row 15.
– Top: sc in each of the 7 sts of Row 15. (7 sc)
– Left side: working down, 2 sc in each row-end of Rows 15–10 through the back only (12 sc), then 2 sc in each row-end of Rows 9–1 through both layers (18 sc). Skip over the slip stitches on the decrease rows. (30 sc on this side)
– Bottom: sc in each of the 7 foundation ch loops through both layers. (7 sc)
– Right side: working up, 2 sc in each row-end of Rows 1–9 through both layers (18 sc), then 2 sc in each row-end of Rows 10–15 through the back only (12 sc). (30 sc on this side)
Sl st to the first sc. Total: 7 + 30 + 7 + 30 = 74 sc. Do not fasten off yet. Place a marker in the first and last of the 7 top sts.
Why the math works: Each side has 15 rows at 0.67 in each, for 10 in (25.4 cm). At 3 sc per inch that is 30 sc. The 18 + 12 split matches the pocket’s 9 rows exactly. The bottom and top each sit on 7 stitches of the panel.
Neck Band
Row 1: Ch 1, sc in each of the 7 marked top sts. Turn. (7 sc)
Rows 2–6: Ch 1, sc in each st across. Turn. (7 sc each row)
The band should be 2.3 in (5.8 cm) wide and 2 in (5.1 cm) tall. Fasten off, leaving a 12 in (30.5 cm) tail.
Round 2 (rev sc): Join cord in the first sc after the neck on the left side. Rev sc in each sc around: 30 down the left side, 7 across the bottom, and 30 up the right side. Sl st at the base of the neck. (67 rev sc: 74 − 7 neck sts) Fasten off.
The crab stitch gives the twisted rope edge and stiffens the pocket opening line. The border adds 0.25 in (0.6 cm) on each edge, bringing the piece to 8.2 in × 10.5 in (20.8 cm × 26.7 cm).
Ring and Tassel
Ring: Pass the neck band through the wooden ring from front to back. Fold it down behind the panel and whipstitch Row 6 to the back of neck Row 1 with the tail. This leaves a snug 1 in (2.5 cm) loop around the ring.
Tassel:
1. Cut 20 strands, each 13 in (33.0 cm) long.
2. Thread the bundle through the bottom tip between the 3rd and 4th bottom sc, through both layers.
3. Fold the bundle in half to make 40 ends of 6.5 in (16.5 cm).
4. Wrap a 24 in (61.0 cm) strand tightly around the bundle 0.75 in (1.9 cm) below the tip. Tie it off and bury the ends inside the tassel.
5. Trim the ends evenly to 5.5 in (14.0 cm) below the wrap. The finished tassel is about 6.25 in (15.9 cm) overall.
Final Blocking
- Lightly mist the whole hanger with water until the cord is damp but not soaked.
- Pin it RS up to 8.2 in × 10.5 in (20.8 cm × 26.7 cm).
- Use a long ruler to keep the Spine perfectly vertical from the tip to the neck.
- Open each mesh space with a fingertip so the holes are even.
- Tuck a folded towel inside the pocket so it dries with a little depth.
- Mist the tassel, comb it straight with your fingers, and let it hang over the board’s edge.
- Let everything dry completely, usually 6–8 hours, before unpinning.
Final Quality-Control Checklist
- Back panel: 15 rows; widest rows 23 sts; Row 15 is 7 sts.
- Pocket: 9 rows; Row 9 shows a clear V at the Spine.
- Both Spines line up in one continuous raised column.
- Border Round 1 is 74 sc, with 30 sc on each side.
- Border Round 2 is 67 rev sc and skips the neck.
- The neck is 7 sc wide and 6 rows tall, securely sewn around the ring.
- The tassel is wrapped tightly and the ends are trimmed level.
- The finished leaf measures 8.2 in × 10.5 in (20.8 cm × 26.7 cm).
- All ends are woven in on the WS.
Troubleshooting
- Spine leans to one side: You switched FPdc/BPdc on the wrong row. RS rows are always FPdc.
- Mesh holes are uneven: Keep every ch-1 the same size as your dc tops. Don’t pull it tight.
- Edges ruffle: You worked more than 2 sc per row-end. Recount to 30 per side.
- Edges pucker: Your border tension is too tight. Go up 0.5 mm for the border only.
- Pocket lies flat and holds nothing: The joining sc were too tight. Redo Round 1 more loosely, or block it over a folded towel.
- Panels don’t align at the sides: Check that the pocket Rows 1–8 counts match the back’s exactly.
- Neck slips on the ring: Sew it 1 row deeper to tighten the loop.
- Tassel is lopsided: Re-wrap it and trim it again while it hangs straight.
Care
Spot clean, or hand wash in cool water with mild soap. Reshape and dry the hanger flat, then fluff the tassel once it is dry.

Final Notes
The measurement chain is simple. At 12 sts per 4 in, the 23-stitch rows give a 7.7 in (19.6 cm) width. Fifteen rows of mesh give 10 in (25.4 cm) of height. Two sc per row-end gives exactly 30 sc per side, the border adds 0.25 in (0.6 cm) all around, and the finished leaf comes to 8.2 in × 10.5 in (20.8 cm × 26.7 cm). If you hit each checkpoint, the pocket, Spine, and border will line up.
Happy crocheting!