

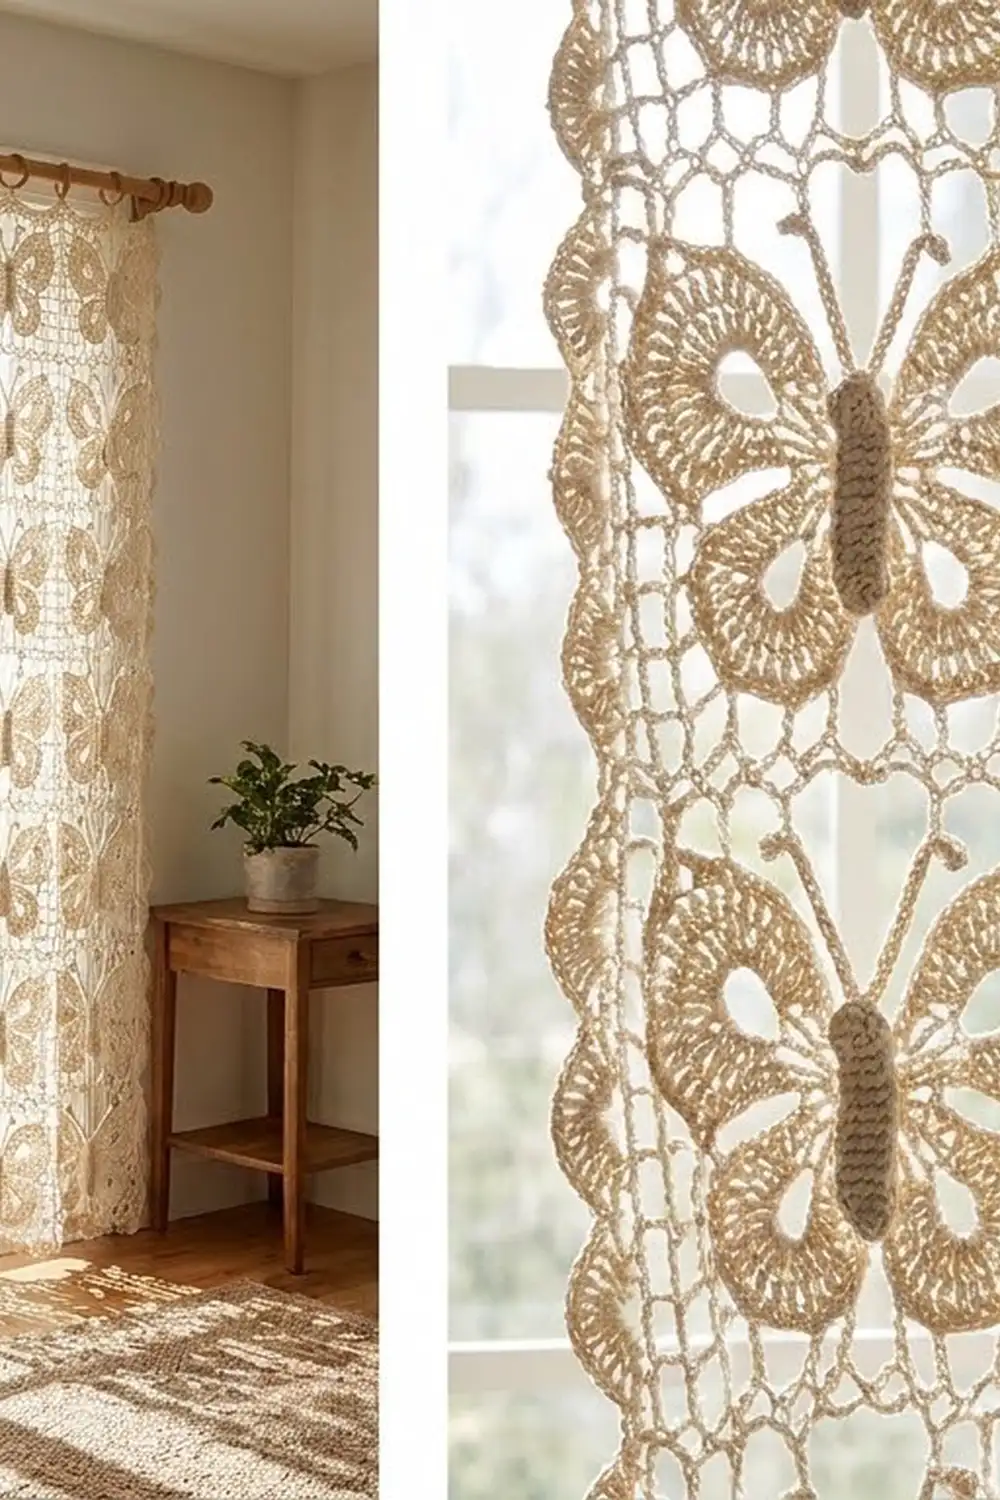
These curtains turn a sunny window into a garden of lace butterflies. Each panel is a grid of cream cotton butterflies. They are joined wing tip to wing tip, with short chain links between rows, so light comes through every open wing.
The only color is a soft cream, which keeps the look airy and vintage and goes well with natural wood, wicker, and plants. Every butterfly has a raised textured body, two knotted antennae, large rounded upper wings, and smaller rounded lower wings. Each wing has an open teardrop center and a band of radiating stitches.
This pattern uses US crochet terms. One finished panel measures 24 in wide x 70.25 in long (61.0 x 178.4 cm), plus tab loops of about 1.5 in (3.8 cm). Hung side by side, the two panels cover 48 in (121.9 cm).
The construction repeats one simple sequence. Crochet one butterfly in four rounds, then add a separate body and antennae. Join each new butterfly to its neighbors in the last round. A three-row header with seven tabs finishes the top edge. The sides and bottom keep their natural scalloped edge.
Finished Size and Construction
- Finished size (one panel): 24 x 70.25 in (61.0 x 178.4 cm), plus 1.5 in (3.8 cm) tab loops
- Skill level: Intermediate
- Terminology: US
- Yarn weight: DK (#3) mercerized cotton
- Hook: 3.5 mm (E-4)
- Number of pieces: 56 butterflies per panel, 112 for the pair
- Layout: 4 butterflies across x 14 down per panel
- Piece size (blocked): 6 x 4.5 in (15.2 x 11.4 cm); each row takes 5 in (12.7 cm) of length, including the chain link
- Size before border: 24 x 69.5 in (61.0 x 176.5 cm)
- Border depth: top header only, 0.75 in (1.9 cm)
Materials
Choose a smooth, mercerized DK cotton. It shows stitches clearly, holds a blocked shape, and doesn’t fuzz up over time. Avoid fuzzy blends, which blur the open wing centers.
- Cream: 950 g / 2,185 m (about nineteen 50 g balls of about 115 m each)
This covers 112 butterflies at about 7 g / 16 m each, plus both headers and all tabs. The amounts include about 15% extra for swatching, joining, and weaving in ends.
Tools:
- 3.5 mm (E-4) crochet hook
- Tapestry needle
- Stitch markers
- Rust-proof pins and a large blocking surface
- Spray bottle and light spray starch (optional)
- Tape measure
- Curtain rod up to 1 in (2.5 cm) in diameter
Abbreviations (US Terms)
- ch – chain
- sl st – slip stitch
- sc – single crochet
- hdc – half double crochet
- dc – double crochet
- yo – yarn over
- BLO – back loop only
- st(s) – stitch(es)
- rnd – round
- RS / WS – right side / wrong side
Special stitches:
- Picot: ch 3, sl st in 3rd ch from hook.
- Joining picot: ch 1, sl st in the matching picot of the neighboring butterfly, ch 1, sl st in the base of the first ch-1.
- Link join: ch 3, sl st in the matching picot of the butterfly above, ch 3, sl st in the last sc worked.
- 3-dc cluster: [yo, insert hook in st, yo, pull up a loop, yo, draw through 2 loops] 3 times in the same st, yo, draw through all 4 loops.
Gauge and Checkpoints
Gauge: 18 sc and 20 rows = 4 in (10.2 cm).
Before anything else, make one complete butterfly, block it, and measure it. This test piece sets the size of the whole curtain.
- After Rnd 2: about 4.25 in wide x 3.25 in tall (10.8 x 8.3 cm).
- After Rnd 3: about 5.5 x 4.25 in (14.0 x 10.8 cm).
- After Rnd 4, blocked: 6 x 4.5 in (15.2 x 11.4 cm).
- Body: 2.25 in (5.7 cm) long.
If the blocked butterfly is more than 1/4 in (0.6 cm) too big, go down a hook size. If it’s too small, go up a hook size. Width matters most, because four butterflies must add up to 24 in (61.0 cm).
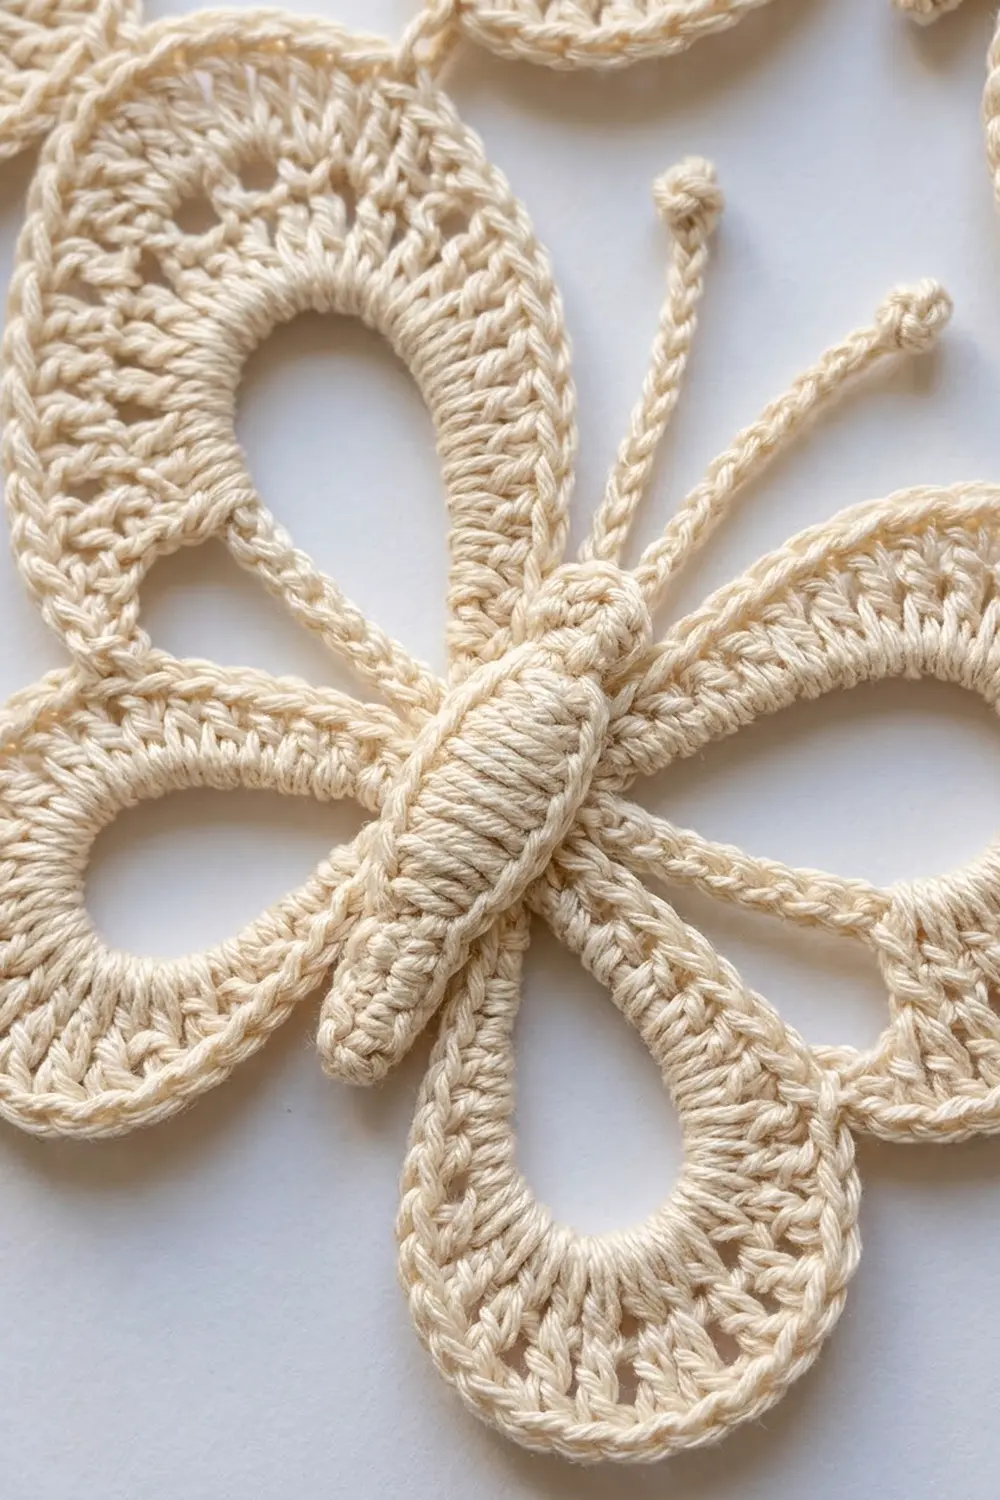
Butterfly (make 112)
Wing Frame
Ch 6, sl st in first ch to form a ring.
Rnd 1 (RS): [Ch 22, sl st in ring; ch 16, sl st in ring; ch 16, sl st in ring; ch 22, sl st in ring]. (4 chain loops: upper wing, lower wing, lower wing, upper wing)
Rnd 2: Sl st into the first ch-22 loop. In each loop, work the stitches around the chain loop rather than into individual chains:
- Upper wing (ch-22 loop): 3 sc, 4 hdc, 18 dc, 4 hdc, 3 sc; sl st in ring. (32 sts)
- Lower wing (ch-16 loop): 2 sc, 3 hdc, 12 dc, 3 hdc, 2 sc; sl st in ring. (22 sts)
- Work a lower wing in the next ch-16 loop, then an upper wing in the last ch-22 loop.
Rnd 2 total: 108 sts (32 + 22 + 22 + 32), not counting sl sts. The middle of each loop stays open and becomes the teardrop wing center.
Outer Wing Band
Rnd 3: Sl st in the first sc of the first upper wing.
- Upper wing (over 32 sts): sl st in first sc, sc in next 2 sc, hdc in next 4 hdc, [2 dc in next dc, dc in next dc] 9 times, hdc in next 4 hdc, sc in next 2 sc, sl st in last sc. (39 sts: 2 sc + 4 hdc + 27 dc + 4 hdc + 2 sc, plus 2 sl sts)
- Lower wing (over 22 sts): sl st in first sc, sc in next sc, hdc in next 3 hdc, [2 dc in next dc, dc in next dc] 6 times, hdc in next 3 hdc, sc in next sc, sl st in last sc. (26 sts: 1 sc + 3 hdc + 18 dc + 3 hdc + 1 sc, plus 2 sl sts)
- Work a lower wing, then an upper wing.
Rnd 3 total: 130 sts (39 + 26 + 26 + 39), plus 8 sl sts. The dc increases make the radiating band.
Edging and Join Points
Rnd 4: Keep the wings separate at the center.
- Upper wing: sl st in sl st, sc in next 13 sts, picot, sc in next 13 sts, picot, sc in next 13 sts, sl st in sl st. (39 sc, 2 picots)
- Lower wing: sl st in sl st, sc in next 9 sts, picot, sc in next 8 sts, picot, sc in next 9 sts, sl st in sl st. (26 sc, 2 picots)
- Work a lower wing, then an upper wing.
Rnd 4 total: 130 sc (130 worked 1-per-existing-st + 0 added), plus 8 picots and 8 sl sts. Fasten off.
The picots sit at even thirds of each wing, so the motif works the same in either direction. After blocking, each upper wing has a top picot and an outer picot, and each lower wing has an outer picot and a bottom picot.
Body
Ch 11.
Rnd 1: Sc in 2nd ch from hook, sc in next 8 ch, 3 sc in last ch. Working along the other side of the chain, sc in next 8 ch, 2 sc in same ch as first sc; join with sl st. (22 sts: 1 + 8 + 3 + 8 + 2)
Rnd 2: Sl st in BLO of each st around. (22 sl sts) This makes the raised ridge. Don’t fasten off.
Antennae
At the top end of the body, ch 8, work a 3-dc cluster in 3rd ch from hook, sl st in each of next 5 ch, sl st in body. Repeat from * to * once in the next st. Each antenna is about 1.25 in (3.2 cm) long. Fasten off, leaving a 12 in (30.5 cm) tail.
Center the body over the ring with the antennae pointing up. Whipstitch around its edge so it covers the wing junction.
Make All Pieces
Make all 112 butterflies in Cream, 56 per panel. Work Rnds 1–3, the body, and the antennae on each one. Leave Rnd 4 for the joining stage.
Layout per panel (B = butterfly, numbered in joining order):
Row 1:   B1   B2   B3   B4
Row 2:   B5   B6   B7   B8
Row 3:   B9   B10  B11  B12
...
Row 14:  B53  B54  B55  B56
Every butterfly faces the same way, with the antennae toward the top.
Joining
Join the butterflies as you go during Rnd 4. Work Rnd 4 as written until you reach a picot that meets a finished neighbor, then replace it with a join:
- Neighbor to the left: replace the upper wing outer picot and the lower wing outer picot with joining picots. (2 joins per seam)
- Neighbor above: replace each upper wing top picot with a link join into the bottom picot of the lower wing directly above. (2 links per butterfly)
Each join takes the exact place of a picot, so no stitches are added. Rnd 4 still has 130 sc.
Joins per panel: 14 rows x 3 seams x 2 = 84 side joins, and 13 gaps x 4 columns x 2 = 104 link joins.
Tension: make the ch-1 and ch-3 segments the same height as a free picot. Tight joins pucker the wing tips, and loose joins let the panel stretch.
Size checkpoint: after Row 2, the panel should measure 24 in wide x 9.5 in tall (61.0 x 24.1 cm). That’s two butterflies of 4.5 in (11.4 cm) plus one 0.5 in (1.3 cm) link. Each new row adds 5 in (12.7 cm), and 14 rows make 24 x 69.5 in (61.0 x 176.5 cm).
Border (Top Header and Tabs)
Only the top edge gets a border. The sides and bottom keep their scalloped shape.
Border gauge: 18 sc = 4 in (10.2 cm). That means 27 sts = 6 in (15.2 cm), the width of one butterfly.
Row 1 (RS): Make a slip knot. Work the following across each of the 4 butterflies in the top row: ch 6, sc in left upper wing top picot, ch 13, sc in right upper wing top picot, ch 6. Pass the ch-13 behind the antennae. (27 sts per butterfly: 6 + 1 + 13 + 1 + 6; 4 x 27 = 108 sts)
No stitches are added at the seams. The two ch-6 segments simply meet above each side join.
Row 2: Ch 1, turn, sc in each st across. (108 sc)
Row 3: Ch 1, turn, sc in each sc across. (108 sc)
The math works because 108 sts ÷ 4.5 sts per in = 24 in (61.0 cm), the same as the joined panel width. The header lies flat without ruffling or pulling in.
Tabs: On Row 3, mark these stitches: 1–6, 18–23, 35–40, 52–57, 69–74, 86–91, and 103–108. That gives 7 tabs of 6 sts with 6 gaps of 11 sts between them (42 + 66 = 108).
For each tab, join yarn at the first marked st, ch 1, sc in the 6 marked sts. (6 sc) For Rows 2–16, ch 1, turn, sc in 6. (6 sc) Fasten off, leaving a 10 in (25.4 cm) tail. Each tab is 3.2 in (8.1 cm) long. Fold it to the WS and whipstitch the last row to Row 1 to make a loop about 1.5 in (3.8 cm) deep.
The header, including the Row 1 arcs, is 0.75 in (1.9 cm) deep. The finished panel measures 24 x 70.25 in (61.0 x 178.4 cm).
Repeat the joining, header, and tabs for the second panel.
Final Blocking
- Weave in all ends along the sc edging.
- Wash gently in cool water with mild soap.
- Roll the panel in towels to remove water. Don’t wring it.
- Lay it flat RS up, working in sections if needed.
- Pin each row to 24 in (61.0 cm) wide and each row repeat to 5 in (12.7 cm).
- Pin every teardrop center open, and pin the antennae into a V.
- Mist with starch for crisper wings, if you like.
- Let it dry completely before you unpin.
Final Quality-Control Checklist
- Each butterfly has 130 sc and 8 picots or joins in Rnd 4.
- Every body is centered and securely sewn.
- Every antenna points up and has a knotted tip.
- All 84 side joins and 104 link joins are in place.
- Header Rows 2 and 3 each have 108 sc.
- All seven tabs are evenly spaced and secure.
- Each panel measures 24 x 70.25 in (61.0 x 178.4 cm).
- The two panels are within 1/2 in (1.3 cm) of each other in length.
Troubleshooting
- Wings cup or ruffle: recount Rnd 3 to 39 and 26 sts per wing.
- Wing centers close up: Rnd 2 is too tight. Spread the stitches along the loop, or go up a hook size.
- Panel narrows: side joins are too tight. Make each one the same height as a free picot.
- Header ripples: recount to 108 sts and work the Row 1 chains a little tighter.
- Antennae droop: use more starch.
- Body twists: pin it straight before sewing.
Care
Hand wash in cool water, roll in towels, and dry flat, re-pinning the wings as needed. Don’t hang the curtain while it’s wet, because wet cotton lace stretches under its own weight.
Final Notes
Here is how the measurements build. One butterfly blocks to 6 x 4.5 in (15.2 x 11.4 cm). Four across make 24 in (61.0 cm). Fourteen rows joined with 0.5 in (1.3 cm) links make 69.5 in (176.5 cm). The 108-st header adds 0.75 in (1.9 cm), for a finished panel of 24 x 70.25 in (61.0 x 178.4 cm). If your first butterfly measures correctly, the rest of the curtain will too.
Happy crocheting!