

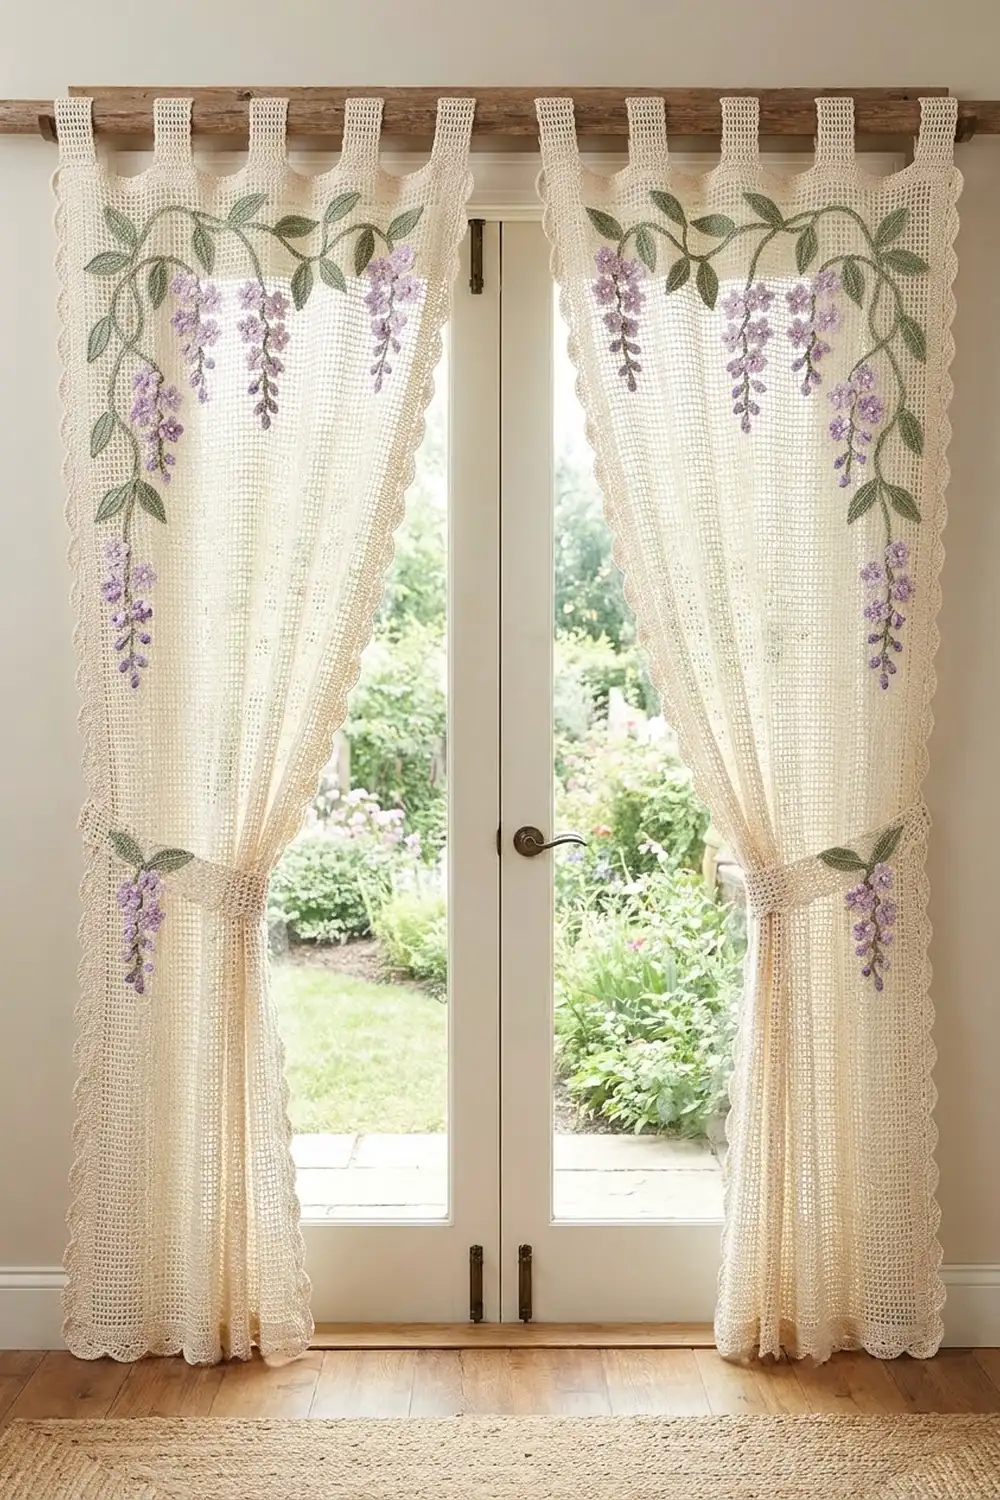
These curtain panels turn a plain doorway into a garden arch. Each one is an airy cream filet mesh with a scalloped shell edge and tab tops that slide straight onto a curtain rod.
A sage-green wisteria vine climbs across the top of each panel and trails down the outer edge. Clusters of tiny lilac and lavender flowers with pearl centers hang from the vine. The two panels are mirror images. Each one has a matching cream tieback with its own small cluster.
This pattern uses US crochet terms. Each finished panel measures 38 in (96.5 cm) wide by 81.25 in (206.4 cm) long, plus the tab loops. Each tieback is 20 in (50.8 cm) long.
You work each panel flat in filet rows and sew on the wisteria pieces, which you make separately. Then you add a two-round border and work the tabs from the top edge. The two panels are never joined to each other.
Finished Size and Construction
- Finished panel size: 38 in x 81.25 in (96.5 cm x 206.4 cm), plus 3 in (7.6 cm) tab loops
- Skill level: Intermediate
- Terminology: US
- Yarn weight: DK / light (#3) cotton
- Hook: 4.0 mm (G-6) for the panels; 3.5 mm (E-4) for the appliqués
- Number of pieces: 2 separate panels and 2 tiebacks, plus sewn-on appliqués
- Layout: Left and right panels hung side by side, with mirrored wisteria
- Size before border: 36 in x 80 in (91.4 cm x 203.2 cm)
- Border depth: 1 in (2.5 cm) on the long sides and bottom; 0.25 in (0.6 cm) at the top
Materials
Choose a smooth, mercerized DK cotton. It gives crisp, square meshes and won’t stretch under its own weight the way acrylic does.
- Cream (MC): 950 g / 2,185 m (19 balls of 50 g / 115 m)
- Sage green (A): 100 g / 230 m
- Pale lilac (B): 100 g / 230 m
- Lavender (C): 100 g / 230 m
Tools:
– 4.0 mm (G-6) and 3.5 mm (E-4) hooks
– 300 pearl beads (4 mm), sewing thread and a beading needle
– Tapestry needle
– 20 stitch markers
– Rustproof pins, blocking mats and a measuring tape
These quantities include a margin of about 15%.
Abbreviations (US Terms)
- ch – chain
- sl st – slip stitch
- sc – single crochet
- hdc – half double crochet
- dc – double crochet
- sk – skip
- sp – space
- st(s) – stitch(es)
- MR – magic ring
- RS/WS – right side/wrong side
Special stitches:
– Mesh: ch 2, sk 2 sts (or the ch-2 sp), dc in the next dc. Each mesh is 3 sts wide.
– Block: 4 dc side by side.
– Shell: 5 dc in the same st or sp.
– Bud: ch 3. (Yo, insert hook in 3rd ch from hook, pull up a loop, yo, draw through 2 loops) 3 times. Yo, draw through all 4 loops, then ch 1 to close.
Gauge and Checkpoints
Filet gauge (4.0 mm hook): 4 meshes (12 sts) = 2 in (5.1 cm), and 4 rows = 2 in (5.1 cm). Each mesh is a 0.5 in (1.3 cm) square, which works out to 6 sts per inch.
Test one swatch first:
1. Ch 27.
2. Row 1: dc in the 4th ch from hook and in each ch across (25 sts).
3. Rows 2–8: ch 5 (counts as dc and ch 2), sk 2, dc in next dc, then (ch 2, sk 2, dc in next st) across, ending with dc in the top of the turning ch (8 meshes).
The swatch should measure 4 in x 4 in (10.2 cm x 10.2 cm). If it’s too big, go down a hook size. If it’s too small, go up a hook size.
Appliqué checkpoints (3.5 mm hook):
– Flower: 0.75 in (1.9 cm)
– Leaf: 1.75 in (4.4 cm)
– Bud: 0.4 in (1.0 cm)
Panel checkpoints:
– After Row 1: 36 in (91.4 cm) wide
– At Row 40: 20 in (50.8 cm) long
– At Row 80: 40 in (101.6 cm) long
– At Row 160: 80 in (203.2 cm) long
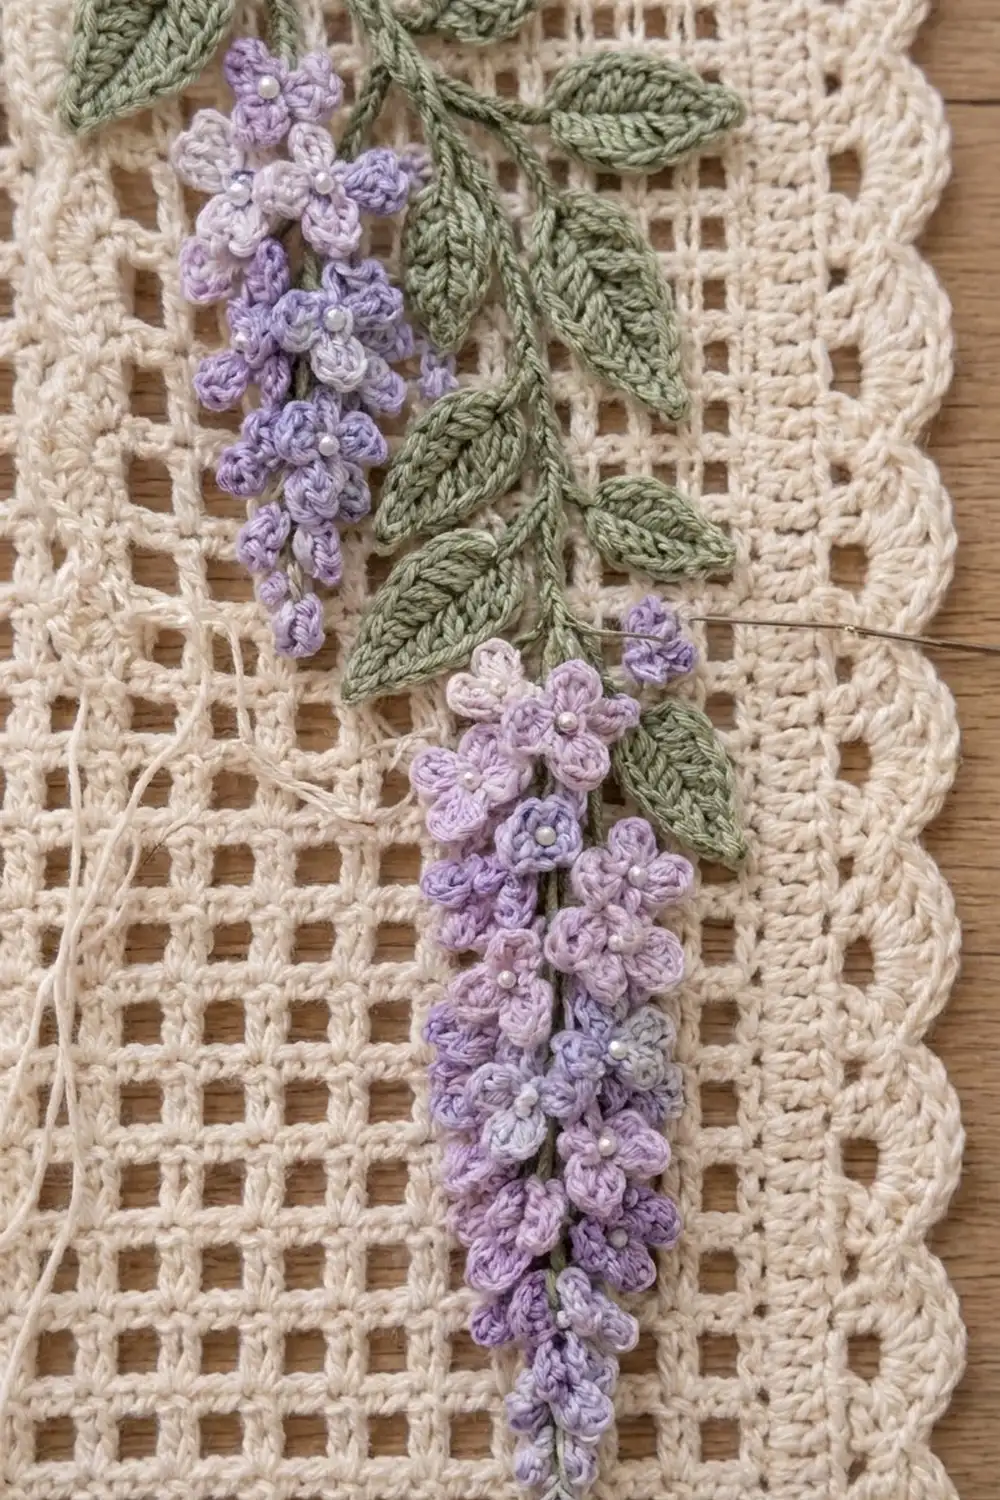
Panel Body (make 2)
The panel is 72 squares across: 1 solid block, then 70 meshes, then 1 solid block. With MC and the 4.0 mm hook, ch 219.
Row 1 (RS): Dc in the 4th ch from hook and in the next 2 ch. The skipped ch count as a dc, so this makes a 4-dc block. *Ch 2, sk 2 ch, dc in next ch; repeat from * 69 more times (70 meshes). Dc in the last 3 ch. Turn. (217 sts: 4 + 210 + 3)
Row 2: Ch 3 (counts as dc). Dc in the next 3 dc. *Ch 2, sk ch-2 sp, dc in next dc; repeat from * 69 more times. Dc in the next 2 dc and in the top of the turning ch. Turn. (217 sts)
Rows 3–160: Repeat Row 2. (217 sts per row.) At the end of Row 160, don’t fasten off. Place the live loop on a marker. The panel measures 36 in x 80 in (91.4 cm x 203.2 cm).
Wisteria Appliqués
Use the 3.5 mm hook for every appliqué piece. Leave an 8 in (20.3 cm) tail on each piece for sewing.
Long Stem (1 per panel): With A, ch 230. Sl st in the back bump of the 2nd ch from hook and of each ch across (229 sl st). This makes a firm cord about 38 in (96.5 cm) long.
Short Stem (1 per panel): With A, ch 200. Sl st in the back bump of the 2nd ch from hook and of each ch across (199 sl st). This cord is about 33 in (83.8 cm) long.
Cluster Spine (18 total): With A, ch 40. Sl st in the 2nd ch from hook and in each ch across (39 sl st). The spine is about 6.5 in (16.5 cm) long.
Leaf:
1. With A, ch 11.
2. Sl st in the 2nd ch from hook, sc in next ch, hdc in next ch, dc in next 4 ch, hdc in next ch, sc in next ch, sl st in last ch (10 sts).
3. Ch 2 for the tip.
4. Working along the other side of the foundation ch: sl st, sc, hdc, dc in next 4 ch, hdc, sc, sl st (10 sts).
5. Sl st to the first sl st.
The leaf has 20 sts plus the ch-2 tip. The foundation chain forms a raised center vein.
Flower: With B or C, make a MR. Work (ch 2, dc, ch 2, sl st) 5 times into the ring, then pull it tight to make 5 petals. Sew a pearl bead in the center.
Bud: With C, work one Bud and fasten off.
Build each cluster: Sew flowers around the spine in tiers spaced 1 in (2.5 cm) apart. From the top down, the tiers are 4 B, 4 B, 3 C, 3 C and 2 C. Sew 5 buds along the bottom 1.5 in (3.8 cm) of the spine. Each cluster has 16 flowers and 5 buds and tapers from 2 in (5.1 cm) wide to a single bud.
Make All Pieces
For the pair of panels and both tiebacks:
- MC: 2 panel bodies and 2 tiebacks. The 14 tabs are worked later, from the border.
- A: 2 long stems, 2 short stems, 18 cluster spines and 54 leaves (24 per panel, 3 per tieback)
- B: 144 flowers
- C: 144 flowers and 90 buds
- Clusters: 18 (8 per panel, 1 per tieback)
Tieback (make 2): With MC and the 4.0 mm hook, ch 121.
– Row 1: Sc in the 2nd ch from hook and in each ch across. (120 sc)
– Rows 2–3: Ch 1, sc in each st. (120 sc)
– At each end, ch 12 and sl st to the same corner to make a hanging loop.
– The tieback is 20 in (50.8 cm) long. Sew 1 cluster and 3 leaves to the center front.
Layout: Number the squares 1 (outer edge) to 72 (inner edge), and the rows 1 (bottom) to 160 (top). The right panel mirrors the left.
LEFT PANEL (outer = left)         RIGHT PANEL (mirror)
row 154: S===C===C===C===C===C     C===C===C===C===C===S
         |                                             |
row 136: C                                             C
row 112: C                                             C
row  88: C                                             C
row  82: end of long stem             end of long stem
S = square 3   C = cluster   | = long stem
Top clusters at squares 12, 24, 36, 48, 60
Joining: Sewing On the Appliqués
The panels are never joined to each other. Here, joining means sewing the wisteria onto each panel body. Do this before you work the border, so the edges stay free.
- Pin the short stem along Row 154 from square 3 to square 64, letting it wave gently.
- Pin the long stem from square 3 at Row 154 down to Row 82. Keep it between squares 2 and 6.
- Hang 5 clusters from the short stem at squares 12, 24, 36, 48 and 60. Hang 3 clusters from the inner side of the long stem at Rows 136, 112 and 88.
- Pin 12 pairs of leaves along the stems, about 5–6 in (12.7–15.2 cm) apart.
Stitch-to-stitch logic: Whipstitch each stem through its back loops, catching one dc post or ch-2 bar per mesh (every 0.5 in / 1.3 cm). Tack each leaf at its base and tip. Tack each cluster at the top of the spine, at every tier and at the tip.
Tension: Keep your stitches snug, but don’t let the mesh gather. Smooth the panel flat every 6 in (15.2 cm).
Size checkpoint: The panel should still measure 36 in (91.4 cm) across at Row 154. If it’s narrower, the stem is pulling the mesh in. Resew that section more loosely.
Border and Tabs
Border gauge: 6 sc per inch on every edge. Work 1 sc per st across the top and bottom. On the sides, work 3 sc per row-end, because each dc row is 0.5 in (1.3 cm) tall.
Round 1 (RS): This is a conversion round. Pick up the live loop at the end of Row 160 and ch 1.
1. Work (sc, ch 2, sc) in the first st.
2. Sc in each st across the top to the last st, then work (sc, ch 2, sc) in the last st.
3. Work 3 sc in each row-end down the side.
4. Work (sc, ch 2, sc) in the first foundation ch.
5. Sc in each ch across the bottom to the last ch, then work (sc, ch 2, sc) in the last ch.
6. Work 3 sc in each row-end up the second side, then sl st to the first sc.
The corners are ch-2 sps and are not counted as stitches. Each corner st gives 1 sc to each of its two sides. Counts between the corner sps:
– Top and bottom: 217 sc each
– Each long side: 480 row-end sc + 2 corner sc = 482 sc
Total: 434 sc (1 per st on the top and bottom) + 960 row-end sc + 4 extra corner sc = 1,398 sc. The panel is now 36.5 in (92.7 cm) wide. Fasten off.
Round 2 (scallops on the long sides and bottom only): Join MC in a top corner ch-2 sp. Ch 3 and work 2 dc in the same sp to make a half shell.
– Long side: Sc in next st. Sk 2, shell in next st, sk 2, sc in next st; repeat from * 79 more times. Sk 1. (80 shells, 81 sc)
– Corner: Shell in the ch-2 sp.
– Bottom: Sc in next st. Sk 2, shell in next st, sk 2, sc in next st; repeat from * 35 more times. (36 shells, 37 sc)
– Corner: Shell in the ch-2 sp.
– Second long side: Repeat the long-side instructions.
– Last corner: Work 3 dc in the remaining top corner sp. Fasten off.
Why the math works: Each scallop repeat uses 6 sts.
– Bottom: 1 + (6 x 36) = 217
– Each long side: 1 + (6 x 80) + 1 skipped = 482
Round 2 totals 1,195 sts: 481 + 481 on the long sides, 217 on the bottom, 10 in the two corner shells and 6 in the two half shells. The panel now measures 38 in x 81.25 in (96.5 cm x 206.4 cm).
Tabs (7 per panel): The tabs sit on the 217 top sc of Round 1. Each tab starts at sc 1, 35, 69, 103, 137, 171 or 205. That leaves 21 sc (3.5 in / 8.9 cm) between tabs, and the math checks out: (7 x 13) + (6 x 21) = 217.
– Row 1: Join MC in the starting sc. Ch 3 (counts as dc). Ch 2, sk 2, dc in next sc; repeat from * 3 more times. Turn. (4 meshes, 13 sts)
– Rows 2–14: Ch 5 (counts as dc and ch 2). Dc in next dc. Ch 2, dc in next dc; repeat from * once more. Ch 2, dc in the 3rd ch of the turning ch. Turn. (13 sts)
– Fasten off, leaving a 12 in (30.5 cm) tail. The tab is 7 in (17.8 cm) long.
– Fold the tab to the WS and sew its last row 1 in (2.5 cm) below the top edge. This makes a 3 in (7.6 cm) loop that fits a rod up to 1.5 in (3.8 cm) across.
Final Blocking
- Soak each panel in cool water for 15 minutes. Press the water out; don’t wring.
- Roll the panel in towels.
- Lay it flat on mats, appliqués up.
- Pin it to 38 in x 81.25 in (96.5 cm x 206.4 cm), with a pin at every shell point.
- Straighten the mesh columns against a long ruler.
- Fluff the petals and leaves with your fingers. Don’t press them.
- Let it dry fully (24–48 hours). Block the tiebacks to 20 in (50.8 cm).
Final Quality-Control Checklist
- Every panel row has 217 sts, and there are 160 rows.
- Round 1 has 217 / 482 / 217 / 482 sc between the corner sps.
- There are 80 scallops on each long side and 36 on the bottom.
- There are 7 tabs, evenly spaced and folded to the same depth.
- Each panel has 8 clusters, and each cluster has 16 flowers and 5 buds.
- The wisteria is mirrored between the two panels.
- All ends are woven into solid stitches.
- Each blocked panel measures 38 in x 81.25 in (96.5 cm x 206.4 cm).
Troubleshooting
- Meshes are rectangles: Adjust how tall you make your dc, or change hook size.
- Side edges pull in: Check that you worked 3 sc per row-end.
- Scallops ruffle: Use a smaller hook for Round 2.
- Puckering behind the stem: Resew the stem more loosely.
- Clusters twist: Add a tack stitch at the middle tier.
- Loose beads: Double-knot the thread behind each flower.
Care
Hand wash in cool water with a mild detergent and dry flat in the blocked shape. Keep the panels out of strong direct sun so the lilac and lavender don’t fade.
Final Notes
Every measurement in this pattern comes from the 0.5 in (1.3 cm) mesh:
– 72 squares make 217 sts and a panel 36 in (91.4 cm) wide.
– 160 rows make the panel 80 in (203.2 cm) long.
– At 6 sc per inch, Round 1 has 217 and 482 sts per side, and both counts divide exactly into 6-st scallops.
– The 1 in (2.5 cm) border brings each panel to 38 in x 81.25 in (96.5 cm x 206.4 cm).
Check your swatch and count at every checkpoint, and both panels will hang straight.
Happy crocheting!