

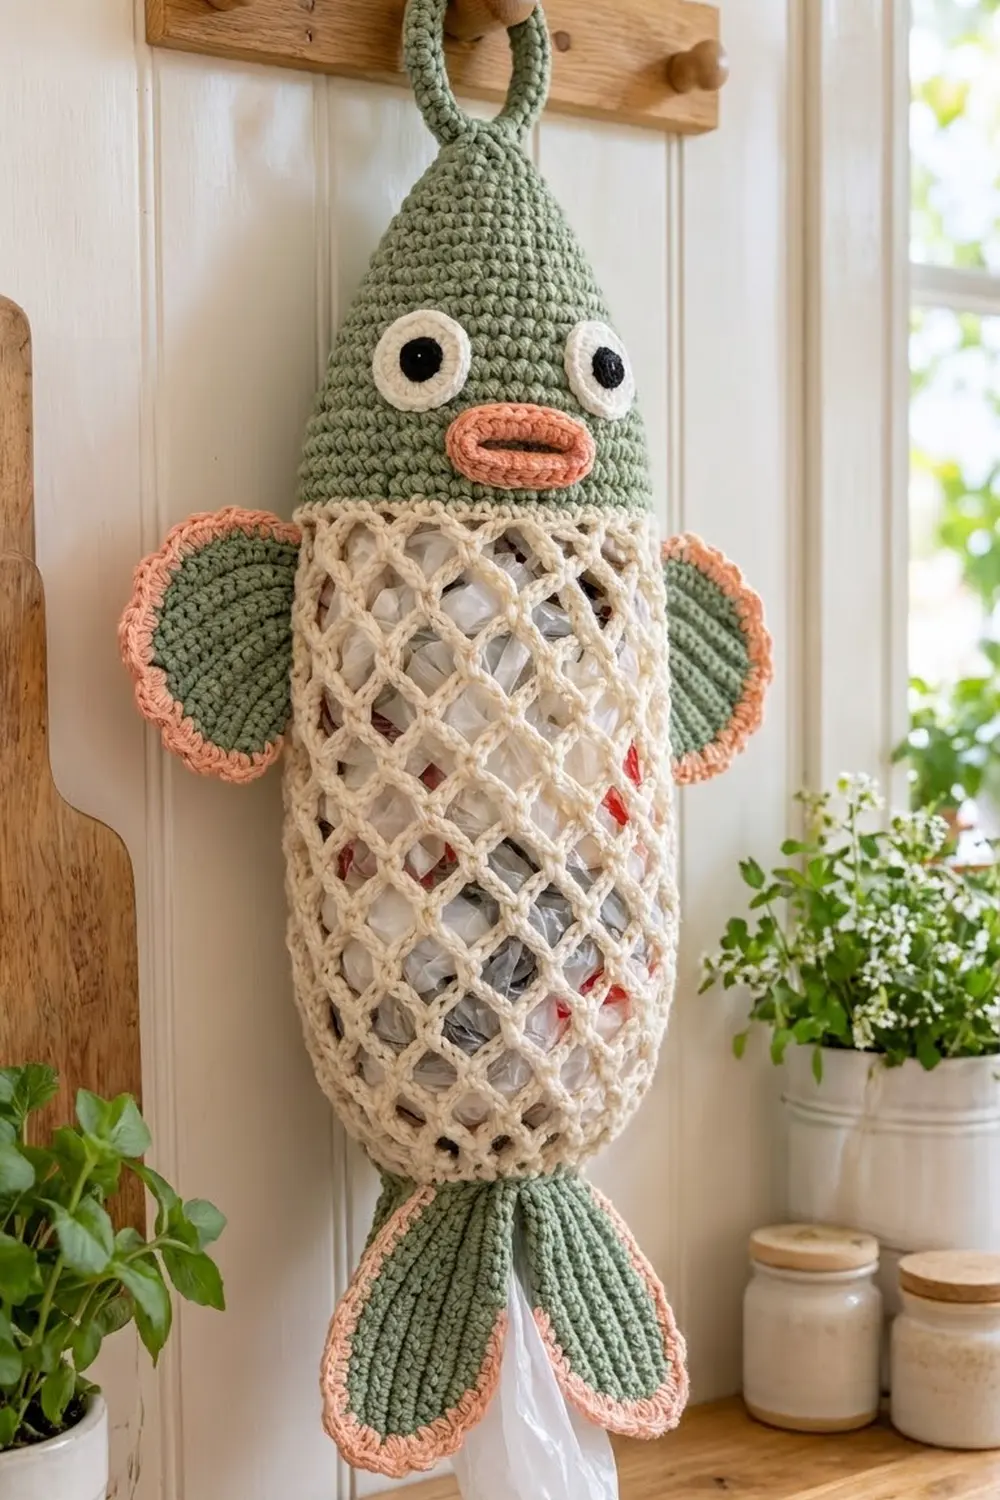
The Sage Minnow is a hanging fish that stores plastic grocery bags. You push bags in through the open mesh at the top of the body and pull them out one at a time from a small ring between the tail fins. It looks good on a kitchen peg rail and is easy to use every day.
The palette is soft and a little vintage. The head and fins are sage green, the mesh body is cream, and salmon pink is used for the mouth and the scalloped fin edges. Black safety eyes sit in cream eye circles to give the fish its slightly surprised face.
This pattern uses US crochet terms. The finished holder measures about 26.6 in (67.6 cm) from the top of the loop to the tail tips. The body is 6 in (15.2 cm) wide lying flat, and the holder is about 10 in (25.4 cm) wide across the side fins.
You work the head from the tip down in spiral rounds of single crochet. The cream mesh body is worked directly off the head’s bottom edge, then narrows into a solid sc ring. You make the fins, eyes, mouth, and loop separately and sew them on.
Finished Size and Construction
- Finished length: about 26.6 in (67.6 cm) including loop and tail
- Body width (flat): 6 in (15.2 cm); about 10 in (25.4 cm) across the side fins
- Skill level: Intermediate
- Terminology: US
- Yarn weight: #4 medium (worsted) cotton
- Hooks: 4.5 mm (US 7) for solid parts, 5.0 mm (US H-8) for the mesh
- Number of pieces: 1 head with the mesh body worked on, 2 side fins, 2 tail fins, 2 eyes, 1 mouth, and 1 hanging loop, assembled into one holder
- Layout: vertical hanging fish
- Head: 6 in (15.2 cm) tall, 6 in (15.2 cm) wide flat
- Fin size before edging: side fins 1.75 × 3 in (4.4 × 7.6 cm); tail fins 1.75 × 5 in (4.4 × 12.7 cm)
- Edging depth: 0.25 in (0.6 cm) per edge
Materials
Use a smooth, firm cotton or cotton blend. Cotton holds the cone shape of the head and keeps the mesh from sagging when it’s full of bags.
- Sage green: 60 g, about 110 m
- Cream: 50 g, about 90 m
- Salmon pink: 20 g, about 36 m
- 4.5 mm (US 7) and 5.0 mm (US H-8) crochet hooks
- 2 black safety eyes, 12 mm, with washers
- Stitch marker
- Tapestry needle
- Scissors
- Pins
- Small amount of fiberfill (optional, for the tip of the head)
The quantities include a margin of about 15% for gauge swatches and differences in tension.
Abbreviations (US Terms)
- ch – chain
- sl st – slip stitch
- sc – single crochet
- hdc – half double crochet
- dc – double crochet
- inc – 2 sc in the same stitch
- MR – magic ring
- st(s) – stitch(es)
- Rnd – round
Special stitch – Scallop: Sc in the next st, then 3 hdc in the following st. Each scallop uses 2 stitches.
Gauge and Checkpoints
- Solid sc (4.5 mm hook): 16 sts × 18 rnds = 4 in (10.2 cm)
- Mesh (5.0 mm hook): 4 ch-5 loops × 5 rnds = 4 in (10.2 cm), gently stretched
Make the head first and check it before you start the mesh. These are the checkpoints:
- After Rnd 16, the head is 48 sts around, which is a 12 in (30.5 cm) circumference.
- After Rnd 27, the head is 6 in (15.2 cm) tall and 6 in (15.2 cm) wide lying flat.
- After Mesh Rnd 14, the mesh is about 11.2 in (28.4 cm) long.
- The bottom ring is 24 sts, which is a 6 in (15.2 cm) circumference and about a 1.9 in (4.8 cm) opening.
If your head is too big, go down a hook size. If it’s too small, go up a hook size. If the mesh gets long and droopy, use a 4.5 mm hook for the mesh too. If the mesh is stiff and narrow, use a 5.5 mm (US I-9) hook.
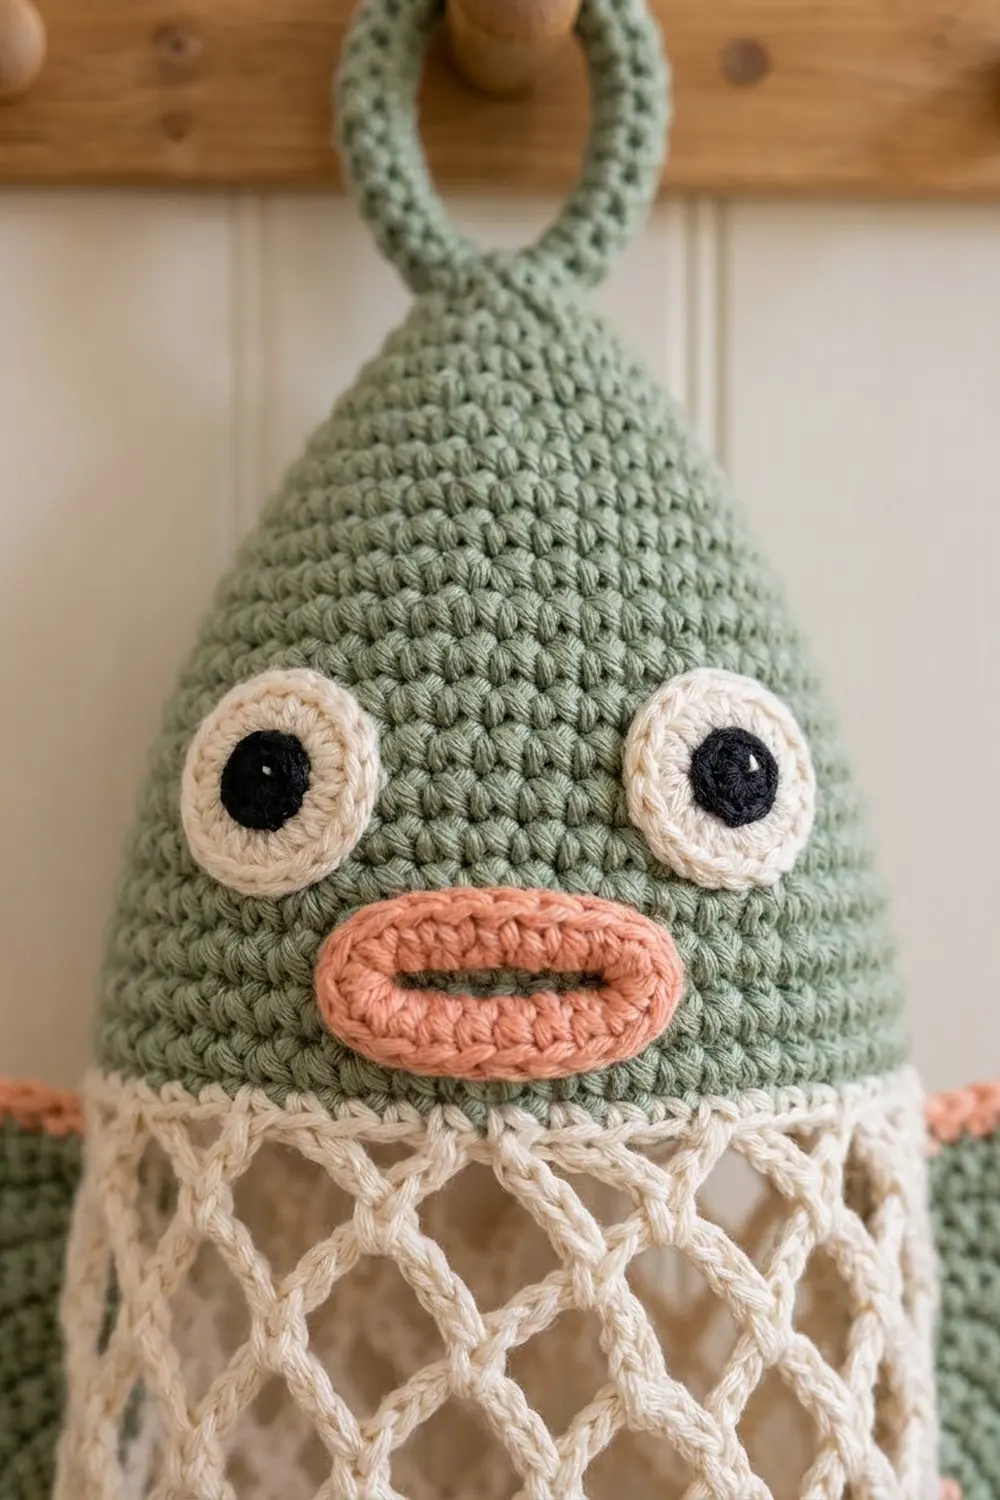
Head (Sage Green, 4.5 mm Hook)
Work in continuous spiral rounds. Place a marker in the first stitch of each round.
- Rnd 1: 6 sc in MR. (6)
- Rnd 2: (sc 1, inc) 3 times. (9)
- Rnd 3: sc in each st. (9)
- Rnd 4: (sc 2, inc) 3 times. (12)
- Rnd 5: sc in each st. (12)
- Rnd 6: (sc 1, inc) 6 times. (18)
- Rnd 7: sc in each st. (18)
- Rnd 8: (sc 2, inc) 6 times. (24)
- Rnd 9: sc in each st. (24)
- Rnd 10: (sc 3, inc) 6 times. (30)
- Rnd 11: sc in each st. (30)
- Rnd 12: (sc 4, inc) 6 times. (36)
- Rnd 13: sc in each st. (36)
- Rnd 14: (sc 5, inc) 6 times. (42)
- Rnd 15: sc in each st. (42)
- Rnd 16: (sc 6, inc) 6 times. (48)
- Rnds 17–27: sc in each st. (48)
Sl st in the next st to smooth out the step, then fasten off. The head should be 6 in (15.2 cm) tall. Mark the center front: it’s the stitch directly above where the spiral started. If you like, put a small pinch of fiberfill in the tip.
Eyes (Make 2, Cream, 4.5 mm Hook)
- Rnd 1: 6 sc in MR. (6)
- Rnd 2: inc in each st. (12)
- Rnd 3: (sc 1, inc) 6 times. (18)
Sl st to join and fasten off, leaving a long tail. Each eye is 1.25 in (3.2 cm) across. Push a safety eye through the center of each eye piece.
Mouth (Salmon, 4.5 mm Hook)
Ch 7.
- Rnd 1: Sc in the 2nd ch from the hook, sc in the next 4 ch, 3 sc in the last ch. Working along the other side of the chain, sc in the next 4 ch, then 2 sc in the first ch. (14)
- Rnd 2: Inc, sc 4, inc 3 times, sc 4, inc 2 times. (20)
Sl st to join and fasten off with a long tail. The mouth is about 2 × 1 in (5.1 × 2.5 cm). With salmon yarn, backstitch along the foundation chain to make the center line of the mouth.
Attach the Face
Do this before you start the mesh, while you can still reach the inside of the head.
- Center the eyes on Rnd 19, with their centers 9 sts apart, which is about 2.25 in (5.7 cm).
- Push each safety eye post through the head and snap the washer on from the inside.
- Sew the outer edge of each eye piece to the head.
- Center the mouth over Rnds 22–24, midway between the eyes, and sew it on around its edge.
Mesh Body (Cream, 5.0 mm Hook)
Join the cream yarn in the last stitch of Rnd 27 at the back of the head.
Mesh Rnd 1: Ch 1, sc in the same st. Ch 5, skip the next 3 sts, sc in the next st. Repeat from * 10 more times (11 repeats total). Ch 2, skip the last 3 sts, and dc in the first sc. (12 loops)
Check the count: 1 sc + (11 × 4 sts) + 3 skipped sts = 48 sts used. The ch 2 + dc counts as the 12th ch-5 loop and leaves your hook in the middle of that loop.
Mesh Rnds 2–14: Ch 1, sc around the post of the joining dc. Ch 5, sc in the next ch-5 loop. Repeat from * 10 more times (11 repeats total). Ch 2, dc in the first sc. (12 loops)
Checkpoint: the mesh is about 11.2 in (28.4 cm) long and lies 6 in (15.2 cm) wide when gently stretched.
Mesh Rnd 15 (taper): Work as for Rnd 2, but use ch 4 in place of ch 5, and close with ch 1, dc in the first sc. (12 loops)
Mesh Rnd 16 (taper): Work as for Rnd 2, but use ch 3 in place of ch 5, and close with ch 1, hdc in the first sc. (12 loops)
The total mesh length is now about 12.4 in (31.5 cm).
Bottom Ring
Rnd 17 (conversion): Ch 1. Work 2 sc around the post of the joining hdc, then 2 sc in each of the next 11 ch-3 loops. Skip the sc’s from the previous round. Sl st to the first sc. (12 loops × 2 sc = 24 sc)
Rnds 18–19: Ch 1, sc in each st, sl st to the first sc. (24)
Fasten off. The ring adds about 0.7 in (1.8 cm), so the head and body together measure about 19.1 in (48.5 cm).
Side Fins (Make 2, Sage Green, 4.5 mm Hook)
Ch 9.
- Rnd 1: Sc in the 2nd ch from the hook, sc in the next 6 ch, 3 sc in the last ch. Working along the other side of the chain, sc in the next 6 ch, then 2 sc in the first ch. (18)
- Rnd 2: Inc, sc 6, inc 3 times, sc 6, inc 2 times. (24)
- Rnd 3: Sc 2, sc 6, inc 6 times, sc 6, sc 4. (30)
Rnd 3 adds stitches only at the far end. That makes the outer end flare into a rounded fan shape, while the narrow end stays small for attaching. Don’t fasten off yet. Each side fin measures 1.75 × 3 in (4.4 × 7.6 cm) at this point.
Tail Fins (Make 2, Sage Green, 4.5 mm Hook)
Ch 17.
- Rnd 1: Sc in the 2nd ch from the hook, sc in the next 14 ch, 3 sc in the last ch. Working along the other side of the chain, sc in the next 14 ch, then 2 sc in the first ch. (34)
- Rnd 2: Inc, sc 14, inc 3 times, sc 14, inc 2 times. (40)
- Rnd 3: Sc 2, sc 14, inc 6 times, sc 14, sc 4. (46)
Each tail fin measures 1.75 × 5 in (4.4 × 12.7 cm) at this point.
Border: Salmon Scallop Edging
Border gauge: each scallop covers 2 sts and is about 0.5 in (1.3 cm) wide. The edging adds 0.25 in (0.6 cm) on every edge.
Side fin edging: Join salmon in the first st of Rnd 3. Work a scallop (sc in the next st, 3 hdc in the next st) across each section of the fin:
- Narrow end, first part: 2 sts = 1 scallop
- First side: 6 sts = 3 scallops
- Flared end: 12 sts = 6 scallops
- Second side: 6 sts = 3 scallops
- Narrow end, last part: 4 sts = 2 scallops
Total: 15 scallops (30 sts). Sl st to the first sc and fasten off. The finished side fin is 2.25 × 3.5 in (5.7 × 8.9 cm).
Tail fin edging: Work the same way:
- Narrow end, first part: 2 sts = 1 scallop
- First side: 14 sts = 7 scallops
- Flared end: 12 sts = 6 scallops
- Second side: 14 sts = 7 scallops
- Narrow end, last part: 4 sts = 2 scallops
Total: 23 scallops (46 sts). The finished tail fin is 2.25 × 5.5 in (5.7 × 14.0 cm).
Why the math works: every section of Rnd 3 has an even number of stitches, so each section takes a whole number of 2-st scallops. A scallop never has to straddle a corner, and the edging lies flat without any fudge stitches.
Hanging Loop (Sage Green, 4.5 mm Hook)
Ch 41.
- Row 1: Sc in the 2nd ch from the hook and in each ch across. (40)
- Row 2: Ch 1, turn, sl st in each st across. (40)
The strip is 10 in (25.4 cm) long. Fold it in half and whipstitch the first 4 sts of each end together to make a 1 in (2.5 cm) stem. The 32 sts left form a ring with an 8 in (20.3 cm) circumference, about 2.5 in (6.4 cm) across. Push the end of the stem into the magic ring at the tip of the head and sew it in securely. The loop stands 3.5 in (8.9 cm) above the head.
Assembly
- Side fins: Pin the narrow end of each fin to the side of the body across Mesh Rnds 1–3, just below the head. Overlap about 1.5 in (3.8 cm) of fin onto the body so that 2 in (5.1 cm) sticks out. Sew through the sc’s and chains of the mesh.
- Tail fins: Pin the narrow ends side by side over the front of the bottom ring, angling the tips outward into a V. Overlap 1.5 in (3.8 cm) so that 4 in (10.2 cm) hangs below the ring. Sew them on, and keep the ring opening clear.
- Weave in all ends on the inside.
Final Blocking
- Mist the fins lightly, or dampen them and press out the extra water.
- Pin each fin flat, easing the scallops into even points.
- Slide a rolled towel, about 5 in (12.7 cm) across, into the mesh body.
- Gently straighten the diamonds so that the loops line up in vertical columns.
- Shape the head over your hand into a smooth cone.
- Let everything dry completely, then remove the pins and towel.
Final Quality-Control Checklist
- The head has 48 sts at its base and measures 6 in (15.2 cm) tall.
- The mesh has 12 loops in every round.
- The bottom ring has exactly 24 sc and opens about 1.9 in (4.8 cm).
- The side fins have 15 scallops and the tail fins have 23.
- The eyes sit level on Rnd 19 and the mouth is centered.
- The loop stem is sewn firmly and doesn’t stretch.
- The total length is about 26.6 in (67.6 cm).
Troubleshooting
- Head is flared, not cone-shaped: your tension is loose. Go down a hook size, or work the plain rounds a little tighter.
- Mesh twists in a spiral: you skipped the joining dc loop. Always start each round by working around its post.
- Mesh has too few loops: count 11 repeats plus the joining loop in every round.
- Fins cup: your edging is tight. Use a larger hook for the scallops only.
- Bags fall out of the ring: add one more round of sc decreases, (sc 2, sc2tog) around, for 18 sts.
- Loop stretches: add a third row of sl sts to the strip.
Care
Hand wash in cool water and lay flat to dry, reshaping the head and fins while damp. Remove the safety-eye washers’ backing only if you are replacing the eyes.
Final Notes
Everything in this pattern follows from one measurement chain. At 16 sc per 4 in, the head base has 48 sts, which is a 12 in (30.5 cm) circumference. Those 48 sts divide into 12 mesh loops, and the mesh tapers back to a 24 sc ring. The even-numbered fin rounds then fit whole 2-st scallops. Check the head first, and the rest of the fish will measure as written. For a lighter version, work the head in cream and edge the tail fins in green.
Happy crocheting!