

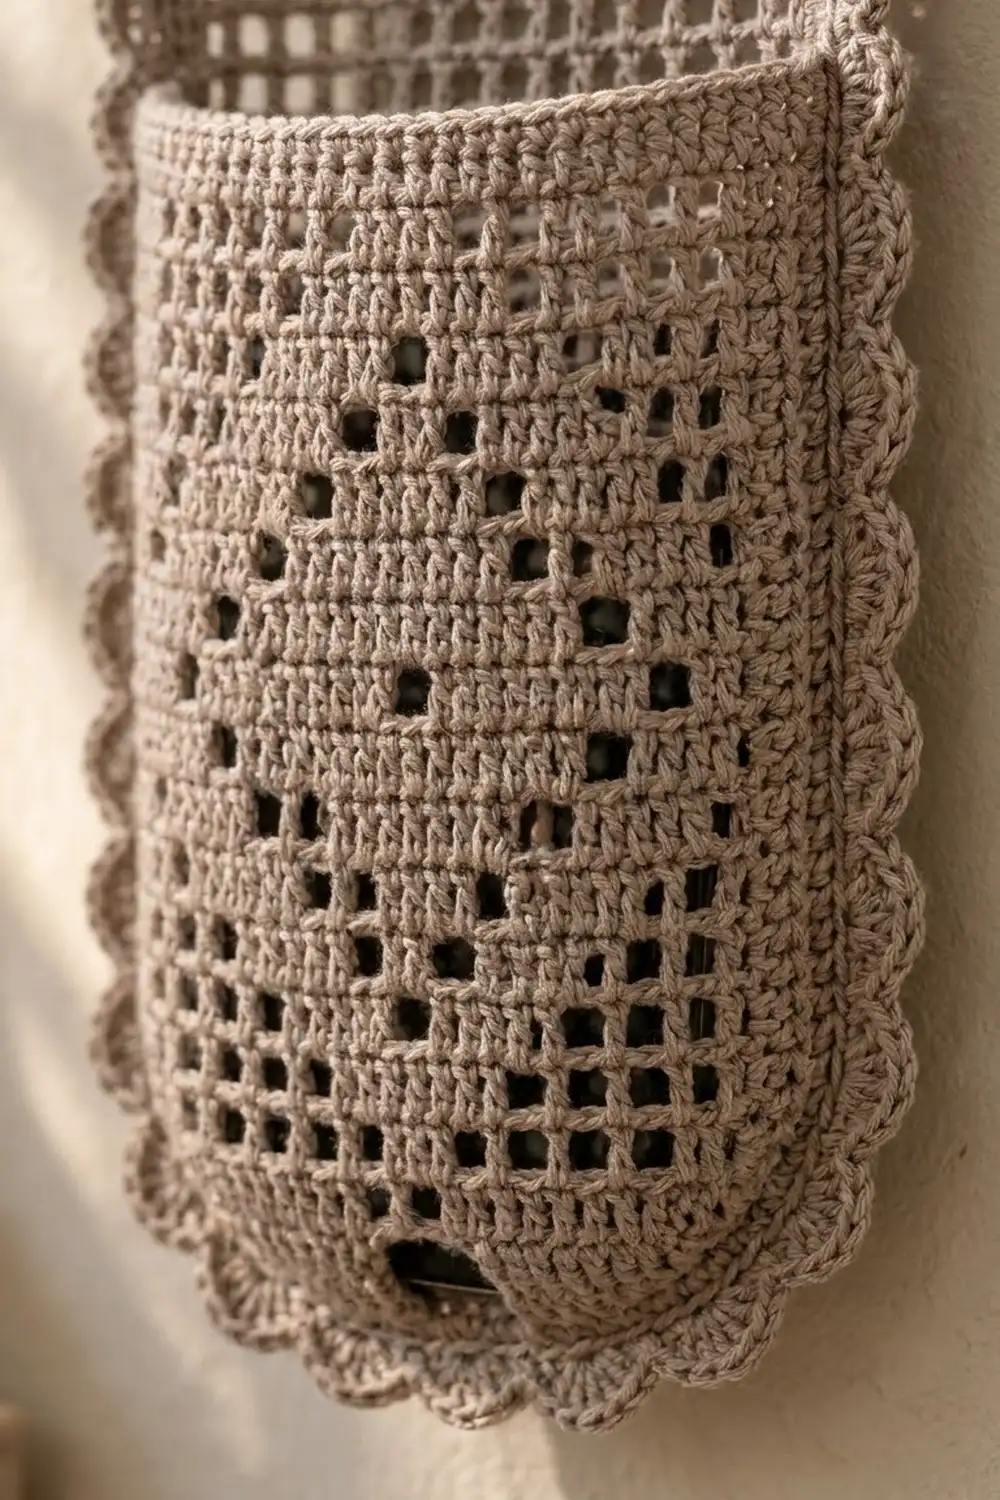
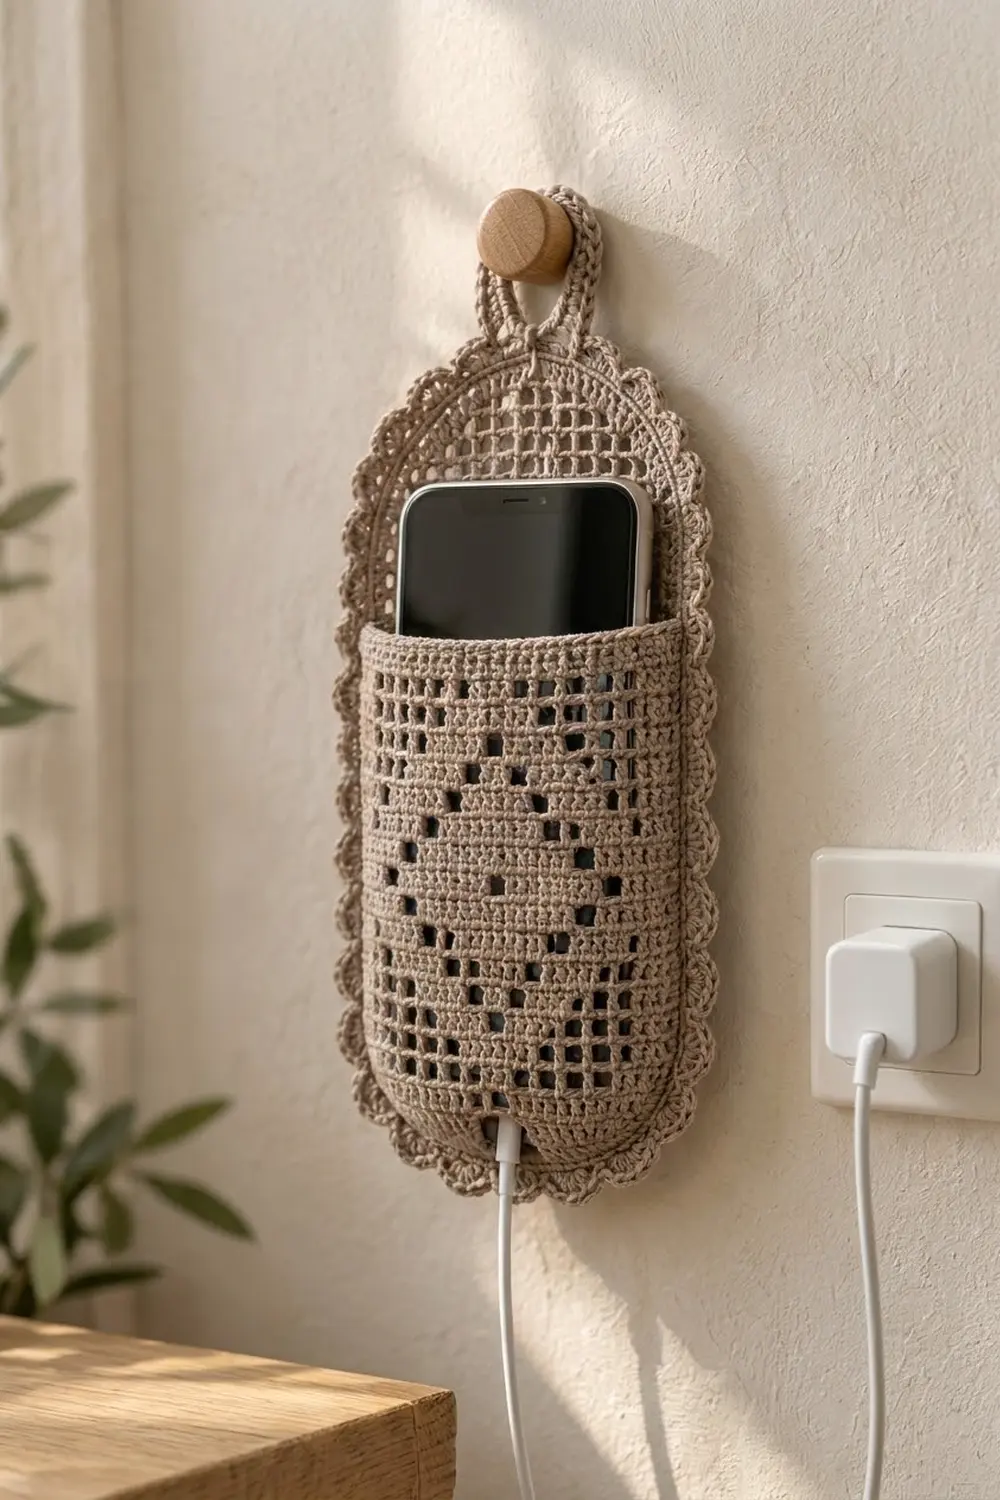
This filet phone holder hangs on the wall and keeps your phone upright and off the counter while it charges. A tall arched back panel carries a front pocket with a lattice diamond, and a soft scalloped edge runs all the way around. A small loop at the top hangs it on a peg or hook.
The sample is one color, a warm taupe cotton, so the open and filled filet blocks carry the design. Light thread cotton keeps the mesh crisp and the holder light enough for a single small peg.
This pattern uses US crochet terms. The finished holder is 4.75 in (12.1 cm) wide and 9 in (22.9 cm) tall, or 10 in (25.4 cm) including the loop. The pocket fits most phones up to about 3.1 in (7.9 cm) wide and 6.5 in (16.5 cm) tall.
Here is the construction in short. You work the back panel from a center foundation row, first upward to the arch and then downward to the rounded bottom, so every shaped edge uses easy decreases only. The pocket is worked from the top down. The first border round joins the pocket to the panel and leaves a cable slot. A scallop round and the hanging loop finish it.
Finished Size and Construction
- Finished size: 4.75 in x 9 in (12.1 cm x 22.9 cm), plus a loop of about 1 in (2.5 cm)
- Skill level: Intermediate (filet blocks, simple shaping)
- Terminology: US
- Yarn weight: Size 3 crochet thread or light fingering cotton (#1 Super Fine)
- Hook: 2.25 mm (US B/1)
- Number of pieces: 2 (back panel and pocket), plus a loop worked in place
- Layout: Pocket lies over the lower 21 rows of the back panel
- Back panel size before border: 3.75 in x 8 in (9.5 cm x 20.3 cm)
- Pocket size: 3.75 in x 5.25 in (9.5 cm x 13.3 cm)
- Border depth: 0.5 in (1.3 cm)
Materials
Yarn: Use a smooth mercerized cotton. Cotton holds the filet squares sharply and doesn’t sag under a phone’s weight. Avoid fuzzy or very stretchy fibers, because the mesh will blur and the pocket will bag.
- Taupe: 25 g, about 85 m (93 yd)
The quantity includes a margin of about 20% for your gauge swatch and weaving in ends.
Tools:
– 2.25 mm (US B/1) crochet hook
– Tapestry needle
– Scissors
– 4 locking stitch markers
– Rust-proof pins and a blocking mat
– Ruler or tape measure
– Spray bottle, plus spray starch (optional)
Abbreviations (US Terms)
- ch – chain
- sl st – slip stitch
- sc – single crochet
- dc – double crochet
- fdc – foundation double crochet
- sk – skip
- st(s) – stitch(es)
- sp – space
- RS / WS – right side / wrong side
- O – open block
- S – solid block
Foundation double crochet (fdc): Ch 3, yo, insert hook in 3rd ch from hook, yo and pull up a loop, yo and pull through 1 loop (this is the “chain”), [yo, pull through 2] twice. For each next fdc: yo, insert hook in the “chain” of the previous st, then finish the same way. Every fdc leaves a free base loop that you can work into later.
Block math: A row of N blocks has 2N + 1 sts: one edge dc, then 2 sts per block.
– Open block (O): ch 1, sk 1 st, dc in next dc.
– Solid block (S): dc in next st (ch-1 sp or dc), dc in next dc.
– Row starting with O: ch 4 (counts as dc + ch 1), sk next st, dc in next dc.
– Row starting with S: ch 3 (counts as dc), dc in next st, dc in next dc.
– Last st of every row: worked in the top of the turning ch.
Decrease 1 block at the start of a row: sl st in next 2 sts, then begin the row as usual. Decrease 1 block at the end of a row: leave the last block unworked and turn.
Shell: 5 dc in the same st.
Gauge and Checkpoints
Gauge: 16 blocks and 16 rows = 4 in (10.2 cm) in filet mesh. That is 4 blocks and 4 rows per 1 in (2.5 cm).
Use the pocket as your gauge test because it’s the smaller piece. Check it at these points:
- After P1: 31 fdc measure 3.75 in (9.5 cm).
- After P8: height is 2 in (5.1 cm).
- After P18: height is 4.5 in (11.4 cm).
- Finished pocket: 3.75 in x 5.25 in (9.5 cm x 13.3 cm).
- Back panel: Row F is 3.75 in (9.5 cm) wide, and the finished panel is 8 in (20.3 cm) tall.
If your piece is too big, go down 0.25 mm in hook size. If it’s too small, go up 0.25 mm. If only the height is off, adjust how far you pull up the first loop of each dc rather than changing hooks. Change hooks before you start the back panel, because the two pieces must match row for row.
Back Panel
Work Row F, then Part A upward. Then turn the panel over and work Part B into the base of Row F.
Row F (RS): 31 fdc. (15 S, 31 sts)
Part A (upward)
Row U1: ch 4, sk next st, dc in next st, *ch 1, sk next st, dc in next st; rep from * across, ending in top of the beginning ch. (15 O, 31 sts)
Rows U2–U20: Work 15 O across, working each dc in a dc and each ch over a ch-1 sp. (15 O, 31 sts)
Checkpoint: Row F plus U1–U20 is 21 rows, which should measure 5.25 in (13.3 cm).
Row U21: Decrease 1 block at the start, work O across, and decrease 1 block at the end. (13 O, 27 sts)
Row U22: 13 O. (27 sts)
Row U23: Decrease 1 block at each end. (11 O, 23 sts)
Row U24: Decrease 1 block at each end. (9 O, 19 sts)
Row U25: Decrease 1 block at each end. (7 O, 15 sts)
Row U26: Decrease 1 block at each end. (5 O, 11 sts) Fasten off.
These steps form the arch. Each side steps in by 5 blocks over the last 6 rows, and the arch top is 1.25 in (3.2 cm) wide.
Part B (downward)
Rotate the panel so the base of Row F is at the top.
Row D1: Join yarn in the first free base loop. Ch 4, sk next loop, dc in next loop, *ch 1, sk next loop, dc in next loop; rep from * across. (15 O, 31 sts)
Row D2: 15 O. (31 sts)
Row D3: Decrease 1 block at each end. (13 O, 27 sts)
Row D4: Decrease 1 block at each end. (11 O, 23 sts)
Row D5: Decrease 1 block at each end. (9 O, 19 sts) Fasten off.
The bottom edge is 2.25 in (5.7 cm) wide.
Panel total: 1 + 26 + 5 = 32 rows, or 8 in (20.3 cm). Weave in the ends.
The pocket is worked from the top down. Choose the neater face as RS.
Row P1: 31 fdc. (15 S)
Row P2: ch 3, dc in each st across. (15 S, 31 sts)
Row P3: S1, O13, S1. (31 sts)
Rows P4–P18 (diamond): Work each row from the list below. Every row is 15 blocks (31 sts).
- P4: S1, O13, S1
- P5: S1, O6, S1, O6, S1
- P6: S1, O5, S1, O1, S1, O5, S1
- P7: S1, O4, S1, O3, S1, O4, S1
- P8: S1, O3, S1, O2, S1, O2, S1, O3, S1
- P9: S1, O2, S1, O2, S1, O1, S1, O2, S1, O2, S1
- P10: S1, O1, S1, O2, S1, O3, S1, O2, S1, O1, S1
- P11 (center): S2, O2, S1, O2, S1, O2, S1, O2, S2
- P12: as P10
- P13: as P9
- P14: as P8
- P15: as P7
- P16: as P6
- P17: as P5
- P18: as P4
The outer diamond reaches the side frame at P11 and comes to points at P5 and P17. The inner diamond comes to points at P8 and P14, with a solid center block at P11.
Row P19: Decrease 1 block at each end, then work S1, O11, S1. (13 blocks, 27 sts)
Row P20: Decrease 1 block at each end, then work S1, O9, S1. (11 blocks, 23 sts)
Row P21: Decrease 1 block at each end, then work S9. (9 blocks, 19 sts) Fasten off.
Top trim: With RS facing, join yarn in the first base loop of P1. Ch 1, sc in each base loop across. (31 sc, 1 per loop) Fasten off.
The bottom shape of the pocket (15, 13, 11, 9 blocks) matches back rows D2–D5 exactly.
Make All Pieces
You need one back panel and one pocket, both in Taupe. The layout, from top to bottom:
[  arch U21–U26   ]   back only
[  U16–U20        ]   back only
[  POCKET P1–P21  ]   over back U15 down to D5
[  cable slot     ]   center 7 sts of bottom edge
Joining
The pocket joins to the panel during Border Round 1. You sc through both layers wherever they overlap.
Place the pocket WS against the back panel RS. Line up P21 with D5 and the pocket’s top edge with U15. Each pocket row end sits on a back row end, and each pocket step sits on a back step. Clip the 4 pocket corners in place with markers.
Stitch-to-stitch logic:
– Along the sides, work 2 sc per row end. Insert the hook through the pocket row end, then the back row end.
– On each step, work 2 sc per exposed block.
– On the bottom edge, D5 and P21 both have 19 sts, so match them stitch to stitch.
Tension: Keep the joining sc a little looser than usual, because they pass through two layers. Tight joins pucker the curved bottom.
Checkpoint: After joining, the pocket should lie flat, with its top edge level with U15. The joined edge should not be shorter than the back-only edge above it.
Border
Border gauge: 8 sc = 1 in (2.5 cm) along both stitch edges and row-end edges.
Round 1 (sc and join): With RS facing, join yarn in the first st of U26.
- Top: 2 sc in first st, 1 sc in each of the next 10 sts. That is 11 (1 per st) + 1 extra = 12 sc.
- Side 1: On the back only, work 2 sc in each row end of U26–U16 (22 sc) and 2 sc in each of the 5 step blocks (10 sc), for 32 sc. Then, through both layers, work 2 sc in each row end of U15–D5 (42 sc) and 2 sc in each of the 3 lower step blocks (6 sc), for 48 sc. Side total: 64 (row ends) + 16 (steps) = 80 sc.
- Bottom: Work 1 sc in each of the next 6 sts through both layers. Work 1 sc in each of the next 7 sts through the back only; this leaves the cable slot, 0.875 in (2.2 cm) wide. Work 1 sc in each of the next 5 sts through both layers, then 2 sc in the last st through both layers. That is 19 (1 per st) + 1 extra = 20 sc.
- Side 2: Work as Side 1 in reverse: 48 joined sc, then 32 back-only sc. (80 sc)
Sl st to the first sc.
Round 1 total: 12 + 80 + 20 + 80 = 192 sc. In other words, 190 sc worked 1 per st, 2 per row end and 2 per step block, plus 2 extra.
Round 2 (scallops): Ch 1, sc in first sc, *sk 1, shell in next sc, sk 1, sc in next sc; rep from * around. On the last repeat, end with sk 1 and sl st to the first sc. (48 shells, 48 sc)
- Top: 3 shells
- Each side: 20 shells
- Bottom: 5 shells
Why the math works: Each scallop repeat uses 4 sts. Each section of Round 1 is already a multiple of 4: 12, 80, 20 and 80. Because the round starts at the first top stitch, every repeat lands evenly and no shell crosses a corner. The 2 extra sc in Round 1 are what bring the top (11 sts) and the bottom (19 sts) up to multiples of 4.
Hanging loop: Join yarn with a sl st in the 3rd dc of the center top shell. Ch 20, then sl st in the same dc. Work 28 sc into the ch-20 loop and sl st in the same dc. Fasten off. The loop’s inner circumference is 2.5 in (6.4 cm), which fits a peg up to about 0.75 in (1.9 cm) wide.
Border depth: Round 1 adds 0.125 in (0.3 cm) and Round 2 adds 0.375 in (1.0 cm), for 0.5 in (1.3 cm) per side.
Final Blocking
- Weave in all ends, hiding them in solid blocks or border sc.
- Soak the holder in cool water for 10 minutes, then press out the water in a towel. Don’t wring it.
- Pin it to 4.75 in x 9 in (12.1 cm x 22.9 cm), not counting the loop.
- Pin each mesh column straight, then the arch and the bottom curve evenly.
- Pin out each scallop point.
- Slide a stack of card about 0.4 in (1.0 cm) thick, wrapped in plastic, into the pocket. This sets a little depth.
- Mist with starch if you want a firmer hold.
- Let it dry completely before you unpin it.
Final Quality-Control Checklist
- The back panel is 32 rows, and Row F is 31 sts.
- The arch steps through 15, 13, 13, 11, 9, 7 and 5 blocks.
- The bottom steps through 15, 15, 13, 11 and 9 blocks on both the panel and the pocket.
- The diamond is symmetrical, with its center block in P11.
- Border Round 1 has 192 sc, and Round 2 has 48 shells.
- The cable slot is open, 7 sts wide.
- The loop is centered and secure.
- The blocked size is 4.75 in x 9 in (12.1 cm x 22.9 cm).
Troubleshooting
- Mesh is taller than it is wide: Your dc are too tall. Pull up shorter loops, or try a smaller hook.
- Diamond looks off-center: Count blocks, not sts. Every row must be 15 blocks (31 sts), with an S at each end.
- Pocket is shorter than the back’s joined section: Your row gauge differs between the pieces. Steam-block the pocket, or redo it with adjusted tension.
- Arch is jagged: Pin the steps into a smooth curve while blocking. The sc round softens them further.
- Scallops ruffle: You’ve added extra sc. Recount Round 1 to 192.
- Scallops pull tight: Your Round 1 sc are too tight. Redo the round more loosely.
- Cable won’t fit through the slot: Widen it to 11 back-only sts. Work 4 joined sts, 11 back only, 3 joined, and 2 sc in the last st. That still totals 20.
Care
Hand wash cool and lay flat to dry, reshaping the pocket while it’s damp. Re-starch lightly if the pocket softens over time.
Final Notes
The measurement chain starts with the gauge: 4 blocks and 4 rows per 1 in (2.5 cm). That gives a 31-st panel 3.75 in (9.5 cm) wide and 8 in (20.3 cm) tall, plus a matching 21-row pocket 5.25 in (13.3 cm) tall. The joining sc round has 192 sts, and the 48-shell scallop round brings the finished holder to 4.75 in x 9 in (12.1 cm x 22.9 cm). Check gauge on the pocket first and the rest falls into place.
Happy crocheting!