

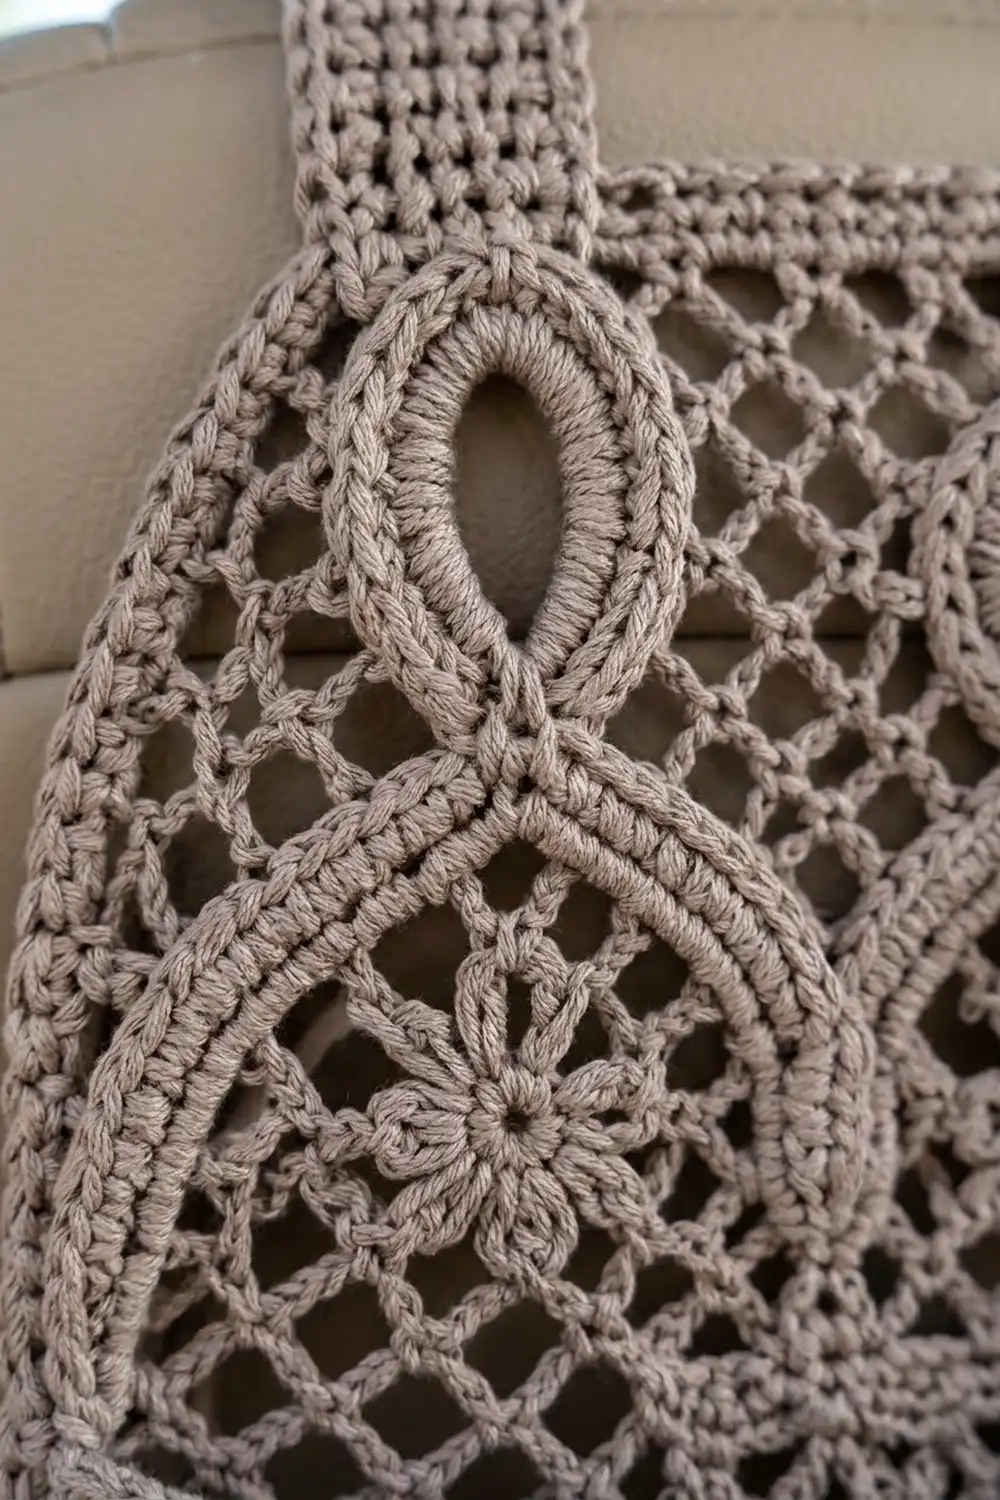
This car seat organizer is useful and also looks good. A tall mesh panel hangs from the headrest posts, with raised teardrops and arches on top like the tracery in a cathedral window. A deep, sturdy pocket at the bottom holds a phone, sunglasses and pens.
The sample uses one color, a soft taupe cotton. A single neutral shade lets the textures do the work. The solid pocket contrasts with the open mesh, and a crab-stitch edging frames every edge with a corded line.
The pattern uses US crochet terms. The finished panel measures 12.7 in wide x 16.5 in tall (32.3 x 41.9 cm). The pocket is 1.5 in (3.8 cm) deep, and the strap loops rise about 2 in (5.1 cm) above the panel.
You’ll work the back panel bottom-up in rows: single crochet shaping for the rounded base, then mesh. Next you sew small corded appliqués onto the mesh. The pocket is made the same way as the panel’s base, gets a wall worked off its edge, and is joined to the panel with single crochet. One round of crab stitch finishes the panel, and you attach two straps last.
Finished Size and Construction
- Finished size: 12.7 x 16.5 in (32.3 x 41.9 cm) panel; about 18.5 in (47.0 cm) tall including strap loops
- Skill level: Intermediate
- Terminology: US crochet terms
- Yarn weight: Light / DK (#3) cotton
- Hook: 3.5 mm (E-4)
- Number of pieces: 12 (1 panel, 1 pocket, 2 straps, 3 teardrops, 2 arch cords, 3 flowers)
- Layout: One panel with appliqués on its front, a pocket over the lower section, and two straps at the top
- Panel size before border: 12.2 x 16 in (31.0 x 40.6 cm)
- Border depth: 0.25 in (0.6 cm) on each edge (2 rounds)
Materials
Yarn: Use a smooth, firmly twisted cotton or cotton blend in DK weight. Cotton holds the raised cords crisply and won’t stretch much under the weight of a phone. Avoid fuzzy or very soft yarn, because it blurs the mesh.
- Taupe: 150 g / 330 m (about three 50 g / 110 m skeins)
These quantities include a margin of about 15 percent for your gauge swatch and tension differences.
Tools:
- 3.5 mm (E-4) crochet hook
- Tapestry needle
- 6 to 8 locking stitch markers
- Rust-proof pins
- Blocking mat
- 2 sew-on snaps, 0.75 in (1.9 cm)
- Measuring tape
- Spray bottle
Abbreviations (US Terms)
- ch – chain
- sc – single crochet
- hdc – half double crochet
- dc – double crochet
- sl st – slip stitch
- st(s) – stitch(es)
- sp – space
- sk – skip
- BLO – back loop only
- rev sc – reverse single crochet
- rep – repeat
- RS / WS – right side / wrong side
Reverse single crochet (crab stitch): Work left to right (or right to left if you crochet left-handed). Insert the hook into the next stitch to the right, yarn over, pull up a loop, yarn over, and pull through both loops. This makes the corded edge.
Shell: Work 5 dc in the same stitch.
Gauge and Checkpoints
Single crochet: 20 sts and 22 rows = 4 in (10.2 cm).
Mesh (dc, ch 1): 20 sts (10 spaces) and 9 rows = 4 in (10.2 cm).
Chain: about 5 ch = 1 in (2.5 cm).
Before you start the panel, make one appliqué flower as a test piece. It should measure 1.8 in (4.6 cm) across. Then swatch 20 sc for 22 rows.
Checkpoints:
- Panel after Row 14: 12.2 in (31.0 cm) wide, about 2.5 in (6.4 cm) tall
- Panel after Row 22: 4 in (10.2 cm) tall
- Panel after Row 47: 15.1 in (38.4 cm) tall
- Panel after Row 52: 12.2 x 16 in (31.0 x 40.6 cm)
- Pocket front after Row 33: 12.2 x 6.8 in (31.0 x 17.3 cm)
If your pieces come out too big, go down a hook size. If they’re too small, go up one. In mesh, a common cause of extra height is tall dc: pull up the first loop snugly.
Back Panel
Work in rows and turn at the end of each row. The turning ch-1 does not count as a stitch.
Rounded Base (Single Crochet)
Ch 42.
Row 1 (RS): Sc in 2nd ch from hook and in each ch across. (41 sc)
Row 2: Ch 1, 2 sc in first st, sc in each st to last st, 2 sc in last st. (43 sc)
Rows 3–8: Rep Row 2. Each row adds 2 sts. (Row 3: 45, Row 4: 47, Row 5: 49, Row 6: 51, Row 7: 53, Row 8: 55 sc)
Row 9: Ch 1, sc in each st across. (55 sc)
Row 10: Rep Row 2. (57 sc)
Row 11: Rep Row 9. (57 sc)
Row 12: Rep Row 2. (59 sc)
Row 13: Rep Row 9. (59 sc)
Row 14: Rep Row 2. (61 sc)
The fast increases in Rows 2–8 and the slower ones in Rows 10–14 give a smooth curve rather than a sharp angle.
Rows 15–22: Ch 1, sc in each st across. (61 sc)
Mesh Section
Row 23: Ch 4 (counts as dc + ch 1), sk next st, dc in next st, ch 1, sk next st, dc in next st; rep from * across. (31 dc + 30 ch-1 sps = 61 sts)*
Rows 24–47: Ch 4 (counts as dc + ch 1), dc in next dc, ch 1, dc in next dc; rep from * across, working the last dc in the 3rd ch of the turning ch. (61 sts, 30 spaces)*
Top Band
Row 48: Ch 1, sc in each dc and each ch-1 sp across. (61 sc)
Rows 49–52: Ch 1, sc in each st across. (61 sc)
Do not fasten off.
Panel Border, Round 1
Rnd 1: Turn so you can work along the top edge, then sc around the whole panel:
- Top edge: 3 sc in first st, sc in next 59 sts, 3 sc in last st. That is 61 sts worked once each plus 4 extra = 65 sts, including both corner groups.
- Side edge: Work 1 sc in each sc row end (Rows 48–52, 15–22 and 1–14) and 2 sc in each mesh row end (Rows 23–47). That makes 5 + 50 + 8 + 14 = 77 sts.
- Bottom edge: 2 sc in first foundation ch, sc in next 39 ch, 2 sc in last ch. That is 41 worked once each plus 2 extra = 43 sts.
- Second side: 77 sts, worked the same way.
Sl st to first sc. (65 + 77 + 43 + 77 = 262 sc) Fasten off. Round 2 comes after you join the pocket.
Appliqués
Teardrops (Make 3)
Ch 30, sl st to first ch to form a ring.
Rnd 1: Ch 1, sc in each of next 14 ch, (sc, ch 2, sc) in next ch, sc in each of remaining 15 ch, sl st to first sc. (30 worked once each + 1 extra = 31 sc, plus a ch-2 point)
Rnd 2: Ch 1, sc in each sc to ch-2 sp, (2 sc, ch 2, 2 sc) in ch-2 sp, sc in each remaining sc, sl st to first sc. (31 worked once each + 4 extra = 35 sc, plus a ch-2 point)
Fasten off and leave a 12 in (30.5 cm) tail. Pinch the point so the ring lies as a teardrop about 1.6 x 2.6 in (4.1 x 6.6 cm).
Arch Cords (Make 2)
Cord 1: Ch 151. Sc in the back bump of 2nd ch from hook and in each back bump across. (150 sc, about 30 in / 76.2 cm)
Cord 2: Ch 126. Sc in the back bump of 2nd ch from hook and in each back bump across. (125 sc, about 25 in / 63.5 cm)
Working into the back bumps leaves the smooth chain on both edges, so the cord looks rounded and raised.
Flowers (Make 3)
Rnd 1: Make a magic ring, ch 1, work 12 sc in the ring, and sl st to first sc. (12 sc)
Rnd 2: Ch 1, sc in first st, ch 3, sk next st, sc in next st, ch 3, sk next st; rep from * 4 more times, then sl st to first sc. (6 sc, 6 ch-3 sps)*
Rnd 3: In each ch-3 sp, work (sc, hdc, 3 dc, hdc, sc), then sl st to first sc. (6 petals, 42 sts)
Fasten off. Each flower is 1.8 in (4.6 cm) across.
Placing the Appliqués
Lay the panel RS up and measure from the bottom of the border.
- Teardrops: Space them 4 in (10.2 cm) apart center to center, with the middle teardrop on the panel’s center line. Their points face up, and their tips sit 1.5 in (3.8 cm) below the top edge.
- Cord 1: Pin it as three pointed arches. The peak of each arch sits 0.5 in (1.3 cm) above a teardrop tip. The legs of neighboring arches meet between the teardrops and run down to about 10 in (25.4 cm) from the bottom.
- Cord 2: Pin it as three rounded arches, each about 4 in (10.2 cm) wide. The top of each arch sits just under a teardrop’s rounded base.
- Flowers: Center one inside each rounded arch, 9 in (22.9 cm) up from the bottom edge.
If a cord is too long, pull out the extra stitches and fasten off again. Sew every piece down along its center line with small, matching stitches, catching the mesh bars. Sewing along the center line keeps the outer edges lifted, which gives the raised look.
Pocket Front
Ch 42. Work Rows 1–14 exactly as for the panel. (61 sc)
Rows 15–28: Ch 1, sc in each st across. (61 sc)
Row 29: Ch 1, sc in each st across. (61 sc)
Row 30 (shells): Ch 1, sc in first st, sk 2 sts, shell in next st, sk 2 sts, sc in next st; rep from * 9 more times. (10 shells + 11 sc = 61 sts)*
Row 31: Ch 5 (counts as dc + ch 2), sc in center dc of next shell, ch 2, dc in next sc, ch 2, sc in center dc of next shell, ch 2, dc in next sc; rep from * across. (11 dc + 10 sc + 20 ch = 61 sts)*
Row 32: Ch 1, sc in first dc, shell in next sc, sc in next dc; rep from * across. (10 shells + 11 sc = 61 sts)*
The Row 32 shells sit directly over the Row 30 shells, so each pair reads as a small flower.
Row 33: Ch 1, sc in each st across. (61 sc)
Checkpoint: 12.2 x 6.8 in (31.0 x 17.3 cm). The sc section measures 5.1 in (13.0 cm) and the lace band 1.7 in (4.3 cm).
Pocket Wall
Row 1: With RS facing, join yarn at the top right corner (the end of Row 33). Sc down the side in the row ends: 1 sc in each sc row end and 2 sc in each dc row end, for 36 sts. Then work 2 sc in first foundation ch, sc in next 39 ch, 2 sc in last ch, for 43 sts. Work up the other side the same way, for 36 sts. (36 + 43 + 36 = 115 sc)
Each side count is Rows 1–14 (14) + Rows 15–28 (14) + Row 29 (1) + Rows 30–32 (6) + Row 33 (1) = 36.
Row 2: Ch 1, turn, sc in BLO of each st across. (115 sc)
Rows 3–8: Ch 1, turn, sc in each st across. (115 sc)
Working Row 2 in the back loop makes a crisp fold, so the wall stands at a right angle to the pocket front. The finished wall is about 1.5 in (3.8 cm) deep. Fasten off and leave a long tail.
Joining
Method: Single crochet through both layers, stitch for stitch.
- On the panel’s border Round 1, count up 36 sts from each end of the 43-st bottom section and place a marker in the 36th st on each side. The side count is Rows 1–14 (14) + Rows 15–22 (8) + Rows 23–29 (7 mesh rows x 2 = 14) = 36.
- Hold the pocket wall’s Row 8 against the panel border with WS together and the pocket front facing you.
- Join yarn at one marker. Sc through one wall stitch and one border stitch together, 115 times in all: 36 up the first side, 43 across the bottom and 36 up the second side.
The joining row needs no extra seam stitches: wall stitches match border stitches exactly, 36 + 43 + 36. Keep the joining sc relaxed and the same height as your normal sc. If they’re tight, the curve puckers.
Checkpoint: The pocket opening’s side corners land at panel Row 29, about 7.1 in (18.0 cm) up, and the pocket bulges evenly.
Border
Border gauge: 2 rounds add 0.25 in (0.6 cm) to each edge.
Rnd 2: Join yarn at the top right corner of the panel. Ch 1 and work rev sc in each st around: top 65, side 77, bottom 43, side 77. Along the joined U, work into the 115 joining sc instead of the border sts beneath them. Sl st to first st. (262 rev sc)
The math: The 115 joining sc replace 115 border sts one for one, so the round stays at 262. Adding 0.25 in (0.6 cm) to each edge of the 12.2 x 16 in (31.0 x 40.6 cm) panel gives 12.7 x 16.5 in (32.3 x 41.9 cm).
Pocket opening edging: Join yarn at the left wall top. Work rev sc across 8 wall row ends, the 61 sts of Row 33, and 8 wall row ends on the other side. (8 + 61 + 8 = 77 rev sc)
Straps (Make 2)
Ch 9.
Row 1: Sc in 2nd ch from hook and across. (8 sc)
Rows 2–44: Ch 1, turn, sc in each st across. (8 sc)
Edging: Ch 1 and sc around the strap. On each short end, work 3 sc in the first st, sc in the next 6 sts, and 3 sc in the last st: 8 worked once each plus 4 extra = 12 sts per end, including the corners. On each long side, work 1 sc per row end, for 44 sts. Sl st to first sc. (12 + 44 + 12 + 44 = 112 sc)
Finished strap: 1.8 x 8.2 in (4.6 x 20.8 cm).
Attaching: Center each strap 2.4 in (6.1 cm) in from a side edge. The strap centers end up 7.9 in (20.1 cm) apart, so adjust this to fit your headrest posts. Sew the bottom 1.5 in (3.8 cm) of each strap flat to the RS of the panel. Sew one half of a snap to the WS of the strap’s free end and the other half to the back of the panel, 1 in (2.5 cm) below the top edge, behind the strap.
Final Blocking
- Mist the whole organizer until it’s damp but not dripping.
- Lay it RS up and pin the panel to 12.7 x 16.5 in (32.3 x 41.9 cm).
- Pin the mesh rows straight, checking with a ruler every 2 in (5.1 cm).
- Use your fingers to round the teardrops and arches again.
- Stuff the pocket lightly with a folded towel so the wall dries upright.
- Leave it to dry completely, at least 12 hours, before you unpin it.
Final Quality-Control Checklist
- Panel measures 12.7 x 16.5 in (32.3 x 41.9 cm)
- Border Round 1 has 262 sc; Round 2 has 262 rev sc
- Pocket wall has 115 sts in every row
- Teardrops are evenly spaced 4 in (10.2 cm) apart, with points up
- Cords lie smoothly, with no twists
- Straps are level, and the snaps line up and close firmly
- All ends are woven in on the WS, under the pocket or along the border
Troubleshooting
Mesh rows are taller than the sc section looks. Your dc are loose. Pull the first loop snugly or go down a hook size for the mesh only.
The pocket curve puckers at the join. The joining sc are too tight. Redo them with a looser, more even tension.
The pocket sags forward. Check that Row 2 of the wall was worked in BLO, and block the pocket with a towel inside.
A cord twists while you sew it. Pin it every 1 in (2.5 cm) before you sew, with the smooth chain side facing up.
The panel corners flare. You probably worked extra stitches into the corner groups. Recount the 3-sc and 2-sc groups against the counts above.
Care
Hand wash in cool water with mild soap, press the water out in a towel, and dry flat over a folded towel. Don’t hang it to dry, because the wet weight stretches the mesh.

Final Notes
Everything here depends on a chain of measurements. A gauge of 20 sts and 22 rows to 4 in (10.2 cm) gives a 61-stitch panel 12.2 in (31.0 cm) wide. Fifty-two rows bring it to 16 in (40.6 cm), and two border rounds take it to 12.7 x 16.5 in (32.3 x 41.9 cm). The pocket’s 36-43-36 wall matches the panel border stitch for stitch, so the join closes cleanly with no fudging. Check each stage as you go and the finished organizer will hang straight and hold everything in place.
Happy crocheting!