

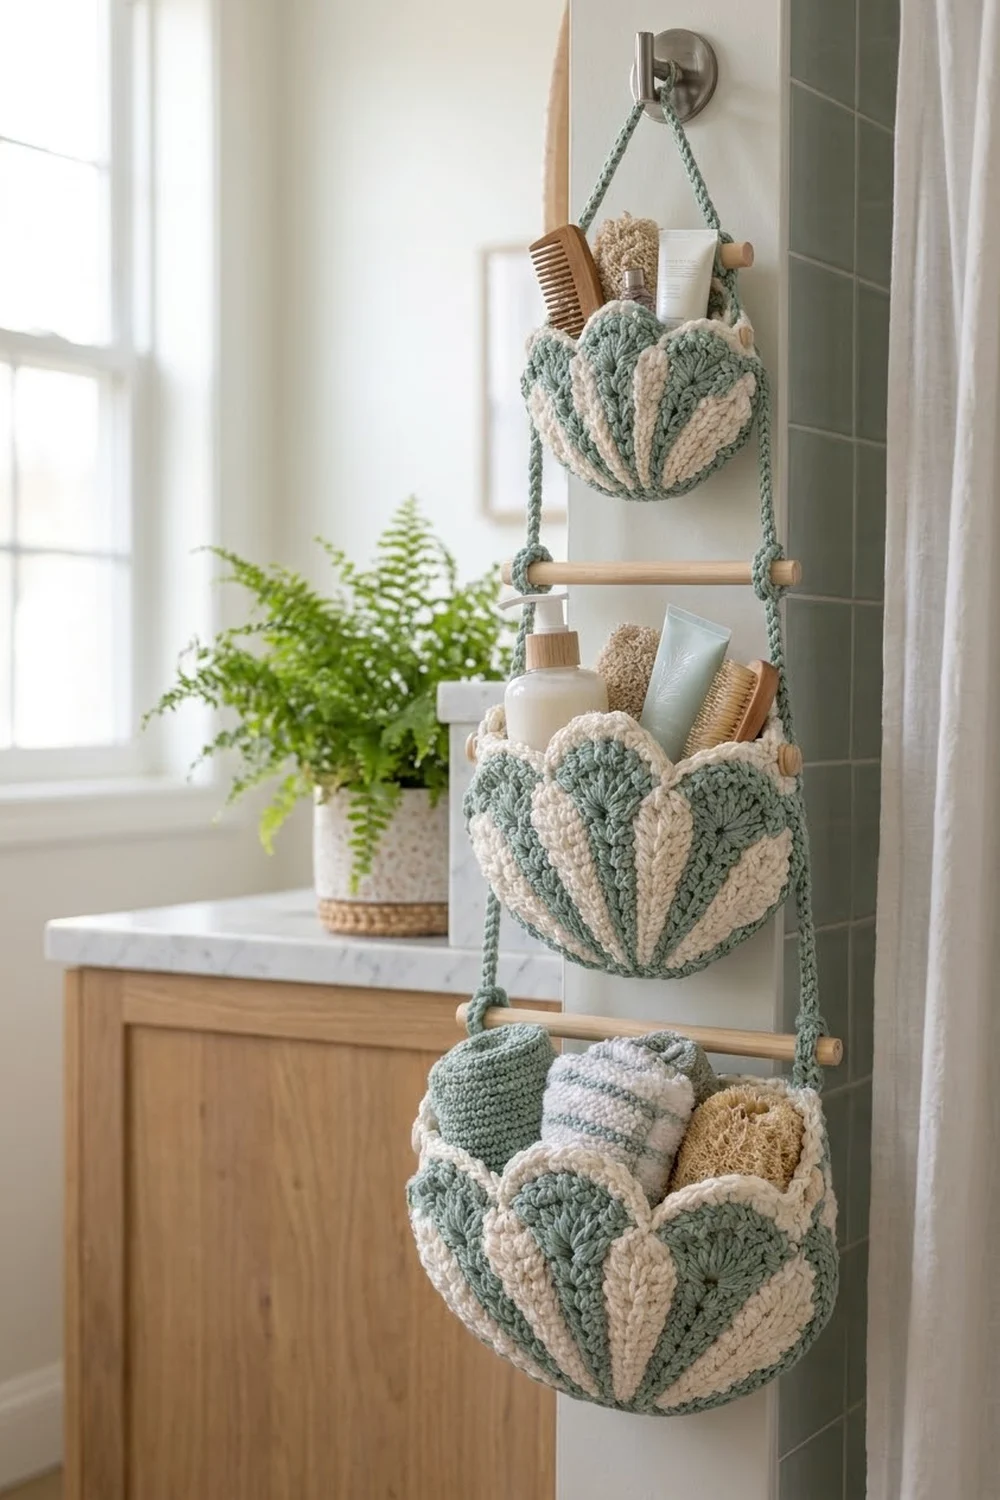
This hanging organizer has three seashell baskets in graduated sizes. They hang one above another on a crocheted cord, with two wooden dowels between the tiers. Each basket front is a fan of alternating sage and cream wedges that radiate from a small sage half-circle at the bottom center. Each wedge ends in a rounded scallop, and a cream rim outlines the whole top edge.
The colors are soft sage green and creamy off-white, which suits a coastal bathroom, a nursery wall, or a craft corner. The texture is chunky but clean. Use the baskets for brushes, small bottles, washcloths and soaps.
The pattern uses US crochet terms. Measured as flat panels, the Small basket is 9.0 in (22.9 cm) wide and 4.8 in (12.2 cm) tall. The Medium is 11.3 in (28.7 cm) by 5.9 in (15.0 cm), and the Large is 13.6 in (34.5 cm) by 7.1 in (18.0 cm). Hung, the organizer is about 37.1 in (94.2 cm) from the cord wrap to the bottom of the Large basket.
Each basket has a striped front panel and a solid sage back panel. Both are worked flat in turning rows of double crochet from a magic ring, and both get the same two-row scalloped border. You seam the panels around the bottom and sides, then box the bottom corners to give the basket depth. One long slip-stitch cord holds all three baskets and both dowels.
Finished Size and Construction
- Finished size (flat panels): Small 9.0 x 4.8 in (22.9 x 12.2 cm); Medium 11.3 x 5.9 in (28.7 x 15.0 cm); Large 13.6 x 7.1 in (34.5 x 18.0 cm)
- Overall hanging length: about 37.1 in (94.2 cm), not counting the hanging loop
- Skill level: Intermediate (tapestry-style color changes)
- Terminology: US
- Yarn weight: Worsted (#4) cotton
- Hook: 5.0 mm (H-8)
- Number of pieces: 6 crocheted panels (3 fronts and 3 backs), 1 cord, 2 wooden dowels
- Layout: 3 baskets stacked vertically, Small on top and Large at the bottom
- Panel size before border (width x height): Small 8.0 x 4.0 in (20.3 x 10.2 cm); Medium 10.3 x 5.1 in (26.2 x 13.0 cm); Large 12.6 x 6.3 in (32.0 x 16.0 cm)
- Border depth: 0.8 in (2.0 cm) at the scallop peaks
Materials
Choose a smooth, firm worsted cotton or cotton blend. Cotton holds the basket shape and keeps the wedge edges crisp. Avoid fuzzy or very drapey yarns. The amounts below assume a yarn with 180 m (197 yd) per 100 g.
- Sage green: 200 g, 360 m (394 yd). This covers the back panels, half the front wedges, the base edges, the seams and the cord.
- Cream: 100 g, 180 m (197 yd). This covers the cream wedges and all rim rows.
These amounts include a margin of about 20 percent for swatching, carried strands and tails.
Tools:
- 5.0 mm (H-8) crochet hook
- 2 wooden dowels, 3/8 in (1.0 cm) in diameter and 16 in (40.6 cm) long
- Tapestry needle
- Scissors
- Stitch markers
- Tape measure
- A wall hook rated for what you plan to store
Abbreviations (US Terms)
- ch: chain
- sl st: slip stitch
- sc: single crochet
- hdc: half double crochet
- dc: double crochet
- st(s): stitch(es)
- RS / WS: right side / wrong side
Tapestry color change: Work the last yarn over of the stitch before the change in the new color. Lay the unused color along the tops of the stitches and work over it so it stays hidden. Do not cut the yarn between wedges.
Ch 3 at the start of a row: Counts as the first dc.
Gauge and Checkpoints
- Double crochet gauge: 14 dc and 7 rows = 4 in (10.2 cm). One dc row is about 0.57 in (1.4 cm) tall.
- Single crochet gauge: 14 sc and 16 rows = 4 in (10.2 cm). One sc row is about 0.25 in (0.6 cm) tall.
Make the Small front panel first and use it as your swatch.
- After Row 4: The fan is 2.3 in (5.8 cm) from the ring to the top edge.
- After Row 7 (last Small row): The fan is 4.0 in (10.2 cm) tall, and the straight bottom edge is 8.0 in (20.3 cm) long.
- After the border: The panel is 4.8 in (12.2 cm) tall at the peaks and 9.0 in (22.9 cm) wide.
If the panel is too big, go down 0.5 mm in hook size. If it’s too small, go up 0.5 mm.
The panel should cup gently. Each row adds 7 stitches, which is slightly more than a flat half-circle needs, and that extra makes the rounded shell front. If the panel ruffles instead of cupping, your stitches are too short, so try a larger hook.
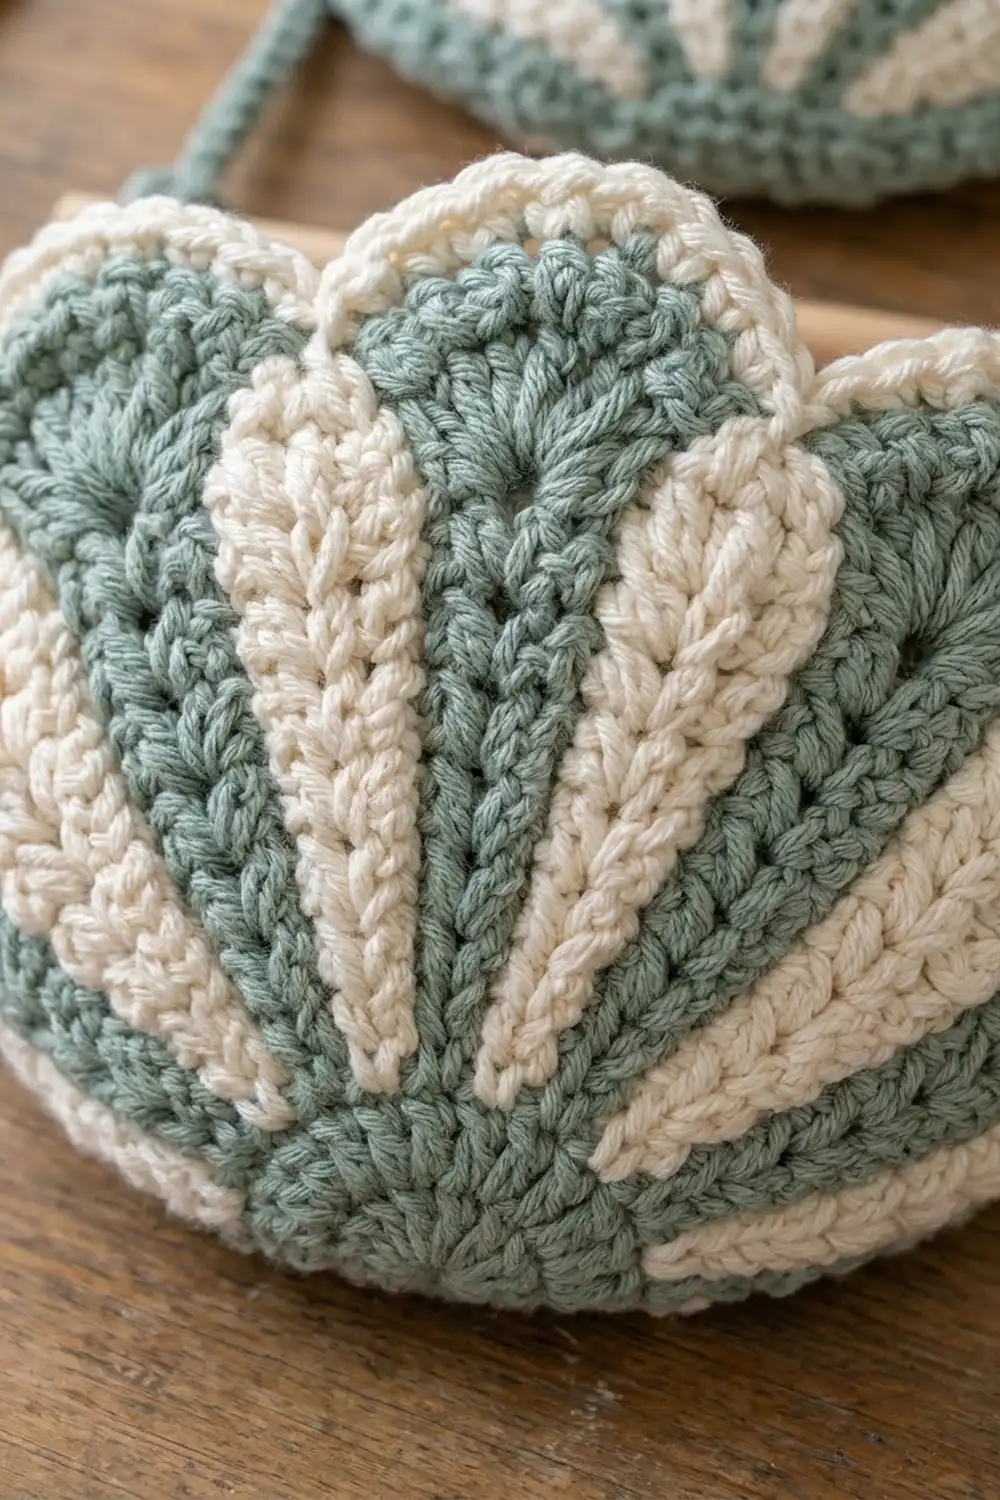
Front Shell Panel (Make 1 in Each Size)
Directions are written as Small (Medium, Large). The last fan row is Row 7 (9, 11). Work every row in order until you reach the last row for your size.
Wedge order: Every row has 7 wedges: sage, cream, sage, cream, sage, cream, sage. The order is symmetrical, so it reads the same on RS and WS rows.
Row 1 (sage): Make a magic ring. Ch 3, then work 6 dc into the ring. Pull the ring closed and turn. (7 dc)
Row 2 (sage): Ch 3, dc in the first st, then 2 dc in each remaining st. Turn. (14 dc, 2 per wedge)
Rows 1 and 2 form the sage half-circle at the bottom center. From Row 3 on, carry cream inside your stitches.
Row 3: Ch 3 (the first dc of the first sage wedge), then 2 dc in the next st. Change color, dc in the next st, 2 dc in the next st. Repeat from * to * 5 more times, alternating cream and sage. Turn. (21 dc, 3 per wedge)
Row 4: Ch 3, dc in the next st, 2 dc in the last st of the wedge. Change color, dc in each of the next 2 sts, 2 dc in the last st of the wedge. Repeat from * to * 5 more times. Turn. (28 dc, 4 per wedge)
Rows 5–7 (9, 11): In each wedge, dc in every st except the last, then work 2 dc in the last st. Change color at every wedge boundary. Turn at the end of each row.
Each row’s total is 7 times the row number:
- Row 5: 35 dc (5 per wedge)
- Row 6: 42 dc (6 per wedge)
- Row 7: 49 dc (7 per wedge). This is the last row for Small.
- Row 8: 56 dc (8 per wedge)
- Row 9: 63 dc (9 per wedge). This is the last row for Medium.
- Row 10: 70 dc (10 per wedge)
- Row 11: 77 dc (11 per wedge). This is the last row for Large.
Because you turn every row, the increase lands on alternating sides of each wedge, which keeps the color lines straight as they fan out. Don’t fasten off. Go straight to the border.
Back Panel (Make 1 in Each Size)
Work the back panel exactly like the front, but use only sage. The counts are the same: 49 (63, 77) dc in the last row. Then work the same border.
Make All Pieces
| Piece | Small | Medium | Large | Colors |
|---|---|---|---|---|
| Front panel | 1 | 1 | 1 | Sage and cream wedges, cream rim |
| Back panel | 1 | 1 | 1 | Sage, cream rim |
| Cord | 1 in total | Sage, 2 strands held together |
Cord:
- Hold 2 strands of sage together and chain until the chain measures 84 in (213.4 cm), relaxed.
- Sl st in the back bump of each chain and fasten off.
- Fold the cord in half. Wrap it tightly with sage 2 in (5.1 cm) below the fold.
The wrap forms the hanging loop and leaves two legs, each 40 in (101.6 cm) long.
Layout:
            ( hanging loop )
               /        \
          [  SMALL BASKET  ]
   |=========== dowel 1 ===========|
         [   MEDIUM BASKET   ]
   |=========== dowel 2 ===========|
       [     LARGE BASKET      ]
Border (All 6 Panels)
Work the border straight off the last fan row of each panel. Border gauge is the single crochet gauge: 14 sc = 4 in (10.2 cm).
Border Row 1 (scallops): On the front panels, keep the wedge colors. On the back panels, use sage. Ch 1 (does not count as a stitch). Over each wedge, work:
- sc in the first st
- hdc in the next st
- dc in each st up to the center st
- 3 dc in the center st
- dc in each st until 2 sts remain
- hdc in the next st
- sc in the last st
Repeat for all 7 wedges, then turn.
This is a conversion row: every existing stitch gets 1 stitch, plus 2 extra in each center stitch.
- Per wedge: 7 (9, 11) + 2 = 9 (11, 13) sts
- Per panel: 49 (63, 77) + 14 = 63 (77, 91) sts
Border Row 2 (rim): Change to cream. Ch 1. Sc in each st, but work 3 sc in the middle dc of each 3-dc group. Fasten off.
- Per scallop: 9 (11, 13) + 2 = 11 (13, 15) sc
- Per panel: 63 (77, 91) + 14 = 77 (91, 105) sc
Base Edge (sage): With RS facing, join sage at one bottom corner. Work along the straight bottom edge as follows:
- 1 sc in the end of the rim row.
- 1 sc in the end of Border Row 1.
- 2 sc in the end of each dc row up to the ring.
- 1 sc into the ring at the bottom center.
- 2 sc in the end of each dc row on the other half.
- 1 sc in the end of Border Row 1, then 1 sc in the end of the rim row. Fasten off.
Total: 4 x 7 (9, 11) + 5 = 33 (41, 49) sc.
Why the math works: Each row of the border adds exactly 2 stitches at each of the 7 peaks, so every scallop stays symmetrical around its center stitch and the valleys stay at sc height. Along the base edge, you work 4 sc for every 2 dc row ends. Two dc rows measure about 1.14 in (2.9 cm), and 4 sc measure the same 1.14 in (2.9 cm), so the edge lies flat.
Joining
Seaming each basket: Hold the matching front and back panels with WS together and the front facing you. Join sage with sc through both layers at the center sc of an outer scallop’s peak.
- Down that half scallop: 6 (7, 8) sts, counting the peak
- Across the base edge: 33 (41, 49) sts
- Up the other half scallop to its peak: 6 (7, 8) sts
- Total: 45 (55, 65) sc. Fasten off.
Both panels have identical counts, so each seam stitch goes through one stitch on each layer. Don’t add stitches at the corners. The 5 middle scallops, plus the inner halves of the two outer scallops, stay open as the basket mouth.
Boxed corners: Turn the basket WS out.
- At one bottom corner, flatten the fabric so the side seam lies on top of the base seam, forming a triangle.
- Measure 1 (1.25, 1.5) in, or 2.5 (3.2, 3.8) cm, in from the tip.
- Whipstitch straight across the triangle at that point, then tack the tip flat to the base.
- Repeat at the other corner and turn the basket RS out.
The base is now 2 (2.5, 3) in, or 5.1 (6.4, 7.6) cm, deep.
Hanging: Measure each cord leg from the wrap below the loop, and keep the two legs equal at every step.
- 8 in (20.3 cm): Tie each leg through both layers at a seam peak of the Small basket. Tack the leg down the side seam to the bottom corner, which falls at about 12.8 in (32.5 cm).
- 15 in (38.1 cm): Tie a clove hitch around dowel 1, 1 in (2.5 cm) from each end. This sets the legs 14 in (35.6 cm) apart.
- 18 in (45.7 cm): Attach the Medium basket the same way. Its bottom corner falls at about 23.9 in (60.7 cm).
- 27 in (68.6 cm): Tie a clove hitch around dowel 2.
- 30 in (76.2 cm): Attach the Large basket. Its bottom corner falls at about 37.1 in (94.2 cm).
- Weave the remaining tail, about 3 in (7.6 cm), into the seam.
Tension: Keep seam stitches firm but not tight, so they don’t pucker the scallops. Pull the clove hitches fully snug so the dowels can’t slide.
Size checkpoint: Hang the organizer. The legs should be equal and the dowels level. It should measure about 37.1 in (94.2 cm) from the wrap to the bottom of the Large basket.
Final Blocking
- Before seaming, mist each panel lightly with water.
- Pin each panel flat to its finished size, shaping each scallop peak into a smooth curve.
- Let the panels dry completely.
- After seaming, fill each basket with a folded towel so it holds a rounded shape, then mist the outside.
- Let the baskets dry overnight before you hang them.
Final Quality-Control Checklist
- Each front has 7 wedges in alternating sage and cream, with straight color lines.
- No carried strands show on the RS.
- Each panel has 7 scallops and an unbroken cream rim.
- Last fan rows are 49 (63, 77) dc, rims are 77 (91, 105) sc, and base edges are 33 (41, 49) sc.
- Seams are 45 (55, 65) sc, and the two boxed corners on each basket match.
- The dowels are level and the cord legs are equal.
- All tails are woven in securely.
Troubleshooting
- Wedge lines zigzag: You’ve probably increased at the start of a wedge on some rows. Always put the increase in the last stitch of the wedge.
- Carried yarn shows through: Keep the carried strand slightly slack and work your stitches snugly over it.
- Panel ruffles: Your dc rows are too short. Go up a hook size or pull up taller loops.
- Base edge waves: Work 3 sc instead of 4 over one or two pairs of dc rows on each half. Make the same change on the matching panel.
- Basket tips forward: Attach the cord legs slightly toward the back panel.
Care
Spot clean, or hand wash in cool water and lay flat to reshape. Take out the dowels before washing, and let everything dry fully before you rehang it.
Final Notes
Every measurement in this pattern builds on the one before it:
- The gauge of 7 dc rows to 4 in (10.2 cm) sets the fan heights of 4.0 (5.1, 6.3) in.
- Seven increases per row give a last fan row of 49 (63, 77) stitches and the gentle shell cup.
- The two border rows bring each panel to 77 (91, 105) stitches and add 0.8 in (2.0 cm) of height.
- Matching panels give seams of 45 (55, 65) stitches, and the boxed corners add depth.
- The measured cord positions set the finished length of 37.1 in (94.2 cm).
Check each checkpoint as you go, and the three tiers will hang evenly.
Happy crocheting!