

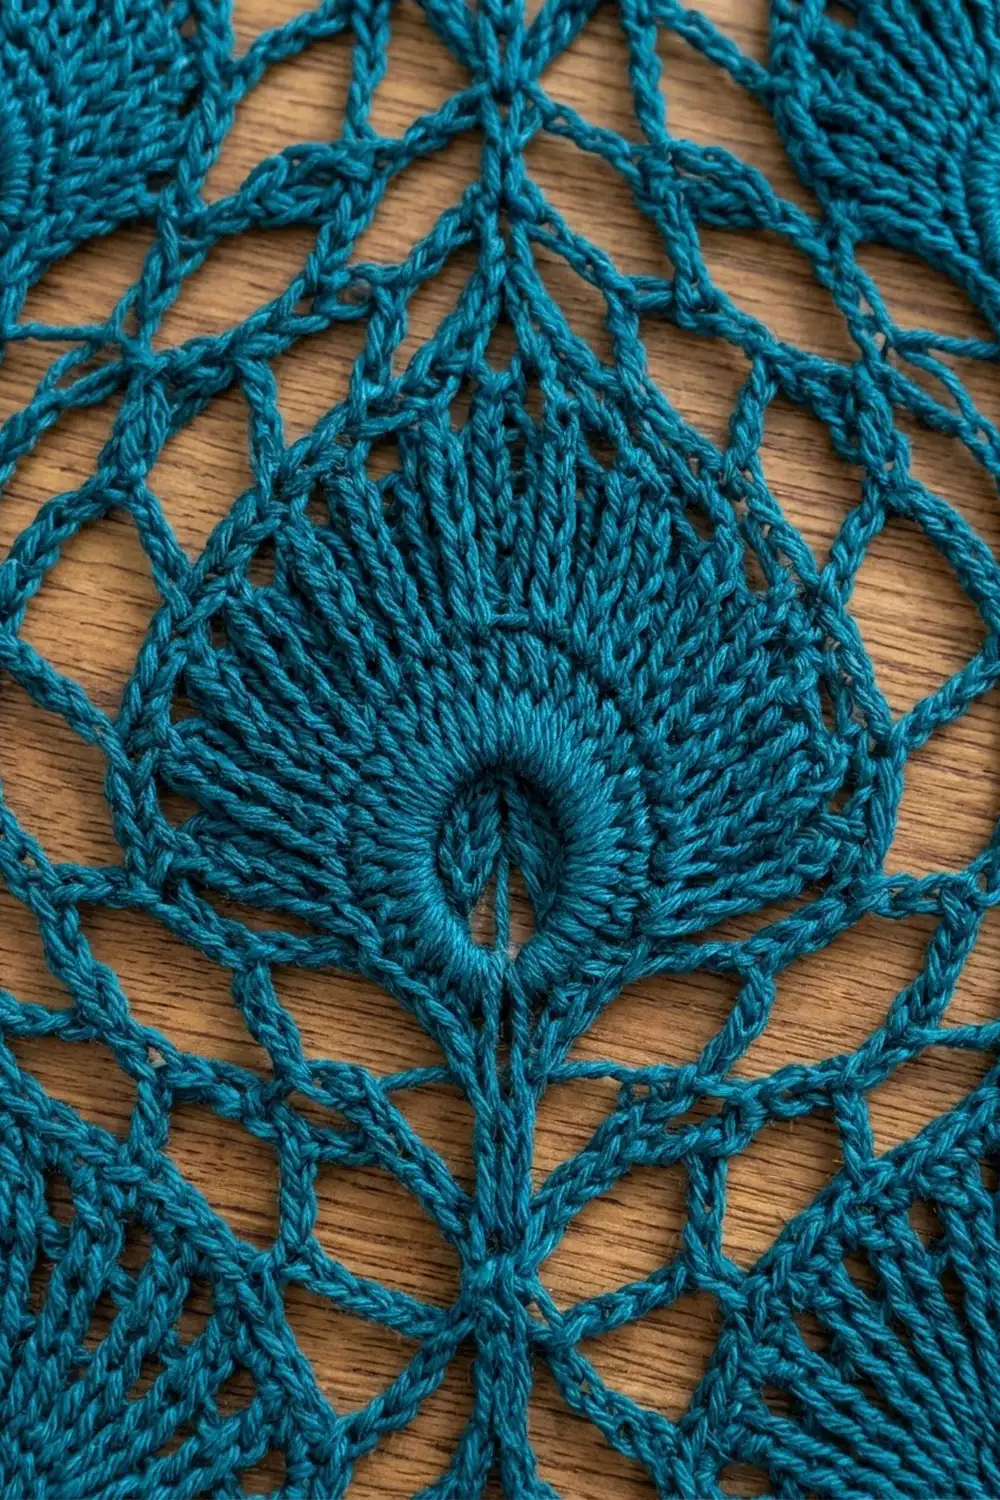
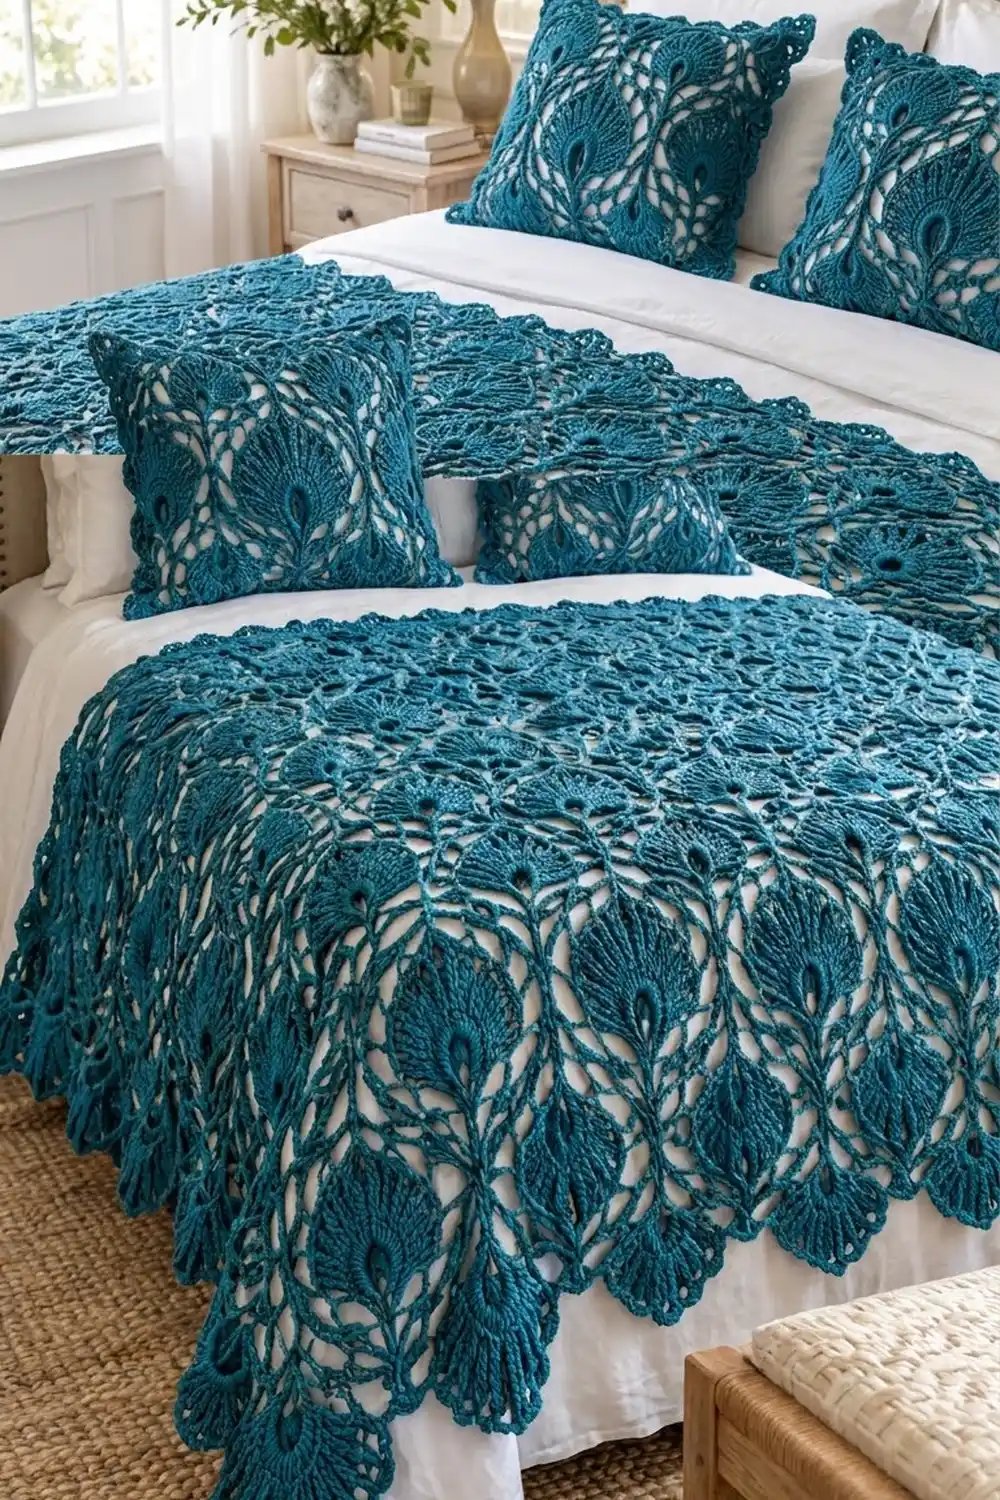
The Teal Plume Bedspread is a lace coverlet built from square motifs. Each motif holds one peacock feather: an open eye, a dense fan of tall stitches, and a narrow stem point. Chain-loop lattice frames every feather, so the joined spread shows rows of plumes tied together by airy lacework.
The sample uses one color, a deep peacock teal, which shows the texture best over white bedding. Any saturated jewel tone works just as well. The style is rich and a little vintage, but the rounds are simple to work.
This pattern uses US crochet terms. The bedspread measures 70 x 86 in (177.8 x 218.4 cm) after blocking, including the border. That fits the top of a full or queen bed with a generous drop.
You make 80 identical square motifs and join them in a grid of 8 across and 10 down with a flat slip-stitch seam. Then you work a four-round scalloped border with one feather fan centered under each edge motif.
Finished Size and Construction
- Finished size: 70 x 86 in (177.8 x 218.4 cm)
- Skill level: Intermediate
- Terminology: US crochet terms
- Yarn weight: Worsted (#4), cotton or cotton blend
- Hook: 5 mm (US H-8)
- Number of pieces: 80 square motifs
- Layout: 8 motifs across x 10 motifs down
- Motif size: 8 x 8 in (20.3 x 20.3 cm)
- Size before border: 64 x 80 in (162.6 x 203.2 cm)
- Border depth: 3 in (7.6 cm) at the fan peaks
Materials
Yarn: Use a smooth worsted-weight cotton or cotton blend at about 170 m (186 yd) per 100 g. Mercerized or tightly plied cotton gives crisp stitch definition and keeps the fans from going limp. Avoid fuzzy yarns, which blur the open eye and the lattice.
- Peacock Teal: 2,500 g, about 4,250 m (4,648 yd), which is 25 balls of 100 g
- Motifs: about 24 g each, 1,920 g total
- Joining: about 80 g
- Border: about 280 g
These quantities include a margin of about 220 g. Buy all the yarn from one dye lot.
Tools:
– 5 mm (US H-8) crochet hook
– Tapestry needle
– Stitch markers
– Rust-proof blocking pins
– Blocking mats or a clean carpet covered with a towel
– Spray bottle
– Measuring tape
Abbreviations (US Terms)
- ch – chain
- sl st – slip stitch
- sc – single crochet
- hdc – half double crochet
- dc – double crochet
- tr – treble crochet (yarn over twice)
- dtr – double treble crochet (yarn over 3 times, then draw through 2 loops 4 times)
- sp – space
- st(s) – stitch(es)
- RS – right side
Special stitches:
– Fan: the stated number of tr worked into one stitch or space.
– Picot loop: ch 3, sc in the next stitch.
Gauge and Checkpoints
Swatch gauge: 16 sc and 17 rows = 4 in (10.2 cm) with a 5 mm hook.
Make one full motif before anything else. It is your real gauge test. Measure it at each checkpoint:
- After Rnd 2: the fan circle is 3.5 in (8.9 cm) across.
- After Rnd 3: the feather is 4.5 in (11.4 cm) tall and 4 in (10.2 cm) wide.
- After Rnd 5: the motif is 6 in (15.2 cm) square.
- After Rnd 7: the motif is 8 in (20.3 cm) square, lightly steamed and pinned.
If the motif is too big (over 8.25 in / 21 cm), go down one hook size. If it is too small (under 7.75 in / 19.7 cm), go up one hook size. A 1/4 in (0.6 cm) error per motif adds up to 2 in (5.1 cm) across the width and 2.5 in (6.4 cm) down the length, so fix gauge now.
Motif (Make 80)
Work every round on the RS. Do not turn.
Rnd 1 (eye): Ch 6 and sl st to the first ch to form a ring. Ch 3 (counts as dc), work 15 dc in the ring, and sl st to the top of the ch-3. (16 dc)
The ring stays open. That hole is the feather’s eye.
Rnd 2 (fan, growth round): Ch 4 (counts as tr). Work 1 tr in the same st, then 2 tr in each st around. Sl st to the top of the ch-4. (32 tr)
Rnd 3 (teardrop shaping): Ch 1. Sc in the same st (this is st 1, the bottom of the feather). Then work:
– sc in the next 3 sts (sts 2–4)
– hdc in the next 4 sts (5–8)
– dc in the next 4 sts (9–12)
– tr in the next 9 sts (13–21)
– dc in the next 4 sts (22–25)
– hdc in the next 4 sts (26–29)
– sc in the next 3 sts (30–32)
Sl st to the first sc. (32 sts: 7 sc, 8 hdc, 8 dc, 9 tr)
The stitch heights climb from sc at the bottom to tr at the top, which turns the circle into a teardrop. St 17 is the top center.
Rnd 4 (lattice and stem): The anchor heights here are the reverse of Rnd 3: tall at the bottom, short at the top. That balances the teardrop inside a square.
- Ch 5 in the same st (counts as dtr). This is the stem point, at st 1.
- Ch 5, skip 3 sts, tr in st 5 (bottom corner).
- Ch 5, skip 3, dc in st 9 (side middle).
- Ch 5, skip 3, hdc in st 13 (top corner).
- Ch 5, skip 3, sc in st 17 (top middle).
- Ch 5, skip 3, hdc in st 21 (top corner).
- Ch 5, skip 3, dc in st 25 (side middle).
- Ch 5, skip 3, tr in st 29 (bottom corner).
- Ch 5, skip 3, sl st to the top of the beginning ch-5.
(8 anchor sts, 8 ch-5 loops)
Rnd 5 (squaring, conversion round):
1. Ch 1, sc in the same st (bottom middle).
2. 7 sc in the next ch-5 loop, then (sc, ch 2, sc) in the next anchor (corner).
3. 7 sc in the next loop, then sc in the next anchor (side middle).
4. Repeat from * to * around, but on the last repeat skip the final side-middle sc. Sl st to the first sc.
Count: (56 sc in loops + 4 sc worked 1-per-anchor at the side middles) + 8 corner sc = 68 sc and 4 ch-2 corner sps. That is 17 sc per side, counting both corner sc.
Rnd 6 (open mesh):
1. Sl st in the next 8 sc, then sl st into the corner ch-2 sp.
2. Ch 1, then (sc, ch 3, sc) in the same sp.
3. Ch 4, skip 2 sc, sc in the next sc (side st 3).
4. [Ch 4, skip 3 sc, sc in the next sc] 3 times (side sts 7, 11, 15).
5. Ch 4, skip 2 sc, (sc, ch 3, sc) in the corner sp.
6. Repeat from * to * around, ending with ch 4, skip 2 sc, sl st to the first sc.
(16 side sc + 8 corner sc, 20 ch-4 loops, 4 ch-3 corners)
Rnd 7 (edge, conversion round):
1. Sl st into the corner ch-3 sp. Ch 1, then (sc, ch 2, sc) in the same sp.
2. Skip the corner sc. [5 sc in the next ch-4 loop, sc in the next sc] 4 times.
3. 5 sc in the next ch-4 loop, skip the corner sc, (sc, ch 2, sc) in the corner sp.
4. Repeat around, ending with sl st to the first sc. Fasten off and weave in the ends.
Count: (16 sc worked 1-per-sc + 100 sc in loops) + 8 corner sc = 124 sc. That is 31 sc per side, including both corner sc, plus 4 ch-2 corner sps.
On each side, st 16 is the center stitch. On the bottom side it sits directly below the dtr stem.
Make All Pieces
Make 80 motifs in Peacock Teal, at about 24 g each. Steam-block each one to 8 in (20.3 cm) square before joining. Matching sizes make the seams much easier.
Layout grid (▼ = stem pointing down, ▲ = stem pointing up). Alternate the rows so the feathers mirror each other across the seams:
Row 1:  ▼ ▼ ▼ ▼ ▼ ▼ ▼ ▼
Row 2:  ▲ ▲ ▲ ▲ ▲ ▲ ▲ ▲
Row 3:  ▼ ▼ ▼ ▼ ▼ ▼ ▼ ▼
Row 4:  ▲ ▲ ▲ ▲ ▲ ▲ ▲ ▲
Row 5:  ▼ ▼ ▼ ▼ ▼ ▼ ▼ ▼
Row 6:  ▲ ▲ ▲ ▲ ▲ ▲ ▲ ▲
Row 7:  ▼ ▼ ▼ ▼ ▼ ▼ ▼ ▼
Row 8:  ▲ ▲ ▲ ▲ ▲ ▲ ▲ ▲
Row 9:  ▼ ▼ ▼ ▼ ▼ ▼ ▼ ▼
Row 10: ▲ ▲ ▲ ▲ ▲ ▲ ▲ ▲
That is 8 columns x 10 rows = 80 motifs.
Joining
Method: Flat slip-stitch join, worked from the RS through the outer loops only.
Stitch-to-stitch logic: Lay two motifs side by side with RS up and their edges touching.
1. Sl st through both corner ch-2 sps together.
2. Sl st through each matched pair of sc, 31 pairs in all. This includes both corner sc.
3. Finish in the next pair of corner ch-2 sps.
Each motif seam is 33 sl sts. When you move straight on to the next pair of motifs in the same seam line, start again in their corner ch-2 sps. No extra chains are added anywhere.
Order: Join all 9 horizontal seams first. Each one runs the full width of 8 motifs. Then join the 7 vertical seams, each running the full length of 10 motifs. Where four corners meet, the ch-2 sps stack neatly.
Tension: Keep each sl st as tall as a sc. If you pull too tight the seam puckers and the spread shrinks. If you work too loose the seam looks like a gap. Check every 10 stitches that the seam lies flat without stretching.
Size checkpoint: The joined panel measures 64 x 80 in (162.6 x 203.2 cm). If it is more than 1 in (2.5 cm) off on either side, re-block before you start the border.
Border
Border gauge: Rnd 1 matches the motif edge: 31 sc per 8 in (20.3 cm). Join the yarn in any outer corner ch-2 sp.
Rnd 1 (base):
– Work (sc, ch 2, sc) in each outer corner ch-2 sp.
– Along each side, work 1 sc in each motif sc and skip the joined ch-2 sps at the seams.
– Short sides: 8 x 31 = 248 sc, plus the 2 new corner sc = 250 sc per side.
– Long sides: 10 x 31 = 310 sc, plus 2 corner sc = 312 sc per side.
– Total: 1,116 + 8 = 1,124 sc and 4 ch-2 corner sps.
Rnd 2 (lattice):
– Work (sc, ch 5, sc) in each corner ch-2 sp, then skip the next corner sc.
– Repeat for each motif width: sc in st 1, then [ch 4, skip 2, sc in the next st] 10 times. This places sc on sts 1, 4, 7 … 31.
– At the end of a side, skip the corner sc and work the next corner.
– Per motif width: 11 sc and 10 ch-4 loops.
– Short side: 88 sc and 80 loops. Long side: 110 sc and 100 loops.
– Total: 404 sc, 360 ch-4 loops, 4 ch-5 corner loops.
Rnd 3 (feather fans):
– Work 9 tr in each corner ch-5 loop.
– Per motif width:
1. Sc in loop 1, [ch 3, sc in the next loop] 3 times (loops 2–4).
2. Skip loop 5, work 13 tr in the 6th sc (motif st 16), then skip loop 6.
3. Sc in loop 7, [ch 3, sc in the next loop] 3 times (loops 8–10).
– Between two motif widths, ch 3 to bridge over the pair of seam sc.
– Per motif width: 8 sc, 6 ch-3 sps, and one 13-tr fan.
– Short side: 64 sc, 55 ch-3 sps (48 + 7 bridges), 8 fans. Long side: 80 sc, 69 ch-3 sps (60 + 9 bridges), 10 fans.
– Total: 288 sc, 248 ch-3 sps, 504 tr.
Rnd 4 (picot edge):
– Work 3 sc in each ch-3 sp and skip the Rnd 3 sc between them.
– On each 13-tr fan: sc in the first tr, then [ch 3, sc in the next tr] 12 times. That makes 13 sc and 12 picot loops.
– On each 9-tr corner fan: 9 sc and 8 picot loops.
– Total: 744 + 468 + 36 = 1,248 sc and 464 picot loops.
– Sl st to the first sc, fasten off, and weave in the ends.
Why the math works: Each motif side has 31 sts, and 31 = 1 + (3 x 10). So the Rnd 2 lattice always starts and ends exactly on a motif’s edge stitches, and its 6th sc lands on st 16, the motif’s center. Every border fan therefore hangs directly below a motif. The repeat restarts at each seam, so nothing drifts along the 80 in (203.2 cm) sides.
Final Blocking
- Soak the bedspread in cool water for 15 minutes, then press the water out gently. Do not wring it.
- Roll it in towels to remove the excess moisture.
- Lay it flat and pin the corners to 70 x 86 in (177.8 x 218.4 cm).
- Pin along every seam line so each motif sits at 8 in (20.3 cm).
- Pin each border fan into a rounded scallop, 3 in (7.6 cm) deep, and open every picot loop.
- Pin the eye of each feather open if it has closed up.
- Let it dry completely, which takes 24–48 hours, before you unpin.
Final Quality-Control Checklist
- All 80 motifs measure 8 in (20.3 cm) square.
- The feather rows alternate ▼ and ▲ as shown in the grid.
- Every seam lies flat with no puckers.
- The short sides each have 8 fans and the long sides each have 10.
- Each fan sits centered under a motif.
- The corner fans curve smoothly.
- All ends are woven in at least 2 in (5.1 cm) and trimmed.
- The finished spread measures 70 x 86 in (177.8 x 218.4 cm).
Troubleshooting
- The feather looks round, not teardrop-shaped: Check that Rnd 3 starts with sc at the bottom and has exactly 9 tr at the top.
- The motif cups: Loosen your Rnd 4 chains or go up a hook size for Rnd 4 only.
- The motif ruffles: Work 6 sc instead of 7 in each Rnd 5 loop, and keep the corners as written.
- The square is lopsided: Recheck the Rnd 4 anchor heights. The dtr belongs at the bottom and the sc at the top.
- A seam is tight: Remove it and rework it with a larger hook.
- Fans are crowded at the corners: Make sure you skipped the Rnd 2 corner sc before starting the next motif-width repeat.
Care
Hand wash cool or machine wash on a gentle cycle in a laundry bag, then dry flat. Do not hang the spread to dry: the weight of wet cotton will stretch the lace.
Final Notes
The whole project depends on one chain of measurements:
– A 3.5 in (8.9 cm) fan grows into a 6 in (15.2 cm) square and then an 8 in (20.3 cm) motif with 31 sc per side.
– 8 x 10 motifs make a 64 x 80 in (162.6 x 203.2 cm) panel.
– A 3 in (7.6 cm) feather border finishes it at 70 x 86 in (177.8 x 218.4 cm).
Check each stage before moving on and the spread will come out square.
Happy crocheting!