

The Lilac Flutter Bedspread is a lacy coverlet made from 63 square motifs. Each square has one butterfly with ribbed wings, set inside an open chain-mesh frame. A deep scalloped fan border runs around the outside edge.
The whole piece is one soft lavender color, so the texture does the work. The wings have tall stitches that fan out like veins, and each wing has a crisp ridged outline. The mesh frames link up into a lattice across the bed.
This pattern uses US crochet terms. The finished bedspread measures 76 x 96 in (193.0 x 243.8 cm) and drapes well over a queen bed.
You work each butterfly from the center out. Two mesh rounds and one solid round turn it into a square. Then you whipstitch the squares into a 7 x 9 grid and add a four-round fan border.
Finished Size and Construction
- Finished size: 76 x 96 in (193.0 x 243.8 cm)
- Skill level: Intermediate
- Terminology: US
- Yarn weight: Worsted (#4)
- Hook: 5.0 mm (H-8)
- Number of pieces: 63 identical square motifs
- Layout: 7 motifs across x 9 motifs long
- Motif size: 10 x 10 in (25.4 x 25.4 cm), 35 sc per side
- Size before border: 70 x 90 in (177.8 x 228.6 cm)
- Border depth: 3 in (7.6 cm) on every side
Materials
Yarn: Choose a smooth worsted-weight cotton or cotton-acrylic blend with clear stitch definition. Fuzzy yarn will blur the wing ridges. Cotton blends block well and keep the lace open.
- Lavender: 2,400 g, about 4,800 m (based on about 200 m per 100 g)
Each motif uses about 30 g (60 m). The border uses about 250 g (500 m). The total includes a margin of about 10% for swatches, test motifs and dye-lot safety. Buy all of it from one dye lot.
Tools:
- 5.0 mm (H-8) crochet hook
- 4 locking stitch markers
- Tapestry needle
- Measuring tape
- Blocking mats and rustproof pins
- Spray bottle
Abbreviations (US Terms)
- ch – chain
- sl st – slip stitch
- sc – single crochet
- hdc – half double crochet
- dc – double crochet
- tr – treble crochet
- BLO – back loop only
- FPtr – front post treble crochet
- sk – skip
- sp(s) – space(s)
- st(s) – stitch(es)
- Rnd(s) – round(s)
Special stitch – FPtr: Yarn over twice. Insert the hook from front to back to front around the post of the stitch indicated. Yarn over and pull up a loop. [Yarn over, pull through 2 loops] 3 times.
Magic ring: Wrap the yarn into a loop, work the stitches into the loop, then pull the tail to close it.
Gauge and Checkpoints
Gauge: 14 sc = 4 in (10.2 cm) with a 5.0 mm hook.
Make and block one full test motif before you start production. Check these measurements:
- After Rnd 4 (butterfly): about 7 in (17.8 cm) wide from wing tip to wing tip and 5.5 in (14.0 cm) tall.
- After Rnd 6 (mesh frame): about 9.5 in (24.1 cm) square when lightly stretched.
- After Rnd 7 (blocked): 10 x 10 in (25.4 x 25.4 cm), with exactly 35 sc per side.
Too big? Go down to a 4.5 mm hook. Too small? Go up to a 5.5 mm hook. Keep every motif within 0.25 in (0.6 cm) of the target. Across 7 motifs, that small error adds up to 1.75 in (4.4 cm).
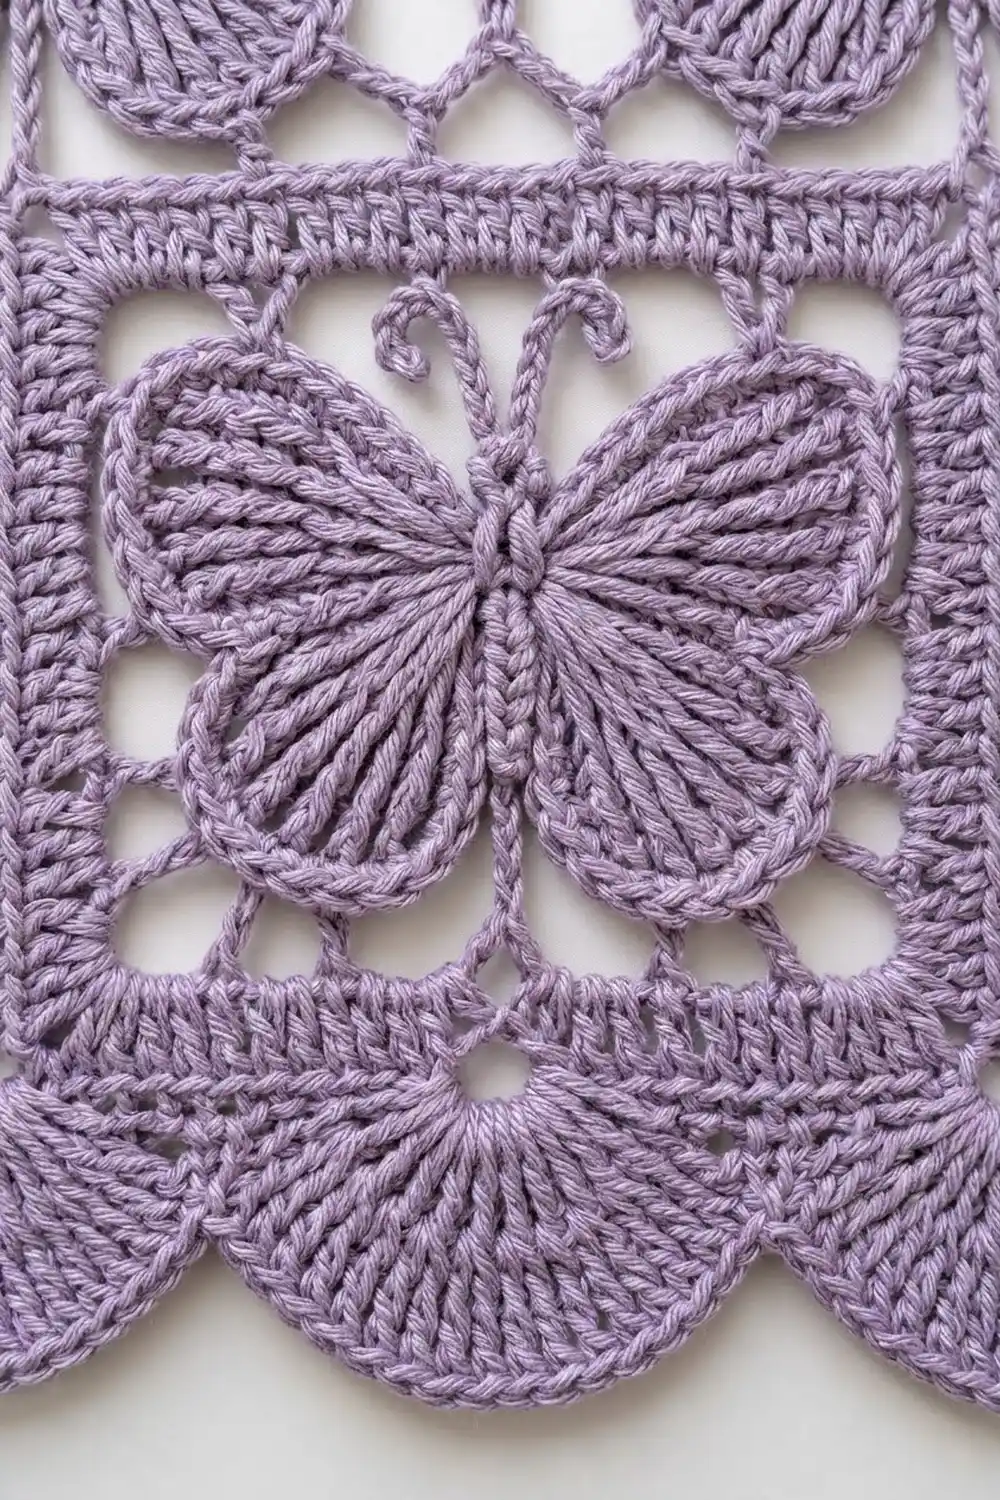
Motif (Make 63)
The Butterfly
Rnd 1: Make a magic ring. Ch 1, work 8 sc into the ring. Sl st to the first sc. (8 sc)
The closed ring forms the knotted body.
Rnd 2 (wing loops): Ch 1, sc in the first sc. Ch 10, sk the next sc, sc in the next sc. Ch 7, sk the next sc, sc in the next sc. Ch 7, sk the next sc, sc in the next sc. Ch 10, sk the last sc. Sl st to the first sc. (4 sc, 2 ch-10 loops, 2 ch-7 loops)
Going around the ring, the loops are: upper right wing (ch-10), lower right wing (ch-7), lower left wing (ch-7) and upper left wing (ch-10).
Rnd 3 (wing fill):
- In the first ch-10 loop, work (sc, 2 hdc, 3 dc, 6 tr, 3 dc, 2 hdc, sc). Sl st in the next sc.
- In each ch-7 loop, work (sc, 2 hdc, 6 dc, 2 hdc, sc). Sl st in the next sc after each one.
- In the last ch-10 loop, repeat the ch-10 fill. Sl st in the first sc of Rnd 2.
Count: 18 sts per upper wing and 12 sts per lower wing. (60 sts, plus 4 sl sts that are not counted)
The tall stitches all come out of one chain loop, so they fan apart and form the vein lines on each wing.
Rnd 4 (ridged outline): Sl st in the next st, which is the first sc of the upper right wing. Ch 1, then sc BLO in each st of all four wings. Skip the 4 sl sts between the wings. Sl st to the first sc and fasten off. (60 sc: 18 + 12 + 12 + 18)
The unused front loops leave a raised ridge just inside the edge of each wing.
Antennae: Join the yarn at the top center, between the upper wings. Ch 9, sl st in the 4th ch from the hook to make a curl, then sl st in each of the next 5 ch. Sl st in the same top-center spot and repeat from * to * once. Fasten off and weave in the ends.
The Square Frame
Rnd 5 (anchor loops): Join with a sl st in the first sc of Rnd 4 (upper right wing). Ch 1, sc in the same st, ch 5, sk 2 sts. Sc in the next st, ch 5, sk 2 sts. Repeat from * around. Sl st to the first sc. (20 ch-5 loops)
That gives 6 loops on each upper wing and 4 loops on each lower wing. Number the loops 1–20 from the start. Place markers in loops 3, 8, 13 and 18. These are the corner loops, and each pair of markers has exactly 4 loops between them.
Rnd 6 (mesh): Sl st into loop 1. Ch 1, sc in loop 1, ch 5, sc in loop 2, ch 5, (tr, ch 5, tr) in loop 3.
- [Ch 5, sc in the next loop] 4 times, ch 5, (tr, ch 5, tr) in the next marked loop. Repeat from * 2 more times.
- [Ch 5, sc in the next loop] 2 times (loops 19 and 20), ch 5. Sl st to the first sc.
Count: 16 sc, 8 tr, 4 corner ch-5 sps and 20 side ch-5 sps. That is 5 side ch-5 sps per side.
Rnd 7 (solid edge): Sl st into the first corner ch-5 sp and ch 1. In the corner sp, work (2 sc, ch 2, 2 sc). Sc in the tr. Work 5 sc in each of the 5 side ch-5 sps, with 1 sc in each of the 4 sc between them. Sc in the next tr. Repeat from * around. Sl st to the first sc and fasten off. On every 4th motif, leave a 24 in (61.0 cm) tail for joining.
Per side: 2 + 1 + 25 + 4 + 1 + 2 = 35 sc between the corner ch-2 sps. (140 sc and 4 ch-2 corner sps)
Make All Pieces
Make 63 motifs in Lavender, about 1,890 g in total. Block each motif to 10 x 10 in (25.4 x 25.4 cm) before joining. Lay every motif the same way, with the antennae toward the head of the bed.
Layout (7 across x 9 down, B = butterfly motif):
Row 1: B B B B B B B
Row 2: B B B B B B B
Row 3: B B B B B B B
Row 4: B B B B B B B
Row 5: B B B B B B B
Row 6: B B B B B B B
Row 7: B B B B B B B
Row 8: B B B B B B B
Row 9: B B B B B B B
Joining
Method: Whipstitch through the back loops, with the right sides facing up and the edges butted together.
Stitch logic: Start in the matching corner ch-2 sps. Join each of the 35 sc on one motif to its matching sc on the next motif, one to one. End in the opposite corner ch-2 sps. No stitches are added or skipped.
Join all the horizontal seams first, then all the vertical seams. Where four corners meet, take one extra pass through all four ch-2 sps.
Tension: Keep each stitch snug but not puckered, and work on a flat table. If a seam ends up shorter than the motif edge, loosen up.
Checkpoint: The joined panel should measure 70 x 90 in (177.8 x 228.6 cm).
Border
Border gauge: Rnds 1–4 together measure 3 in (7.6 cm) deep.
Rnd 1: With the right side facing, join in any outer corner ch-2 sp and ch 1. Work 5 sc in each outer corner ch-2 sp and 1 sc in each sc along the sides. At the seams, don’t work into the joined ch-2 sps. Go straight from the last sc of one motif to the first sc of the next. Sl st to the first sc.
Count: the short sides have 7 x 35 = 245 sc and the long sides have 9 x 35 = 315 sc. The middle sc of each 5-sc corner group is the corner st. With the 2 extra corner sc at each end, there are 249 sts between corner sts on the short sides and 319 on the long sides. (1,140 sc)
Rnd 2 (fans): Sl st to a corner st. Ch 4 (counts as tr) and work 12 tr in the same st for the corner fan.
- *[Sk 4 sts, sc in the next st, sk 4 sts, 9 tr in the next st] until 9 sts remain before the next corner st.
- Sk 4 sts, sc in the next st, sk 4 sts, then work 13 tr in the corner st.* Repeat from * around, leaving out the last corner fan.
- Sl st to the top of the ch-4.
Count: 24 fans and 25 sc on each short side, 31 fans and 32 sc on each long side, plus 4 corner fans of 13 tr. (1,156 sts)
Rnd 3 (ribbed fans – conversion round): Ch 4 (counts as FPtr). In each fan, work [FPtr around the next tr, ch 1] across, ending with an FPtr around the last tr of the fan. Sc in each valley sc.
Count: 1,156 sts worked 1 per existing st + 928 ch-1 sps added (8 per side fan x 110 fans, plus 12 per corner fan x 4).
Rnd 4 (trim round): In each fan, sc in each FPtr and work 2 sc in each ch-1 sp. Sl st in each valley sc. Fasten off.
Count: 1,042 fan sts worked 1 per st + 1,856 sc added in the ch-1 sps = 2,898 sc. That is 25 sc per side fan and 37 sc per corner fan.
Why the math works: Each fan repeat uses 10 sts (sk 4, sc, sk 4, fan st). Each side also needs a final 9-st run that ends in a sc. So a side needs 10 x (number of fans) + 9 sts: 10 x 24 + 9 = 249 and 10 x 31 + 9 = 319. Both numbers match Rnd 1, so every side ends in a valley and every corner gets a full fan.
Final Blocking
- Weave in all the ends along the solid sc rounds.
- Soak the bedspread in cool water for 15 minutes, then gently press the water out. Don’t wring it.
- Roll it in towels to remove more water.
- Lay it flat on mats. A clean floor covered with a sheet also works.
- Pin the panel edge to 70 x 90 in (177.8 x 228.6 cm), working from the center out.
- Pin each fan tip outward so the border is 3 in (7.6 cm) deep.
- Use your fingers to open up the mesh frames and the wing tips.
- Let it dry completely, usually 24–48 hours, before unpinning.
Final Quality-Control Checklist
- All 63 motifs measure 10 x 10 in (25.4 x 25.4 cm) and have 35 sc per side.
- Every butterfly faces the same direction.
- The corners meet cleanly at every intersection.
- The seams lie flat with no puckering.
- There are 24 fans on each short side and 31 on each long side.
- Each corner fan has 13 FPtr.
- The final size is 76 x 96 in (193.0 x 243.8 cm).
- All ends are woven in securely.
Troubleshooting
- Wings cup or ruffle: Loosen your tension in the tr section of Rnd 3. Or work 5 tr instead of 6 and add 1 dc on each side so the count stays at 18.
- Frame won’t square: Recheck the corner markers. There must be exactly 4 loops between them.
- Side count isn’t 35: Recount the 5 sc in each side ch-5 sp in Rnd 7.
- Border ruffles: Use a smaller hook for Rnds 2–4.
- Border corners pull in: Make sure each corner fan has 13 tr, not 9.
- Holes at the four-corner junctions: Add one more whipstitch pass through all four ch-2 sps.
Care
Hand wash in cool water, or machine wash on a gentle cycle in a large mesh laundry bag. Reshape and dry flat. Never hang it while it’s wet.
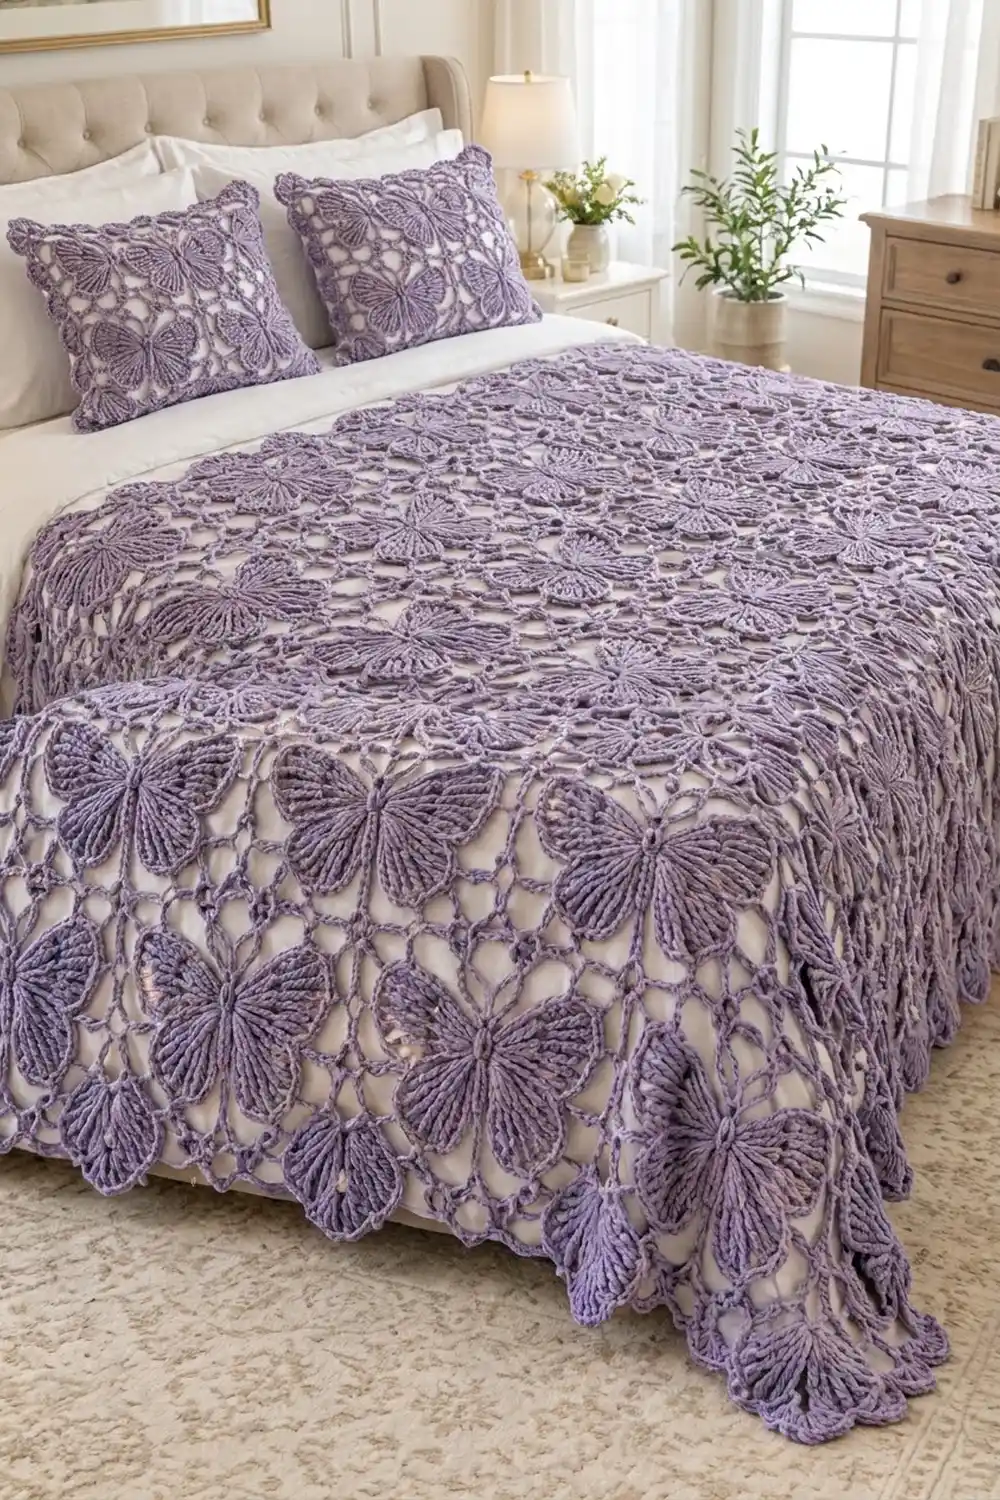
Final Notes
Here is the measurement chain. A butterfly 7 in (17.8 cm) wide becomes a 10 in (25.4 cm) motif with 35 sc per side. Sixty-three motifs join into a 70 x 90 in (177.8 x 228.6 cm) panel. A 3 in (7.6 cm) fan border brings the total to 76 x 96 in (193.0 x 243.8 cm). If every step in that chain stays accurate, the bedspread will lie flat and square.
Happy crocheting!