

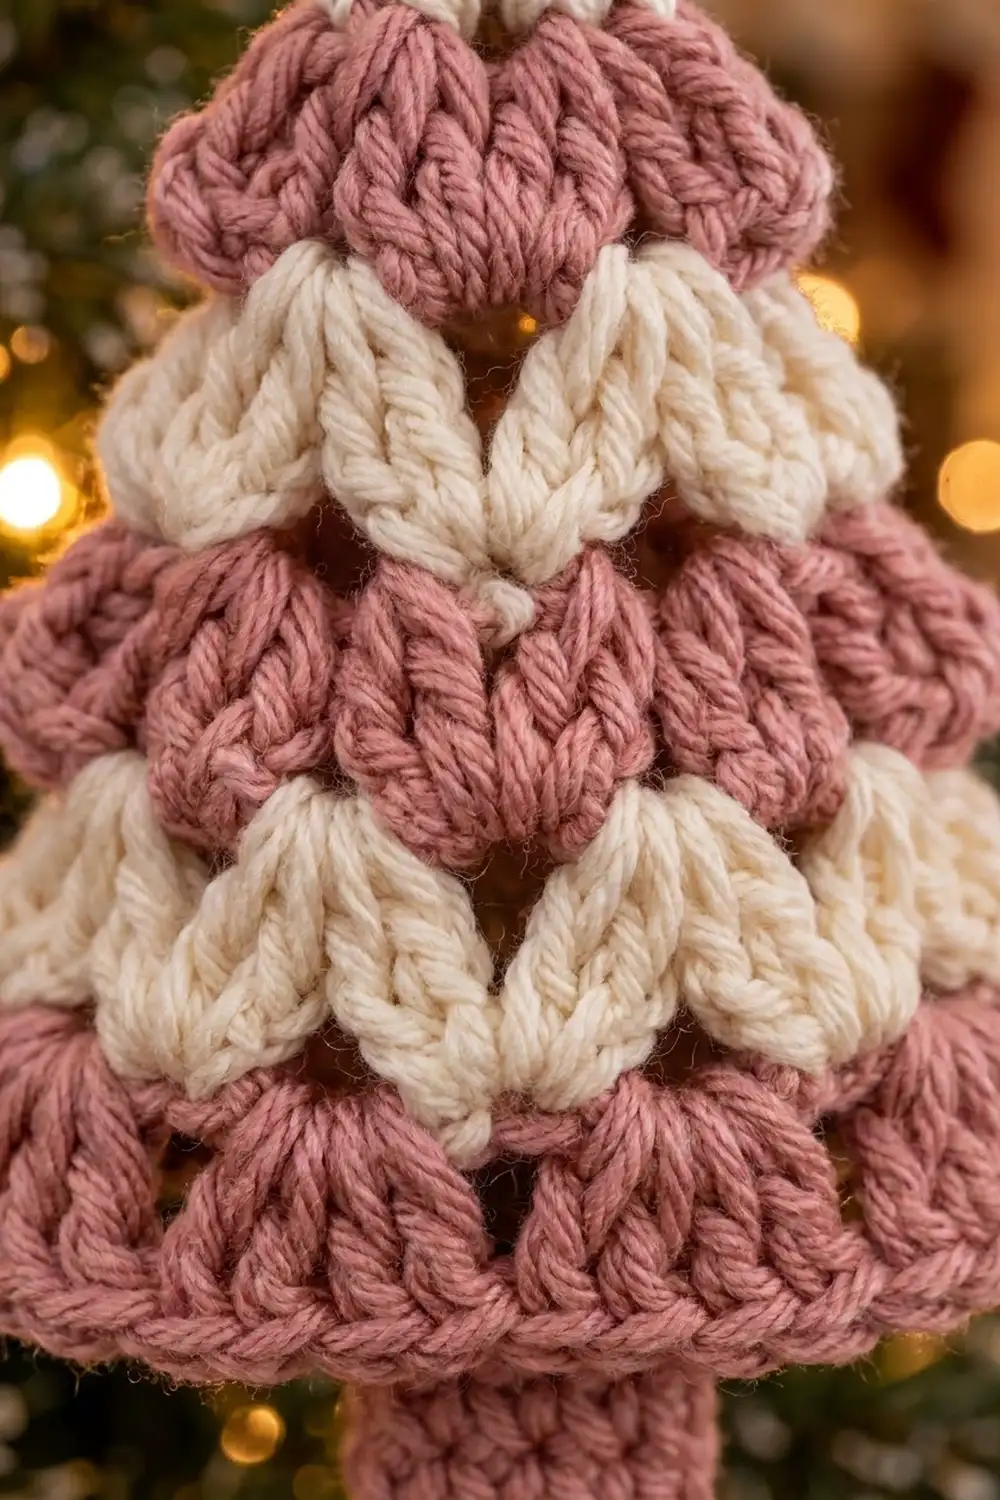
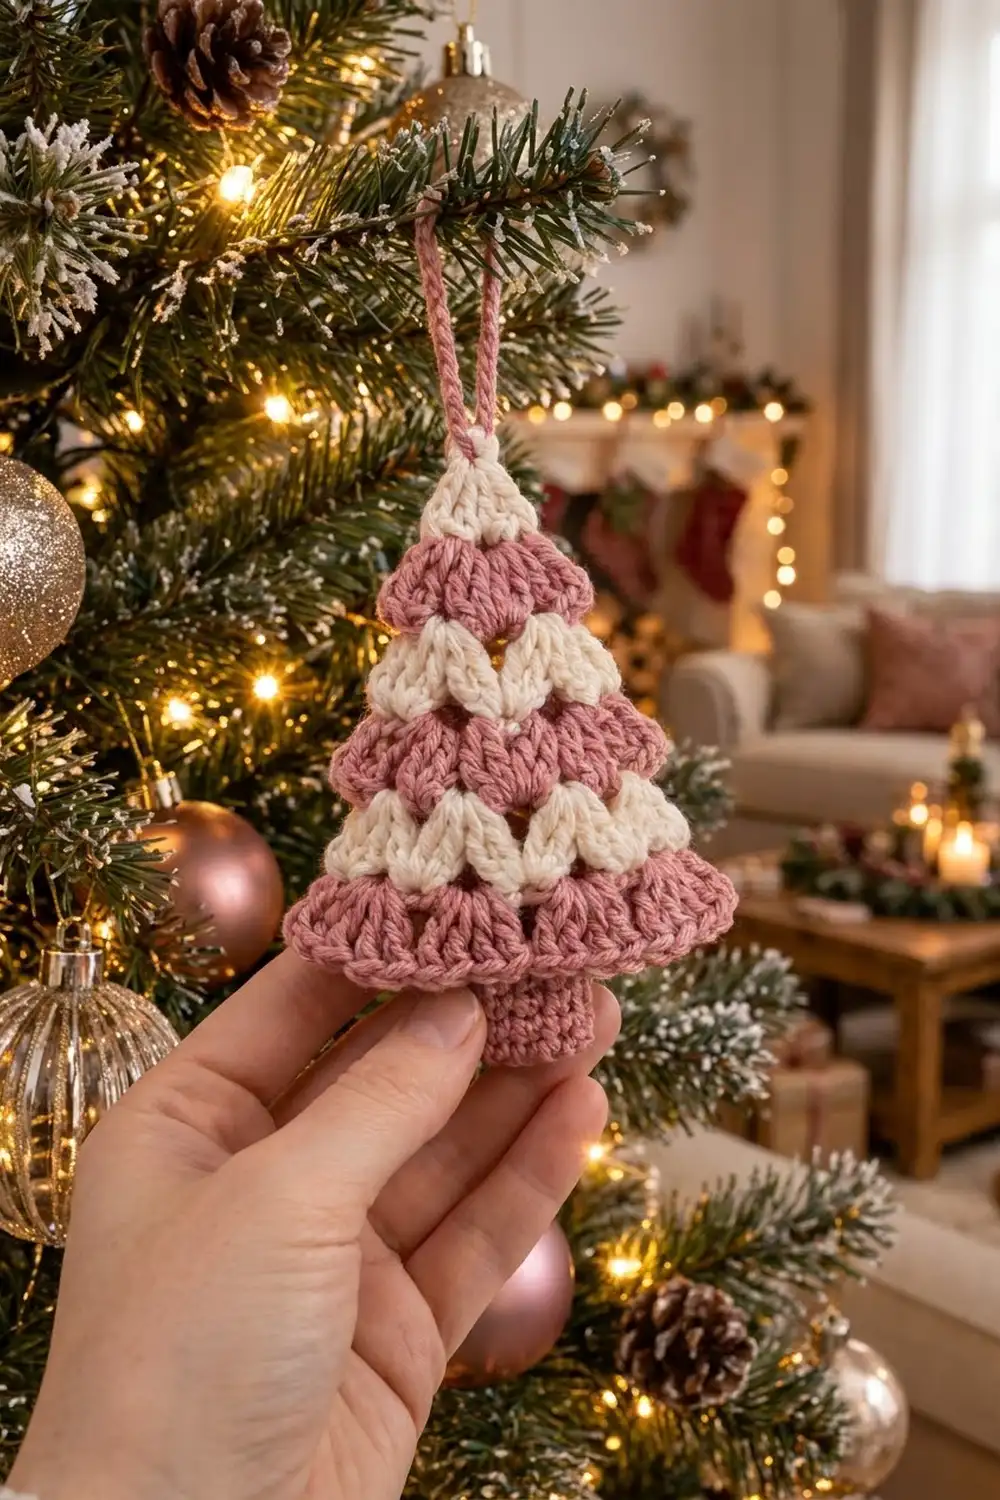
This little tree is a flat ornament made of classic granny shells. Each row of 3-double-crochet clusters steps out wider than the one above, so the piece forms a neat pyramid with a scalloped hem. A small single-crochet trunk and a chain hanging loop finish it.
The colors are soft and vintage-looking: dusty rose and cream in alternating stripes. The tip is cream and the widest row at the bottom is dusty rose. It looks good on a natural green tree, a gift package, or a garland of mixed ornaments.
This pattern uses US crochet terms. The finished ornament measures 3.5 in (8.9 cm) wide and 3.75 in (9.5 cm) tall without the loop, or about 5 in (12.7 cm) tall with the loop.
You work it top-down in one piece. You start at the cream tip in a magic ring and add one shell per row for six rows, changing color each row. Then you add the trunk to the center of the bottom edge and the hanging loop at the apex.
Finished Size and Construction
- Finished size: 3.5 in (8.9 cm) wide x 3.75 in (9.5 cm) tall, not counting the loop
- Height with loop: about 5 in (12.7 cm)
- Skill level: Easy
- Terminology: US crochet terms
- Yarn weight: Worsted (#4)
- Hook: 4.0 mm (G-6)
- Number of pieces: 1
- Layout: Single flat triangle, worked top-down in rows
- Piece size (tree body): 3.5 in (8.9 cm) wide x 3 in (7.6 cm) tall
- Size before border: 3.5 in x 3 in (8.9 cm x 7.6 cm), which is the tree body only
- Border depth: No edging round. The trunk adds 0.75 in (1.9 cm) below the body and the loop adds 1.25 in (3.2 cm) above it.
Materials
Yarn: Use a smooth worsted-weight yarn. Cotton or a cotton blend gives the crispest shells and holds its shape best on the tree. Soft acrylic also works, but block it a little more firmly. Avoid fuzzy or very splitty yarns, because they hide the shell gaps.
- Color A, Dusty Rose: 10 g / about 20 m (22 yd)
- Color B, Cream: 5 g / about 10 m (11 yd)
The quantities include a comfortable margin for gauge swatching and weaving in ends. One ornament actually uses a little less.
Tools:
– 4.0 mm (G-6) crochet hook
– Tapestry needle
– Scissors
– Rust-proof pins and a blocking mat or folded towel
– Spray bottle with water
– Ruler or measuring tape
– Stitch marker (optional)
Abbreviations (US Terms)
- ch – chain
- sl st – slip stitch
- sc – single crochet
- dc – double crochet
- sp – space
- st(s) – stitch(es)
- RS / WS – right side / wrong side
Special stitch – Shell: 3 dc worked into the same stitch or space.
Edge shell: Ch 3 (counts as the first dc), then 2 dc in the stitch at the base of the ch-3. This counts as one shell of 3 dc.
Gauge and Checkpoints
Gauge matters more for an ornament than you might expect. If several trees will hang together, they should match.
Shell gauge: 1 shell plus its ch-1 sp = 0.6 in (1.5 cm) wide. 2 rows of dc = 1 in (2.5 cm) tall.
Trunk gauge: 4 sc = 1 in (2.5 cm) wide. 4 rows of sc = 0.75 in (1.9 cm) tall.
The first tree is your swatch. Make one, block it, and measure it before you make a set.
Checkpoints:
– After Row 3: about 1.7 in (4.3 cm) wide x 1.5 in (3.8 cm) tall
– After Row 4: about 2.3 in (5.8 cm) wide x 2 in (5.1 cm) tall
– After Row 6: 3.5 in (8.9 cm) wide x 3 in (7.6 cm) tall
– After the trunk: 3.75 in (9.5 cm) total height
If your tree is too big: Go down to a 3.75 mm (F-5) hook, or check that your turning chains aren’t loose.
If your tree is too small: Go up to a 4.5 mm (7) hook. Tight shells also cup and curl, so a larger hook improves flatness as well.
Tree Body
You work back and forth in rows and change color at the end of every row.
To change color, work the last dc of the row until 2 loops remain on the hook. Drop the old color, yarn over with the new color, and pull through. Then cut the old color, leaving a 4 in (10.2 cm) tail.
Because each color would end up on the wrong side of the piece every time, do not carry the yarn up the side. Cutting and weaving gives clean edges.
Every row from Row 2 onward follows one rule. Work an edge shell at the start, a shell in every ch-1 sp, and a shell in the top of the turning ch at the end. Put ch 1 between shells. Each row has exactly one more shell than the row before.
Row 1 (Color B, Cream): Make a magic ring. Ch 3 (counts as dc) and work 2 dc in the ring. Pull the ring tight, change to Color A on the last dc, and turn.
(1 shell: 3 dc, 0 ch-1 sps)
This small cream fan is the tip of the tree.
Row 2 (Color A, Dusty Rose): Ch 3 (counts as dc) and work 2 dc in the first st (edge shell). Ch 1, skip the next dc, and work 3 dc in the top of the turning ch-3. Change to Color B on the last dc and turn.
(2 shells: 6 dc, 1 ch-1 sp)
Row 3 (Color B): Ch 3 and work 2 dc in the first st (edge shell). Ch 1, skip the next 2 dc, and work 3 dc in the ch-1 sp. Ch 1, skip the next 2 dc, and work 3 dc in the top of the turning ch-3. Change to Color A and turn.
(3 shells: 9 dc, 2 ch-1 sps)
Row 4 (Color A): Ch 3 and work 2 dc in the first st. Ch 1, skip 2 dc, 3 dc in the next ch-1 sp. Repeat from * to * once more. Ch 1, skip 2 dc, and work 3 dc in the top of the turning ch-3. Change to Color B and turn.
(4 shells: 12 dc, 3 ch-1 sps)
Row 5 (Color B): Ch 3 and work 2 dc in the first st. Ch 1, skip 2 dc, 3 dc in the next ch-1 sp. Repeat from * to * across (3 times total). Ch 1, skip 2 dc, and work 3 dc in the top of the turning ch-3. Change to Color A and turn.
(5 shells: 15 dc, 4 ch-1 sps)
Row 6 (Color A): Ch 3 and work 2 dc in the first st. Ch 1, skip 2 dc, 3 dc in the next ch-1 sp. Repeat from * to * across (4 times total). Ch 1, skip 2 dc, and work 3 dc in the top of the turning ch-3. Fasten off Color A.
(6 shells: 18 dc, 5 ch-1 sps)
Count check: Row n always has 3n dc and n − 1 ch-1 sps. Row 6 has 6 x 3 = 18 dc and 5 sps.
Color check: Rows 1, 3 and 5 are cream, and Rows 2, 4 and 6 are dusty rose. That gives a cream tip and a dusty rose base.
The free tops of the Row 6 shells form the scalloped bottom edge of the tree. Work no edging over them.
Weave in all the color-change tails now, along the side edges, into stitches of the same color.
Border: Trunk and Hanging Loop
This ornament has no traditional border round. The shell edges are the finished edge. The “border” stage is the trunk at the bottom and the loop at the top, and both are worked with exact counts.
Border gauge: 4 sc = 1 in (2.5 cm), and 4 sc rows = 0.75 in (1.9 cm).
Trunk (Color A)
Hold the tree with the RS facing and Row 6 at the bottom. Find the center ch-1 sp of Row 6. It is the 3rd of the 5 sps, between Shell 3 and Shell 4.
Trunk Row 1: Join Color A with a sc in the 3rd (last) dc of Shell 3. Work 2 sc in the center ch-1 sp, then 1 sc in the 1st dc of Shell 4. Turn.
(4 sc = 1 st from Shell 3 + 2 sts in the sp + 1 st from Shell 4)
Trunk Rows 2–4: Ch 1 and work 1 sc in each sc across. Turn.
(4 sc each row)
Fasten off after Row 4, leaving a 6 in (15.2 cm) tail. Weave the tail up into the trunk.
Why the math works: At 4 sc per inch, 4 sc give a 1 in (2.5 cm) wide trunk. That is a little under one-third of the 3.5 in (8.9 cm) body width, which reads correctly as a tree trunk. The stitches sit symmetrically on either side of the center: 2 sc in the shared center space, plus one stitch borrowed from each neighboring shell. As a result, the trunk sits dead center under Shells 3 and 4, and the scallops on each side stay intact (2.5 shells’ worth per side). Four rows give 0.75 in (1.9 cm). Adding that to the 3 in (7.6 cm) body gives 3.75 in (9.5 cm) total.
Hanging Loop (Color A)
Loop: Join Color A with a sl st into the top of the magic ring at the cream tip. Use the center dc of Row 1. Ch 20, then sl st into the same st. Fasten off and weave the ends down into the cream tip from the WS.
(20 ch, folded into a loop about 1.25 in / 3.2 cm tall)
If you like a cleaner join, close the magic ring tail through the loop base before you weave it in. This anchors the loop firmly.
Final Blocking
Shells always look better after blocking. The scallops open up and the tree edges straighten.
- Weave in every end before blocking.
- Lay the tree WS-up on a blocking mat or folded towel.
- Spritz it evenly until damp, not dripping.
- Pin the apex, then pin the two bottom corners so the base measures 3.5 in (8.9 cm).
- Check that the body measures 3 in (7.6 cm) from the tip to the bottom of Row 6.
- Pin each Row 6 shell gently downward so the scallops are even.
- Pin the trunk straight at 1 in (2.5 cm) wide x 0.75 in (1.9 cm) tall.
- For cotton, you can mist it lightly with spray starch for a stiffer ornament.
- Let it dry fully, usually 4 to 8 hours, before unpinning.
Final Quality-Control Checklist
- Six rows of shells, with 1, 2, 3, 4, 5 and 6 shells per row
- Row 6 has 18 dc and 5 ch-1 sps
- Colors alternate cream and rose, with a cream tip and a rose base
- The side edges are straight, with no extra or missing edge shells
- The trunk is 4 sc wide and 4 rows tall, centered under the middle sp
- The loop is 20 ch, secure and centered at the tip
- The body is 3.5 in x 3 in (8.9 cm x 7.6 cm), and the total height is 3.75 in (9.5 cm) without the loop
- All ends are woven in, with no tails showing on the RS
- It lies flat after blocking, with no cupping or ruffling
Troubleshooting
The tree leans to one side. You probably missed the edge shell on one end. Check that each row starts with ch 3 + 2 dc and ends with 3 dc in the turning chain.
The edges are wavy. Your turning chains are too loose. Make the ch-3 snug, or replace it with ch 2 if your chains run long.
The piece cups. Your shells are too tight. Go up a hook size or loosen your ch-1 spaces.
The trunk is off-center. Recount the Row 6 spaces. The trunk must start in the last dc of the 3rd shell.
The color changes look jagged. Make sure you change color on the final yarn-over of the last dc, not after the stitch is complete.
The loop twists. Untwist the chain before joining, and sl st into the same stitch you started from.
Care
Hand wash in cool water with mild soap, press out the water in a towel, and reshape flat to dry. Store it flat or hanging so the scallops keep their shape.
Final Notes
The measurement chain is simple. Each shell plus its ch-1 adds about 0.6 in (1.5 cm) of width, and each dc row adds 0.5 in (1.3 cm) of height. Six rows give a 3.5 in x 3 in (8.9 cm x 7.6 cm) body. The 4-row sc trunk adds 0.75 in (1.9 cm), which brings the tree to 3.75 in (9.5 cm). The 20-ch loop adds about 1.25 in (3.2 cm), for roughly 5 in (12.7 cm) overall.
Check your first tree against these numbers and the rest will match. Then you can fill a whole branch with soft rose-and-cream trees.
Happy crocheting!