

This lacy little tree is made from tiers of open dc fans that spread downward from a tiny ring at the tip. One fan sits at the top. Then 2, 3, and finally 4 fans fan out to make a soft, scalloped hem. A thin edging of chain loops outlines the shape, and a small cream trunk sits under the center of the tree.
The sample uses a dusty rose mercerized cotton for the tree and a warm cream for the trunk. The look is vintage and delicate, like doily lace in the shape of a tree. It looks lovely on a branch, tied to a gift, or grouped on a wreath hoop.
The pattern uses US crochet terms. The finished ornament is 4.5 in (11.4 cm) wide and 5.6 in (14.2 cm) tall including the trunk. The hanging loop adds about 2 in (5.1 cm).
You work the tree top-down in turned rows that alternate between a fan row and a loop row, so each tier adds one fan. Then you work a two-round border all the way around, building the hanging loop into the tip as you go. Last, you work the trunk straight onto the bottom edge. Everything is one piece, so there’s no sewing.
Finished Size and Construction
- Finished size: 4.5 in (11.4 cm) wide × 5.6 in (14.2 cm) tall, plus a 2 in (5.1 cm) loop
- Skill level: Intermediate (easy lace, simple counts)
- Terminology: US
- Yarn weight: Sport (#2) mercerized cotton
- Hook: 2.75 mm (US C/2)
- Number of pieces: 1 (trunk worked directly onto the tree)
- Layout: single triangle, 4 tiers of fans (1-2-3-4)
- Tree body before border: 4 in (10.2 cm) wide × 4.5 in (11.4 cm) tall
- Tree body after border: 4.5 in (11.4 cm) wide × 5 in (12.7 cm) tall
- Border depth: 0.25 in (0.6 cm) on each edge
- Trunk: 1 in (2.5 cm) wide × 1 in (2.5 cm) long, about 0.6 in (1.5 cm) of which hangs below the fan tips
Materials
Choose a smooth, mercerized cotton. Its crisp stitch definition shows off the fans, and it holds its shape after blocking. Cotton-acrylic blends work too, but they block less sharply.
- Color A, dusty rose: 12 g / about 36 m (39 yd)
- Color B, cream or beige: 2 g / about 6 m (7 yd)
Tools:
– 2.75 mm (US C/2) crochet hook
– Tapestry needle
– Scissors
– Rust-proof pins and a blocking mat
– Optional: spray starch or a fabric stiffener for a crisper ornament
These quantities include about a 30% margin for your gauge swatch and weaving in ends.
Abbreviations (US Terms)
- ch: chain
- sl st: slip stitch
- sc: single crochet
- hdc: half double crochet
- dc: double crochet
- sp: space
- sk: skip
- st(s): stitch(es)
- tch: turning chain
- RS: right side
- rep: repeat
Special stitch: fan. Work 7 dc into the same stitch. On the first fan of a row, the ch 3 counts as the first dc, so you work only 6 more dc into that stitch. The center dc of a fan is its 4th dc.
Gauge and Checkpoints
Gauge isn’t critical for an ornament, but it controls the final size. Work Rows 1–3 first as a test, then measure.
- After Row 1 (1 fan): 1 in (2.5 cm) wide × 0.75 in (1.9 cm) tall
- After Row 3 (2 fans): 2 in (5.1 cm) wide × 2 in (5.1 cm) tall
- After Row 5 (3 fans): 3 in (7.6 cm) wide × 3.25 in (8.3 cm) tall
- After Row 7 (4 fans): 4 in (10.2 cm) wide × 4.5 in (11.4 cm) tall
- Border gauge: 5 sc per 1 in (2.5 cm) along the slanted sides
- Trunk gauge: 7 hdc and 6 hdc rows per 1 in (2.5 cm)
Each tier adds 1 in (2.5 cm) of width and 1.25 in (3.2 cm) of height.
If your piece is too big, go down to a 2.5 mm hook or pull the ch-4 loops a little snugger. If it’s too small, go up to a 3.0 mm hook. Don’t change the stitch counts. The fans only line up correctly with the counts as written.
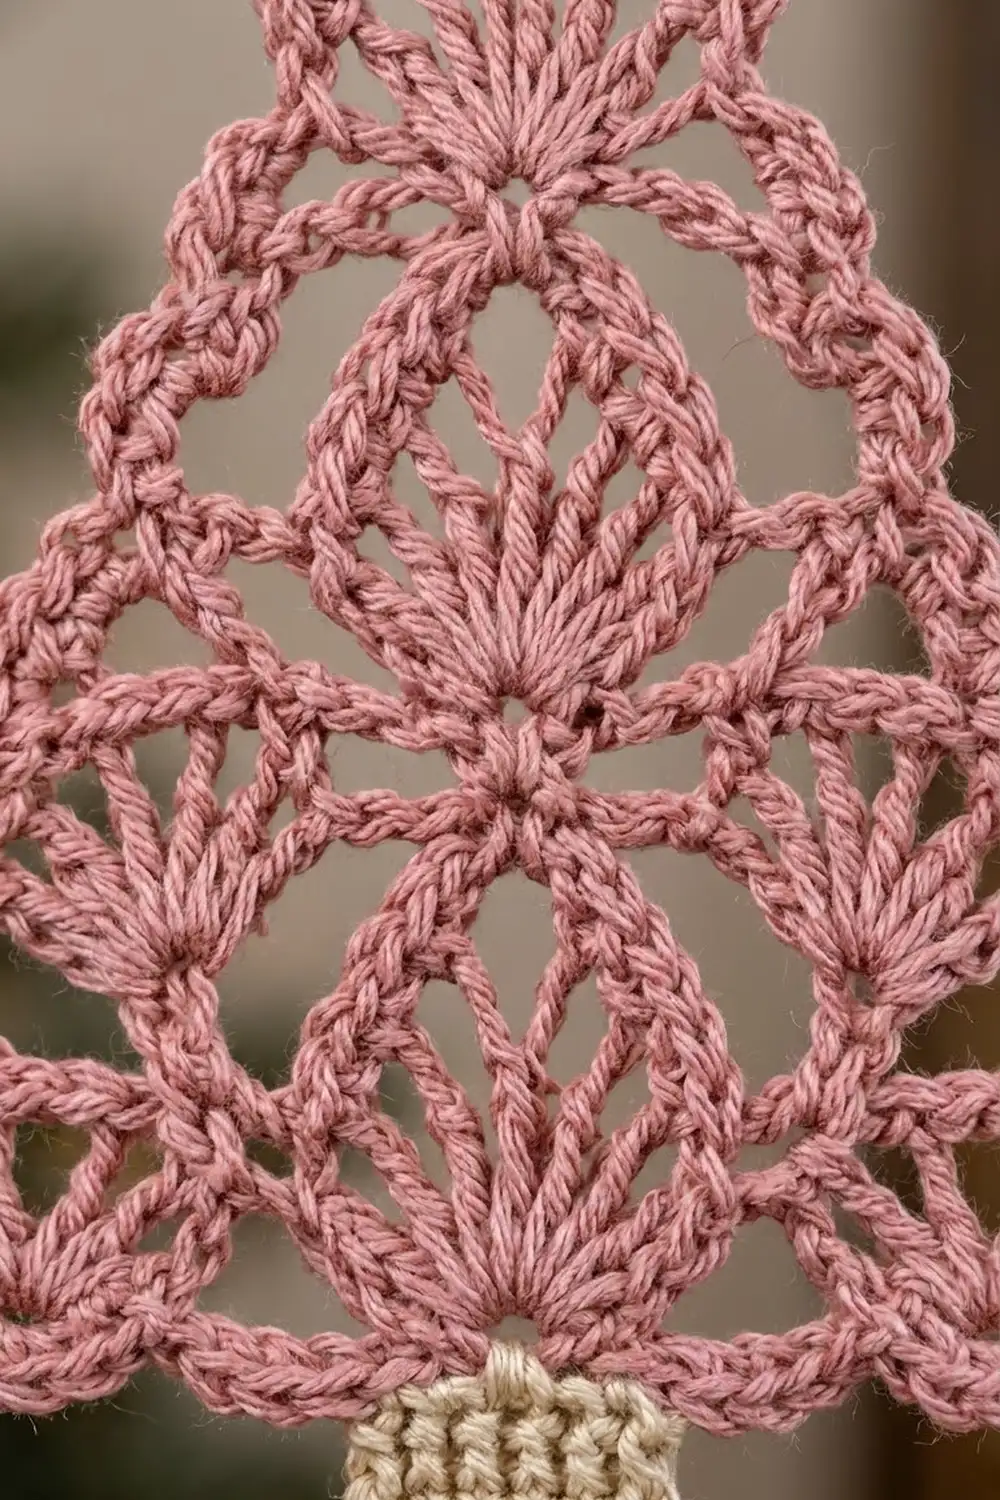
Tree Body
Use Color A. Work in turned rows. The ring at the start becomes the tip of the tree.
Row 1 (fan row, 1 fan): Ch 4, sl st in first ch to form a ring. Ch 3 (counts as dc), 6 dc in ring. Turn.
(7 dc = 1 fan)
Row 2 (loop row): Ch 1, sc in first dc, ch 4, sc in center dc, ch 4, sc in top of tch. Turn.
(3 sc, 2 ch-4 loops)
The first and last sc are anchor sc, where the next fans go. The middle sc is a center sc.
Row 3 (fan row, 2 fans): Ch 3 (counts as dc), 6 dc in first sc (fan made). Sc in next ch-4 loop, ch 3, sk center sc, sc in next ch-4 loop. Work 7 dc in last anchor sc. Turn.
(2 fans = 14 dc, 2 sc, 1 ch-3 sp)
The ch 3 that bridges between the fans opens the first diamond window.
Row 4 (loop row): Ch 1, sc in first dc. Ch 4, sc in center dc of first fan. Ch 4, sc in ch-3 sp (anchor). Ch 4, sc in center dc of next fan. Ch 4, sc in top of tch. Turn.
(5 sc: 3 anchor + 2 center; 4 ch-4 loops)
Row 5 (fan row, 3 fans): Ch 3, 6 dc in first sc. Sc in next ch-4 loop, ch 3, sk center sc, sc in next ch-4 loop, 7 dc in next anchor sc; rep from * once more. Turn.
(3 fans = 21 dc, 4 sc, 2 ch-3 sps)*
The middle fan of this row sits directly under the tip fan, which gives the tree its central column of fans.
Row 6 (loop row): Ch 1, sc in first dc. Ch 4, sc in center dc of next fan, ch 4, sc in next ch-3 sp; rep from * once more. Ch 4, sc in center dc of last fan, ch 4, sc in top of tch. Turn.
(7 sc: 4 anchor + 3 center; 6 ch-4 loops)*
Row 7 (fan row, 4 fans): Ch 3, 6 dc in first sc. Sc in next ch-4 loop, ch 3, sk center sc, sc in next ch-4 loop, 7 dc in next anchor sc; rep from * 2 more times. Do not turn or fasten off.
(4 fans = 28 dc, 6 sc, 3 ch-3 sps)*
Count check: each fan row has (fans × 7) dc, plus 2 sc and 1 ch-3 sp for each gap between fans. Each loop row has (2 × fans above + 1) sc and (2 × fans above) ch-4 loops.
Checkpoint: 4 in (10.2 cm) across the fan tips × 4.5 in (11.4 cm) from ring to fan tips.
Border
The border has two rounds, worked with RS facing and Color A. Use the border gauge of 5 sc per 1 in (2.5 cm) along the sides.
Side math: each slanted side measures about 5 in (12.7 cm). At 5 sc per inch, that’s 25 sc per side. That count includes the one tip sc on that side. The fan scallops are curved, so each one is about 1.4 in (3.6 cm) long, which holds 7 sc at the same gauge.
Rnd 1: Ch 1 (bottom corner ch-1 sp). Now work along the side edge toward the tip, placing sc into the row ends:
– 4 sc around the post of the Row 7 end dc
– 3 sc around the Row 6 end
– 4 sc around the Row 5 end
– 3 sc around the Row 4 end
– 4 sc around the Row 3 end
– 3 sc around the Row 2 end
– 3 sc around the Row 1 end
That’s 24 sc.
At the tip, work (sc, ch 2, sc) into the free top of the ring. Work down the second side with the same counts in reverse order (3, 3, 4, 3, 4, 3, 4) for 24 sc. Ch 1 (bottom corner ch-1 sp).
Across the bottom, work along the tops of the Row 7 fans: *sc in each of 7 dc of the fan, sk sc, sl st in ch-3 sp, sk sc; rep from * 2 more times, then sc in each of 7 dc of the last fan. Join with sl st to the first sc of the round.
Rnd 1 counts:
– Each side: 24 + 1 tip sc = 25 sc
– Bottom: 28 sc + 3 sl st
– Plus 1 ch-2 tip sp and 2 ch-1 corner sps
– Total: 2 + 24 + 28 + 24 = 78 sc
Rnd 2 (loop edging and hanging loop): Sl st in corner ch-1 sp, ch 1, sc in same sp.
First side (25 sc): sc in first sc, [ch 3, sk 1 sc, sc in next sc] 12 times. The last sc lands in the tip sc.
Tip: (sc, ch 30, sc) in the ch-2 tip sp. This makes the hanging loop.
Second side (25 sc): sc in tip sc, [ch 3, sk 1 sc, sc in next sc] 12 times. Then sc in the corner ch-1 sp.
Bottom: *sc in first sc of fan, [ch 3, sk 1 sc, sc in next sc] 3 times, sl st in sl st; rep from * 2 more times, then sc in first sc of last fan, [ch 3, sk 1 sc, sc in next sc] 3 times. Join with sl st to first sc. Fasten off.
Rnd 2 counts:
– Each side: 13 sc and 12 ch-3 loops, since 1 + (12 × 2) = 25 sts used
– Each fan: 4 sc and 3 ch-3 loops, since 1 + (3 × 2) = 7 sts used
– Bottom: 16 sc, 12 loops, 3 sl st
– Corners: 1 sc each
– Tip: 2 sc and the ch-30 loop
– Total: 46 sc, 36 ch-3 loops
Why the math works: each side’s 25 sc is an odd number, and the “sc, then (ch 3, sk 1, sc) repeat” pattern always uses an odd number of stitches. So each side starts and ends on a sc, with no leftover stitch. Each fan’s 7 sc works the same way. The border adds 0.25 in (0.6 cm) on every edge, so the body grows from 4 in (10.2 cm) to 4.5 in (11.4 cm) wide and from 4.5 in (11.4 cm) to 5 in (12.7 cm) tall.
Trunk
Use Color B. Work the trunk in rows onto the bottom valley between fans 2 and 3.
Row 1: With RS facing, join B in the last ch-3 loop of fan 2. Work:
– 2 sc in that loop
– sc in next sc
– sc in sl st
– sc in next sc (first sc of fan 3)
– 2 sc in first ch-3 loop of fan 3
Turn. (7 sc)
Rows 2–6: Ch 2 (does not count as a st), hdc in each st across. Turn.
(7 hdc in each row)
Fasten off, leaving a 6 in (15.2 cm) tail.
Trunk checkpoint: 1 in (2.5 cm) wide × 1 in (2.5 cm) long, measured from the valley. The trunk extends about 0.6 in (1.5 cm) below the fan tips, so the overall height is 5.6 in (14.2 cm).
Final Blocking
- Weave in all ends, but don’t trim them yet. Hide the trunk tail inside the trunk edge stitches.
- Soak the ornament in cool water for 10 minutes. Press out the water gently in a towel. Don’t wring it.
- Pin it to the mat with the tip pointing up. Pin the tip, then each bottom corner, so the base is 4.5 in (11.4 cm) wide and the tip is 5 in (12.7 cm) above the base.
- Pin the bottom of each of the 4 fans into a smooth, rounded scallop.
- Open each diamond window with a pin so the ch-3 bridges and ch-4 arches lie flat.
- Pin the trunk square, 1 in × 1 in (2.5 cm × 2.5 cm).
- If you like, spray with starch for a stiffer ornament.
- Let it dry completely, then trim the ends.
Final Quality-Control Checklist
- Row 7 has 4 fans of 7 dc each.
- The center fans of Rows 1 and 5 line up vertically.
- Every diamond window is open and even.
- Each side of Rnd 1 has 25 sc, including the tip sc.
- Each side of Rnd 2 has 12 ch-3 loops, and each fan has 3.
- The hanging loop is centered on the tip and is about 2 in (5.1 cm) tall.
- The trunk is centered on the valley between fans 2 and 3 and is 7 sts wide.
- The finished size is 4.5 in × 5.6 in (11.4 cm × 14.2 cm).
Troubleshooting
- The fans cup or ruffle: your dc are too loose. Go down a hook size, or block more firmly.
- The triangle is lopsided: check that each fan row starts with ch 3 + 6 dc, so the first fan is a full fan. A short first fan pulls that side in.
- The diamond windows close up: you may have worked into the center sc instead of skipping it. Each ch-3 bridges over the center sc.
- The sides ripple after the border: use fewer sc per row end (3 instead of 4). Keep each side total odd so the Rnd 2 repeat still fits.
- The sides pull in: add 1 sc in each loop-row end, keeping the total odd, for example 27 sc. Then adjust Rnd 2 to 13 repeats.
- The trunk is off-center: count the fans from the left again. The trunk always goes on the valley between fans 2 and 3.
Care
Hand wash in cool water and lay flat to dry, then reshape and pin if needed. Store flat or hanging, away from crushing weight, so the fans keep their shape.
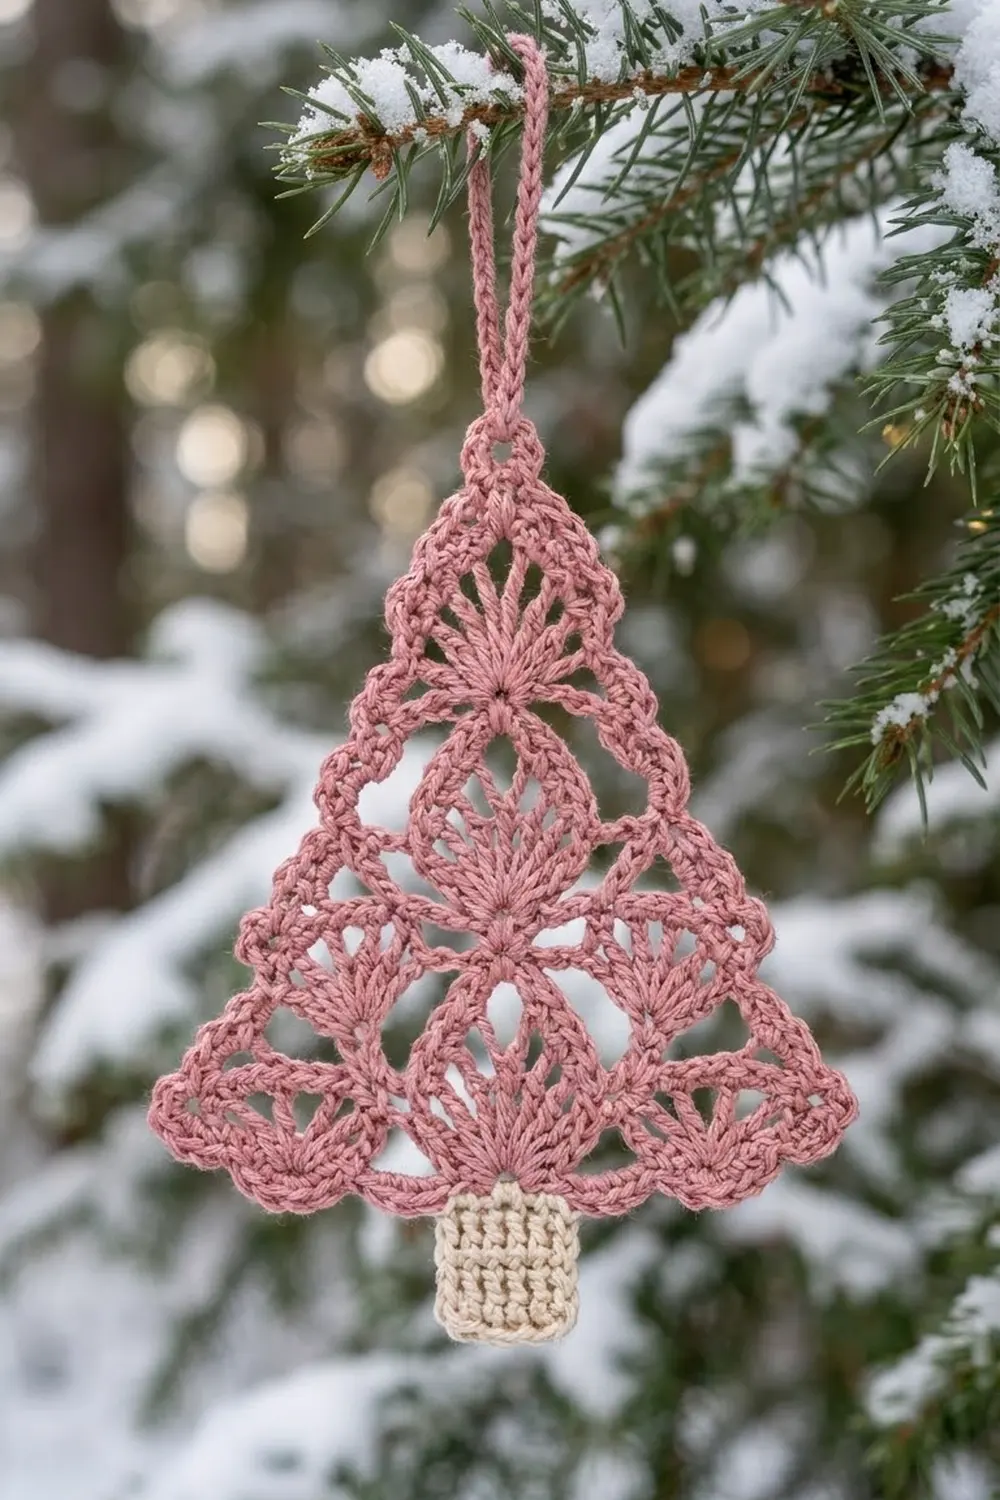
Final Notes
The size of the ornament comes from a simple chain of measurements:
– Each tier adds 1 fan, 1 in (2.5 cm) of width, and 1.25 in (3.2 cm) of height.
– Four tiers make a 4 in × 4.5 in (10.2 cm × 11.4 cm) body.
– The border adds 0.25 in (0.6 cm) on each edge, for 4.5 in × 5 in (11.4 cm × 12.7 cm).
– The trunk brings the total height to 5.6 in (14.2 cm).
If you check your counts at Rows 1, 3, 5, and 7, the border will fit cleanly every time. Make one for the tree, or a few for a wreath hoop.
Happy crocheting!