

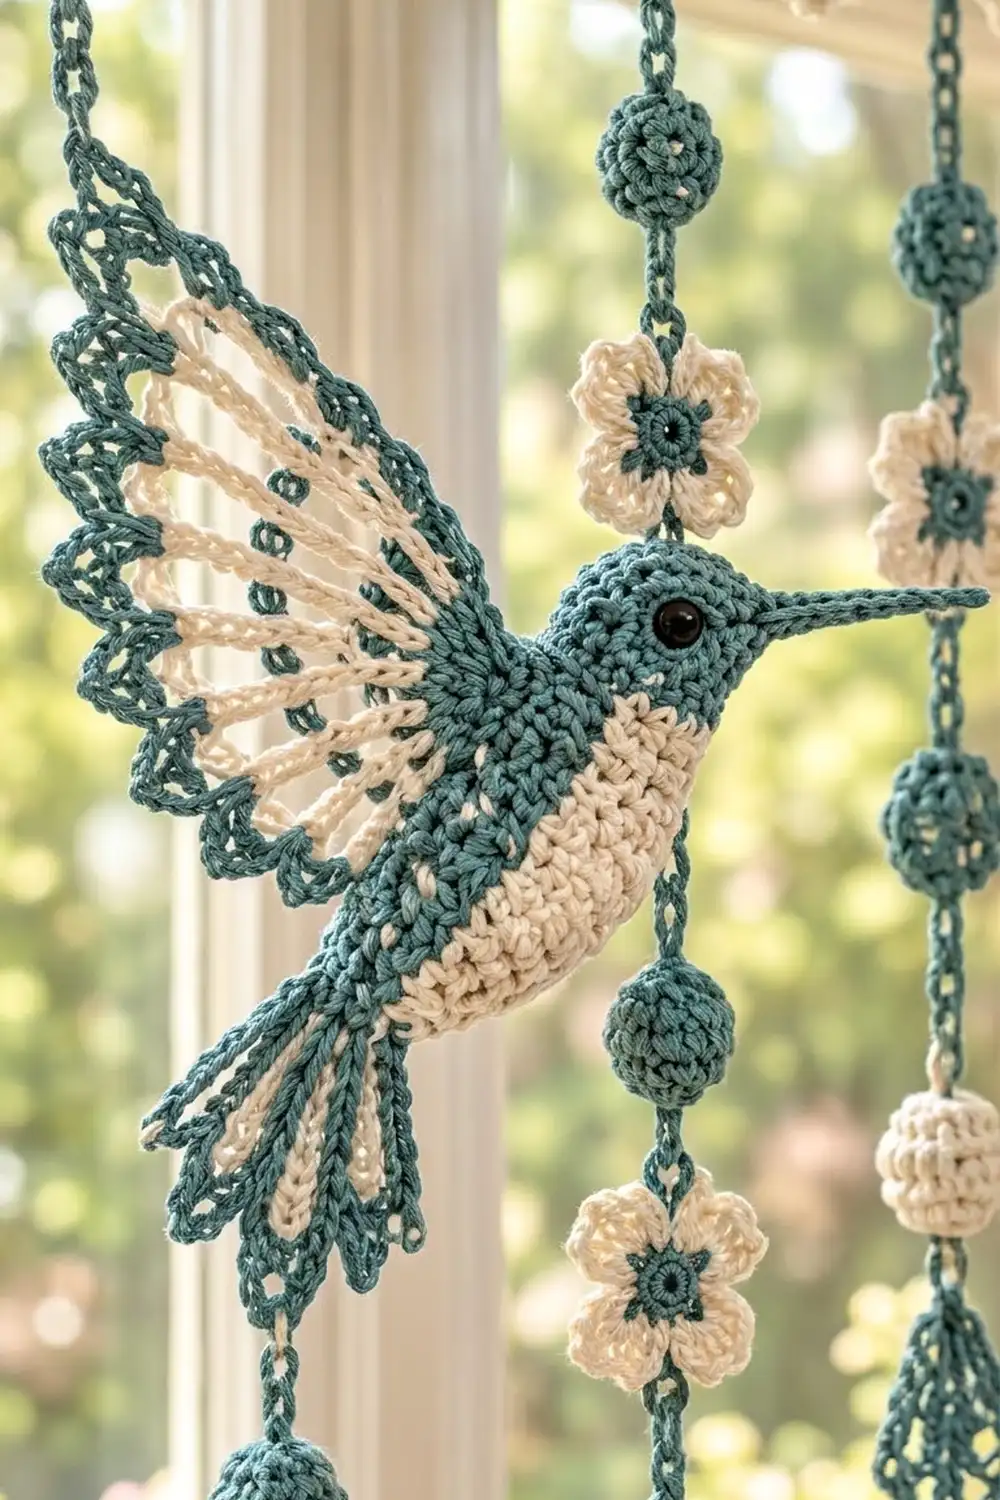
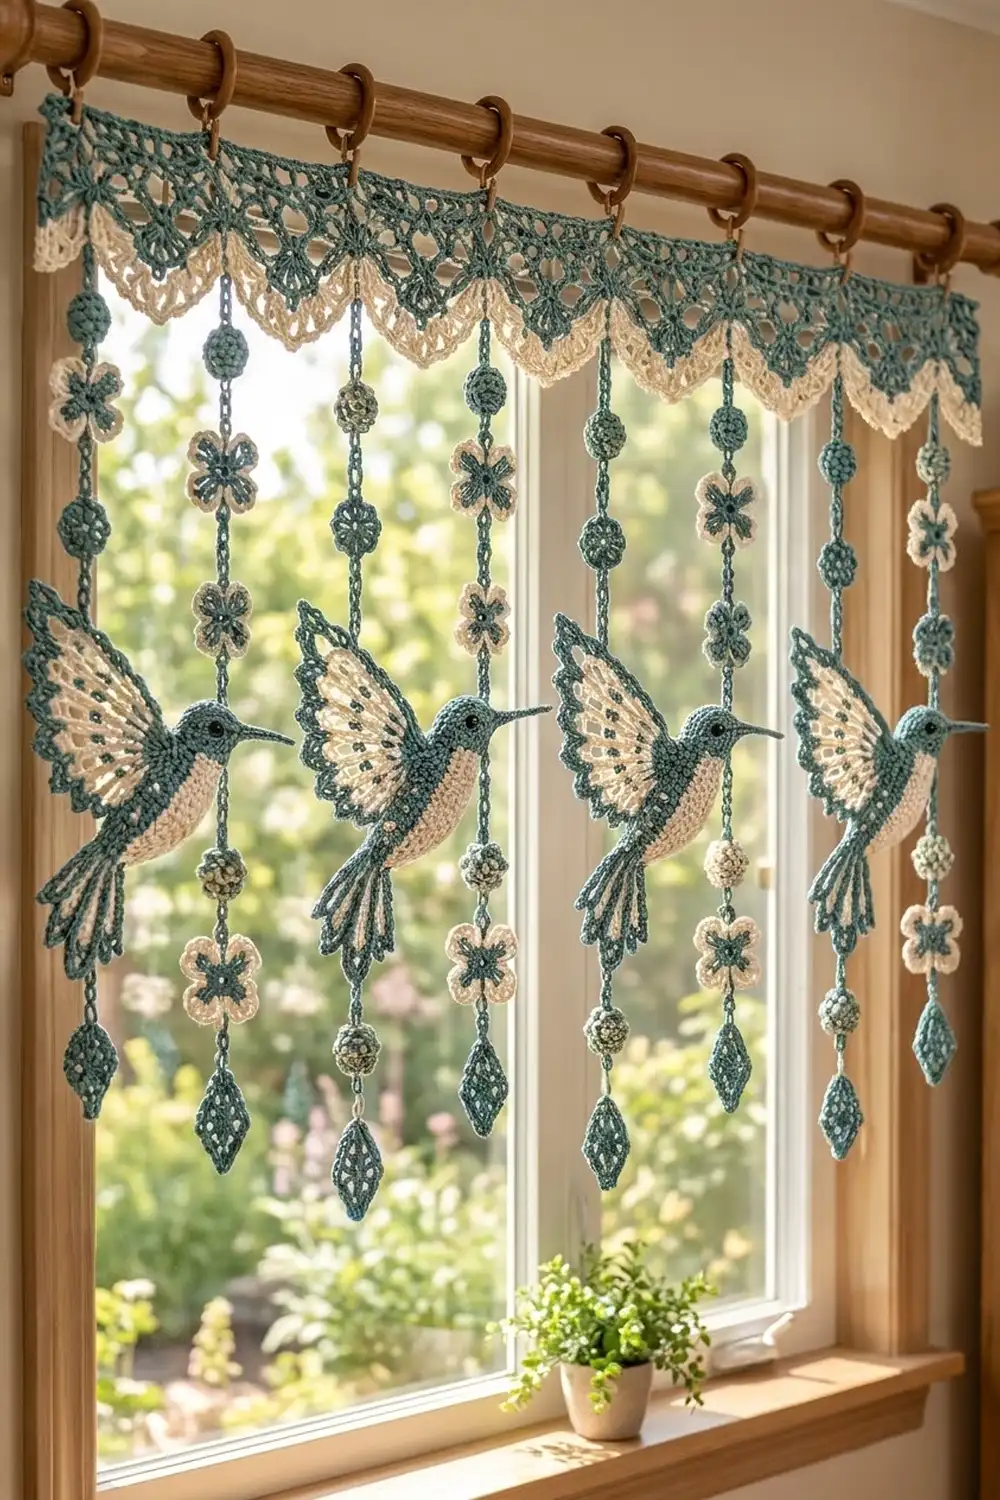
This lace valance has a scalloped header band and seven beaded strands, with four hummingbirds hovering among them. Every element is crocheted, including the round “beads,” the little flowers and the diamond drops.
The valance uses two colors. Soft teal is for the lace header, cords, balls, small flowers, drops and the hummingbird heads, backs and tails. Cream is for the scalloped edge, the five-petal flowers, the ridged balls and the hummingbird bellies and wing feathers. The style is cottage-garden lace with a light, whimsical feel.
The pattern uses US terms. The finished valance measures 32.2 in (81.8 cm) wide and 27.5 in (69.9 cm) long, from the top edge to the drop tips.
Construction is straightforward:
1. Work the teal header in rows across its full width.
2. Add a cream scallop border along the bottom.
3. Chain the seven cords directly off the scallop points.
4. Make the motifs and hummingbirds separately and sew them onto the cords.
Finished Size and Construction
- Finished size: 32.2 in (81.8 cm) x 27.5 in (69.9 cm)
- Skill level: Intermediate
- Terminology: US
- Yarn weight: Sport (#2) mercerized cotton
- Hook: 2.75 mm (US C-2)
- Number of pieces: 1 header, 7 cords, 20 teal balls, 4 cream balls, 10 cream flowers, 7 teal flowers, 7 drops, 4 hummingbirds (body, head, wing and tail for each)
- Layout: Header across the top, with 7 strands hanging 4 in (10.2 cm) apart and birds on strands 1, 3, 5 and 7
- Header size: 32.2 in (81.8 cm) x 5.5 in (14.0 cm)
- Size before border: 32.2 in (81.8 cm) x 4 in (10.2 cm)
- Border depth: 1.5 in (3.8 cm)
- Strand length: 22 in (55.9 cm)
Materials
Use mercerized cotton. It gives crisp scallops and feathers, keeps its shape after blocking, and doesn’t fuzz in the sun. Avoid acrylic, because the lace relaxes and the strands stretch over time.
- Teal: 110 g / 340 m
- Cream: 50 g / 155 m
- 2.75 mm (US C-2) hook
- 4 black beads, 6 mm, for the eyes
- Small amount of fiberfill
- Tapestry needle and sewing needle
- 9 curtain clip rings
- Rust-proof pins and a blocking board
The yarn quantities include a margin of about 15% for swatching and tails.
Abbreviations (US Terms)
- ch: chain
- sl st: slip stitch
- sc: single crochet
- hdc: half double crochet
- dc: double crochet
- tr: treble crochet
- dtr: double treble crochet
- sc2tog: single crochet 2 together
- MR: magic ring
- BLO: back loop only
- sp(s): space(s)
- st(s): stitch(es)
Shell: (2 dc, ch 2, 2 dc) in the same stitch.
Gauge and Checkpoints
Gauge:
– Double crochet: 24 dc = 4 in (10.2 cm) wide
– Chain: 7 ch = 1 in (2.5 cm)
The header’s lace rows are taller than plain dc rows, so use stitch width as your main gauge.
Test piece: Before you start the header, ch 27 and work Rows 1–5 of the header pattern. You’ll have 25 sts, which is 2 repeats plus 1. The swatch should measure 4.2 in (10.7 cm) wide x 2.25 in (5.7 cm) tall.
Checkpoints:
– Header Row 1: 193 dc = 32.2 in (81.8 cm)
– Header after Row 9: 4 in (10.2 cm) deep
– Header after border: 5.5 in (14.0 cm) deep
– Bird body after Rnd 3: 2.75 in (7.0 cm) x 1.25 in (3.2 cm)
– Wing: 3 in (7.6 cm) x 2.75 in (7.0 cm)
If your swatch is off:
– Too big: go down 0.25 mm.
– Too small: go up 0.25 mm.
Never change the stitch counts, because every dimension depends on 6 sts per inch.
Header
With teal, ch 195.
Row 1: Dc in 4th ch from hook (the skipped ch count as dc) and in each ch across. Turn. (193 dc)
Row 2: Ch 3 (counts as dc). Sk 2 sts, shell in next st, sk 2 sts, dc in next st; rep from * 31 more times. Turn. (32 shells, 33 dc)*
Row 3: Ch 3. (3 dc, ch 2, 3 dc) in ch-2 sp of next shell, dc in next single dc; rep from * across, working the last dc in the top of the turning ch. Turn. (32 large shells, 33 dc)*
Row 4: Ch 5 (counts as dc + ch 2). Sc in ch-2 sp of next shell, ch 2, dc in next single dc, ch 2; rep from * across, ending the last rep at . Turn. (33 dc, 32 sc, 64 ch-2 sps)*
Row 5: Ch 3 (counts as dc). 2 dc in next ch-2 sp, dc in next sc, 2 dc in next ch-2 sp, dc in next dc; rep from * across. Turn. (1 + 32 x 6 = 193 dc)*
Rows 6–9: Repeat Rows 2–5. Fasten off. (193 dc)
Checkpoint: The header should measure 32.2 in (81.8 cm) x 4 in (10.2 cm).
Make All Pieces
Work all rounded pieces in continuous rounds with the right side facing out.
Teal Ball (make 20)
Rnd 1: 6 sc in MR. (6)
Rnd 2: 2 sc in each st. (12)
Rnds 3–4: Sc in each st. (12)
Rnd 5: Sc2tog 6 times. (6)
Stuff firmly and close, leaving a long tail. The ball measures 0.7 in (1.8 cm) across.
Cream Ball (make 4)
Rnd 1: 6 sc in MR. (6)
Rnd 2: 2 sc in each st. (12)
Rnd 3: Sc in next st, 2 sc in next st; rep from * 5 more times. (18)
Rnds 4–5: Sc in BLO of each st. (18)
Rnd 6: Sc in next st, sc2tog; rep from * 5 more times. (12)
Rnd 7: Sc2tog 6 times. (6)
Stuff and close. The BLO rounds make a ridged band around the middle. The ball measures 1 in (2.5 cm) across.
Cream Flower (make 10)
Rnd 1 (teal): Ch 1, 10 sc in MR, join. Fasten off. (10)
Rnd 2 (cream): Join in any sc. (Ch 2, 3 dc, ch 2) in next sc, sl st in next sc; rep from * 4 more times. (5 petals)*
The flower measures 1.25 in (3.2 cm) across.
Teal Flower (make 7)
Rnd 1 (cream): Ch 1, 8 sc in MR, join. Fasten off. (8)
Rnd 2 (teal): Join in any sc. (Ch 3, 2 tr, ch 3) in next sc, sl st in next sc; rep from * 3 more times. (4 petals)*
The flower measures 1 in (2.5 cm) across.
Drop (make 7, teal)
Rnd 1: 4 sc in MR. (4)
Rnd 2: Sc in next st, 2 sc in next st; rep from * once more. (6)
Rnd 3: Sc in next st, 2 sc in next st; rep from * 2 more times. (9)
Rnd 4: Sc in next 2 sts, 2 sc in next st; rep from * 2 more times. (12)
Rnd 5: Sc in each st. (12)
Rnd 6: Sc in next 2 sts, sc2tog; rep from * 2 more times. (9)
Rnd 7: Sc in next st, sc2tog; rep from * 2 more times. (6)
Rnd 8: Sc2tog 3 times. (3)*
Stuff lightly and close. The pointed diamond measures 1.5 in (3.8 cm) long.
Hummingbird (make 4)
Body
With cream, ch 13.
Rnd 1: 2 sc in 2nd ch from hook, sc in next 10 ch, 4 sc in last ch. Working along the opposite side of the chain, sc in next 10 ch, 2 sc in first ch. Join. (28)
Rnd 2: Ch 1. 2 sc in each of next 2 sts, sc in next 10 sts, 2 sc in each of next 4 sts, sc in next 10 sts, 2 sc in each of last 2 sts. Join. Fasten off cream. (36)
Rnd 3 (teal): Join teal. Sc in each st around, join. (36)
Back stripe: Don’t fasten off. Continue with hdc in each of the next 16 sts along one long side, then fasten off. The striped side is the back and the cream side is the belly.
Checkpoint: The body should measure 2.75 in (7.0 cm) x 1.25 in (3.2 cm).
Head
With teal:
Rnd 1: 6 sc in MR. (6)
Rnd 2: 2 sc in each st. (12)
Rnd 3: Sc in next st, 2 sc in next st; rep from * 5 more times. Join. (18)*
Beak: Ch 15. Sl st in 2nd ch from hook and in each ch back (14 sl st), then sl st into the head. Fasten off.
The head measures 1 in (2.5 cm) across and the beak is 2 in (5.1 cm) long. Sew the bead eye just above the center of the head.
Wing
Row 1 (cream): Work into a MR: ch 4 (counts as dc + ch 1), (dc, ch 1) 5 times, dc. Pull the ring half closed. Turn. (7 dc, 6 ch-1 sps)
Row 2: Ch 4 (counts as tr), tr in same st. Ch 2, 2 tr in next dc; rep from * 5 more times. Turn. (14 tr, 6 ch-2 sps)*
Row 3: Ch 5 (counts as dtr), dtr in next tr. Ch 3, dtr in each of next 2 tr; rep from * 5 more times. Fasten off cream. (14 dtr, 6 ch-3 sps)*
Row 4 (teal outline): Join teal at the ring. Work 6 sc up the row ends (1 for the dc row + 2 for the tr row + 3 for the dtr row). Sc in first dtr of the pair, ch 3, sc in second dtr, 3 sc in next ch-3 sp; rep from * 5 more times, then work from * to ** once more. Work 6 sc down the opposite row ends. Fasten off. (44 sc, 7 ch-3 feather tips)*
Checkpoint: The wing should measure 3 in (7.6 cm) wide x 2.75 in (7.0 cm) tall.
Tail
With teal:
Row 1: Ch 1, 5 sc in MR. Turn. (5)
Row 2: Ch 5 (counts as dtr), dtr in same st, 2 dtr in each of next 4 sts. Turn. (10)
Row 3: Ch 1, sc in first st. Ch 5, sc in next st; rep from * 8 more times. Fasten off. (10 sc, 9 ch-5 loops)*
The tail measures 2 in (5.1 cm) long.
Assemble the Bird
- Sew the head over one narrow end of the body so it overlaps by 0.25 in (0.6 cm).
- Sew the ring of the wing to the middle of the back stripe, with the feathers fanning up and back.
- Sew the tail to the opposite end of the body, angled downward.
- Make sure every beak points right.
Each finished bird measures 6.5 in (16.5 cm) from beak to tail and 5 in (12.7 cm) tall.
Quantities per Color
- Teal: header, 7 cords, 20 balls, 7 drops, 4 heads, 4 tails, Rnd 2 of the teal flowers, Rnd 3 of the bodies and the wing outlines
- Cream: border, 4 balls, petals for 10 flowers, centers for 7 flowers, 4 bodies and Rows 1–3 of 4 wings
Layout Grid
The grid shows each motif’s position down the cord, measured from the header.
Key: B = teal ball, CF = cream flower, TF = teal flower, CB = cream ball, H = hummingbird, D = drop.
       S1   S2   S3   S4   S5   S6   S7
2 in   B    B    B    B    B    B    B
5 in   CF   CF   CF   CF   CF   CF   CF
8 in   B    B    B    B    B    B    B
11 in  |    TF   |    TF   |    TF   |
12 in  H    |    H    |    H    |    H
14 in  |    B    |    B    |    B    |
16 in  CB   |    CB   |    CB   |    CB
17 in  |    CF   |    CF   |    CF   |
19 in  TF   |    TF   |    TF   |    TF
20 in  |    B    |    B    |    B    |
22 in  D    D    D    D    D    D    D
The same positions in metric are 5.1, 12.7, 20.3, 27.9, 30.5, 35.6, 40.6, 43.2, 48.3, 50.8 and 55.9 cm.
Totals check: 20 B, 10 CF, 7 TF, 4 CB, 4 H, 7 D.
Border
Border gauge: One scallop spans 12 header sts, which is 2 in (5.1 cm).
With the right side facing, join cream in the first st of Row 9.
Border Row 1 (conversion): Ch 1, sc in each st across. Turn. (193 sc = 193 worked 1-per-stitch + 0 added)
Border Row 2: Ch 1, sc in first sc. Sk 5 sts, 11 tr in next st, sk 5 sts, sc in next st; rep from * 15 more times. Turn. (16 scallops: 17 sc + 176 tr = 193 sts)*
Border Row 3 (trim): Ch 1, sc in first sc. (Sc in next tr, ch 2) 10 times, sc in next tr, sc in next sc; rep from * 15 more times. Fasten off. (193 sc worked 1-per-existing-stitch + 160 ch-2 sps added)*
Why the math works: Each scallop uses 5 + 1 + 5 + 1 = 12 sts, and 1 + 16 x 12 = 193. That means the last scallop ends exactly on the last stitch. The junction sc between scallops line up above header sts 1, 13, 25 and so on through 193.
Side trim (teal): Work 2 sc around each of the 9 header row ends and 1 sc in each of the 3 border row ends. That’s 21 sc per short side.
Joining
Cords
The cords hang from the junction sc above header sts 25, 49, 73, 97, 121, 145 and 169.
– Cord 4 sits on st 97, the exact center, with 96 sts on each side.
– The cords are 24 sts apart, which is 4 in (10.2 cm).
To make each cord:
1. Join teal in the junction sc and ch 155.
2. Sl st in the back bump of 2nd ch from hook and in each ch back to the header (154 sl st).
3. Sl st into the junction sc and fasten off.
Checkpoint: Each cord should measure 22 in (55.9 cm).
Motifs
Sew each motif to the cord at its grid position:
– Balls: Stitch the tail through 2 cord sl sts.
– Flowers: Sew 2 center sc on each side of the cord.
– Hummingbirds: From behind, sew 4 stitches through body Rnd 2 into 4 consecutive cord sl sts.
– Drops: Sew the narrow top to the last sl st of the cord.
Tension
Keep your sewing snug but not tight, because over-tight stitches pucker the cord and shorten it. Recheck the 22 in (55.9 cm) length on each strand after sewing.
Hanging
Clip the 9 rings to top-edge sts 1, 25, 49, 73, 97, 121, 145, 169 and 193. That spaces them 4 in (10.2 cm) apart.
Final Blocking
- Soak the valance in cool water for 15 minutes, then press out the water in a towel.
- Pin the header to 32.2 in (81.8 cm) x 5.5 in (14.0 cm).
- Pin each scallop into a smooth arc.
- Pin the feather tips and tail loops open, and straighten the beaks.
- Let the strands hang so they dry at 22 in (55.9 cm).
- Remove the pins only when everything is completely dry.
Final Quality-Control Checklist
- [ ] Header has 193 sts and measures 32.2 in (81.8 cm)
- [ ] 16 scallops, each with 11 tr
- [ ] 7 cords, each 22 in (55.9 cm), on the correct junctions
- [ ] Motifs match the grid
- [ ] All beaks point the same way
- [ ] Eyes are secure and all ends are woven in
Troubleshooting
- Header ruffles: Your gauge is loose. Go down a hook size.
- Scallops cup: Your tr are tight. Loosen them or block firmly.
- Scallops end off-count: Recount Border Row 1. It must be 193 sc.
- Cords are uneven: Recount the chain before you slip stitch back.
- Birds tip forward: Move the attachment stitches toward the tail.
Care
Hand wash in cool water with mild soap, lay flat to dry, and reblock. Hang the valance again only when it’s fully dry.
Final Notes
Each measurement builds on the one before:
1. A gauge of 6 sts per inch gives 193 dc, which is 32.2 in (81.8 cm).
2. Nine rows bring the header to 4 in (10.2 cm).
3. The border adds 1.5 in (3.8 cm), for a 5.5 in (14.0 cm) header.
4. Spacing of 24 sts puts the cords 4 in (10.2 cm) apart.
5. Cords of 22 in (55.9 cm) bring the valance to 27.5 in (69.9 cm).
If every checkpoint matches, the finished valance will too.
Happy crocheting!