

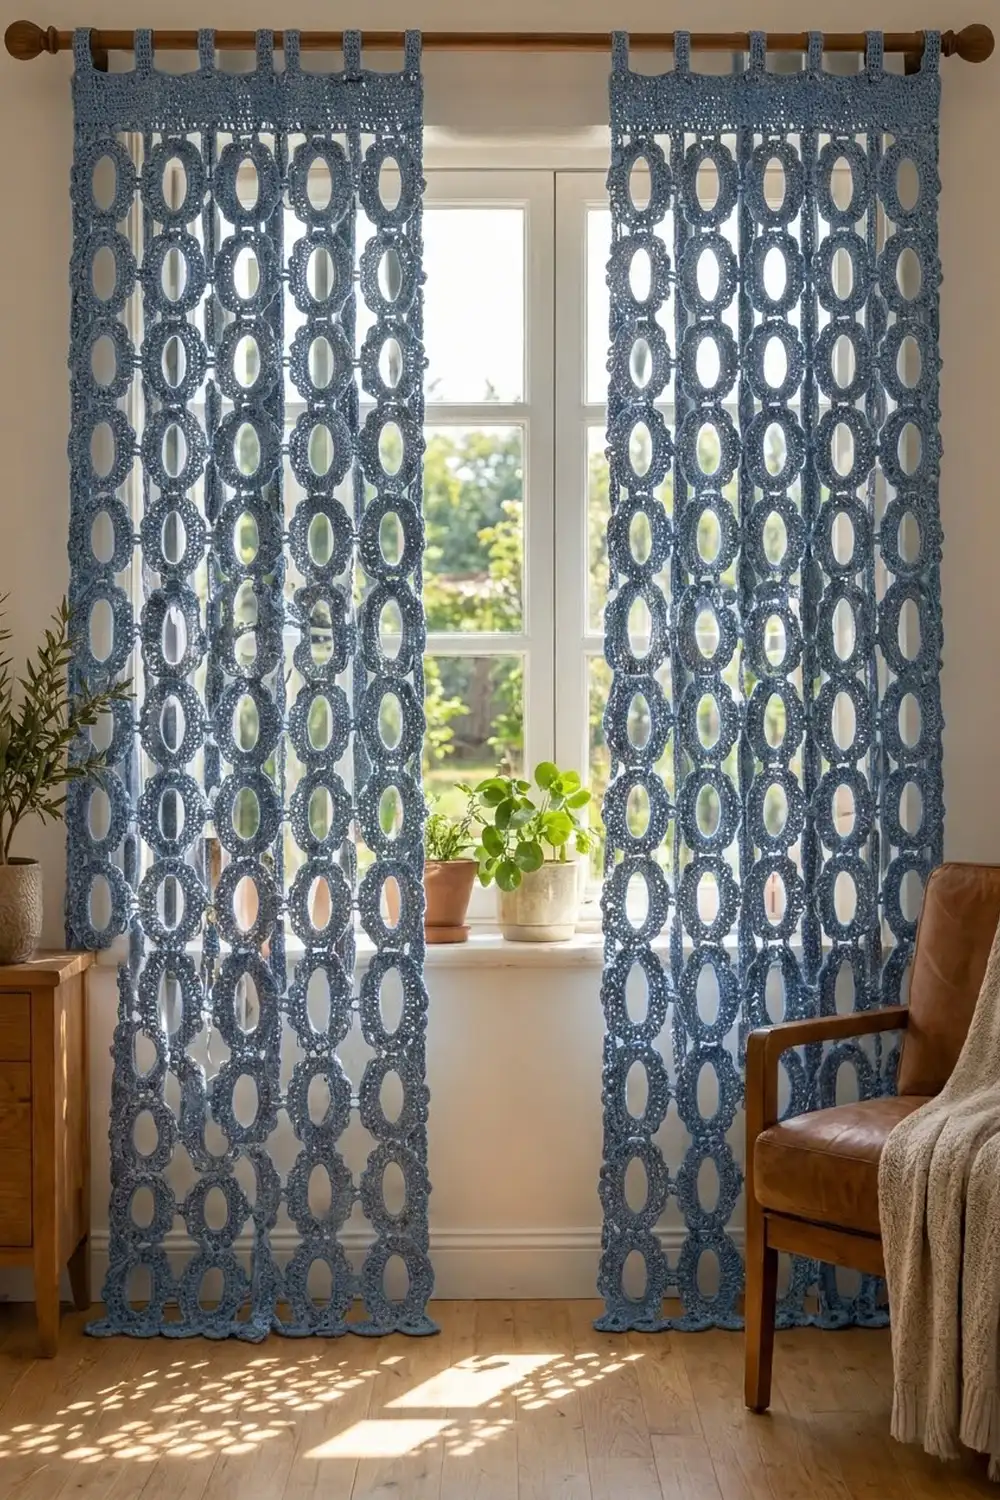
The Bluebell Lattice curtain is a pair of airy tab-top panels made from scalloped oval motifs. Each motif is an open oval ring edged with plump shells. The motifs are linked by short double chain bars, so light comes through every oval and through the gaps between them.
The sample is worked in one color, a soft dusty denim blue. One solid color keeps the focus on the repeating ovals and the shadows they throw. The style is relaxed cottage boho and works on a living room or bedroom window.
This pattern uses US crochet terms. Each finished panel measures about 24 in (61.0 cm) wide and 80.5 in (204.5 cm) long from the bottom scallops to the top of the band. The tab loops add about 2.5 in (6.4 cm) above the band.
You make 60 motifs for each panel, 5 across and 12 down. Motifs are joined as you go during their last round. A solid double crochet band with six tabs is worked across the top row of motifs. Then you make a second identical panel.
Finished Size and Construction
- Finished size (each panel): 24 in (61.0 cm) wide x 80.5 in (204.5 cm) long, plus 2.5 in (6.4 cm) tab loops
- Skill level: Intermediate
- Terminology: US
- Yarn weight: DK (light #3), cotton or cotton blend
- Hook: 4.0 mm (G-6)
- Number of pieces: 120 motifs (60 per panel) plus 2 top bands
- Layout: 5 motifs across x 12 motifs down per panel
- Motif size: 4 in (10.2 cm) wide x 6 in (15.2 cm) tall
- Size before border: 24 in (61.0 cm) x 77.5 in (196.9 cm) per panel
- Border depth: 3 in (7.6 cm) top band, plus 2.5 in (6.4 cm) tab loops
Materials
Cotton or a cotton blend gives the clearest stitch definition and holds the ovals’ shape when the panels hang. Use a smooth, tightly plied yarn. Fuzzy yarns blur the scallops and make the chain bars hard to see.
- Dusty denim blue, DK cotton: about 600 g / 1,320 m (for example, 12 balls of 50 g / 110 m)
- 4.0 mm (G-6) crochet hook
- Tapestry needle
- Stitch markers (at least 4)
- Rust-proof pins and blocking mats
- Spray bottle
- Measuring tape
- Curtain rod up to 1.25 in (3.2 cm) in diameter
The quantities above include a margin of about 15% for gauge swatches, tails, and differences in tension.
Abbreviations (US Terms)
- ch = chain
- sl st = slip stitch
- sc = single crochet
- dc = double crochet
- tr = treble crochet
- st(s) = stitch(es)
- sk = skip
- rep = repeat
- RS = right side
Shell: 5 dc in the same st. The 3rd dc is the center dc.
Joining shell (horizontal): In the st for the shell, work 3 dc. Ch 5, sl st in the center dc of the matching shell on the neighbor motif, ch 5, sl st in the top of the 3rd dc you just made. Work 2 dc in the same st. This makes a double chain bar and the shell still has 5 dc.
Joining shell (vertical): Same as the horizontal joining shell, but ch 3 each way instead of ch 5.
Gauge and Checkpoints
Gauge: 18 sc and 20 rows = 4 in (10.2 cm); 18 dc and 8 rows = 4 in (10.2 cm).
Make one complete motif before starting the panel and block it lightly. Check it at each stage:
- After Rnd 1: center opening about 1.75 in (4.4 cm) wide x 3.5 in (8.9 cm) tall
- After Rnd 2: about 2.6 in (6.6 cm) x 4.4 in (11.2 cm)
- After Rnd 3: about 3 in (7.6 cm) x 4.9 in (12.4 cm)
- After Rnd 4: 4 in (10.2 cm) x 6 in (15.2 cm)
If your motif comes out larger than 4 in (10.2 cm) wide, go down one hook size. If it is smaller than 4 in (10.2 cm), go up one size. A difference of just 0.25 in (0.6 cm) per motif adds up to 1.25 in (3.2 cm) across the panel width and 3 in (7.6 cm) down its length.
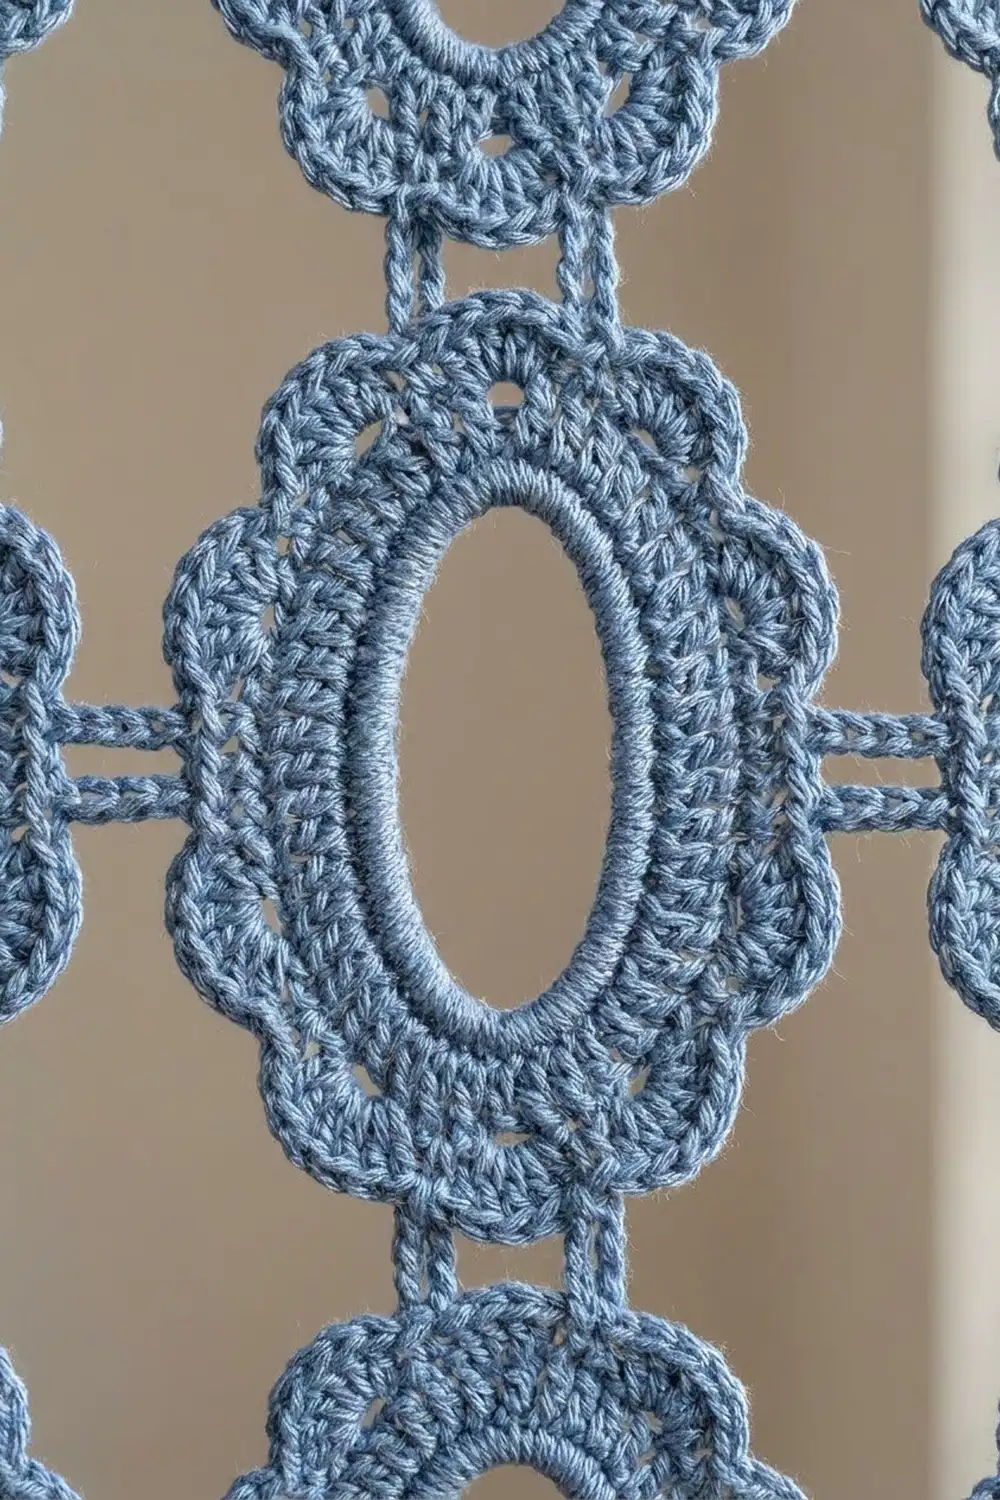
Oval Motif
The motif is an oval worked in rounds. Each round has four sections: two straight sides with no increases and two curved ends where all the increases happen. Keeping the sides straight is what makes the shape oval rather than round.
Sections are named in working order: side A, end B, side C, end D. Mark the first st of each section on Rnd 1 and move the markers up each round.
Rnd 1: Ch 40, sl st in first ch to form a ring, being careful not to twist. Ch 1, sc in same ch and in each ch around; join with sl st to first sc. (40 sc: side A 8, end B 12, side C 8, end D 12)
Rnd 2 (growth): Ch 3 (counts as first dc), dc in next 7 sts (side A). (2 dc in next st, dc in next st) 6 times (end B). Dc in next 8 sts (side C). Rep from * to * once (end D). Join with sl st to top of ch-3. (52 dc: side A 8, end B 18, side C 8, end D 18)
Rnd 3 (growth): Ch 1, sc in same st and in next 7 sts (side A). (2 sc in next st, sc in next 2 sts) 6 times (end B). Sc in next 8 sts (side C). Rep from * to * once (end D). Join with sl st to first sc. (64 sc: side A 8, end B 24, side C 8, end D 24)
Number the Rnd 3 sts 1 to 64, starting with the first st of side A. Shells will fall on every 4th st (4, 8, 12 and so on). That puts a shell at the middle of each side (sts 4 and 36) and at the tip of each end (sts 20 and 52). These four are the join shells.
Rnd 4 (scallop edge): Ch 1, sk st 1, sc in st 2. Sk next st, shell in next st, sk next st, sc in next st. Rep from * to * 15 more times, leaving off the final sc on the last rep. Join with sl st to first sc. Fasten off. (16 shells and 16 sc: 80 dc + 16 sc = 96 sts)
Shells are numbered 1 to 16 in working order. Shells 1 and 9 are the side join shells. Shells 5 and 13 are the end (tip) join shells. Turn the motif so the ends point up and down.
Make All Pieces
Each panel has 60 motifs. You need 120 motifs for the pair, all in dusty denim blue.
Work Rnds 1 to 3 of every motif on its own. Work Rnd 4 of the first motif as written. On every other motif, use joining shells on Rnd 4 to attach it to the motifs already in place.
Layout of one panel (M = motif, = is a horizontal ch-5 double bar, || is a vertical ch-3 double bar):
Row 1:   M = M = M = M = M
         ||  ||  ||  ||  ||
Row 2:   M = M = M = M = M
         ||  ||  ||  ||  ||
 ...      (rows 3 to 11 the same)
         ||  ||  ||  ||  ||
Row 12:  M = M = M = M = M
Joining
Join as you go. Start with Row 1 at the top left and work each row from left to right.
Method: Before you start Rnd 4, turn the motif so that its join shells will face the motifs it has to join. Rnds 1 to 3 are symmetrical, so you can turn the motif any way you need to.
- Row 1, motif 1: work Rnd 4 with no joins.
- Row 1, motifs 2 to 5: replace the side join shell facing the left neighbor with a horizontal joining shell.
- Rows 2 to 12, motif 1: replace the top tip join shell with a vertical joining shell, attached to the bottom tip shell of the motif above.
- Rows 2 to 12, motifs 2 to 5: make one vertical join (motif above) and one horizontal join (left neighbor).
Stitch-to-stitch logic: Each join always goes center dc to center dc. Join shells sit exactly 16 sts apart on Rnd 3, so every motif lines up straight with its neighbors. The chain bars are extra and are not counted in the 96-st total.
Tension: Keep the bar chains the same size as your normal chains. Tight bars make the panel pucker. Loose bars make it sag. Lay the motifs flat after each join and check that the bars are straight and not twisted.
Size checkpoint: A finished row of 5 motifs measures 24 in (61.0 cm): 5 x 4 in plus 4 bars x 1 in (2.5 cm). Four joined rows measure about 25.5 in (64.8 cm) tall: 4 x 6 in plus 3 bars x 0.5 in (1.3 cm). After all 12 rows, the panel should measure 24 in (61.0 cm) x 77.5 in (196.9 cm).
Border: Top Band and Tabs
The panel’s only border is a top band worked across Row 1. The side edges and bottom edge are left with their scallops showing.
Border gauge: 18 dc = 4 in (10.2 cm); each dc row is 0.5 in (1.3 cm) tall.
On each Row 1 motif, the top end has five shells across it: the tip shell (shell 5 or 13) and the two shells on each side of it. Call these shells a, b, c, d, e from left to right. Shell c is the tip.
Row 1 (leveling row): With RS facing, join yarn in the center dc of shell a on the leftmost motif. Ch 4 (counts as tr). Ch 3, dc in center dc of shell b, ch 3, sc in center dc of shell c, ch 3, dc in center dc of shell d, ch 3, tr in center dc of shell e. That is 17 sts for the motif: 5 sts + 12 ch. Ch 6, tr in center dc of shell a on the next motif, then rep from * to . Continue across all 5 motifs. Turn. (5 motifs x 17 sts + 4 gaps x 6 ch = 85 + 24 = 109 sts)*
The tall stitches at the motif shoulders and the short sc at each tip even out the curved tops, so the row ends flat.
Row 2: Ch 3 (counts as dc), dc in each st and in each ch across. Turn. (109 dc)
Rows 3 to 6: Ch 3 (counts as dc), dc in each st across. Turn. (109 dc each row)
The band is now 3 in (7.6 cm) deep: Row 1 is 0.5 in (1.3 cm) and Rows 2 to 6 are 5 x 0.5 in. Do not fasten off.
Tabs: Work 6 tabs, each 9 sts wide, with 11 sts between tabs.
Tab rows: Ch 1, sc in first 9 sts. Turn. Work 24 more rows of sc, 9 sc each, to make 25 rows. The tab is 5 in (12.7 cm) long and 2 in (5.1 cm) wide. Fasten off, leaving a 12 in (30.5 cm) tail.
Join yarn in the next unworked st on Row 6 of the band. Sk 11 sts, then work the next tab in the next 9 sts. Repeat this until you have 6 tabs. They sit on sts 1–9, 21–29, 41–49, 61–69, 81–89 and 101–109.
Why the math works: 6 tabs x 9 sts + 5 gaps x 11 sts = 54 + 55 = 109. That matches the band count exactly, so the first and last tabs sit right at the panel edges. The band is 109 sts at 18 dc per 4 in, which comes to about 24.2 in (61.5 cm). That’s within a stitch of the 24 in (61.0 cm) motif grid, so the band lies flat without gathering or flaring.
Fold each tab to the wrong side. Sew its last row to the top of Row 3 of the band with the tail, which leaves a loop 2.5 in (6.4 cm) deep. Weave in all ends.
Repeat everything for the second panel.
Final Blocking
- Weave in every end before blocking, splitting the plies so the cotton won’t work loose.
- Lay one panel on blocking mats with the RS up. Work in sections if you don’t have enough space.
- Pin the top band straight at 24 in (61.0 cm) wide.
- Pin each motif row so the ovals stand upright and the bars run straight. Pin at the center dc of each join shell.
- Pin the bottom row’s scallops one at a time to open the shells.
- Spray until damp but not soaked. Pat the oval openings into shape with your fingers.
- Check that the panel measures 24 in (61.0 cm) x 80.5 in (204.5 cm), then leave it to dry completely.
- Unpin the panel and block the second one to the same measurements.
Final Quality-Control Checklist
- Each panel has 60 motifs in a 5 x 12 grid.
- Each motif has 16 shells and an upright oval opening.
- Every horizontal bar is a ch-5 double bar, and every vertical bar is a ch-3 double bar.
- No bars are twisted and none are missing.
- Band Row 1 has 109 sts and every band row after it has 109 dc.
- There are 6 tabs of 9 sts each, spaced 11 sts apart.
- Each panel measures 24 in (61.0 cm) x 80.5 in (204.5 cm).
- Both panels match in length to within 0.5 in (1.3 cm).
- All ends are woven in securely.
Troubleshooting
- Motif cups or bowls: Your Rnd 3 is too tight. Go up a hook size for Rnd 3 only, or check that you haven’t added increases on the sides.
- Motif ruffles: The shells are too loose. Work Rnd 4 with a hook one size smaller.
- Opening looks round, not oval: You probably added increases on sides A and C. Those sides must stay at 8 sts on every round.
- Grid leans to one side: A join was made off-center. Each bar must go from center dc to center dc.
- Band ripples: Row 1 has extra ch. Recount it to 109 sts.
- Band pulls in: Use a larger hook for the band, or check that every ch in the ch-6 gaps was worked in Row 2.
- Panels hang at different lengths: Steam-block the shorter panel and gently stretch it to length.
Care
Hand wash in cool water, or machine wash in a mesh bag on the delicate cycle. Lay flat to dry, reshape the ovals while damp, and never hang the panels wet.
Final Notes
Everything in this pattern comes back to one measurement chain. A 4 in x 6 in (10.2 cm x 15.2 cm) motif, joined with 1 in (2.5 cm) and 0.5 in (1.3 cm) bars, makes a grid of 24 in x 77.5 in (61.0 cm x 196.9 cm). The 109-st band adds 3 in (7.6 cm) for an 80.5 in (204.5 cm) panel. Check the first motif carefully and the rest of the project follows from it.
Happy crocheting!