

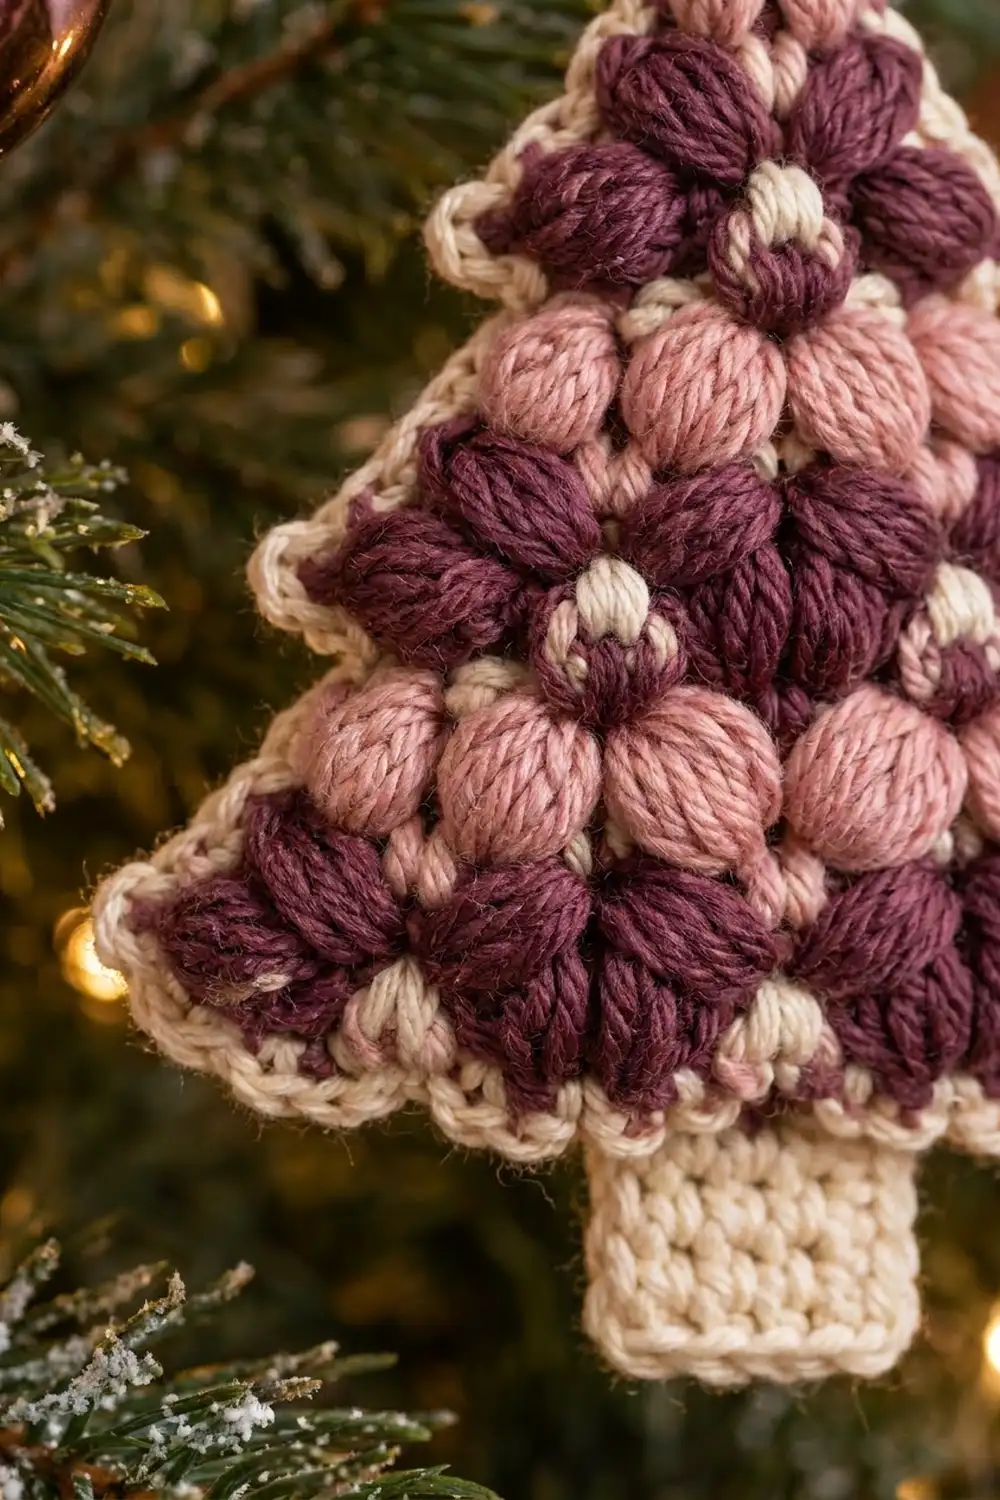
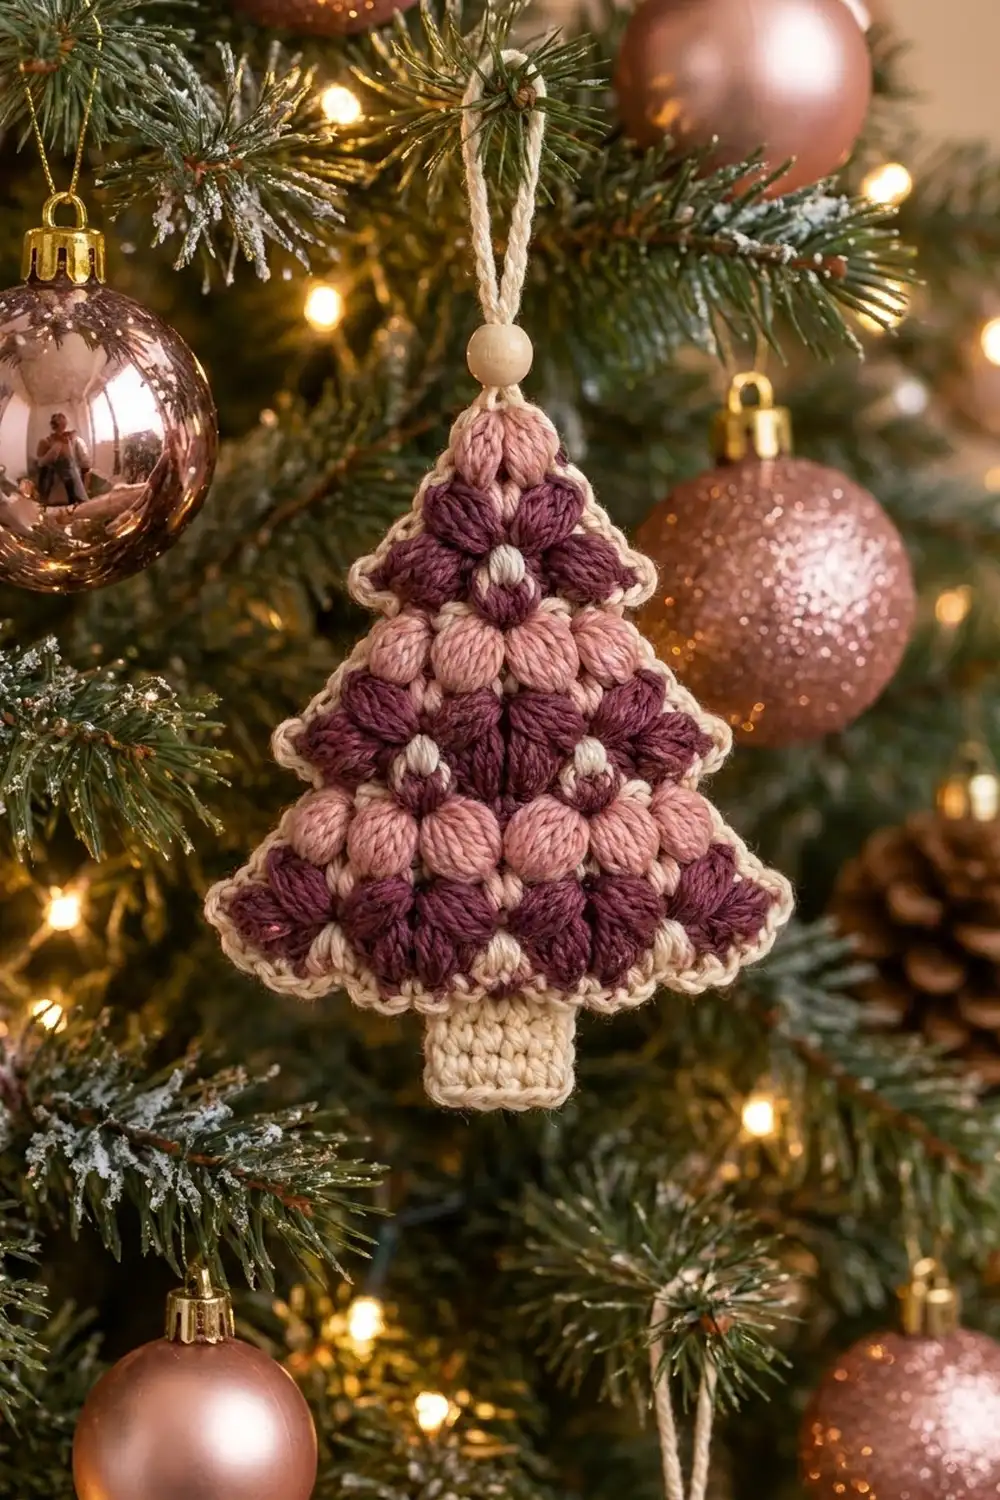
This little tree is all about texture. Rows of puff stitches stack from a single pink puff at the tip down to a wide plum base. A cream picot border frames the whole shape. A short cream trunk and a wooden bead on the hanging loop finish it off.
The colors are deep plum, dusty rose pink and cream. The puff rows alternate pink and plum, with a cream single crochet row between each pair. The cream shows as tiny bumps between the puffs, so the tree looks dotted with snow or fairy lights.
The pattern uses US crochet terms. The finished ornament measures 3.5 in (8.9 cm) wide and 4.75 in (12.1 cm) tall including the trunk. The hanging loop adds about 2 in (5.1 cm).
The whole piece is worked flat. You crochet the tree body from the top down in 13 rows, increasing on every cream row. Then you add a two-round cream border, work the trunk into the center of the bottom edge and tie on the bead loop.
Finished Size and Construction
- Finished size: 3.5 in (8.9 cm) wide x 4.75 in (12.1 cm) tall, plus a 2 in (5.1 cm) loop
- Skill level: Easy-intermediate (puff stitches, color changes, picots)
- Terminology: US crochet terms
- Yarn weight: Worsted / medium (#4)
- Hook: 4.0 mm (G-6)
- Number of pieces: 1 (single flat ornament)
- Layout: Triangle tree body and border, with the trunk centered below
- Piece size before border: 3 in (7.6 cm) wide x 3.25 in (8.3 cm) tall
- Border depth: 0.25 in (0.6 cm) per edge (2 rounds)
- Trunk: 1.2 in (3.0 cm) wide x 1 in (2.5 cm) tall
Materials
Use a smooth worsted-weight cotton or cotton blend. Cotton keeps the puffs round and the picots crisp. Acrylic also works, but the puffs will look softer and may need firmer blocking.
- Color A, Plum: 8 g / 16 m
- Color B, Dusty Pink: 7 g / 14 m
- Color C, Cream: 10 g / 20 m (body rows, border, trunk and hanging loop)
These amounts include about 20% extra for gauge checks and tails. One ornament uses less than a quarter of a 50 g ball of each color, so three balls are enough for a whole set of trees.
Tools:
- 4.0 mm (G-6) crochet hook
- One 12 mm natural wooden bead with a hole large enough for 2 strands of yarn
- Tapestry needle
- Scissors
- Stitch marker
- Rust-proof pins and a blocking mat or folded towel
- Spray bottle with water
Abbreviations (US Terms)
- ch: chain
- sc: single crochet
- sl st: slip stitch
- st(s): stitch(es)
- yo: yarn over
- RS / WS: right side / wrong side
- puff: puff stitch (see below)
- picot: ch-2 picot (see below)
Puff stitch (puff): (Yo, insert hook in st, yo, pull up a loop about 0.5 in / 1.3 cm tall) 3 times in the same st. You now have 7 loops on the hook. Yo and pull through all 7 loops, then ch 1 to lock. The locking ch doesn’t count as a stitch. One puff counts as 1 st.
Picot: Ch 2, then sl st into the front loop and left leg of the sc just made.
Color change: Finish the last st of the row in the old color, but work its final yo with the new color. Cut the old color, leaving a 4 in (10.2 cm) tail. The border covers the side tails, so you only have a few ends to weave in.
Gauge and Checkpoints
Gauge: 13 sts = 3 in (7.6 cm) across the widest row (Row 13). One puff row plus one cream sc row = 0.5 in (1.3 cm) tall.
The tree body is your gauge swatch, so you don’t need a separate test piece. Make the body first and measure it before you start the border.
Checkpoints:
- After Row 7 (9 sts): about 2.1 in (5.3 cm) wide and 1.75 in (4.4 cm) tall
- After Row 13 (13 sts): 3 in (7.6 cm) wide and 3.25 in (8.3 cm) tall
- After the border: 3.5 in (8.9 cm) wide and 3.75 in (9.5 cm) tall
- After the trunk: 4.75 in (12.1 cm) tall overall
If your tree is too big, go down to a 3.75 mm (F-5) hook or pull up shorter puff loops. If it’s too small, go up to a 4.5 mm (7) hook. Width matters more than height here. If the width is right but the puffs look flat, pull the puff loops up a little taller.
Tree Body
The odd rows (1, 3, 5, 7, 9, 11 and 13) are cream WS rows. The even rows (2 through 12) are RS puff rows, and the puffs pop out toward the RS. Each puff row has a sc at both edges and a sc between each pair of puffs. That means a row with N puffs always has (2 x N) + 1 sts.
Row 1 (WS, C): Ch 4. Sc in 2nd ch from hook and in each ch across. Change to B in the last st. Turn. (3 sts)
Row 2 (RS, B): Ch 1, sc in first st, puff in next st, sc in last st. Change to C. Turn. (3 sts: 1 puff, 2 sc)
Row 3 (WS, C): Ch 1, 2 sc in first st, sc in next st (the top of the puff, not the locking ch), 2 sc in last st. Change to A. Turn. (5 sts)
Row 4 (RS, A): Ch 1, sc in first st, *puff in next st, sc in next st; rep from * across. Change to C. Turn. (5 sts: 2 puffs, 3 sc)
Row 5 (WS, C): Ch 1, 2 sc in first st, sc in each st across to last st, 2 sc in last st. Change to B. Turn. (7 sts)
Row 6 (RS, B): Repeat Row 4, changing to C at the end. (7 sts: 3 puffs, 4 sc)
Row 7 (WS, C): Repeat Row 5, changing to A at the end. (9 sts)
Checkpoint: about 2.1 in (5.3 cm) wide.
Row 8 (RS, A): Repeat Row 4, changing to C at the end. (9 sts: 4 puffs, 5 sc)
Row 9 (WS, C): Repeat Row 5, changing to B at the end. (11 sts)
Row 10 (RS, B): Repeat Row 4, changing to C at the end. (11 sts: 5 puffs, 6 sc)
Row 11 (WS, C): Repeat Row 5, changing to A at the end. (13 sts)
Row 12 (RS, A): Repeat Row 4, changing to C at the end. (13 sts: 6 puffs, 7 sc)
Row 13 (WS, C): Ch 1, sc in each st across, with no increases. (13 sts) Fasten off, leaving a 4 in (10.2 cm) tail.
Each cream row adds exactly 2 sts, one at each edge. Those 2 sts make room for one more puff in the next colored row. Row 13 is the only cream row without increases, because it forms the flat base of the tree.
Checkpoint: 3 in (7.6 cm) wide and 3.25 in (8.3 cm) tall. From top to bottom you should see 6 puff rows: pink, plum, pink, plum, pink, plum, with 1, 2, 3, 4, 5 and 6 puffs.
Border
Border gauge: Each border round adds about 0.125 in (0.3 cm) to every edge, so the 2 rounds add 0.25 in (0.6 cm) per edge. Keep the same tension as the body: 13 sts = 3 in (7.6 cm).
Edge rule for the slanted sides: Work 1 sc into the end of each cream row and 2 sc into the end of each puff row. Each side has 7 cream row ends and 6 puff row ends, so that’s 7 + 12 = 19 sc per slanted side.
Round 1 (RS, C): With RS facing, join C in the last st of Row 13 (bottom right corner). Ch 1, 3 sc in the same st (corner). Sc in the next 11 sts. 3 sc in the last st (corner). Work 19 sc evenly up the left side, following the edge rule. At the top, work into the other side of the foundation ch: sc in the first ch, 3 sc in the middle ch (top corner), sc in the last ch. Work 19 sc evenly down the right side. Sl st to the first sc. (60 sts)
The 3 corner sts are the center sc of each 3-sc group. Counted between the corners:
- Bottom: 1 + 11 + 1 = 13 sts
- Left side: 1 + 19 + 1 + 1 = 22 sts
- Right side: 1 + 1 + 19 + 1 = 22 sts
- Corners: 3 sts
Total: 13 + 22 + 22 + 3 = 60 sts. If you count each side with both of its corners, each slanted side has 24 sts and the bottom has 15.
Round 2 (RS, C, picot round): Ch 1. Start in the bottom right corner st.
– Bottom right corner: (sc, picot, sc) in the corner st.
– Bottom edge: sc in each of the next 13 sts, with no picots.
– Bottom left corner: (sc, picot, sc) in the corner st.
– Left side: sc in next st, (picot, sc in next 2 sts) 10 times, picot, sc in next st.
– Top corner: (sc, picot, sc) in the corner st.
– Right side: sc in next st, (picot, sc in next 2 sts) 10 times, picot, sc in next st.
Sl st to the first sc. Fasten off and weave in the ends.
This round works 1 sc in each of the 60 existing sts, plus 3 extra sc (1 extra in each corner), for 63 sc. It also adds 25 picots.
- Bottom: 13 sc, 0 picots
- Each slanted side: 22 sc, 11 picots
- Each corner: 2 sc, 1 picot
Why the math works: Each slanted side has an even 22 sts. That lets you place a picot after every 2 sc, with a single sc at each end. With the corner sc included, every picot is exactly 2 sc from the next one, all the way around the point. The bottom stays plain so the trunk has smooth sts to work into. Its odd count of 13 sts lets the trunk sit exactly in the center.
Checkpoint: 3.5 in (8.9 cm) wide and 3.75 in (9.5 cm) tall.
Trunk
Count the 13 plain sc along the bottom of Round 2. The trunk uses the center 5 sts (sts 5 through 9), which leaves 4 sts free on each side.
Row 1 (RS, C): Turn the tree upside down. With RS facing, join C in st 5. Ch 1, sc in the same st and in the next 4 sts. Turn. (5 sts)
Rows 2–5 (C): Ch 1, sc in each st across. Turn. (5 sts)
Fasten off, leaving a 6 in (15.2 cm) tail. Use the tail to whipstitch any small gaps where the trunk meets the border.
Checkpoint: the trunk is 1.2 in (3.0 cm) wide and 1 in (2.5 cm) tall, and the whole ornament is 4.75 in (12.1 cm) tall.
Hanging Loop
- Cut a 10 in (25.4 cm) length of C.
- Use a tapestry needle to thread it through the top corner picot.
- Pass both ends together through the wooden bead.
- Slide the bead down so it rests just above the picot.
- Tie the two ends in a tight overhand knot about 2 in (5.1 cm) above the bead.
- Trim the ends to 0.25 in (0.6 cm). Add a tiny dot of fabric glue to the knot if you like.
Final Blocking
- Weave in all remaining ends on the WS, hiding them inside the cream rows.
- Mist the ornament lightly with water until it’s damp but not soaked.
- Lay it RS up on the blocking mat.
- Pin the 3 corners first. The base corners go 3.5 in (8.9 cm) apart, and the top point goes 3.75 in (9.5 cm) above the base line.
- Pin each slanted side in a straight line between its corners. Put a pin in every 2nd or 3rd picot so the picots fan out evenly.
- Pin the trunk square, 1.2 in (3.0 cm) wide.
- Gently pinch each puff back into a round shape with your fingertips. Don’t press the puffs flat.
- Let it dry completely, at least 4 hours, before you remove the pins.
Final Quality-Control Checklist
- 6 puff rows, alternating pink and plum, with 1 to 6 puffs from top to bottom
- Cream bumps visible between the puffs on every puff row
- Body measures 3 in (7.6 cm) wide before the border
- Round 1 has 60 sts, and Round 2 has 63 sc and 25 picots
- Picots evenly spaced on both slanted sides, with none on the bottom edge
- Trunk centered, with 4 border sts free on each side
- Finished size of 3.5 in (8.9 cm) x 4.75 in (12.1 cm)
- Bead sitting snugly at the top, with a secure knot
- No tails visible on the RS
Troubleshooting
Puffs are flat or lean sideways. Pull every loop up to the same height before the final yo, and always work the locking ch 1.
The sides look wavy. You have too many border sts. Check that you worked 19 sc per slanted side and not 2 sc in every row end.
The sides pull in or curl. You have too few sts, or your border tension is too tight. Loosen up, or use a hook half a size larger for the border only.
Stitch counts are off after a cream row. Work the sc into the top of the puff, not into the locking ch. Working into the locking ch adds an extra st.
The trunk sits off-center. Recount the 13 plain sts along the bottom and start the trunk in st 5.
Colors mix at the row ends. Change colors on the last yo of the previous row, and pull the tails snug before you work the border over them.
Care
Hand wash in cool water with mild soap, roll in a towel to remove the water and dry flat, reshaping the puffs while they’re damp. Store flat in tissue paper so the picots don’t get crushed.
Final Notes
The measurements are easy to check as you go. The body is 13 sts = 3 in (7.6 cm) wide and 3.25 in (8.3 cm) tall. The two border rounds bring it to 3.5 in (8.9 cm) x 3.75 in (9.5 cm). The 1 in (2.5 cm) trunk brings the finished ornament to 4.75 in (12.1 cm) tall.
If Row 13 measures correctly, the rest will fit. Make one and hang it, and you’ll probably want a few more in other shades for the tree.
Happy crocheting!