

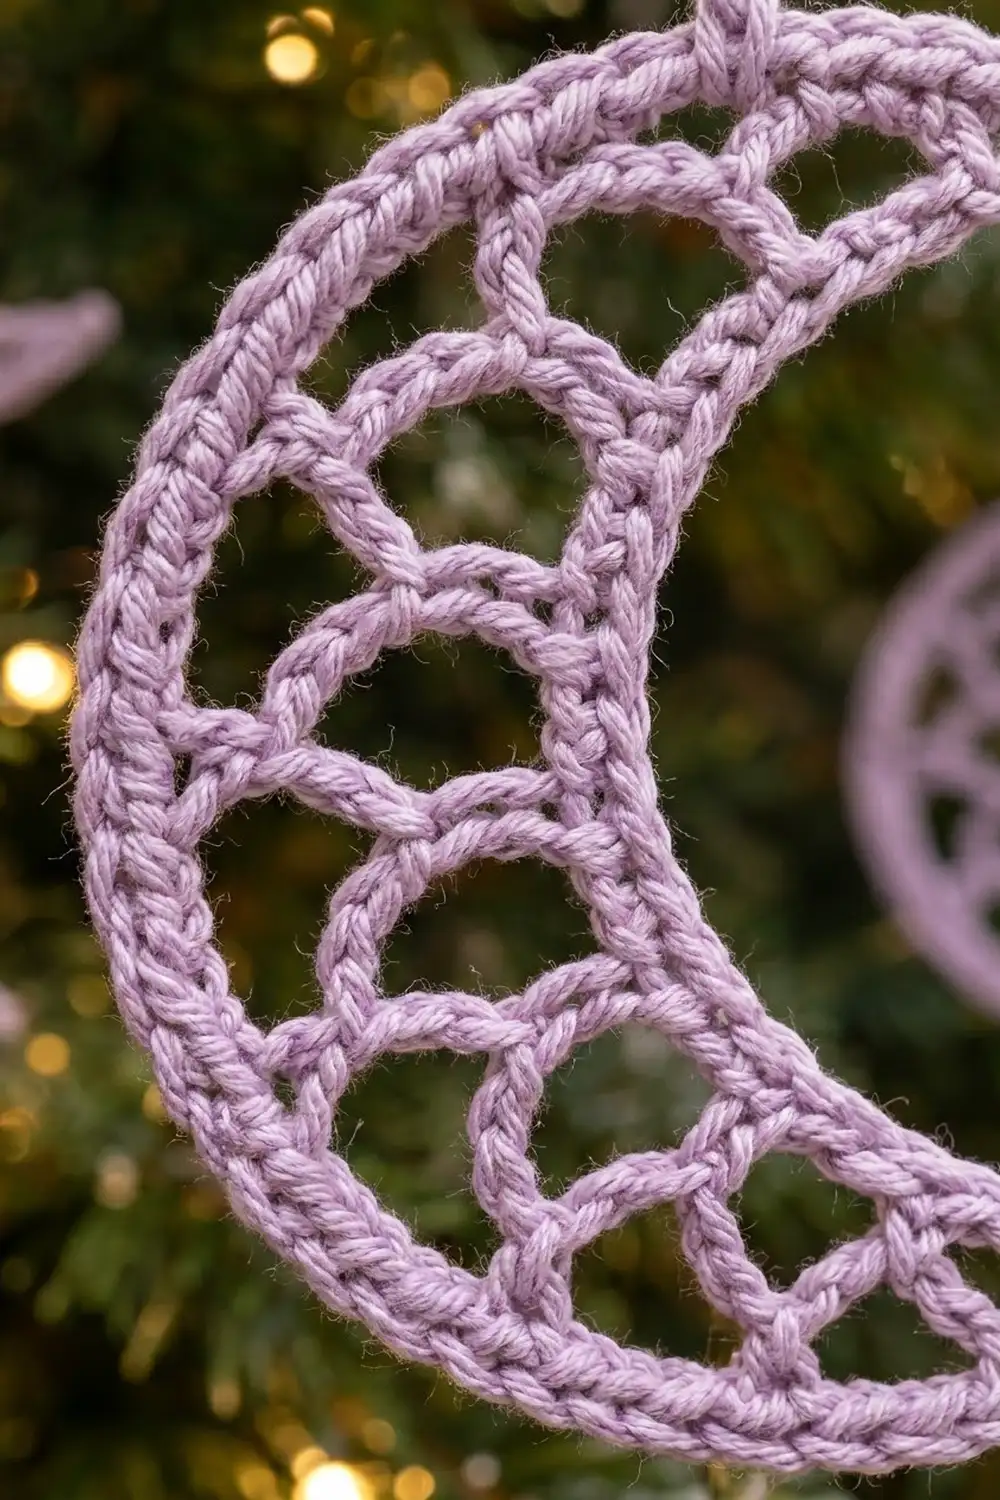
The Lavender Lullaby Moon is a light, lacy crescent ornament that looks delicate on a tree branch or a gift. Small chain arches stack like fish scales inside a smooth, corded frame, so light shows through the moon from every angle.
This pattern uses one color, a soft pale lavender. Lavender gives the moon a quiet, dreamy look that goes well with gold baubles, warm fairy lights, and frosted greenery. The style is simple and calm, with clean lines and an open center.
All instructions use US crochet terms. The finished ornament measures about 4.5 in (11.4 cm) from tip to tip, 3 in (7.6 cm) across the curve, and 1.7 in (4.3 cm) wide at its widest point. The hanging loop adds about 0.75 in (1.9 cm).
The construction is short and logical. You work one long row of single crochet for the outer curve, then add three rows of chain arches that get shorter each time. One round of single crochet frames the whole shape, and a round of reverse single crochet gives it the corded edge. Blocking with stiffener then sets the crescent curve.
Finished Size and Construction
- Finished size: 4.5 in (11.4 cm) tip to tip × 3 in (7.6 cm) across the curve
- Widest point: 1.7 in (4.3 cm)
- Skill level: Easy to intermediate (reverse single crochet is the only special technique)
- Terminology: US crochet terms
- Yarn weight: Super fine (#1) fingering-weight cotton
- Hook: 2.5 mm
- Number of pieces: 1
- Layout: Single crescent motif, no joining
- Piece size before border: Row 1 measures 5.9 in (15.0 cm) long when laid straight; the piece is 1.3 in (3.3 cm) deep at the center
- Border depth: About 0.2 in (0.5 cm) on every edge
Materials
Yarn advice: Use a smooth, tightly plied mercerized cotton in fingering weight. Cotton shows the arches clearly and holds its shape after stiffening. Fuzzy or very soft acrylic yarns blur the scallops and make the corded edge look flat.
- Pale lavender: 10 g, about 35 m (38 yd)
Tools:
- 2.5 mm crochet hook
- Tapestry needle with a sharp or semi-sharp tip
- Scissors
- Fabric stiffener, or a strong starch solution
- Blocking board or a piece of foam with plastic wrap over it
- Rust-proof pins
- Small ruler or tape measure
Note: the yarn quantity includes a margin of roughly 30% for your gauge swatch, joining tails, and weaving in ends.
Abbreviations (US Terms)
- ch – chain
- sc – single crochet
- sl st – slip stitch
- sk – skip
- sp – space
- st(s) – stitch(es)
- RS – right side
- rev sc – reverse single crochet (crab stitch)
Special stitches
Standing sc: Make a slip knot on your hook, insert the hook into the stated stitch or space, yarn over and pull up a loop, then yarn over and pull through both loops on the hook.
Reverse sc (rev sc): Work from left to right (right-handed). Insert the hook into the next stitch to the right, yarn over, pull up a loop, then yarn over and pull through both loops. This forms the twisted, rope-like edge.
Gauge and Checkpoints
Gauge: 14 sc = 2 in (5.1 cm) with a 2.5 mm hook.
Make one full ornament as your test piece. Measure it at each stage below so you can correct your tension early.
- After Row 1: 41 sc measure 5.9 in (15.0 cm) when laid straight.
- After Row 2: The strip is about 0.55 in (1.4 cm) deep. Each ch-5 arch stands about 0.4 in (1.0 cm) tall.
- After Row 3: The center is about 0.9 in (2.3 cm) deep.
- After Row 4: The center is about 1.3 in (3.3 cm) deep.
- After the border and blocking: 4.5 in (11.4 cm) tip to tip, 3 in (7.6 cm) across the curve, and 1.7 in (4.3 cm) at the widest point.
If Row 1 is longer than 5.9 in (15.0 cm): Switch to a 2.25 mm hook, or tighten your foundation chain.
If Row 1 is shorter than 4.75 in (12.1 cm)… or noticeably short: Switch to a 2.75 mm hook. A tight foundation chain is the most common cause, so try chaining with a hook one size larger and then switch back for Row 1.
Small differences are fine for an ornament. Just keep the stitch counts exact so the shape stays balanced.
Pattern
Row 1 – Outer Curve
Ch 42.
Row 1: Sc in 2nd ch from hook and in each ch across. Turn. (41 sc)
This row becomes the solid inner layer of the outer curve. Leave the foundation chain loops free, because you will work into them during the border.
Row 2 – First Arch Row
Row 2: Ch 1 (does not count as a st), sc in first sc, ch 5, sk 3 sc, sc in next sc; repeat from * 9 more times. (11 sc, 10 ch-5 arches)*
Check: 1 sc + (10 repeats × 4 sts covered) = 41 sts. Your last sc sits in the last sc of Row 1.
Fasten off, leaving a 4 in (10.2 cm) tail.
Row 3 – Second Arch Row
With the RS facing (the same side that faced you for Row 2), skip the first ch-5 arch of Row 2.
Row 3: Join with a standing sc in the 2nd ch-5 arch, ch 5, sc in next ch-5 arch; repeat from * 6 more times. (8 sc, 7 ch-5 arches)*
Your last sc sits in the 9th arch of Row 2. The 1st and 10th arches of Row 2 stay uncovered. These open arches start the taper toward each tip.
Fasten off, leaving a 4 in (10.2 cm) tail.
Row 4 – Third Arch Row
With the RS facing, skip the first ch-5 arch of Row 3.
Row 4: Join with a standing sc in the 2nd ch-5 arch, ch 5, sc in next ch-5 arch; repeat from * 3 more times. (5 sc, 4 ch-5 arches)*
Your last sc sits in the 6th arch of Row 3. The 1st and 7th arches of Row 3 stay uncovered.
Fasten off, leaving a 4 in (10.2 cm) tail.
Because each sc sits in the center of an arch below it, the arches overlap in an offset pattern. This creates the fish-scale look. In total, the piece has 21 arches stacked in three tapering rows: 10, then 7, then 4.
Tip: Do not weave in the tails yet. You will crochet over them in the border round, which hides them inside the frame.
Identifying the Edges and Tips
Lay the piece RS up. The long Row 1 edge with the free foundation loops is the outer edge. The stepped edge of open arches is the inner edge.
- Tip A is the end where you started the foundation chain. The hanging loop goes here.
- Tip B is the opposite end, where Row 1 and Row 2 ended.
Border
Border gauge: Keep using the same 2.5 mm hook. Along the outer edge, the border sc should match your Row 1 gauge of 14 sc = 2 in (5.1 cm). Pack the inner-edge stitches a little tighter, because that edge has to draw in to form the crescent.
Round 1 – Single Crochet Frame
With the RS facing, join with a standing sc in the free loop of the first foundation ch at Tip A (the ch at the base of the first sc of Row 1).
- Outer edge: Sc in the free loop of each remaining foundation ch across. (41 sc on the outer edge, counting the joining sc)
- Tip B: Work 3 sc into the corner formed by the row-ends of Rows 1 and 2. (3 sc)
- Inner edge: Work 3 sc into each open arch in this order: the 10th arch of Row 2, the 7th arch of Row 3, the 4th, 3rd, 2nd, and 1st arches of Row 4, the 1st arch of Row 3, and the 1st arch of Row 2. Move straight from one arch into the next without working into the sc between them. (8 arches × 3 sc = 24 sc)
- Tip A: Work 3 sc into the corner formed by the row-ends of Rows 1 and 2. (3 sc)
Sl st to the first sc to join. (71 sc total: 41 + 3 + 24 + 3)
As you go, lay the yarn tails along the edge and work over them.
Round 2 – Corded Edge and Hanging Loop
Ch 1. Working left to right, rev sc in each sc around until you reach the center sc of the 3-sc group at Tip A.
In that center sc, work a rev sc, then ch 10 and sl st into the top of the same rev sc to form the hanging loop. Continue with rev sc in each remaining st. Sl st to the first rev sc to join. (71 rev sc + one ch-10 hanging loop)
Fasten off and weave in the ends.
Why the Math Works
The outer edge has 41 sc and the inner edge has only 24, so the inner edge is much shorter. That difference pulls the strip into a curve. The shorter rows of arches (10, then 7, then 4) leave the ends narrow and the center deep, which gives you two pointed tips and a full middle.
The 3-sc groups at each tip turn the corner without puckering. Round 2 works exactly 1 rev sc into each of the 71 stitches, so the border lies flat with nothing added or skipped. The border adds about 0.2 in (0.5 cm) on every edge. This brings the center depth from 1.3 in (3.3 cm) to 1.7 in (4.3 cm).
Final Blocking
- Mix the fabric stiffener according to its label, or prepare a strong starch solution.
- Soak the ornament fully, then press it gently in a towel until it is damp but not dripping.
- Lay it RS up on a covered blocking board.
- Pin Tip A and Tip B 4.5 in (11.4 cm) apart.
- Pin the outer edge into a smooth, even curve, so the crescent measures 3 in (7.6 cm) across.
- Open each arch with a pin tip so it stands round and even. Pin the center of the larger openings if needed.
- Check that the widest point measures 1.7 in (4.3 cm).
- Shape the hanging loop so it stands straight up from Tip A.
- Let it dry completely, usually 12 to 24 hours, before you unpin it.
Final Quality-Control Checklist
- Row 1 has 41 sc, and Rows 2, 3, and 4 have 10, 7, and 4 arches.
- All arches are the same height and sit in an even, offset pattern.
- Round 1 has 71 sc, with 3 sc at each tip and 3 sc in each of the 8 open arches.
- The corded edge is even, with no gaps or bunched stitches.
- Both tips come to clean points of the same size.
- The finished ornament measures 4.5 in (11.4 cm) tip to tip and 1.7 in (4.3 cm) at the widest point.
- The hanging loop is firm and centered on Tip A.
- All tails are hidden and trimmed, with no ends showing.
Troubleshooting
The moon stays straight instead of curving. Your inner-edge stitches are too loose. Redo Round 1 and work the 3 sc in each arch more tightly. Then block it firmly into the curve.
The arches look uneven. Check that you skipped exactly 3 sc between the sc stitches in Row 2. Also keep each ch-5 the same tension.
The edge ruffles. You may have added extra stitches. Recount Round 1 and make sure it has exactly 71 sc.
The edge cups or pulls in. Your rev sc is too tight. Loosen your tension, or work Round 2 with a 2.75 mm hook.
The tips look blunt. Work the 3 sc at each tip tightly. Pin each point firmly during blocking.
The ornament feels limp. Use a stronger stiffener, or apply a second coat and let it dry again.
Care
Spot clean with a damp cloth and lay flat to dry. If the ornament softens over time, block it again with stiffener.

Final Notes
The whole ornament follows one measurement chain. A 41-stitch Row 1 measures 5.9 in (15.0 cm), and three rows of arches build the center to 1.3 in (3.3 cm). A 71-stitch border then adds 0.2 in (0.5 cm) on every side, and blocking sets the crescent at 4.5 in (11.4 cm) tip to tip and 1.7 in (4.3 cm) at the widest point. Check each stage before moving on, and the moon will come out balanced every time. Each ornament uses very little yarn, so it is easy to make one for every branch.
Happy crocheting!