

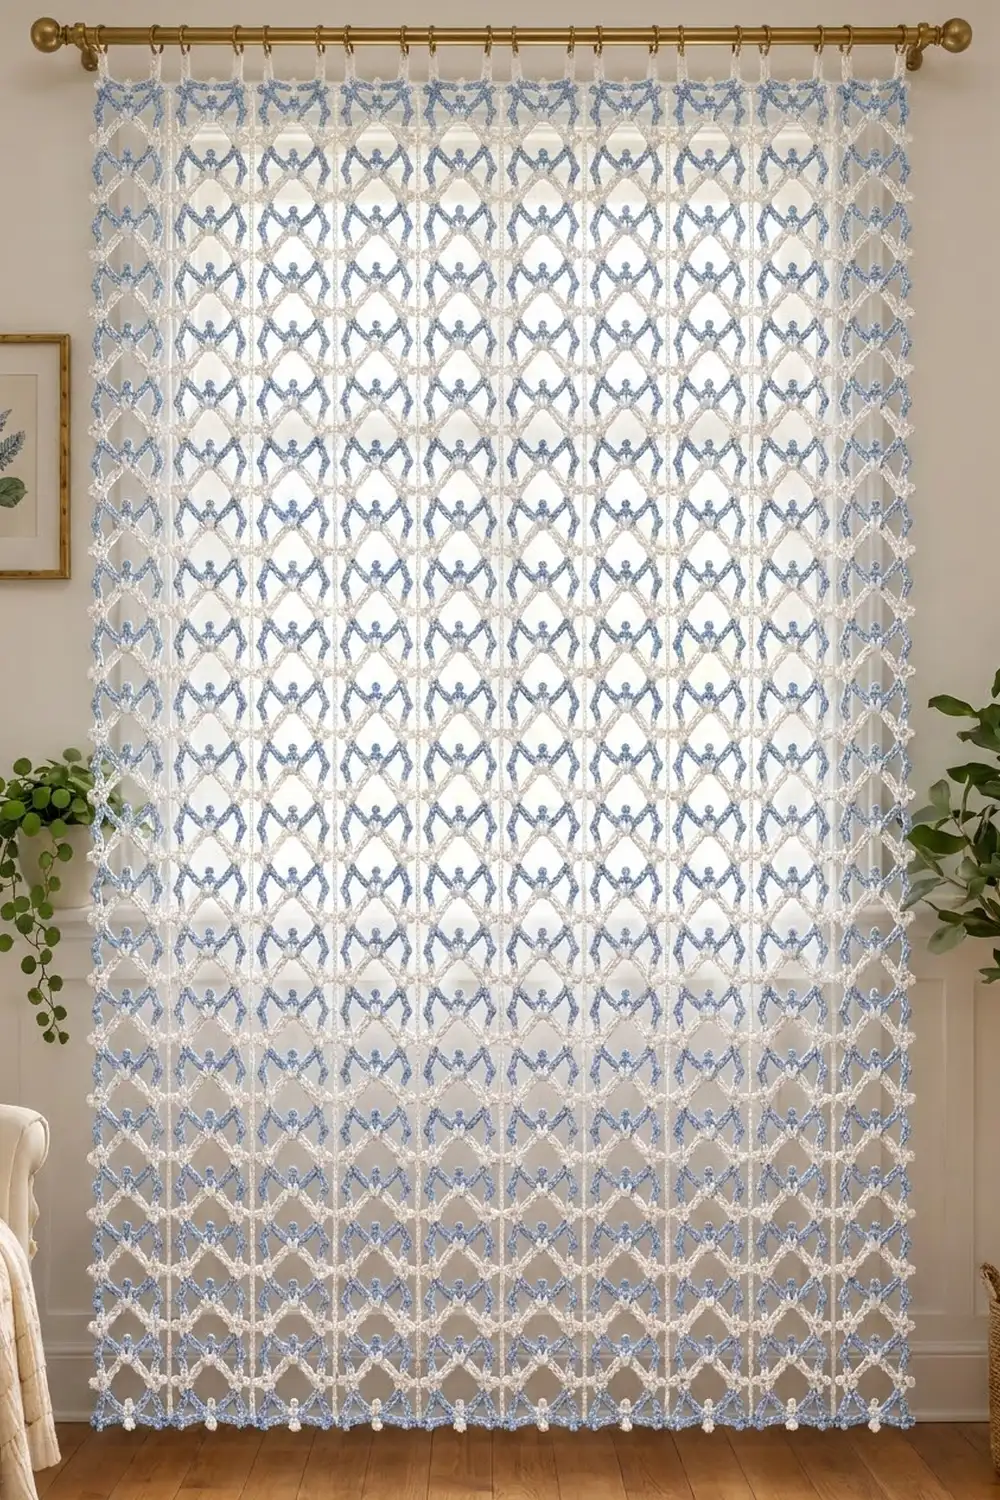
The Bluebell Lattice Strip Curtain is a light, airy window panel made from twelve narrow lace strips joined side by side. Each strip is a column of open diamonds outlined in crossing blue and white chains. A small blue trefoil picot and a white five-stitch fan sit at the top of every diamond, and white trefoil picots run along both edges.
The palette is just two colors: soft powder blue and clean white. The finished curtain looks like a cottage-style net curtain. It lets light through and frames the view, and it still looks handmade from across the room.
This pattern uses US crochet terms. The finished curtain is 36 in (91.4 cm) wide and 71 in (180.3 cm) long including the top border. The hanging loops add about 1.5 in (3.8 cm).
The construction is simple. You work each strip from the top down in rows of chain mesh, changing color every row. Strips 2 through 12 are joined as you go through their edge picots. Last, you work a white single crochet band with twelve hanging loops across the top of all the strips.
Finished Size and Construction
- Finished size: 36 in (91.4 cm) wide x 71 in (180.3 cm) long, plus hanging loops
- Skill level: Intermediate
- Terminology: US crochet terms
- Yarn weight: DK (3) cotton
- Hook: 4 mm (G-6)
- Number of pieces: 12 identical strips, joined into one panel
- Layout: 12 strips across x 1 strip tall
- Strip size: 3 in (7.6 cm) wide x 70 in (177.8 cm) long
- Size before border: 36 in (91.4 cm) x 70 in (177.8 cm)
- Border depth: 1 in (2.5 cm), across the top edge only, plus loops
Materials
Use a smooth mercerized or combed cotton in DK weight. Cotton keeps the open mesh crisp and washes well, which matters for something that hangs in a window. Avoid fuzzy or very stretchy yarns. They blur the diamonds and let the strips grow longer when hung.
- White: 300 g, about 690 m (6 balls of 50 g / 115 m)
- Powder blue: 150 g, about 345 m (3 balls of 50 g / 115 m)
Tools:
- 4 mm (G-6) crochet hook
- 2 locking stitch markers, to hold the dropped loops
- Tapestry needle
- Scissors and measuring tape
- Rust-proof pins, a spray bottle, and a large blocking surface
These quantities include a generous margin for a gauge swatch and for differences in tension.
Abbreviations (US Terms)
- ch = chain
- sl st = slip stitch
- sc = single crochet
- dc = double crochet
- tr = treble crochet
- dtr = double treble crochet (yo 3 times, insert hook, pull up a loop, [yo, pull through 2 loops] 4 times)
- sk = skip
- st(s) = stitch(es)
- sp = space
Special stitches
- Trefoil picot (tp): Ch 1 (this is the base ch), [ch 3, sl st in base ch] 3 times. This makes three small petals around one point.
- Joining trefoil picot (jtp): Ch 1 (base ch), ch 3, sl st in base ch; ch 1, sl st in the middle petal of the matching tp on the previous strip, ch 1, sl st in base ch; ch 3, sl st in base ch.
- Fan: 5 dc worked into the base ch of the tp in the center loop.
Gauge and Checkpoints
Make one test section of a strip before you commit to all twelve.
- Chain and sc gauge: 5 ch = 1 in (2.5 cm); 20 sc = 4 in (10.2 cm).
- Strip width: Row 1 (the foundation row) measures 3 in (7.6 cm) across.
- Row gauge: one pattern repeat (one blue row plus one white row) = 2 in (5.1 cm) tall after blocking.
Checkpoints:
- After Row 1: the strip is 3 in (7.6 cm) wide.
- After Row 9: the strip is 3 in (7.6 cm) x 8 in (20.3 cm), lightly stretched.
- After Row 35: the strip is about 34 in (86.4 cm) long.
- After Row 71: the strip is 70 in (177.8 cm) long after blocking.
If Row 1 is wider than 3 in (7.6 cm), go down a hook size. If it is narrower, go up a size. If the width is right but the repeats are shorter than 2 in (5.1 cm), work the tall edge stitches a little looser. If the repeats are longer, work the long chain loops a little tighter. Width matters most, because the top border depends on it.

Strip Pattern (Make 12)
The strip hangs with Row 1 at the top, and each new row is added below. Blue rows (B rows) and white rows (A rows) alternate.
Carrying the colors: Don’t cut the yarn between rows. At the end of each row, put a marker in the loop and drop it. Start each row at the edge where its own color is waiting. That means you work two rows from one edge, then two rows from the other edge. Turn the strip as needed, since the mesh looks the same on both sides. Carry the unused strand loosely along the edge so it lies flat beside the edge stitch.
Edge names: Edge A is the slip-knot end of the foundation chain, where Row 1 ends. Edge B is the opposite edge.
Foundation: With white, ch 16.
Row 1 (white, A-type foundation): Sc in 2nd ch from hook, [ch 6, sk 6 ch, sc in next ch] 2 times. Drop white at Edge A.
Count: 3 sc and 2 ch-6 loops (15 sts across).
Row 2 (blue, B row): Join blue with sl st in the edge sc at Edge A, ch 7 (counts as dtr and ch-2 sp), sc in next ch-6 loop, ch 4, tp, ch 4, sc in next ch-6 loop, ch 2, dtr in last sc. Drop blue at Edge B.
Count: 2 dtr (including the beginning ch), 2 sc, 2 ch-2 sps, 1 center loop (ch 4, tp, ch 4).
The two sc sit in the middle of the loops above them, so this row is offset from the row before. That offset is what creates the diamonds.
Row 3 (white, A row): Pick up white at Edge A. Sl st in the 5th ch of the beginning ch-7, ch 4 (counts as tr), tp, ch 9, fan in the base ch of the blue tp, ch 9, tr in the top of the last dtr, tp. Drop white at Edge B.
Count: 2 tr (including the beginning ch), 2 tp, 1 fan (5 dc), 2 ch-9 loops.
The fan hangs down from the blue picot, so each diamond has a blue trefoil at the top with a small white fan just below it. The white tp at each end of the row becomes an edge picot.
Row 4 (blue, B row): Pick up blue at Edge B. Sl st in the top of the edge tr, ch 7 (counts as dtr and ch-2 sp), sc in next ch-9 loop, ch 4, tp, ch 4, sc in next ch-9 loop, ch 2, dtr in top of beginning ch-4. Drop blue at Edge A.
Count: 2 dtr, 2 sc, 2 ch-2 sps, 1 center loop.
Row 5 (white, A row): Pick up white at Edge B. Sl st in the 5th ch of the beginning ch-7, ch 4 (counts as tr), tp, ch 9, fan in the base ch of the blue tp, ch 9, tr in top of last dtr, tp. Drop white at Edge A.
Count: 2 tr, 2 tp, 1 fan, 2 ch-9 loops.
Rows 6–71: Repeat Rows 2–5, always working each B row into the ch-9 loops of the A row above it. Row 2 is the only B row worked into ch-6 loops. Rows 6–7 start at Edge A, Rows 8–9 start at Edge B, and so on. End after Row 71, which is a white A row. Fasten off both colors and weave the ends in along the edge.
Strip totals: 71 rows; 35 blue B rows with 35 blue tp; 35 white A rows with 70 white tp (35 on each edge) and 35 fans.
Make All Pieces
- Strip 1: Work exactly as written.
- Strips 2–12: Work as written, but in every A row use jtp instead of tp at Edge B (see Joining).
Each strip uses about 39 m of white and 21 m of blue. For 12 strips, that’s about 468 m of white and 252 m of blue. The border uses about 25 m more white.
Layout (front view, Row 1 at the top):
[ border band with 12 hanging loops ................ ]
| S1 | S2 | S3 | S4 | S5 | S6 | S7 | S8 | S9 | S10 | S11 | S12 |
Each strip’s Edge A faces right, and the next strip’s Edge B joins to it on that side.
Joining
You join the strips as you go, through the middle petal of each edge trefoil. This keeps the seams invisible. Neighboring strips just touch at their white picots, the same way the chains meet inside each strip.
Stitch-to-stitch logic: On Strip 2, the Row 3 tp at Edge B joins to the Row 3 tp at Edge A on Strip 1. Row 5 joins to Row 5, and so on through Row 71. That gives 35 joins per seam, 11 seams, and 385 joins in total. Because rows always match row to row, the diamonds line up straight across the panel.
Row 1 is not joined. The top border holds the tops of the strips together.
Tension: Keep the ch 1 on each side of the joining sl st as loose as your normal chains. If the joins are tight, the edges pucker and the strips pull together into a V. If they are loose, the gaps between strips open wider than the diamonds inside them.
Checkpoint: After you join Strip 2, the pair measures 6 in (15.2 cm) wide. After Strip 4, it’s 12 in (30.5 cm). After Strip 12, the panel is 36 in (91.4 cm) x 70 in (177.8 cm).
Border
The border is a white sc band worked into the free loops of the foundation chains across the top of all the strips. The sides and bottom are left open so the fans and edge picots at the bottom hang freely.
Border gauge: 5 sc = 1 in (2.5 cm), the same as the chain gauge.
Starting count: Each strip has 15 free loops on its foundation chain. With 12 strips, the top edge has 12 x 15 = 180 sts. Nothing is added at the seams, because the last ch of one strip sits right beside the first ch of the next.
Row 1: With the foundation chains at the top, join white in the first free loop at the right-hand corner. Ch 1, sc in each free loop across all 12 strips. Turn.
Top edge: 180 sc. Sides and bottom: 0 sts (left open).
Rows 2–3: Ch 1, sc in each sc across. Turn.
180 sc in each row.
Row 4 (loop row): Ch 1, sc in first 8 sc, ch 16, sc in next 15 sc; repeat from * 10 more times, ch 16, sc in last 7 sc. Fasten off.
Count: 8 + (11 x 15) + 7 = 180 sc and 12 ch-16 loops.*
Why the math works: 180 sc at 5 sc per inch is 36 in (91.4 cm), exactly the joined width. Each loop comes after the 8th of its strip’s 15 sts, so all 12 loops are centered over their strips and spaced 3 in (7.6 cm) apart. Four sc rows make the band 1 in (2.5 cm) deep. Each ch-16 loop fits a rod up to 1 in (2.5 cm) thick, or you can clip curtain rings onto the loops instead.
Final Blocking
- Weave in any remaining ends along the strip edges or into the border.
- Soak the curtain in cool water for 10 minutes. Press the water out gently, without wringing.
- Roll the curtain in towels to remove extra moisture.
- Lay it flat on a large surface, working in sections if needed. Pin the top border straight at 36 in (91.4 cm).
- Pin each strip to 3 in (7.6 cm) wide and check that every diamond repeat is 2 in (5.1 cm) tall.
- Open each blue trefoil and white fan with your fingertips, and pin the outer edge picots into points.
- Let it dry completely. You can also hang it on the rod while it’s damp and smooth the strips straight. The weight of the cotton will even out the mesh.
Final Quality-Control Checklist
- Each strip is 3 in (7.6 cm) wide and 70 in (177.8 cm) long.
- Each strip has 71 rows, 35 blue trefoils, 35 fans, and 70 white edge picots.
- All 11 seams have 35 joins each, matched row to row.
- The panel is 36 in (91.4 cm) wide before the border.
- Every border row has 180 sc, and the 12 loops are evenly spaced.
- The total length is 71 in (180.3 cm), not counting the loops.
- Carried strands lie flat along the edges and don’t pull.
- All ends are woven in and trimmed.
Troubleshooting
The strip is too wide or too narrow: Measure Row 1 against 3 in (7.6 cm) and change hook size. Don’t change the chain counts.
The edges ruffle: The edge tr and dtr are too tall for the center loops. Work them a little tighter, or shorten the carried strands.
The edges pull in or curve: The tall edge stitches are too short. Pull up a slightly longer first loop on each tr and dtr.
The fans flip upward: Make sure all 5 dc go into the base ch of the tp, not around the ch-4 spaces.
Diamonds don’t line up between strips: A row was joined to the wrong row. Count the rows from Row 1 and undo the joins that don’t match.
The border ruffles or pinches: Recount. Every row needs exactly 180 sc, 15 per strip.
Carried strands show at the edges: Keep each one as long as the edge stitch beside it, and no longer.
Care
Hand wash, or machine wash in a mesh bag on a gentle cool cycle. Reshape the curtain and dry it flat or hang it damp on the rod. Don’t use a hot dryer, which can shrink cotton and distort the diamonds.
Final Notes
All the measurements in this curtain build on each other. At 5 chains per inch, the 15-stitch foundation is 3 in (7.6 cm) wide. Each pair of blue and white rows adds one 2 in (5.1 cm) diamond, so 35 repeats make a 70 in (177.8 cm) strip. Twelve strips joined row to row are 36 in (91.4 cm) wide, and the 12 x 15 = 180 border stitches match that width exactly. The 1 in (2.5 cm) band brings the panel to 36 in x 71 in (91.4 cm x 180.3 cm), ready for the window.
Check the width first, then the length, then the joins, and everything else will line up.
Happy crocheting!