

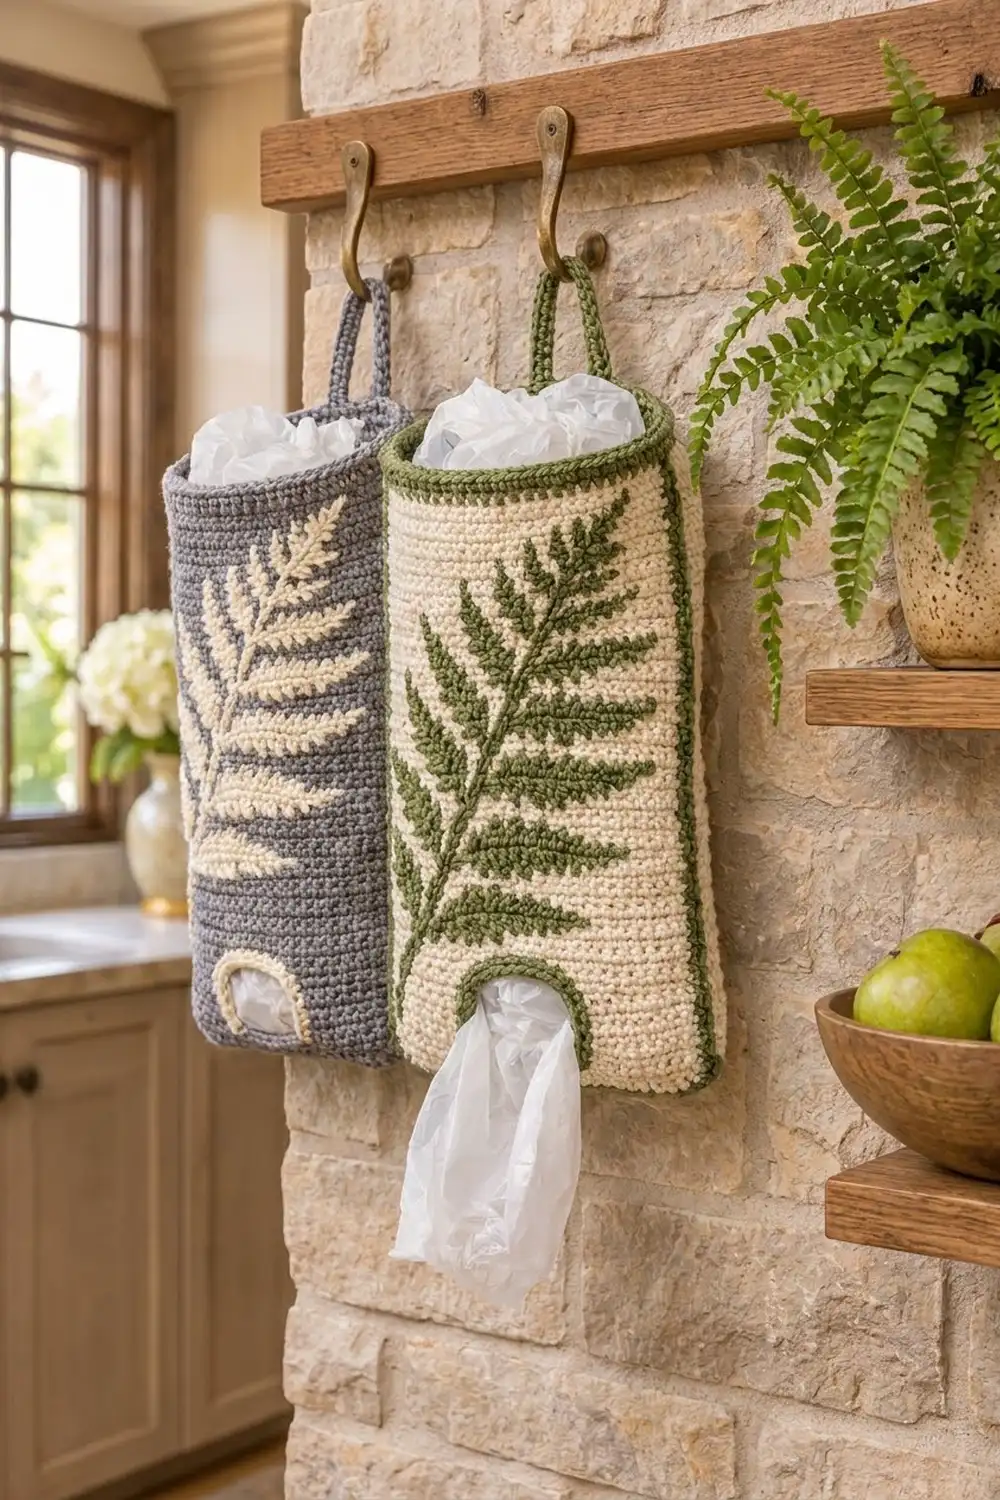
This bag holder puts a quiet piece of the forest in your kitchen. It’s a tall cream tube with a dark sage fern climbing diagonally across the front. Thin green lines frame the sides and bottom, and a rolled green rim and sturdy hanging loop finish the top.
You stuff plastic grocery bags in at the top and pull them out one at a time through the arched, green-edged opening near the bottom. The style is calm, natural and a little rustic. It suits stone walls, wood shelves and farmhouse kitchens.
The pattern uses US crochet terms. The finished holder is about 6.5 in (16.5 cm) wide when flat and 12.7 in (32.3 cm) tall, not counting the loop. The loop adds about 3 in (7.6 cm).
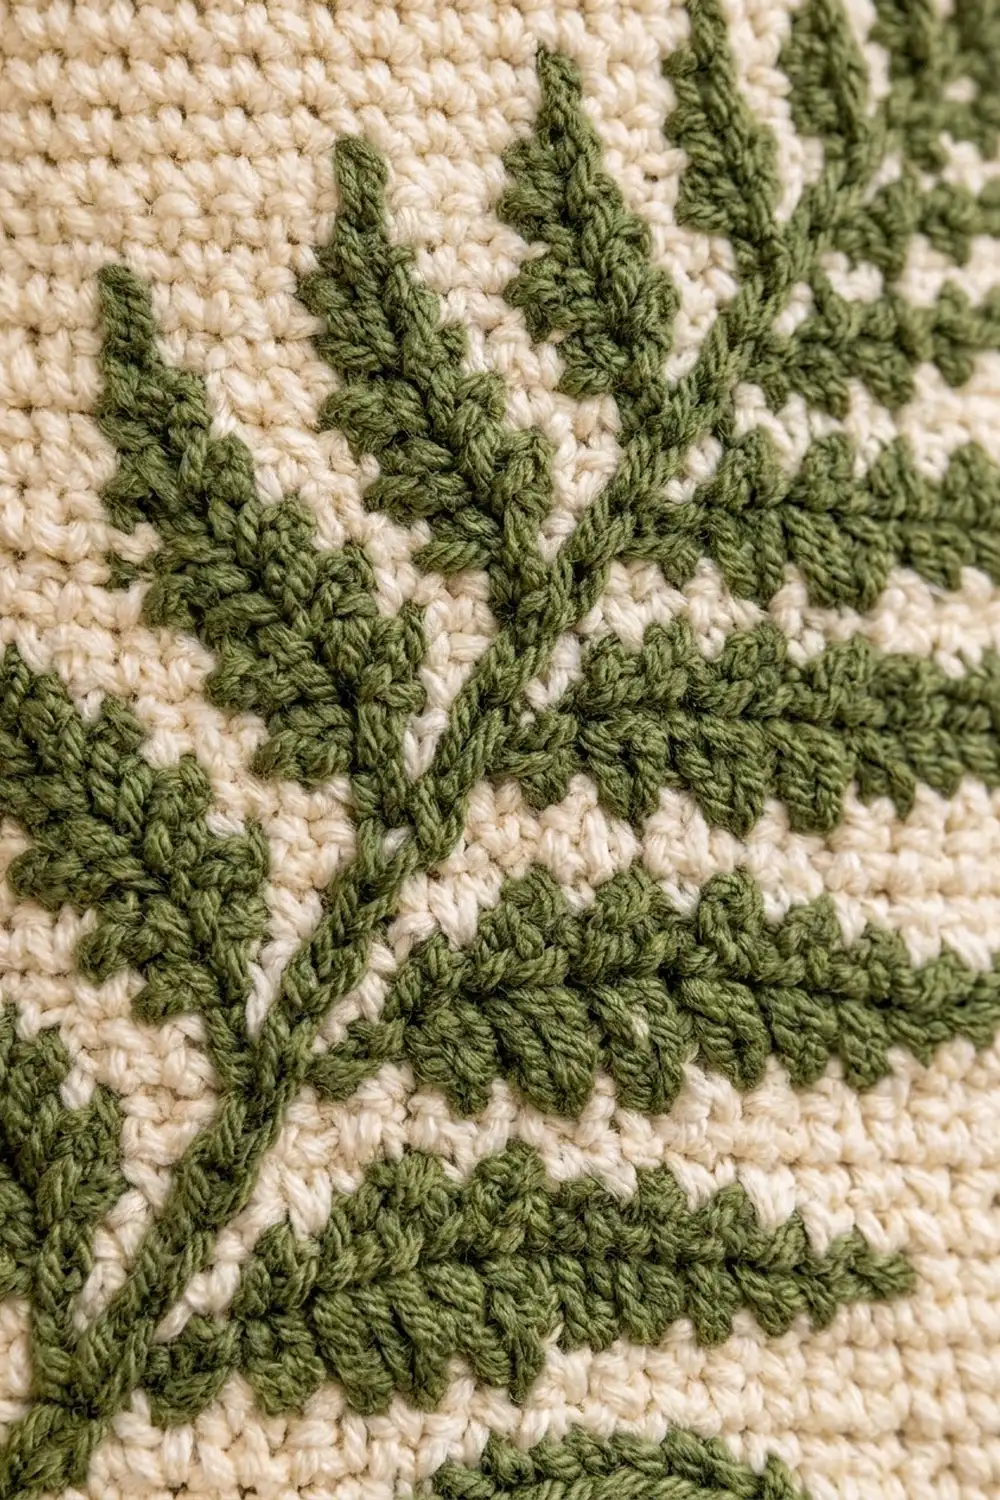
Construction is simple and mostly seamless. You work an oval base, then single crochet rounds straight up. For a short stretch you work turned rows to leave the dispensing opening. After that you finish the cream rounds, add the green rim and loop, and edge the opening. Last, you draw the fern and frame lines onto the surface with surface slip stitch.
Finished Size and Construction
- Finished size: 6.5 in (16.5 cm) wide flat × 12.7 in (32.3 cm) tall, plus a 3 in (7.6 cm) loop
- Skill level: Intermediate
- Terminology: US
- Yarn weight: Worsted (#4) cotton
- Hook: 4.5 mm (US 7)
- Number of pieces: 1 (one seamless tube, with all trim worked onto it)
- Layout: Single holder, 26 stitches across the front and 26 across the back
- Base size: about 5.5 × 2 in (14.0 × 5.1 cm), oval
- Size before border: 6.5 in (16.5 cm) wide × 12 in (30.5 cm) tall from the base ridge
- Border depth: the top rim adds about 0.7 in (1.8 cm)
Materials
Yarn: Use a smooth worsted-weight cotton or cotton blend, about 155 m per 100 g. Cotton holds its shape when the holder is full of bags, and it washes well. Acrylic also works but stretches more under weight.
- Cream (main color, MC): 100 g / 155 m
- Sage green (contrast color, CC): 30 g / 47 m
These quantities include a safety margin of about 30%.
Tools:
– 4.5 mm (US 7) crochet hook
– Tapestry needle
– 6 locking stitch markers
– Scissors
– Measuring tape
– Blocking pins and a spray bottle
Abbreviations (US Terms)
- ch – chain
- sc – single crochet
- sc2tog – single crochet 2 together
- sl st – slip stitch
- BLO – back loop only
- st(s) – stitch(es)
- rnd(s) – round(s)
- RS / WS – right side / wrong side
- MC / CC – main color / contrast color
Special stitches
- Surface slip stitch (surf sl st): Hold the yarn behind the fabric. Insert the hook from the front into a gap between stitches, pull up a loop to the front, insert the hook into the next gap along your planned line, pull up a loop and draw it through the loop on the hook. Each stitch spans about one round. The result is a raised, chain-like line.
- Reverse single crochet (rev sc): Single crochet worked from left to right (for right-handed crocheters), which makes a rolled, corded edge.
- Standing sc: With a slip knot on the hook, insert into the stitch and complete a sc without joining first.
Gauge and Checkpoints
Gauge: 16 sc and 18 rnds = 4 in (10.2 cm) in sc worked in the round.
Your test piece is the holder itself. Work Rnds 1–10, then measure before going further. Flatten the tube: it should be 6.5 in (16.5 cm) wide.
Checkpoints:
– After Rnd 3: the base is about 5.5 × 2 in (14.0 × 5.1 cm), with 52 sts.
– After Rnd 16: the tube measures 2.9 in (7.4 cm) from the base ridge, and the opening is about 3 in (7.6 cm) wide × 1.8 in (4.6 cm) tall.
– After Rnd 36: 7.3 in (18.5 cm) from the ridge.
– After Rnd 57: 12 in (30.5 cm) from the ridge.
If your tube is too wide, go down half a hook size. If it’s too narrow, go up half a hook size. Don’t change the stitch count, because the fern placement depends on 26 stitches across the front. If only your row height is off, add or remove plain rounds between Rnd 17 and Rnd 21 so the fern still sits correctly.
Pattern
Stitch map: After Rnd 3, sts 1–26 are the front and sts 27–52 are the back. The side folds fall just before st 1 and just before st 27. Place a marker in st 1 and another in st 27, and move them up as you work.
Oval Base (MC)
Ch 17.
Rnd 1: 2 sc in 2nd ch from hook, sc in next 14 ch, 4 sc in last ch. Working along the opposite side of the chain: sc in next 14 ch, 2 sc in the same ch as the first sts. Join with sl st to first sc. (36 sts)
Rnd 2: Ch 1, 2 sc in each of next 2 sts, sc in next 14, 2 sc in each of next 4, sc in next 14, 2 sc in each of last 2. Join. (52 sts would come later — this round has 44 sts: 4 + 14 + 8 + 14 + 4)
Rnd 3: Ch 1, (sc, 2 sc in next) twice, sc in next 14, (sc, 2 sc in next) 4 times, sc in next 14, (sc, 2 sc in next) twice. Join. (52 sts: 6 + 14 + 12 + 14 + 6)
Body Start (MC)
Rnd 4 (turning ridge): Ch 1, sc BLO in each st around. Join. (52 sts) This turns the work upward and leaves a ridge of front loops for the green bottom line.
Rnds 5–7: Ch 1, sc in each st around. Join. (52 sts)
Fasten off at the end of Rnd 7.
Dispensing Opening (MC, Turned Rows)
The opening sits over front sts 8–19: 12 stitches, centered with 7 sts on each side.
Row 8 (RS): Join MC with a standing sc in st 20. Sc in sts 21–52, then in sts 1–7. (40 sts) Ch 1, turn. Sts 8–19 stay unworked.
Rows 9–15: Sc in each st across. Ch 1, turn. (40 sts) Row 15 is a WS row.
Rnd 16 (closing round, RS): Sc in each of the 40 sts, ch 12, and sl st to the first sc of this round. (52 sts: 40 sc + 12 ch) The chain sits across the top of the opening, directly over sts 8–19. Fasten off.
Upper Body (MC)
Rnd 17: Join MC with a standing sc in st 1 (the side fold). Sc in the next 39 sts, sc in each of the 12 ch, then join. (52 sts) Rejoining here keeps the round seam at the fold.
Rnds 18–57: Ch 1, sc in each st around. Join. (52 sts) Fasten off MC.
The tube now measures 12 in (30.5 cm) from the base ridge (54 rounds from Rnd 4 to Rnd 57, at 4.5 rounds per inch).
Fern and Frame (CC, Surface Slip Stitch)
Number the front columns 1–26 from left to right as you look at the front. Each round is one step up. Work from the bottom of each line toward the top, and fasten off on the inside after each line.
Side frame lines: Work surf sl st up column 1, from Rnd 4 to Rnd 57 (54 sts). Repeat on column 26 (54 sts).
Bottom frame line: Sl st into the free front loops of Rnd 3 across front sts 1–26 (26 sts).
Stem: Start in Rnd 8 at column 3. Work 1 surf sl st per round up to Rnd 54, shifting 1 column to the right after every 3rd stitch. That’s 47 sts in total, ending at column 18. As a check, the stem column in any round is 3 + (round − 8) ÷ 3, rounded down. In Rnds 8–15 the stem stays in columns 3–5, well clear of the opening.
Leaflets: The leaflets come in pairs, one on each side of the stem, at these rounds:
| Round | Stem column | Leaflet length |
|---|---|---|
| 22 | 7 | 5 sts |
| 26 | 9 | 5 sts |
| 30 | 10 | 5 sts |
| 34 | 11 | 4 sts |
| 38 | 13 | 4 sts |
| 42 | 14 | 4 sts |
| 46 | 15 | 3 sts |
| 50 | 17 | 3 sts |
For each leaflet, start beside the stem. Work outward, moving 1 column per stitch and climbing 1 round on every 2nd stitch, so the leaflet angles upward. At the end, turn and work back the same number of stitches along the gaps right next to the first line. Each leaflet ends up as a plump double line.
The lowest left leaflet ends at column 2, just inside the side frame line.
Tip leaflet: From the top of the stem, work 2 sts up and to the right through Rnds 55–56, then 2 sts back.
Fern total: 47 stem sts + 136 leaflet sts + 4 tip sts = 187 surf sl sts.
Border
The trim is all green. It has three parts: the top rim, the hanging loop and the opening edging. It uses the same gauge as the body, 16 sts per 4 in (10.2 cm), with no increases.
Top Rim
Rnd 58: Join CC with a standing sc in st 1. Sc in each st around and join. (52 sts: 26 front + 26 back)
Rnd 59: Ch 1, sc in each st around. Join. (52 sts: 26 + 26)
Rnd 60: Ch 1, rev sc in each st around. Join. (52 sts: 26 + 26) Fasten off.
Why the math works: The rim has exactly 52 sts, the same as the body. That means it neither flares nor pulls in. The 26 front sts sit directly above the 26 fern columns, so the rim lines up with the side frame lines at columns 1 and 26.
Hanging Loop
The back runs from st 27 to st 52, so its center falls between sts 39 and 40. With the inside of the back facing you, join CC with sl st in st 37 of Rnd 59.
Ch 30, then sl st in st 42 of Rnd 59. The loop’s base covers sts 37–42, which is 6 sts centered on the back.
Row 1: Work 32 sc over the chain loop, enclosing the chain rather than working into it, then sl st in st 37.
Row 2: Turn. Sl st in each of the 32 sc, then sl st in st 42. (32 sts) Fasten off and weave the end firmly into the rim.
The finished loop stands about 3 in (7.6 cm) tall.
Opening Edging
Rnd 1: With RS facing, join CC at the bottom-right corner of the opening. Work the sides in this order:
- sc in the bottom-right corner (1)
- sc in 7 row-ends going up (7)
- sc2tog over the last row-end and the 1st chain (1)
- sc in the next 10 chains (10)
- sc2tog over the 12th chain and the top row-end on the left (1)
- sc in 7 row-ends going down (7)
- sc in the bottom-left corner (1)
- sc in the 12 free loops of Rnd 7 along the bottom (12)
Join. (40 sts)
Rnd 2: Sl st in each st around. (40 sts) Fasten off.
The two sc2tog stitches round off the top corners into an arch, and the bottom stays flat. The finished opening is about 2.5 in (6.4 cm) wide × 1.3 in (3.3 cm) tall.
Final Blocking
- Weave in all ends on the inside, with each CC end running under same-color stitches.
- Lay the holder flat with the side folds at columns 1 and 26, so the fern is centered on the front.
- Mist it until damp, but not soaked.
- Pin it to 6.5 in (16.5 cm) wide and 12 in (30.5 cm) tall from the ridge to the bottom of the rim.
- Shape the opening into an arch with your fingers, and roll the rim so it sits evenly.
- Stuff a folded towel inside so the base keeps its oval shape.
- Let it dry completely before you remove the pins.
Final Quality-Control Checklist
- [ ] The base is oval, about 5.5 × 2 in (14.0 × 5.1 cm), with a clean ridge.
- [ ] The body is 52 sts all the way up, with 26 sts on each face.
- [ ] The round seam is hidden at the side fold.
- [ ] The opening is centered, with a flat bottom and rounded top.
- [ ] The stem runs from column 3 to column 18, and there are 8 leaflet pairs plus a tip.
- [ ] The frame lines are straight and sit on columns 1 and 26.
- [ ] The rim has 52 sts and the loop is centered on the back.
- [ ] The holder measures 6.5 × 12.7 in (16.5 × 32.3 cm), plus the loop.
Troubleshooting
The base cups or ruffles. Re-count Rnds 2 and 3. They should total 44 and then 52 sts.
The opening is off-center. Check that Row 8 started in st 20, and that sts 8–19 are the ones left unworked.
The surface lines are puckered. Work the surface slip stitches more loosely, or go up one hook size for this step only.
The leaflets look thin. Make sure you worked back along each leaflet so it’s a double line.
The loop stretches. Add a third row of sl st, or work Row 1 more tightly.
The rim flares. Your rev sc is too loose. Redo Rnd 60 with a smaller hook.
Care
Hand wash in cool water, press out the excess and dry flat with the holder reshaped around a towel. Avoid the dryer, which can distort the surface stitching.
Final Notes
Everything in this holder follows one measurement chain. A gauge of 16 sts per 4 in (10.2 cm) gives 52 sts, so each face is 26 sts and 6.5 in (16.5 cm) wide. At 18 rnds per 4 in, 54 body rounds give 12 in (30.5 cm), and the rim adds about 0.7 in (1.8 cm) for a total height of 12.7 in (32.3 cm).
The 12-st opening is centered on the 26 front sts. The fern grid follows the same columns and rounds, and the green rim keeps exactly 52 sts so it lies flat. If you check your measurements at each checkpoint, the holder will finish true to size.
Happy crocheting!