

This grumpy crab turns a messy stash of plastic grocery bags into a cheerful wall piece. Bags go in through a hinged dome lid and come out one at a time through a small opening at the bottom. Through the open mesh body, you can see when the stash is running low.
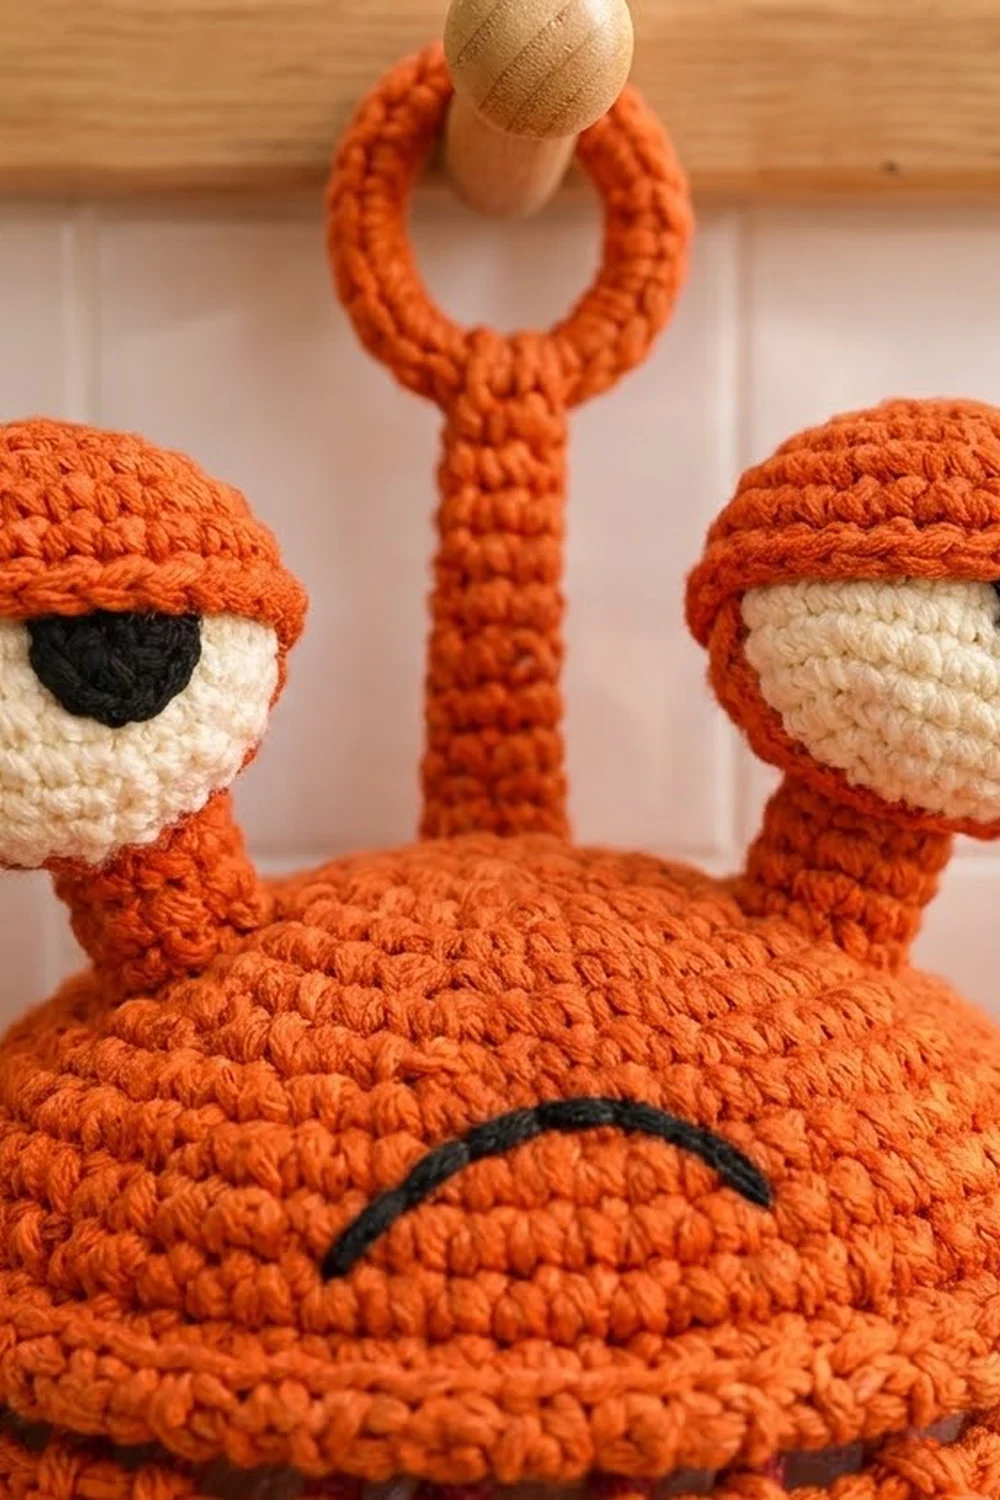
The main color is bright orange. Deep burgundy is used on the bottom cuff and inside the claws. The eyes are cream with black pupils and heavy orange eyelids, and a black embroidered frown gives the crab its sulky look. The style is classic amigurumi: firm stuffed parts and a clean diamond mesh.
All instructions use US crochet terms. When filled, the body is about 8 in (20.3 cm) wide and 12 in (30.5 cm) tall from cuff to lid top. With the hanging loop it is about 16 in (40.6 cm) tall, and it is about 14 in (35.6 cm) wide across the claws.
You work the body in one piece from the bottom up: a solid ring, 12 rounds of mesh, then a solid rim. The dome lid is sewn on at the back as a hinge. The eyes, stalks, claws and legs are small stuffed parts that you sew on at the end.
Finished Size and Construction
- Finished size: 8 in (20.3 cm) wide x 12 in (30.5 cm) tall; 16 in (40.6 cm) tall with loop; 14 in (35.6 cm) across claws
- Skill level: Intermediate
- Terminology: US
- Yarn weight: worsted (#4) cotton
- Hooks: 4.0 mm (G-6) for solid parts, 5.0 mm (H-8) for mesh
- Number of pieces: one finished holder, built from 21 sewn components
- Layout: upright body, lid on top, claws at the upper sides, 3 legs per side
- Body mesh: 24 loops around at the widest point, 9 in (22.9 cm) tall
- Size before border: about 9.2 in (23.4 cm) tall (bottom ring plus mesh)
- Border depth: top rim 0.6 in (1.5 cm); bottom cuff 0.75 in (1.9 cm)
Materials
Choose a smooth combed or mercerized cotton. It holds its shape under the weight of the bags and shows the mesh crisply. Acrylic also works, but it sags a little more.
- Orange: 200 g / 340 m
- Burgundy: 20 g / 34 m
- Cream: 10 g / 17 m
- Black: 5 g / 9 m
These amounts include a margin of about 15%.
Tools:
– 4.0 mm (G-6) and 5.0 mm (H-8) hooks
– one 1.5 in (3.8 cm) metal or plastic ring
– polyester fiberfill
– 9 pipe cleaners
– stitch markers
– tapestry needle
– pins
– scissors
– tape measure
Abbreviations (US Terms)
- ch: chain
- sc: single crochet
- dc: double crochet
- sl st: slip stitch
- MR: magic ring
- inc: 2 sc in the same stitch
- sc2tog: single crochet 2 together
- FLO: front loop only
- st(s): stitch(es)
Mesh decrease (mesh-dec): Ch 5, insert hook in next ch-5 loop, yo, pull up a loop, insert hook in following loop, yo, pull up a loop, yo and draw through all 3 loops. This joins 2 old loops at one point.
Mesh join: Each mesh round ends with “ch 2, dc in the first sc.” The ch-2 plus dc forms the last loop and leaves your hook at its center, ready for the next round.
Gauge and Checkpoints
- Solid sc (4.0 mm): 18 sts and 20 rnds = 4 in (10.2 cm); one round is 0.2 in (0.5 cm).
- Mesh (5.0 mm): 4 ch-5 loops = 4 in (10.2 cm) wide and 4 rounds = 3 in (7.6 cm) tall, lightly stretched. One loop is 1 in (2.5 cm) wide.
Make one leg first as your gauge test. It should be 2.4 in (6.1 cm) long. If it matches, your sc gauge is right.
Checkpoints:
– Bottom ring: 5.3 in (13.5 cm) around.
– Mesh height after Mesh Rnd 8: 6 in (15.2 cm); after Mesh Rnd 12: 9 in (22.9 cm).
– Rim: 5.7 in (14.5 cm) across.
– Lid base: 5.9 in (15.0 cm) across.
If your parts come out too big, go down half a hook size. If they’re too small, go up half a size. The lid must always be slightly wider than the rim.
Body
Bottom Ring
With orange and the 4.0 mm hook, ch 24 and join with a sl st without twisting.
Rnd 1: Ch 1, sc in each ch around, sl st to first sc. (24 sts)
This ring is the opening the bags come out of, 1.7 in (4.3 cm) across.
Mesh
Change to the 5.0 mm hook.
Mesh Rnd 1: Ch 1, sc in first st, ch 5, skip 1 st, sc in next st 11 times, ch 2, dc in first sc. (12 loops)
Mesh Rnd 2 (growth): (Ch 5, sc) twice in next loop, ch 5, sc in next loop 6 times, ending with ch 2, dc in dc. (18 loops)
Mesh Rnd 3 (growth): (Ch 5, sc) twice in next loop, [ch 5, sc in next loop] twice 6 times, ending with ch 2, dc in dc. (24 loops)
Mesh Rnds 4–10: Ch 5, sc in next loop around, ending with ch 2, dc in dc. (24 loops each)
Mesh Rnd 11 (decrease): Mesh-dec, [ch 5, sc in next loop] 4 times 4 times, ending with ch 2, dc in dc. (20 loops) Each repeat uses 6 old loops and makes 5 new ones.
Mesh Rnd 12: Ch 5, sc in next loop 19 times, ch 5, sl st in dc. (20 loops) Ending with a full ch-5 loop gives the rim 20 equal loops to work into. Don’t fasten off. Go straight on to the Top Rim.
Lid
With orange and the 4.0 mm hook, work in continuous rounds and mark the first st of each round.
- Rnd 1: 6 sc in MR. (6)
- Rnd 2: Inc in each st. (12)
- Rnds 3–10: (Sc X, inc) 6 times. X is 1 on Rnd 3 and goes up by 1 each round. Counts: 18, 24, 30, 36, 42, 48, 54, 60.
- Rnd 11: (Sc 9, inc) 6 times. (66)
- Rnd 12: Sc in each st. (66)
- Rnd 13: (Sc 10, inc) 6 times. (72)
- Rnd 14: Sc in each st. (72)
- Rnd 15: (Sc 11, inc) 6 times. (78)
- Rnd 16: Sc in each st. (78)
- Rnd 17: (Sc 12, inc) 6 times. (84)
- Rnds 18–20: Sc in each st. (84)
- Rnd 21: Sc in FLO of each st. (84) This makes the raised ridge around the base of the dome.
- Rnd 22: Sc in each st, sl st to next st. (84)
Fasten off with a long tail. The dome is about 1.5 in (3.8 cm) deep. With black, backstitch a frown 1.25 in (3.2 cm) wide on the front, between Rnds 12 and 16, with both ends curving down.
Eyes (make 2)
Eyeball: With cream:
– Rnd 1: 6 sc in MR (6).
– Rnd 2: inc in each st (12).
– Rnd 3: (sc 1, inc) 6 times (18).
– Rnd 4: (sc 2, inc) 6 times (24).
– Rnds 5–6: sc around (24).
Change to orange.
– Rnd 7: sc around (24).
– Rnd 8: (sc 2, sc2tog) 6 times (18).
– Rnd 9: (sc 1, sc2tog) 6 times (12). Stuff firmly.
– Rnd 10: sc2tog 6 times (6). Close the hole.
The eyeball is 1.7 in (4.3 cm) across.
Eyelid: With orange, work in rows.
– Row 1: 6 sc in MR, ch 1, turn (6). Pull the ring into a half circle.
– Row 2: inc in each st, ch 1, turn (12).
– Row 3: (sc 1, inc) 6 times, ch 1, turn (18).
– Row 4: (sc 2, inc) 6 times (24).
Fasten off with a long tail.
Pupil: With black, 6 sc in MR, then inc in each st (12), sl st to join. It is 0.8 in (2.0 cm) across.
Pin the eyelid over the top half of the cream front, with the straight edge just above center, for a heavy half-closed look. Sew it down. Sew the pupil just under the lid edge.
Stalks (make 3)
With orange:
– Rnd 1: 6 sc in MR (6).
– Rnds 2–7: sc around (6).
Fasten off. Each eye stalk is 1.4 in (3.6 cm) long.
For the hanging stalk, keep going through Rnd 12 (6) for 2.4 in (6.1 cm).
Insert a trimmed pipe cleaner in each stalk.
Hanging ring: With orange, work 36 sc around the 1.5 in (3.8 cm) ring until it is fully covered. Sl st to join, fasten off, and sew it to the top of the hanging stalk.
Claws (make 2)
Upper pincer: With orange:
– Rnd 1: 6 sc in MR (6).
– Rnd 2: (sc 1, inc) 3 times (9).
– Rnd 3: (sc 2, inc) 3 times (12).
– Rnd 4: (sc 3, inc) 3 times (15).
– Rnds 5–7: sc around (15).
Fasten off and stuff lightly.
Lower pincer: Work Rnds 1–3 (12), then Rnds 4–7: sc around (12). Don’t fasten off. Stuff lightly.
Rnd 8 (joining): Sc in 9 sts of the lower pincer, leaving its 3 inner sts unworked. Carry on to the upper pincer and sc in 12 sts, leaving its 3 inner sts unworked. (9 + 12 = 21)
- Rnd 9: (Sc 6, inc) 3 times. (24)
- Rnds 10–12: Sc around. (24)
- Rnd 13: (Sc 2, sc2tog) 6 times. (18) Stuff firmly.
- Rnd 14: (Sc 1, sc2tog) 6 times. (12)
- Rnds 15–21 (arm): Sc around. (12)
Fasten off with a long tail and stuff the arm lightly. Each claw with its arm is about 4.5 in (11.4 cm) long.
Lining (make 2): With burgundy, ch 5. Sc in 2nd ch from hook and next 2 ch, 3 sc in last ch. Working down the other side, sc in next 2 ch, 2 sc in first ch. (10) Sl st to join.
Fold the lining into a V and sew it into the gap between the pincers so it covers the 6 unworked sts. The inside of the claw now shows burgundy.
Legs (make 6)
With orange:
– Rnd 1: 4 sc in MR (4).
– Rnd 2: (sc 1, inc) twice (6).
– Rnds 3–12: sc around (6).
Fasten off with a long tail. Each leg is 2.4 in (6.1 cm) long. Insert a pipe cleaner and bend the leg into a gentle downward curve.
Border
The border has two parts: the top rim and the burgundy bottom cuff. Both use the solid sc gauge of 18 sts = 4 in (10.2 cm).
Top Rim
Pick up from Mesh Rnd 12 and change to the 4.0 mm hook.
Rim Rnd 1: Ch 1, 4 sc in each ch-5 loop around, sl st to first sc. (20 loops x 4 = 80 sts)
Rim Rnds 2–3: Ch 1, sc in each st around, sl st to first sc. (80 sts each)
Fasten off. The rim is 0.6 in (1.5 cm) deep.
Why the math works: Each mesh loop is 1 in (2.5 cm) wide, and 4 sc cover about 0.9 in (2.3 cm). The rim therefore gathers the mesh only slightly and firms up the opening. At 80 sts the rim is 17.8 in (45.2 cm) around, or 5.7 in (14.5 cm) across. The lid’s 84 sts give 5.9 in (15.0 cm) across, so the lid sits just over the rim.
Bottom Cuff
Turn the body upside down. Join burgundy with the 4.0 mm hook in a free loop of the foundation chain.
Cuff Rnd 1: Ch 1, sc in each free loop around. (24 sts)
Cuff Rnd 2: Ch 1, sc in each st around. (24 sts)
Cuff Rnd 3 (trim): Sc in next st, skip 1 st, 5 dc in next st, skip 1 st 6 times, sl st to first sc. (6 sc + 30 dc = 36 sts)
Each repeat uses 4 sts, so 6 repeats use all 24 and make 6 rounded scallops. The cuff is 0.75 in (1.9 cm) deep.
Assembly
- Hinge: Set the lid on the rim with the ridge facing out. Whipstitch 16 sts of the lid’s back edge to 16 sts of the rim’s back, about 3.6 in (9.1 cm), and go over the seam twice.
- Hanging stalk: Sew it to the top center of the lid over Rnds 1–4.
- Eyes: Sew the eye stalks to the front of the lid at Rnds 8–10, about 2 in (5.1 cm) apart, then sew an eye onto each.
- Claws: Sew each arm to one side of the body at Mesh Rnds 11–12, stitching into the sc anchors and the rim.
- Legs: Sew 3 legs on each side at Mesh Rnds 4, 6 and 8, angled down. Always sew into the sc anchors, never into bare chains.
Final Blocking
- Lightly mist the mesh with water.
- Fill the body with crumpled bags to round it out.
- Check the width: 8 in (20.3 cm) across.
- Tug the mesh gently so the diamonds are even.
- Close the lid and pin it flat on the rim.
- Shape the legs and stalks.
- Let it dry fully before hanging.
Final Quality-Control Checklist
- Bottom ring: 24 sts.
- Mesh loops: 12, then 18, then 24 for 8 rounds, then 20 for 2 rounds.
- Rim: 80 sts on every round.
- Lid: 84 sts at the base.
- Cuff: 6 even scallops.
- Hinge sewn twice across 16 sts.
- All tails woven in, eyes level and frown centered.
Troubleshooting
Mesh ruffles or flares. Your chains are too loose. Use a 4.5 mm hook for the mesh, or work ch 4 loops and keep the same loop counts.
Lid won’t cover the rim. Work one more increase round, (Sc 13, inc) 6 times for 90 sts, before Rnds 18–22.
Bags fall out. Before the cuff, work one round of (sc 4, sc2tog) 4 times (20 sts). Then work Cuff Rnd 3 with 5 repeats.
Claws droop. Stuff the arms more firmly and add a second line of stitches into the rim.
Stalks flop. Fold the pipe cleaner in half for double strength.
Care
Spot clean with mild soap and cool water, then air dry. Don’t machine wash, because the stuffing and pipe cleaners can shift.

Final Notes
The measurement chain is short. A 24-st ring makes a 1.7 in (4.3 cm) opening. The mesh grows from 12 to 24 loops to reach the 8 in (20.3 cm) width, then narrows to 20 loops, giving 9 in (22.9 cm) of mesh. The 20 loops become an 80-st rim 5.7 in (14.5 cm) across, and the 84-st lid fits just over it.
Happy crocheting!