

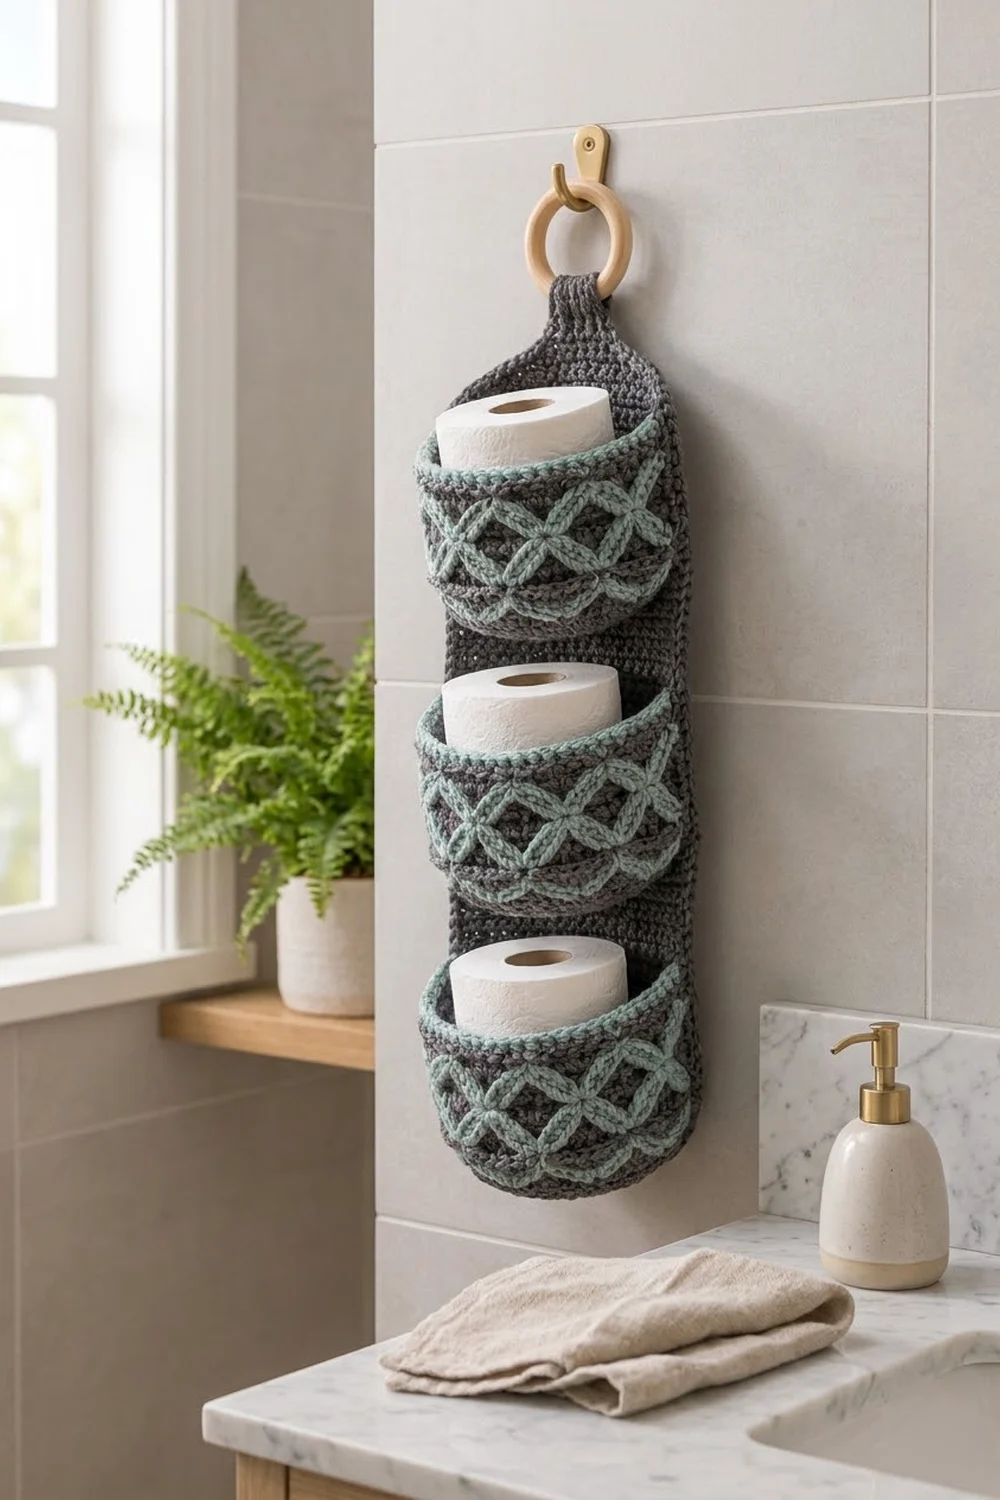
This hanging toilet paper holder keeps three spare rolls tidy and off the counter. A long charcoal backing panel hangs from a wooden ring, and three round pockets are stacked down its front. Each pocket holds one standard roll standing upright.
The look comes from contrast. The charcoal single crochet is dense, sturdy and slightly nubby. Around the middle of each pocket, sage-teal chain arches cross to form a trellis of X’s and diamonds, and a soft teal rim finishes each cup. The style is modern farmhouse: calm colors and strong texture.
The pattern uses US crochet terms. The finished holder measures 6.5 in (16.5 cm) wide by 18 in (45.7 cm) tall, not counting the ring. Each pocket is 4.75 in (12.1 cm) across and 3.5 in (8.9 cm) deep.
You crochet the backing panel flat in rows, shaping it as you go. Each pocket is crocheted in the round as a cup and gets a surface trellis before you sew it to the panel. A two-row edging finishes the panel, and the strap folds over the ring.
Finished Size and Construction
- Finished size: 6.5 in (16.5 cm) x 18 in (45.7 cm), ring not included
- Skill level: Intermediate
- Terminology: US crochet terms
- Yarn weight: Worsted / Aran (#4 medium)
- Hook: 5.0 mm (H-8)
- Number of pieces: 4 (1 backing panel + 3 pockets)
- Layout: 3 pockets stacked in one vertical column
- Panel size before edging: 6 in (15.2 cm) x 16.25 in (41.3 cm), plus strap
- Pocket size: 4.75 in (12.1 cm) base diameter, 3.5 in (8.9 cm) wall height
- Edging depth: 0.25 in (0.6 cm)
Materials
Use a smooth cotton or cotton-blend worsted yarn. Cotton holds its shape in a damp bathroom and shows the stitches clearly. Acrylic also works, but the pockets will be softer.
- Charcoal gray (MC): 110 g, about 200 m (219 yd)
- Sage teal (CC): 30 g, about 55 m (60 yd)
Tools:
- 5.0 mm (H-8) crochet hook
- 1 wooden ring, 2 in (5.1 cm) across
- Yarn needle
- 6 locking stitch markers
- Rust-proof pins and a blocking mat
- Measuring tape and scissors
These amounts include about 15% extra for your gauge check, sewing tails and differences in tension.
Abbreviations (US Terms)
- ch: chain
- sc: single crochet
- sl st: slip stitch
- inc: 2 sc in the same stitch
- sc2tog: single crochet 2 together
- BLO: back loop only
- st(s): stitch(es)
- rnd: round
- MC / CC: main color / contrast color
Special stitch: post anchor (PA). Insert the hook from front to back around the post of the stitch named. Yarn over, pull up a loop, then yarn over and pull through both loops. This is a single crochet worked around a post, and it anchors the overlay chains to the surface of the fabric.
Gauge and Checkpoints
Gauge: 16 sc and 18 rows = 4 in (10.2 cm) in MC. That works out to 4 stitches and 4.5 rows per inch.
Make one pocket first. It is the smallest piece, so it checks your gauge quickly and shows whether a roll fits.
- Pocket base after Rnd 5 (30 sts): 2.4 in (6.1 cm) across.
- Pocket base after Rnd 10 (60 sts): 4.75 in (12.1 cm) across.
- Finished pocket: 3.5 in (8.9 cm) tall. A standard roll, about 4.25 in (10.8 cm) across, should fit snugly and stand about 0.5 in (1.3 cm) above the rim.
- Panel after Row 8: 6 in (15.2 cm) wide.
- Panel after Row 36: 8 in (20.3 cm) tall.
If your piece is too big, go down half a hook size. If it is too small, or the roll won’t fit, go up half a hook size. Change the hook, not the stitch counts, because the pocket placement depends on stitches and rows lining up.

Backing Panel
The panel is worked in MC from the bottom up. The ch 1 at the start of each row does not count as a stitch.
Row 1: Ch 11, sc in 2nd ch from hook and in each ch across, turn. (10 sts)
Row 2: Ch 1, inc in first st, sc to last st, inc in last st, turn. (12 sts)
Rows 3–8: Repeat Row 2. (14, 16, 18, 20, 22, 24 sts) These increases make the rounded bottom.
Rows 9–66: Ch 1, sc in each st across, turn. (24 sts per row)
Rows 67–70: Ch 1, sc2tog, sc to last 2 sts, sc2tog, turn. (22, 20, 18, 16 sts)
Row 71: Ch 1, (sc2tog) twice, sc 8, (sc2tog) twice, turn. (12 sts)
Row 72: Ch 1, (sc2tog) twice, sc 4, (sc2tog) twice, turn. (8 sts)
Row 73: Ch 1, sc2tog, sc 4, sc2tog, turn. (6 sts)
Strap (Rows 74–89): Ch 1, sc in each st across, turn. (6 sts per row)
The strap is 1.5 in (3.8 cm) wide and about 3.5 in (8.9 cm) long. Fasten off, leaving a 12 in (30.5 cm) tail.
Checkpoint: Rows 1–73 measure 6 in (15.2 cm) x 16.25 in (41.3 cm).
Pocket (Make 3)
Work the pocket in joined rounds. Join each round with a sl st to the first sc. The ch 1 does not count as a stitch.
Base
With MC, make a magic ring.
Rnd 1: Ch 1, 6 sc in ring, join. (6 sts)
Rnd 2: Ch 1, inc in each st around, join. (12 sts)
Rnd 3: Ch 1, (sc 1, inc) 6 times, join. (18 sts)
Rnd 4: Ch 1, (sc 2, inc) 6 times, join. (24 sts)
Rnd 5: Ch 1, (sc 3, inc) 6 times, join. (30 sts)
Rnd 6: Ch 1, (sc 4, inc) 6 times, join. (36 sts)
Rnd 7: Ch 1, (sc 5, inc) 6 times, join. (42 sts)
Rnd 8: Ch 1, (sc 6, inc) 6 times, join. (48 sts)
Rnd 9: Ch 1, (sc 7, inc) 6 times, join. (54 sts)
Rnd 10: Ch 1, (sc 8, inc) 6 times, join. (60 sts)
The base is now 4.75 in (12.1 cm) across, with a circumference of 15 in (38.1 cm).
Wall
Rnd 11: Ch 1, sc in BLO of each st around, join. (60 sts) The unused front loops form the crisp ridge at the base.
Rnds 12–24: Ch 1, sc in each st around, join. (60 sts)
Rnds 25–26: Change to CC. Ch 1, sc in each st around, join. (60 sts) Fasten off.
The wall is 16 rounds tall (Rnds 11–26), which is about 3.5 in (8.9 cm).
Trellis Overlay
The trellis sits on Rnds 15–22, a band about 1.75 in (4.4 cm) tall. Number the stitches 1–60, starting at the joining seam. Each repeat covers 10 stitches, so there are 6 repeats around.
Pass A: With CC, PA around st 1 on Rnd 15. *Ch 9, PA around st 6 on Rnd 22, ch 9, PA around st 11 on Rnd 15*. Repeat from * to * around, ending with a PA in st 1 on Rnd 15. (12 chain segments, 12 anchors) Fasten off.
Pass B: With CC, PA around st 1 on Rnd 22. *Ch 9, PA around st 6 on Rnd 15, ch 9, PA around st 11 on Rnd 22*. Repeat from * to * around, ending at st 1 on Rnd 22. (12 chain segments, 12 anchors) Fasten off.
The two zigzags mirror each other, so their segments cross at about Rnd 18. This makes 12 crossings around the pocket.
Each segment runs 1.25 in (3.2 cm) across and about 1.5 in (3.8 cm) up, so the straight-line distance is about 2 in (5.1 cm). A ch 9 is slightly longer than that, so each segment bows into a soft arch. Charcoal diamonds show between the arches.
Tack the crossings: With a CC tail, sew one small stitch over each crossing, through both chains and into the fabric underneath. This locks each X in place.
Make All Pieces
- Panel: 1, in MC (about 50 g)
- Pockets: 3, each using about 20 g MC and 10 g CC
Layout, top to bottom:
[ ring ]
[ strap ]
[ shoulders ]
[ Pocket 1 ]  base Row 48, rim Row 64
[ Pocket 2 ]  base Row 28, rim Row 44
[ Pocket 3 ]  base Row 8,  rim Row 24
[ rounded bottom ]
Joining
Each pocket spans 16 panel rows, which matches its 16 wall rounds.
Mark the back: On each pocket, mark 20 consecutive stitches on the rim to be the back section. Place them so the trellis is centered on the other 40 stitches. Mark the same 20 stitches on the Rnd 11 ridge directly below. These 20 stitches, 5 in (12.7 cm) wide, are sewn flat against the panel.
Placement: Center each pocket’s back section over panel stitches 3–22. This leaves 0.5 in (1.3 cm) of panel clear on each side. Line up each pocket’s base and rim with the rows shown in the layout. That leaves a 4-row gap, just under 1 in (2.5 cm), between pockets.
Sew stitch to stitch. Using MC and a whipstitch:
- Sew the 20 marked base stitches to panel stitches 3–22 on the pocket’s base row.
- Sew up each side, from Rnd 11 to Rnd 26, into panel columns 3 and 22, one round to one row.
- Sew the 20 marked rim stitches to stitches 3–22 on the rim row.
The pocket and panel share the same gauge, so they match 1:1 and nothing puckers. Keep the stitches snug. If you pull them tight, the panel will dimple.
Checkpoint: The panel is still 6 in (15.2 cm) wide and lies flat.
Edging
The edging is worked in MC around the panel only. The pockets are not part of the count, so no stitches are added at the seams.
Edging gauge: The rows stack at 4.5 per inch, but edging stitches sit at 4 per inch. To match, work 8 sc for every 9 rows.
Edging Row 1: With the right side facing, join MC at the right side of the strap base (top of Row 73). Ch 1.
- Right side: Work down the edge with 1 sc in each row end, skipping the row ends of Rows 72, 63, 54, 45, 36, 27, 18 and 9. (73 − 8 = 65 sc)
- Bottom: Work 1 extra sc in the corner, then 1 sc in each of the 10 foundation chains, then 1 extra sc in the second corner.
- Left side: Work up the edge with 65 sc, skipping the same row ends. Turn.
Total: (65 + 10 + 65) worked into existing stitches and row ends, plus 2 extra corner stitches = 142 sts.
Edging Row 2: Ch 1, sl st in each st across. (142 sts) Fasten off.
Why the math works: 65 sc at 4 per inch covers 16.25 in. The 73 rows at 4.5 per inch measure 16.2 in, so the edging matches the panel height. The sides stay flat, and the 2 corner stitches ease the bottom curve.
With the edging, the panel measures 6.5 in (16.5 cm) wide and 16.5 in (41.9 cm) tall below the strap.
Strap: Thread the strap through the ring, fold it to the back, and sew Row 89 to the back of Row 73. About 1.75 in (4.4 cm) of strap shows above the shoulders, bringing the total height to 18 in (45.7 cm).
Final Blocking
- Mist the holder until it is damp.
- Lay it face up on a blocking mat.
- Pin the panel to 6.5 in (16.5 cm) x 16.5 in (41.9 cm), with a pin every 1 in (2.5 cm).
- Fill each pocket with a roll wrapped in a plastic bag so it dries round.
- Shape the arches into even curves and center each X.
- Let it dry completely, then remove the pins.
Final Quality-Control Checklist
- Panel is 6.5 in (16.5 cm) x 16.5 in (41.9 cm), and the total height is 18 in (45.7 cm).
- Each pocket has 60 sts per round, a ridge at the base and 2 CC rim rounds.
- Each trellis has 24 segments, 24 anchors and 12 tacked crossings.
- Pockets are centered over panel stitches 3–22, with 4-row gaps between them.
- The 142-stitch edging lies flat.
- The ring hangs straight, and all ends are woven in.
Troubleshooting
- The roll won’t fit: Go up one hook size. Or add a 66-stitch round, (sc 9, inc) 6 times, before Rnd 11, and use 11-stitch trellis repeats.
- The arches sag: Use ch 8 instead of ch 9.
- The band pulls in: Use ch 10 instead of ch 9.
- The panel sides ruffle: Redo Edging Row 1 with the 8 skips on each side.
- A pocket leans forward: Sew the rim section more firmly.
- The holder hangs crooked: Re-sew the strap so it sits centered.
Care
Hand wash in cool water and lay flat to dry, reshaping the pockets while damp. Don’t wring it, so the trellis stays raised.
Final Notes
Every measurement follows from the gauge of 4 stitches and 4.5 rows per inch:
- Pocket: 60 stitches give a 4.75 in (12.1 cm) base, and 16 rounds give a 3.5 in (8.9 cm) wall.
- Panel: 24 stitches give 6 in (15.2 cm) of width, and 73 rows give 16.25 in (41.3 cm) of height.
- Joining: Pockets sew on 1:1 over 20 stitches and 16 rows.
- Edging: 65 stitches per side match the 73 rows, for a finished size of 6.5 in (16.5 cm) x 18 in (45.7 cm).
Check your gauge on the first pocket and the rest will fit together.
Happy crocheting!