

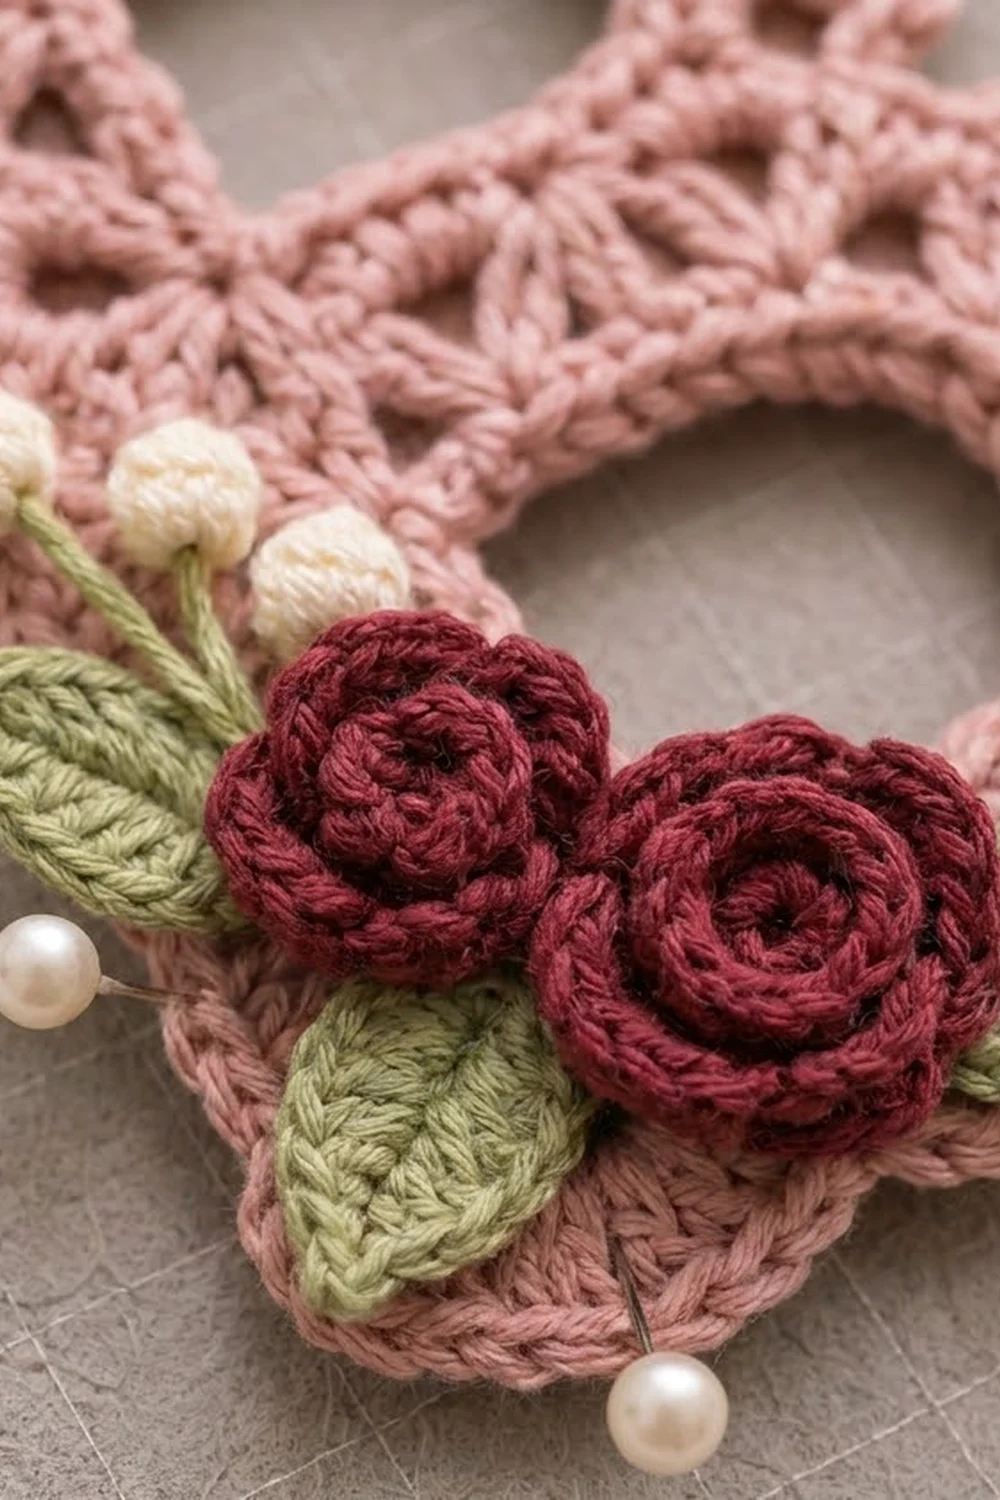
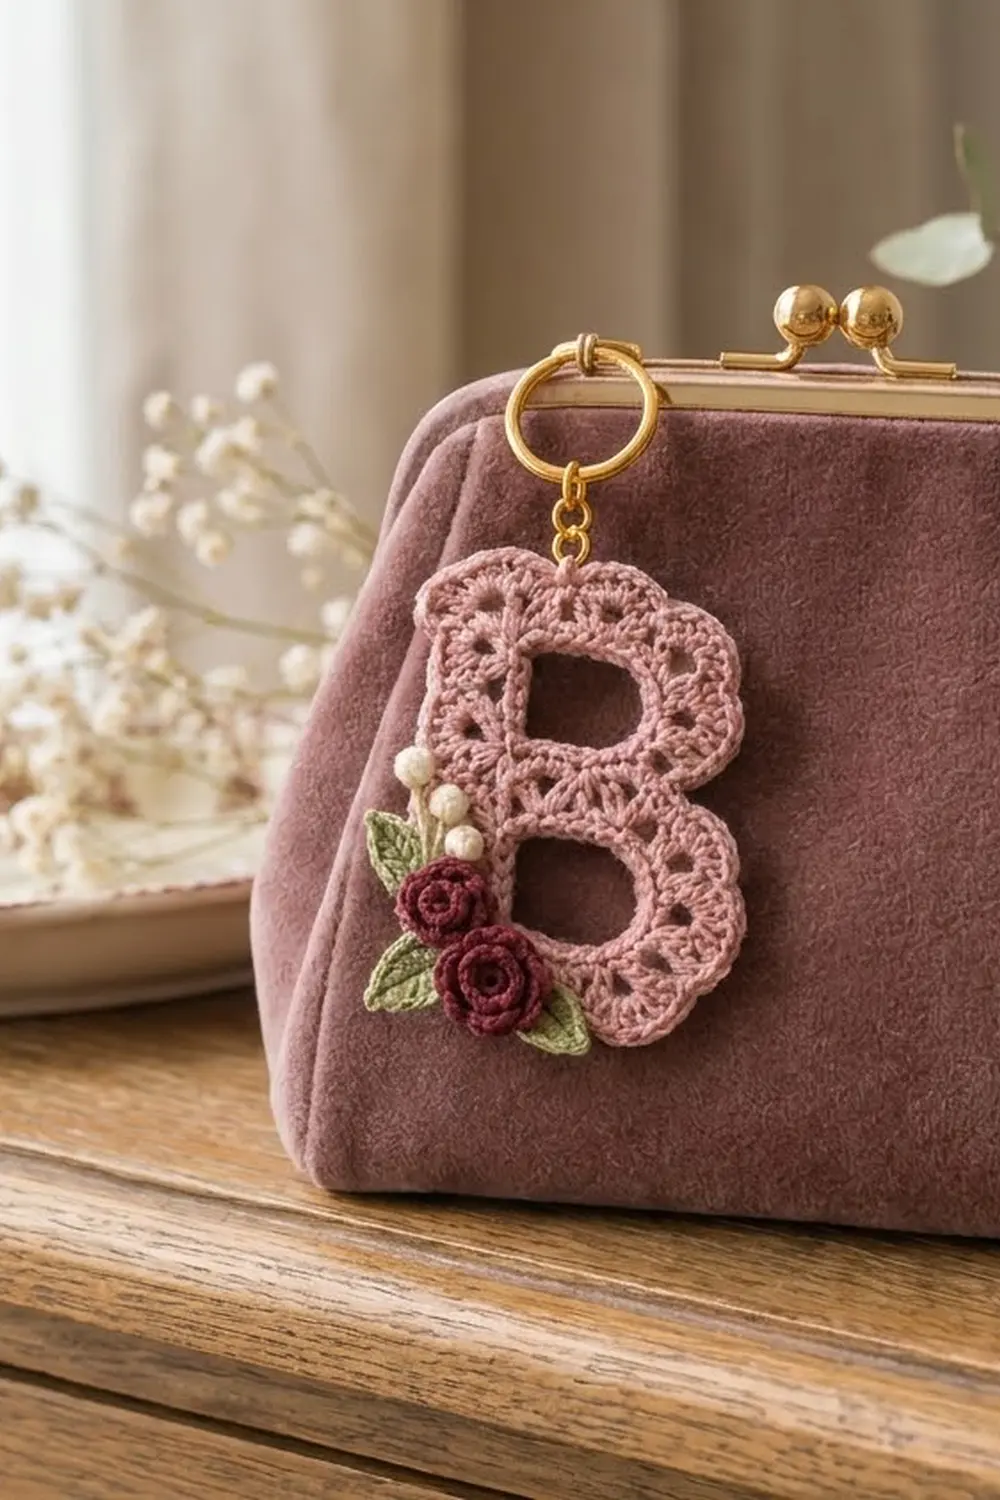
This little letter B is a lace monogram charm for a bag, purse frame, or set of keys. The letter has two open counters, each rimmed with single crochet. A band of V-stitch fans surrounds them, and a scalloped edge runs around the whole outline. A small bouquet of rolled roses, leaves, and berries sits on the lower-left spine.
The letter is dusty rose-pink. The roses are deep burgundy, the leaves are soft sage green, and the berries are cream. The style is vintage and romantic, and it makes a good personalized gift.
This pattern uses US crochet terms. The finished letter measures about 3.6 in (9.1 cm) tall and 2.7 in (6.9 cm) wide, not counting the hardware.
The letter is worked as one continuous piece. First you make the upper bowl (Bowl A) in rounds. Then you chain the lower bowl (Bowl B) directly from it and join the two bowls through the middle bar as you work Bowl B’s V-stitch round. One scallop round around the full outline finishes the shape. The appliqués are made separately and sewn on.
Finished Size and Construction
- Finished size: 3.6 in (9.1 cm) tall × 2.7 in (6.9 cm) wide
- Skill level: Intermediate (working into chain rings, join-as-you-go, small appliqués)
- Terminology: US
- Yarn weight: Fine (#2) mercerized cotton, sport/4-ply
- Hook: 2.5 mm (between US B-1 and C-2)
- Number of pieces: 1 letter + 8 small appliqués (2 roses, 3 leaves, 3 berry stems)
- Layout: Single letter with the appliqué cluster on the lower-left spine
- Bowl sizes (after Rnd 3): Bowl A 1.4 in (3.6 cm) tall × 1.9 in (4.8 cm) wide; Bowl B 1.6 in (4.1 cm) tall × 2.1 in (5.3 cm) wide
- Size before border: 3.0 in (7.6 cm) tall × 2.1 in (5.3 cm) wide
- Border depth: 0.3 in (0.8 cm) on every edge
Materials
Use a smooth mercerized cotton, about 170 m (186 yd) per 50 g. Mercerized cotton shows the lace clearly and holds its shape on a keychain. Avoid fuzzy or very stretchy yarns, because the counters will close up.
- Color A, dusty rose-pink (letter): 5 g, about 17 m
- Color B, burgundy (roses): 2 g, about 7 m
- Color C, sage green (leaves, stems): 2 g, about 7 m
- Color D, cream (berries): 1 g, about 3 m
All quantities include a margin of roughly 25% for swatching and tails.
Tools:
– 2.5 mm crochet hook
– Tapestry needle with a small eye
– Sewing needle and matching thread (optional, for tacking the appliqués)
– 1 in (2.5 cm) gold split keyring
– 0.25 in (0.6 cm) gold jump ring and 2 pairs of flat-nose pliers
– Blocking mat, rustproof pins, and a spray bottle
– 2 locking stitch markers
Abbreviations (US Terms)
- ch: chain
- sl st: slip stitch
- sc: single crochet
- hdc: half double crochet
- dc: double crochet
- tr: treble crochet
- sk: skip
- sp: space
- st(s): stitch(es)
- rnd: round
Special stitches
- V (V-stitch): (dc, ch 1, dc) in the same stitch.
- Tr-V: (tr, ch 1, tr) in the same stitch. It counts as one V and makes the sides of each bowl wider.
- Joined V: dc, then instead of the ch 1, sl st into the ch-1 sp of the matching V on Bowl A, then dc in the same stitch.
- Shell: 5 dc in the same space.
- Bobble: 4 dc in the same stitch, each left unfinished (2 loops on the hook). Yarn over and pull through all 5 loops.
Gauge and Checkpoints
Gauge: 10 sc = 1.5 in (3.8 cm). One dc is about 0.25 in (0.6 cm) tall.
Make Bowl A first as your test piece and measure it before you go on. The checkpoints are:
- Bowl A after Rnd 2: 0.9 in (2.3 cm) across
- Bowl A after Rnd 3: about 1.4 in (3.6 cm) tall × 1.9 in (4.8 cm) wide, lightly flattened
- Bowl B after Rnd 2: 1.1 in (2.8 cm) across
- Joined body after Bowl B Rnd 3: 3.0 in (7.6 cm) tall × 2.1 in (5.3 cm) wide
- After Rnd 4 (scallops): 3.6 in (9.1 cm) × 2.7 in (6.9 cm)
If Bowl A is too big (over 1.5 in, or 3.8 cm, tall), go down to a 2.25 mm hook. If it is too small (under 1.3 in, or 3.3 cm), go up to a 2.75 mm hook. A difference of 0.1 in (0.3 cm) in Bowl A becomes about 0.3 in (0.8 cm) in the finished height, so check it now.
Bowl A (Upper Bowl)
Use Color A throughout the letter.
Rnd 1 (foundation ring): Ch 14 and sl st into the first ch to form a ring. Place this join at the bottom center of the bowl. Both bowls meet here.
Rnd 2: Ch 1. Work 28 sc into the ring, working over the chain rather than into it, and pack the stitches evenly. Sl st to the first sc. (28 sc)
The ring stretches to make the open upper counter, and the sc tops face outward to form the tight inner rim.
Rnd 3: Ch 4 (counts as dc + ch 1), dc in the same st as the join. This is V1, at the bottom center. Sk 1 sc, V in the next sc; repeat from * around, working V4, V5, V11, and V12 as Tr-V. Sl st to the 3rd ch of the beginning ch-4. (14 V: 10 dc-V + 4 Tr-V, 28 posts, 14 ch-1 sps)
The Tr-V pairs sit at the left and right sides (V4–V5 and V11–V12), so the bowl stretches into a wide D shape instead of a circle.
Do not fasten off. Check that Bowl A matches the checkpoint above.
Bowl B (Lower Bowl, Joined)
Rnd 1 (foundation ring): You are now at the bottom center of Bowl A. Ch 18, then sl st into the first of these 18 ch to form a second ring. This ring hangs directly below Bowl A, and its join sits at Bowl B’s top center.
Rnd 2: Ch 1. Work 36 sc over the ring and sl st to the first sc. (36 sc)
Rnd 3 (joining round): Lay the piece flat so that Bowl B sits under Bowl A.
- V1 (Joined V): Ch 3 (counts as dc), sl st in the ch-1 sp of Bowl A’s V1, dc in the same st as the join.
- V2 (Joined V): Sk 1 sc, then in the next sc work a Joined V into the neighboring Bowl A V that lies directly opposite (V2 or V14; lay the piece flat to check).
- V3–V17: Sk 1 sc, V in next sc; repeat 15 times, working V5, V6, V14, and V15 as Tr-V.
- V18 (Joined V): Sk 1 sc, then Joined V in the last sc into Bowl A’s remaining bottom V.
- Sl st to the top of the ch-3. (18 V: 3 Joined V + 11 dc-V + 4 Tr-V, 36 posts)
The three joined pairs make the middle bar of the B. The two V bands now share an edge, with no gap and no ridge. Fasten off and weave in the ends inside the middle bar.
Free V count: Bowl A has 11 free Vs (V3–V13) and Bowl B has 15 free Vs (V3–V17). That gives 26 free Vs on the outline.
Checkpoint: The joined body is 3.0 in (7.6 cm) tall (1.4 + 1.6 in) and 2.1 in (5.3 cm) wide at Bowl B.
Border: Scallop Round
Border gauge: One shell-plus-sc repeat covers 2 V spaces and is about 0.45 in (1.1 cm) wide along the outline. Each shell stands 0.3 in (0.8 cm) tall.
Rnd 4: Join Color A with a sl st in the ch-1 sp of Bowl B’s V3, the first free V beside the junction.
- Bowl B segment: Ch 3 (counts as dc), 4 dc in the same sp (first shell). Sc in the next V sp, shell in the next V sp; repeat 6 more times, ending with a shell in V17. (8 shells + 7 sc = 47 sts)
- Bowl A segment: Continue to the first free V of Bowl A on that side. Sc in the V sp, shell in the next V sp; repeat 4 more times, then sc in the last free V. (5 shells + 6 sc = 31 sts)
- Sl st to the top of the beginning ch-3. Round total: 13 shells + 13 sc = 78 sts.
Fasten off and leave a 6 in (15.2 cm) tail.
Why the math works: Each free V receives exactly one item, either a shell or a sc. The 15 Vs on Bowl B (odd) begin and end with a shell, and the 11 Vs on Bowl A (odd) begin and end with a sc. At both junctions a shell therefore meets a sc, so the shell-sc alternation never breaks. Each 5-dc shell spans 2 V spaces, which is just enough fullness for the curve to lie flat. The pinch where a sc meets a shell at the right-hand junction forms the waist notch of the B.
Appliqués
Rolled Roses (make 2, Color B)
Row 1: Ch 13. Sc in the 2nd ch from the hook and in each ch across. (12 sc)
Row 2: Ch 2 (does not count), turn. Work 3 hdc in each of the first 4 sc (12 hdc), then 3 dc in each of the next 8 sc (24 dc). (36 sts)
Fasten off and leave a 10 in (25.4 cm) tail. Roll the strip from the hdc end so it forms a tight center, and let the dc end flare outward as the outer petals. Stitch through all layers at the base 3 or 4 times. Each rose is about 0.75 in (1.9 cm) across.
Leaves (make 3, Color C)
Ch 8.
- Side 1: Sc in the 2nd ch from the hook, hdc in the next ch, dc in the next 2 ch, hdc in the next ch, sc in the next ch, sl st in the last ch.
- Side 2: Rotate the leaf and work along the free loops of the chain: sc, hdc, dc in the next 2, hdc, sc. Sl st into the tip ch to make the point. (12 sts + 2 sl sts)
Fasten off and leave a 6 in (15.2 cm) tail. Each leaf is about 0.6 in (1.5 cm) long.
Berry Stems (make 3)
- Berry: With Color D, ch 3. Work a bobble in the 3rd ch from the hook, then ch 1 to close it. Fasten off and leave a short tail. The berry is about 0.2 in (0.5 cm).
- Stem: Join Color C at the base of the bobble. Ch 8 and sl st back in each ch, for 7 sl st. Make the second stem with ch 7 and the third with ch 6. The stems are 0.8 in (2.0 cm), 0.7 in (1.8 cm), and 0.6 in (1.5 cm) long.
Assembling the Cluster
- Place the three berry stems first so they fan upward over the left spine, just above the middle bar. Sew them along the stems.
- Sew one leaf to the upper left of the cluster, pointing outward. Sew the other two below, one at the lower left and one at the lower right, angled outward.
- Sew the first rose at the center of the cluster, over the stem bases. Sew the second rose below it and slightly to the right, overlapping its edge.
- The whole cluster is about 1.5 in (3.8 cm) wide × 1.75 in (4.4 cm) tall.
- Stitch from the back only through the sc rim and the V posts, so no stitches show inside the counters.
Hardware
Open the jump ring by twisting the ends sideways with the pliers. Never pull them apart. Pass it through the sc between the two scallops nearest the top-left corner of Bowl A. Add the split keyring and close the jump ring.
Final Blocking
- Remove the keyring before blocking. You can leave the appliqués on.
- Spray the letter until it is damp but not dripping.
- Pin the left spine in a straight vertical line 3.0 in (7.6 cm) long, measured between the shells, not their tips.
- Pin the outer curve of Bowl A to 1.9 in (4.8 cm) wide and Bowl B to 2.1 in (5.3 cm) wide, keeping the waist notch.
- Pin the tip of each scallop so it is rounded and even.
- Push a pin through the middle of each counter to keep the holes open and oval.
- Let it dry completely, at least 6 hours, then reattach the hardware.
Final Quality-Control Checklist
- [ ] Height is 3.6 in (9.1 cm) and width is 2.7 in (6.9 cm).
- [ ] Bowl A has 28 sc and 14 V. Bowl B has 36 sc and 18 V.
- [ ] Exactly 3 joined Vs form the middle bar.
- [ ] Rnd 4 has 13 shells and 13 sc (78 sts).
- [ ] Both counters are open and evenly rimmed.
- [ ] The left spine is straight and the waist notch is clear.
- [ ] The appliqués are stitched securely and no stitches show from the front.
- [ ] The jump ring is fully closed with no gap.
- [ ] All tails are woven in through at least 1 in (2.5 cm) of stitches.
Troubleshooting
- Counter closed up or puckered: Too few sc in Rnd 2, or the sc were packed too tightly. Spread them evenly over the full ring.
- Bowl is round, not D-shaped: Check the Tr-V positions, then pin the bowl wider while blocking.
- Gap or twist at the middle bar: The joined Vs were matched to the wrong Bowl A spaces. Rework them, matching center to center.
- Scallops ruffle: Check that the shells sit in alternate Vs only. If they still ruffle, use a hook 0.25 mm smaller for Rnd 4.
- Scallops pull flat: Work Rnd 4 with a hook 0.25 mm larger.
- Rose looks loose: Roll it tighter and add 2 more securing stitches through the base.
Care
Hand wash in cool water with mild soap, press out the water in a towel, and lay it flat to dry. Remove the metal hardware before washing so it doesn’t tarnish.
Final Notes
The measurements build like this. Bowl A blocks to 1.4 in (3.6 cm) tall and Bowl B to 1.6 in (4.1 cm), so the joined body is 3.0 in (7.6 cm) tall and 2.1 in (5.3 cm) wide. The 0.3 in (0.8 cm) scallop border on every edge brings the letter to 3.6 in (9.1 cm) × 2.7 in (6.9 cm). If Bowl A hits its checkpoint, the rest of the letter will too.
To spell another initial, keep the same ring, V, and scallop rounds and change only the foundation shape.
Happy crocheting!