

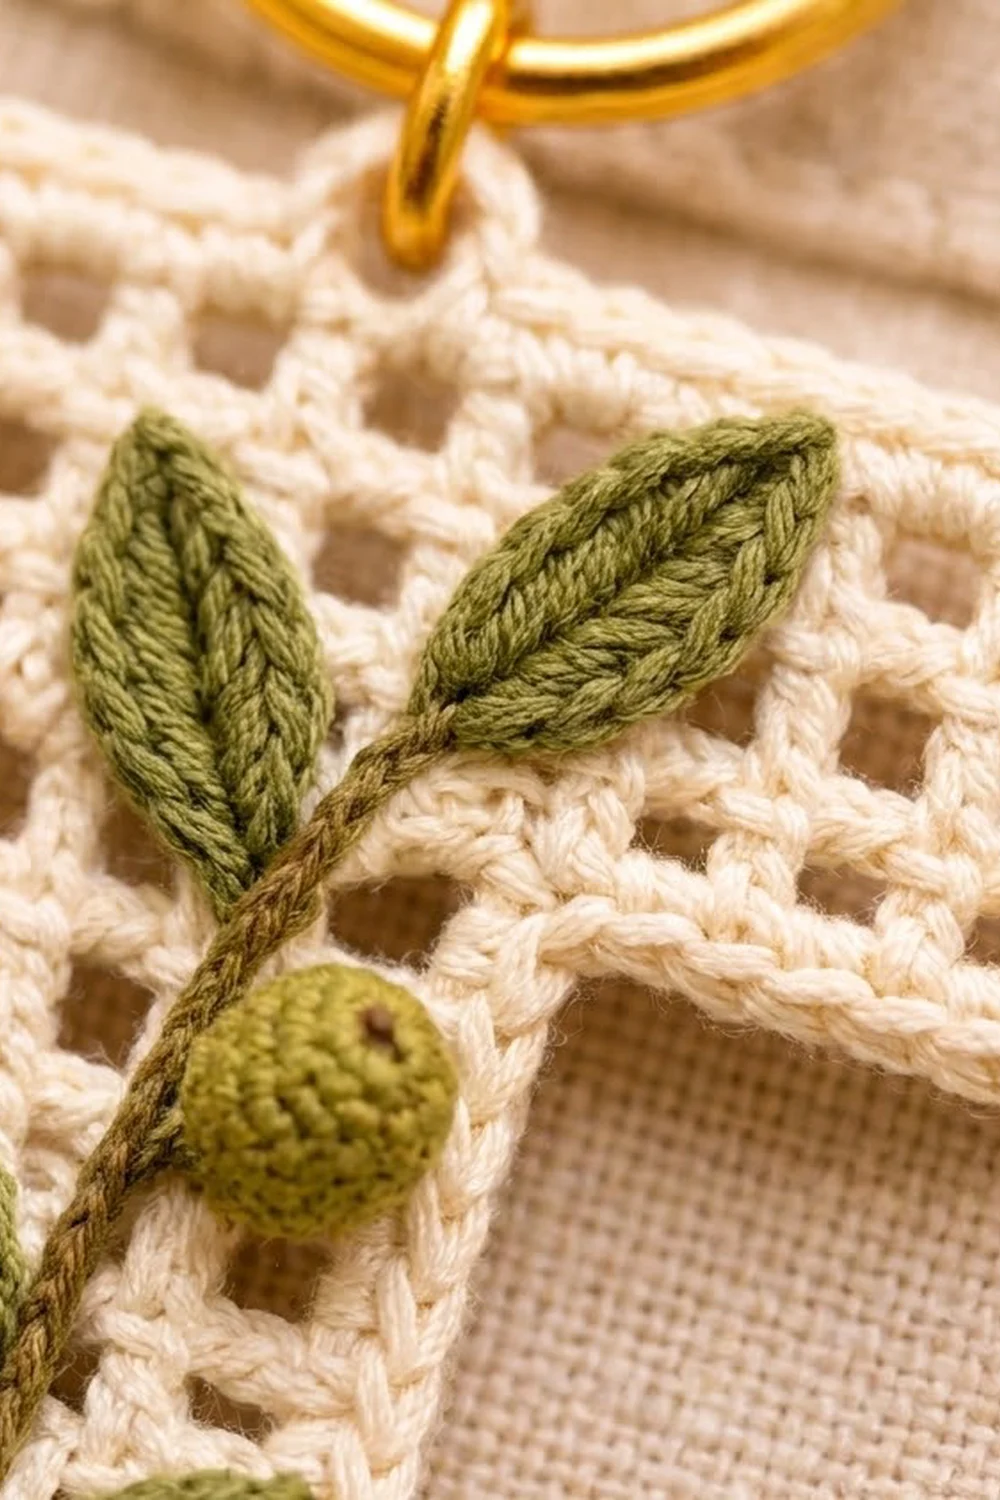
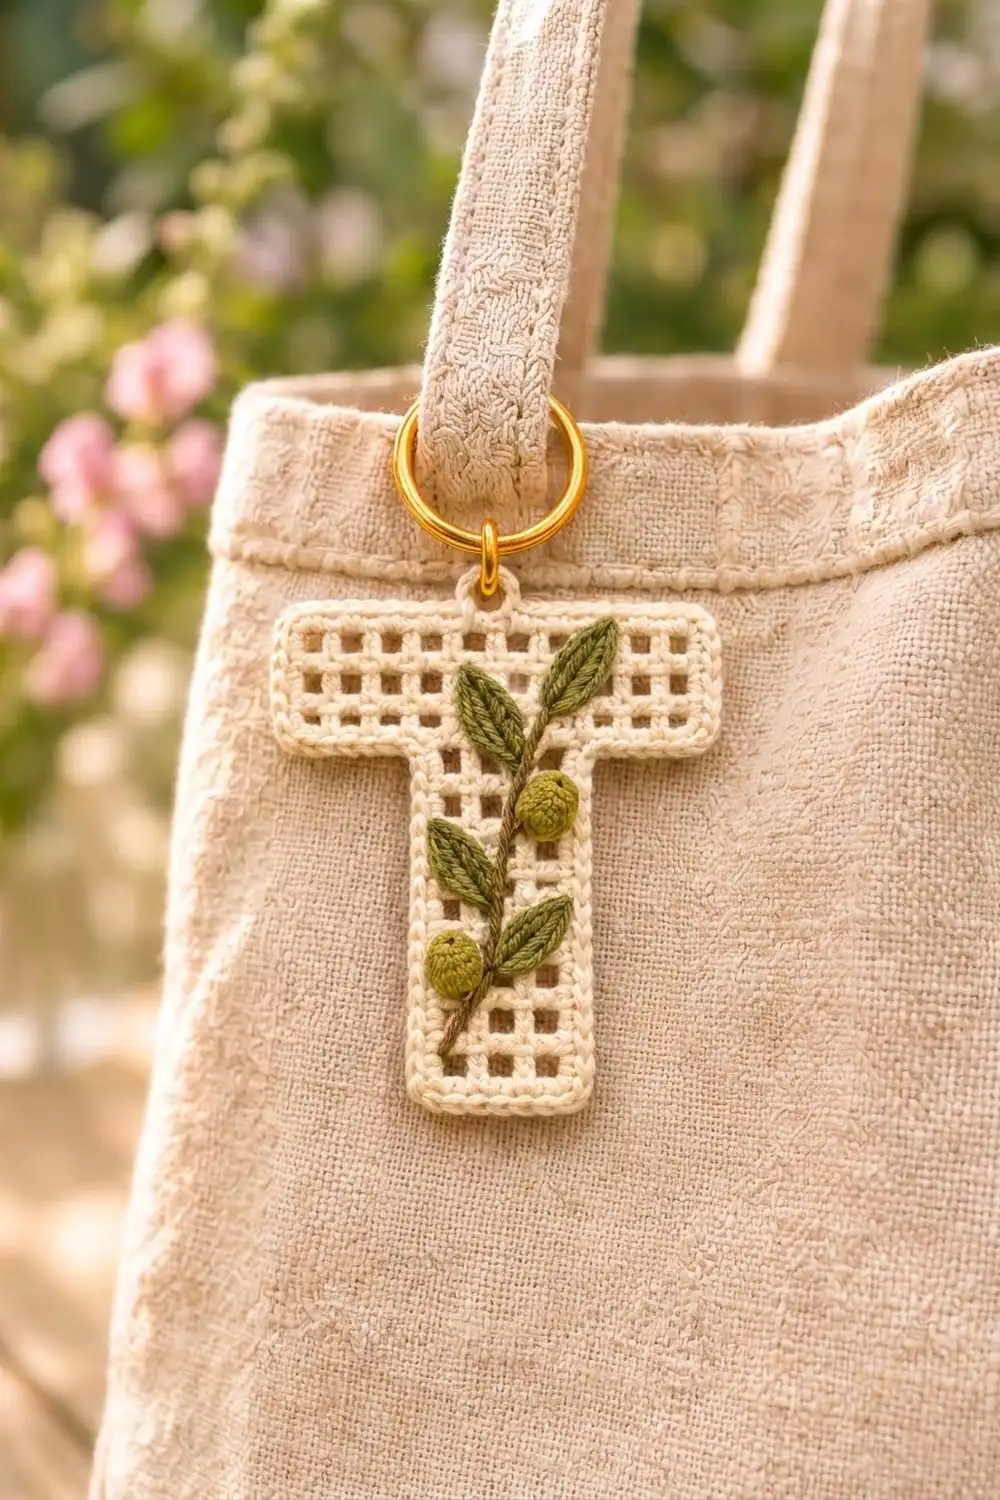
This little letter keychain pairs a crisp cream filet-mesh “T” with a delicate olive vine stitched across its face. The open grid keeps it light, the solid border gives it a clean, tailored outline, and the leaves and berries add a soft botanical touch. It works well as a monogram gift, a bag charm, or a quick market make.
The palette is quiet and natural: cream for the letter, sage-olive for the leaves and berries, and a deeper olive-brown for the vine and leaf veins. Gold hardware finishes it off.
The pattern uses US crochet terms. The finished letter measures 2.9 in (7.4 cm) wide by 3.5 in (8.9 cm) tall, not counting the hanging loop and ring.
You work the letter top-down in one piece. First comes the 8-square top bar, then the 4-square stem, which grows straight down from the bar’s center. Two rounds of single crochet border the whole shape. After that, you add a small loop, crochet the vine, leaves, and berries separately, and sew them on.
Finished Size and Construction
- Finished size: 2.9 in (7.4 cm) wide × 3.5 in (8.9 cm) tall
- Skill level: Easy-intermediate
- Terminology: US crochet terms
- Yarn weight: Fingering (#1 super fine) mercerized cotton
- Hook: 2.25 mm (US B-1)
- Number of pieces: 1 letter, plus appliqué parts (1 vine, 5 leaves, 2 berries)
- Layout: Single “T” shape: 8-square bar over a centered 4-square stem
- Mesh square size: 0.3 in (0.8 cm)
- Size before border: 2.4 in (6.1 cm) wide × 3.0 in (7.6 cm) tall; stem 1.2 in (3.0 cm) wide
- Border depth: 0.25 in (0.6 cm), 2 rounds of sc
Materials
Choose a smooth, mercerized cotton in fingering weight. It shows the grid clearly, holds its shape, and survives life on a keyring. Avoid fuzzy or very stretchy yarns, because the squares will blur and sag.
- Cream (main): 6 g / 20 m
- Sage-olive (leaves and berries): 2 g / 7 m
- Olive-brown (vine and veins): 1 g / 3 m
The quantities include a small safety margin.
Tools:
- 2.25 mm (US B-1) crochet hook
- Tapestry needle
- 1 in (2.5 cm) gold split key ring
- 8 mm gold jump ring
- 2 pairs of flat-nose pliers
- Blocking mat and rust-proof pins
- Optional: fabric stiffener or starch spray
- Scissors and a ruler
Abbreviations (US Terms)
- ch – chain
- sl st – slip stitch
- sc – single crochet
- hdc – half double crochet
- dc – double crochet
- sc2tog – single crochet 2 together
- sp – space
- st(s) – stitch(es)
- RS – right side
Special stitch: mesh square. One mesh square is one dc, ch 1, then one dc in the next dc. Next-door squares share their dc. A row of n squares has n + 1 dc and n ch-1 spaces, so it has 2n + 1 stitch positions.
Gauge and Checkpoints
Gauge: 4 mesh squares and 4 rows = 1.2 in (3.0 cm) square, so each square is 0.3 in (0.8 cm).
Test first: Ch 12 and work Rows 4–7 of the stem pattern (4 rows, 4 squares wide). Pin it flat without stretching and measure. This swatch is exactly one stem section, so it predicts the stem’s width directly.
Checkpoints:
- After Row 2 (bar): 2.4 in (6.1 cm) × 0.6 in (1.5 cm)
- After Row 10: 2.4 in (6.1 cm) wide × 3.0 in (7.6 cm) tall
- After Border Round 1: 2.65 in (6.7 cm) × 3.25 in (8.3 cm)
- After Border Round 2: 2.9 in (7.4 cm) × 3.5 in (8.9 cm)
Too big? Go down to a 2.0 mm hook. Too small? Go up to a 2.5 mm hook. Squares taller than they are wide? Pull up the dc loops slightly less, or make the ch-1 a little snugger.
The Letter T (Cream)
Top Bar
Row 1: Ch 20. Dc in the 6th ch from the hook. The 5 skipped chs count as the first dc, a ch-1 sp, and one skipped base ch. Work (ch 1, skip 1 ch, dc in next ch) 7 times. (8 squares: 9 dc, 8 ch-1 sps, 17 stitch positions)
Row 2: Ch 4 (counts as dc + ch 1) and turn. Skip the first ch-1 sp and dc in the next dc. Work (ch 1, dc in next dc) 6 times. Ch 1, then dc in the 4th of the 5 skipped chs from Row 1. (8 squares, 9 dc)
Checkpoint: the bar measures 2.4 in (6.1 cm) × 0.6 in (1.5 cm).
Stem
Row 3: Turn. Sl st in the first dc, then in the next ch-1 sp, next dc, next ch-1 sp, and next dc. You are now on the 3rd dc, and 2 squares are bypassed. Ch 4 (counts as dc + ch 1). Dc in the next dc. Work (ch 1, dc in next dc) 2 times. Ch 1, then dc in the next dc, which is the 7th dc. Leave the last 2 squares unworked. (4 squares: 5 dc, 9 stitch positions)
The stem is now centered under the bar, with 2 free squares on each side.
Rows 4–10: Ch 4 (counts as dc + ch 1) and turn. Dc in the next dc. Work (ch 1, dc in next dc) 2 times. Ch 1, then dc in the 3rd ch of the turning ch. (4 squares, 5 dc in each row)
Checkpoint: the stem is 1.2 in (3.0 cm) wide. The full letter is 2.4 in (6.1 cm) × 3.0 in (7.6 cm), and the stem is 8 rows tall, or 2.4 in (6.1 cm). Fasten off and weave in the ends.
Pick the neater face as the RS and hold the letter upright, with the foundation chain at the top.
Border (Cream)
Border gauge: Each sc is about 0.15 in (0.4 cm) wide and 0.125 in (0.3 cm) tall. Along horizontal edges, work 1 sc in each stitch position, which gives 2 sc per square. Along vertical edges, work 2 sc around each dc row end, which also gives 2 sc per 0.3 in (0.8 cm). Because both directions match the mesh, the edges lie flat.
Corner rules:
- Outer (convex) corners: work 3 sc in the corner stitch. There are 6.
- Inner (concave) corners: skip the shared corner stitch. There are 2, where the bar meets the stem.
Round 1: With the RS facing, join cream with a sc in the top-left corner ch of the foundation.
- Top edge: Work 2 more sc in the same ch (3 sc for the corner). Sc in each of the next 15 foundation chs, then 3 sc in the last ch.
- Bar right side: Work 2 sc around each of the 2 row ends (4 sc).
- Under the bar, right: Work 3 sc in the top of the corner dc. Sc in the ch-sp, the dc, and the ch-sp (3 sc). Skip the shared dc at the inner corner.
- Stem right side: Work 2 sc around each of the 8 row ends (16 sc).
- Stem bottom: Work 3 sc in the corner st, sc in each of the next 7 sts, then 3 sc in the last st.
- Stem left side: Work 16 sc.
- Under the bar, left: Skip the shared dc. Work 3 sc, inserting the hook under the slip stitches, then 3 sc in the corner dc.
- Bar left side: Work 4 sc.
- Sl st to the first sc.
Round 1 count: 21 + 4 + 6 + 16 + 13 + 16 + 6 + 4 = 86 sc.
Round 1 sides between corner-center sts: top 17, bar right 6, under-bar right 4, stem right 17, bottom 9, stem left 17, under-bar left 4, bar left 6. Add the 6 corner centers to get 86.
Round 2: Ch 1 and work around as follows:
- Sc in the first sc, then 3 sc in the next sc (corner center).
- Sc in the next 17 sts, then 3 sc in the corner center.
- Sc in the next 6 sts, then 3 sc in the corner center.
- Sc in the next 3 sts, then sc2tog across the inner corner.
- Sc in the next 16 sts, then 3 sc in the corner center.
- Sc in the next 9 sts, then 3 sc in the corner center.
- Sc in the next 16 sts, then sc2tog across the inner corner.
- Sc in the next 3 sts, then 3 sc in the corner center.
- Sc in the next 5 sts and sl st to the first sc.
Round 2 count: 86 + 12 (corners) − 2 (inner decreases) = 96 sc.
Round 2 per side: top 3 + 17 + 3; bar sides 6 each; under-bar sections 3 + 1 sc2tog each; stem sides 16 each; bottom 3 + 9 + 3.
Why the math works: Each outer corner gains 2 sts per round, which lets the corner turn 90° without cupping. Each inner corner loses 1 st per round, so it doesn’t ruffle. The straight sides stay at a 1:1 match with the mesh. Two rounds add 0.125 in (0.3 cm) each per side, which brings 2.4 × 3.0 in (6.1 × 7.6 cm) up to 2.9 × 3.5 in (7.4 × 8.9 cm).
Fasten off and weave in the ends.
Hanging Loop
Join cream in the 9th of the 17 top-edge sts, which is the exact center. Ch 8, then sl st in the same st. Turn and work 12 sc into the ch-8 loop. Sl st into the base and fasten off. The loop stands about 0.4 in (1.0 cm) tall.
Vine Appliqué (Olive-Brown)
Ch 26. Sl st into the back bump of the 2nd ch from the hook and each ch across (25 sl sts). The vine measures about 2.75 in (7.0 cm). Leave a 10 in (25.4 cm) tail for sewing.
Leaves (Sage-Olive) – Make 5
Ch 7. Working into the back bumps:
- Sc in the 2nd ch from the hook, hdc in the next ch, dc in each of the next 2 chs, hdc in the next ch, and sc in the last ch.
- Ch 2 for the pointed tip.
- Working along the other side of the foundation: sc in the first ch, hdc in the next, dc in each of the next 2, hdc in the next, and sc in the last.
- Sl st to the first sc.
(12 sts + ch-2 tip)
Each leaf is about 0.6 in (1.5 cm) long. With olive-brown, add a center vein in backstitch from the base to the tip. Leave a sage tail for sewing.
Berries (Sage-Olive) – Make 2
- Round 1: 6 sc in a magic ring. (6)
- Round 2: 2 sc in each st. (12)
- Round 3: Sc in each st. (12)
- Round 4: Sc2tog 6 times. (6)
Stuff the berry with its starting tail, then close the hole with the end tail. Each berry is about 0.35 in (0.9 cm) across.
Assembly of the Appliqué
- Lay the vine diagonally. Start about 0.4 in (1.0 cm) above the stem’s bottom left, and curve gently up to the bar, ending right of center about 0.3 in (0.8 cm) below the top edge.
- Whipstitch the vine down along its length, catching the mesh bars behind it.
- Sew the leaves on, alternating sides. Put 1 at the tip pointing up, 2 on the right, and 2 on the left, with their bases touching the vine and tips angled outward.
- Sew 1 berry on the right of the vine where the bar meets the stem, and 1 on the left of the lower stem.
- Open the jump ring sideways with the pliers. Thread it through the hanging loop and the split ring, then close it.
Final Blocking
- Lightly mist the letter with water. Remove the key ring first, or keep the hardware dry.
- Pin it to the mat at 2.9 in (7.4 cm) × 3.5 in (8.9 cm). Put pins at the 4 bar corners, the 2 stem corners, and the top center.
- Use a pin tip to nudge each square open until the grid is even.
- Check that the stem is 1.7 in (4.3 cm) wide, square to the bar, and centered.
- If you want it firmer, apply fabric stiffener to the cream areas only.
- Let it dry completely, at least 4 hours, before you unpin it.
- Lightly press the leaves into shape with your fingers.
Final Quality-Control Checklist
- The bar has 8 squares and the stem has 4, centered with 2 free squares on each side.
- The stem has 8 rows and the bar has 2.
- Border Round 1 has 86 sts and Round 2 has 96 sts.
- The outer corners are rounded and the inner corners lie flat.
- The finished size is 2.9 in (7.4 cm) × 3.5 in (8.9 cm).
- The loop is centered, and the jump ring is fully closed.
- The vine, 5 leaves, and 2 berries are secure, and no tails show.
Troubleshooting
- Squares lean or skew: You’re dc-ing into the ch-sp instead of the dc. Always work into the top of the dc.
- Stem off-center: Recount the Row 3 slip stitches. You need exactly 5 to land on the 3rd dc.
- Border ruffles: Your hook is too large, or you put 3 sc in each row end. Use 2.
- Border cups or pulls: You missed a 3-sc corner. Count the round.
- Inner corners bunch: Make sure you skipped the shared dc in Round 1 and used sc2tog in Round 2.
- Vine puckers the mesh: Sew more loosely and catch only the front bar of the mesh.
Care
Hand wash in cool water with mild soap, press out the water in a towel, and dry flat, reshaping as needed. If you used stiffener, re-apply it after washing.
Final Notes
The measurement chain is simple:
- Each square is 0.3 in (0.8 cm).
- The 8-square bar is 2.4 in (6.1 cm) wide and the 4-square stem is 1.2 in (3.0 cm) wide.
- The 10 rows make 3.0 in (7.6 cm) of height.
- Two border rounds add 0.25 in (0.6 cm) on every side, for a finished 2.9 in (7.4 cm) × 3.5 in (8.9 cm).
- The stitch counts are 86 sc in Round 1 and 96 sc in Round 2.
Check your gauge at the swatch, check again after the stem, and the rest falls into place. You can adapt the same mesh method to other letters for a full set of monograms.
Happy crocheting!