

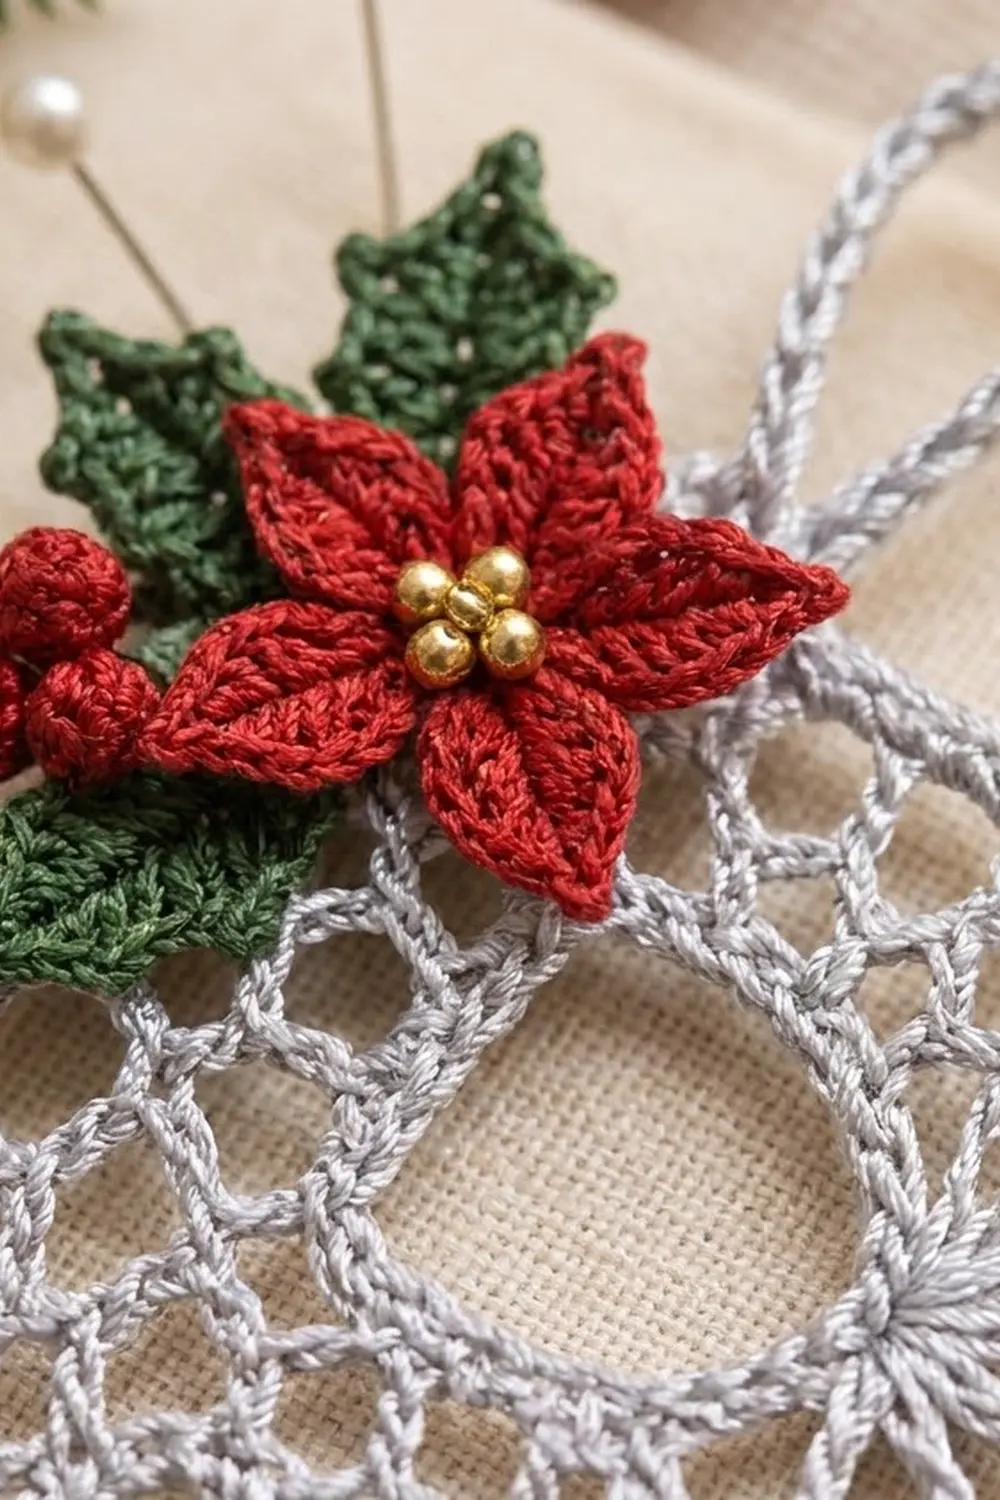
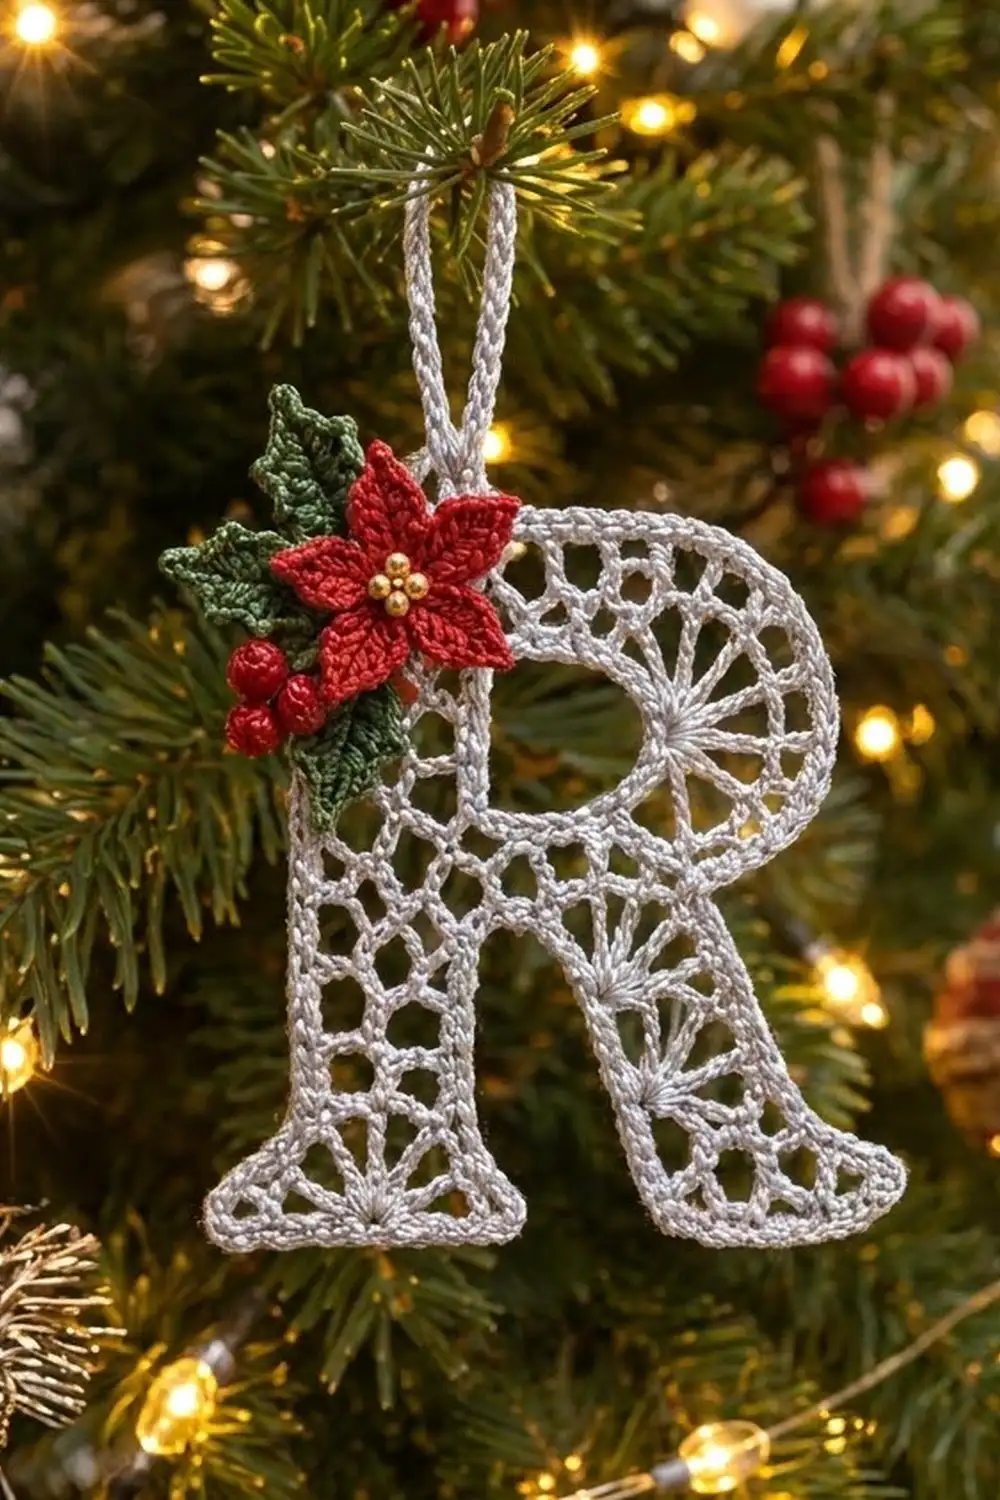
This lace letter R is a small heirloom ornament. It has an open silver honeycomb net, little sunburst fans in the feet, stem and bowl, and a crisp corded outline that makes the letter easy to read from across the room.
The colors are simple. Silver-gray thread forms the letter. A festive cluster in the top-left corner adds a red poinsettia with a gold bead center, two green holly leaves and three red berries.
The pattern uses US crochet terms. The finished letter measures 3.75 in (9.5 cm) wide by 4.75 in (12.1 cm) tall, plus a 1.25 in (3.2 cm) hanging loop.
You work the letter flat in rows from the bottom up: two legs, a joining row, a split around the counter, then the top bar. A two-round border outlines everything. Then you starch the letter, add the loop and sew on the appliqué.
Finished Size and Construction
- Finished size: 3.75 in (9.5 cm) x 4.75 in (12.1 cm), not counting the loop
- Skill level: Intermediate
- Terminology: US
- Yarn weight: Size 10 crochet thread (Lace, 0)
- Hook: 1.75 mm (US steel 6)
- Number of pieces: 1 letter, plus 1 flower, 2 leaves and 3 berries sewn on as appliqué
- Layout: Single ornament, no joining
- Size before border: 3.5 in (8.9 cm) x 4.5 in (11.4 cm)
- Border depth: 0.125 in (0.3 cm) on every edge
- Hanging loop: 1.25 in (3.2 cm)
Materials
Use mercerized cotton thread in size 10. It gives crisp stitch definition and takes starch well. A thread with a slight metallic sheen gives the frosted look.
- Silver-gray: 8 g, about 22 m (letter, border, loop)
- Red: 2 g, about 5.5 m (poinsettia, berries)
- Green: 1 g, about 3 m (holly leaves)
- Gold: 5 gold seed beads, size 8/0 (flower center)
All quantities include a margin of about 25 percent.
Tools:
– 1.75 mm hook
– Tapestry needle
– Beading needle and matching sewing thread
– Stitch markers
– Rustproof pins
– Foam blocking board
– Liquid starch
– A paper template of the letter, drawn at 3.75 x 4.75 in (9.5 x 12.1 cm)
Abbreviations (US Terms)
- ch: chain
- sl st: slip stitch
- sc: single crochet
- hdc: half double crochet
- dc: double crochet
- sp: space
- sc2tog: single crochet 2 together
- rsc: reverse single crochet (crab stitch)
- RS: right side
Net row: Ch 4, turn, sc in each sp across. The turning ch-4 is the first loop, so a row worked into N sps has N loops.
Fan (replaces 2 loops): Ch 1, (dc, [ch 1, dc] 5 times) in next sp, ch 1, sc in next sp. A fan has 6 dc and 5 inner ch-1 sps. On the next row the fan counts as 2 sps: work 1 sc in its 2nd inner ch-1 sp and 1 sc in its 4th.
Dec-start: Instead of ch 4, sl st into the first sp, then ch 4 and sc in each remaining sp. This takes away 1 loop at the start edge.
Inc-end: After the last sc, ch 4, then sc in the side of the edge stitch of the row below. This adds 1 loop at the end edge.
Odd rows begin at the right-hand edge as you look at the RS. Even rows begin at the left-hand edge.
Gauge and Checkpoints
Gauge: 4 loops and 6 rows = 1 in (2.5 cm) in net pattern, lightly stretched.
Your test piece is the stem leg (Rows 1–12). It should measure 1 in (2.5 cm) wide by 2 in (5.1 cm) tall.
Checkpoints:
– After Row 16: 3 in (7.6 cm) wide at the bowl and about 2.67 in (6.8 cm) tall
– After Row 27: 3.5 in (8.9 cm) x 4.5 in (11.4 cm)
– After the border: 3.75 in (9.5 cm) x 4.75 in (12.1 cm)
If the test leg is too big, use a 1.5 mm hook. If it is too small, use a 2 mm hook.
Stem Leg
With silver, ch 18.
Row 1 (RS): Sc in 2nd ch from hook, *ch 3, skip 3 ch, sc in next ch; repeat from * 3 more times. (5 sc, 4 sps)
Row 2: Ch 4, turn, sc in first sp, Fan, ch 4, sc in last sp. (4 loops, 1 fan)
Rows 3–7: Net row. (4 loops)
Row 8: Repeat Row 2. (4 loops, 1 fan)
Rows 9–12: Net row. (4 loops)
Fasten off. Row 12 ended at the stem’s right-hand edge.
Diagonal Leg
With silver, ch 18.
Rows 1–2: Work as for the stem leg. (4 loops, 1 fan)
Row 3: Dec-start, sc in each sp across, inc-end. (4 loops)
Row 4: Net row. (4 loops)
Rows 5–12: Repeat Rows 3–4 four more times. (4 loops)
The leg has now shifted left 5 times, once on each odd row from 3 to 11. That moves it 1.25 in (3.2 cm) toward the stem. Do not fasten off.
Checkpoint: Lay both legs flat with the feet level. They should be 1.5 in (3.8 cm) apart at Row 1 and 0.25 in (0.6 cm) apart at Row 12.
Joining Row and Lower Bowl
Row 13: Ch 4, turn, sc in each of the 4 sps of the diagonal leg (4 loops). For the bridge, ch 4 and sc in the last sc of stem Row 12 (1 loop). *Ch 4, sc in next stem sp; repeat from * 3 more times (4 loops). (9 loops)
Row 14: Ch 4, turn, sc in each sp across, working a Fan centered over the bridge. Inc-end twice. (11 loops, 1 fan)
Row 15: Net row. (11 loops)
Row 16: Net row, then inc-end. (12 loops)
Counter Split
Row 17, bowl side: Ch 4, turn, sc in each of the next 4 sps. Leave the remaining sps unworked. (4 loops)
Rows 18–19: Net row. (4 loops)
Row 20: Ch 4, turn, sc in first sp, Fan, ch 4, sc in last sp. (4 loops, 1 fan)
Rows 21–22: Net row. (4 loops)
Pull up a long loop at the right-hand edge and hold it on a marker.
Row 17, stem side: With the RS facing, join silver with a sl st in the 5th sp from the left edge of Row 16. Ch 4, then sc in each of the next 4 sps. (4 loops)
Rows 18–22: Net row. (4 loops) Fasten off.
The unworked sps between the two sections form the counter, which is 1 in (2.5 cm) square.
Top Bar
Row 23: Return the live loop to your hook. Ch 4, turn, sc in each of the 4 sps of the bowl section (4 loops). Ch 16, then sc in the last sc of the stem section’s Row 22; this bridge counts as 4 loops. *Ch 4, sc in next sp; repeat from * 3 more times (4 loops). (12 loops)
Row 24: Ch 4, turn, sc in each of the 4 stem sps. Across the bridge, ch 4 and sc in the 4th ch. Then work a Fan with its dc group in the 8th ch and its closing sc in the 12th ch. Ch 4, sc in the 16th ch. Finish with ch 4, sc in each of the bowl-section sps. (12 loops, 1 fan)
Row 25: Dec-start, sc in each sp across. (11 loops)
Row 26: Net row. (11 loops)
Row 27: Dec-start, sc in each sp across. (10 loops) Fasten off.
Checkpoint: The letter should be 3.5 in (8.9 cm) x 4.5 in (11.4 cm). Pin it to your template before you start the border.
Border
Border gauge: 12 sc = 1 in (2.5 cm). Work 3 sc per loop along horizontal edges and 2 sc per row along vertical edges.
Rnd 1: With the RS facing, join silver at the bottom-left corner of the stem foot. Work sc clockwise using the counts below.
These counts exclude corners. Work 1 extra sc at each of the 5 square corners: the 4 foot corners and the top-left corner.
- Stem foot: 12 sc
- Stem outer edge (27 rows): 54 sc
- Top edge (10 loops): 30 sc
- Upper-right curve, Rows 27–16: 30 sc (24 along row ends + 6 across the two dec steps)
- Lower-bowl curve, Rows 15–13: 15 sc (6 along row ends + 9 across the inc steps)
- Outer diagonal: 30 sc
- Diagonal foot: 12 sc
- Inner diagonal: 30 sc
- Under the Row 13 bridge: 3 sc
- Inner stem edge (12 rows): 24 sc
Rnd 1 total: 240 sc + 5 corner sc = 245 sc. Join with a sl st.
Rnd 2: Ch 1, rsc in each sc around. (245 rsc) Fasten off.
Counter Rnd 1: Join silver at any corner of the counter. Work 12 sc along each of the 4 sides. At each corner, work the last sc of one side and the first sc of the next together as a sc2tog to round it. (48 − 4 = 44 sts)
Counter Rnd 2: Ch 1, rsc in each st around. (44 rsc) Fasten off.
Why the math works: At 12 sc per inch:
– The 4.5 in (11.4 cm) stem edge takes 54 sc.
– The 2.5 in (6.4 cm) top edge takes 30 sc.
– Each 1 in (2.5 cm) foot takes 12 sc.
– Each 2.36 in (6.0 cm) diagonal edge needs 28 sc. Working 30 adds a little ease so the bias edge lies flat.
The two rounds add 0.125 in (0.3 cm) all around, taking the letter from 3.5 x 4.5 in (8.9 x 11.4 cm) to 3.75 x 4.75 in (9.5 x 12.1 cm).
Hanging Loop
Join silver in the 8th rsc to the right of the top-left corner. Ch 40, then sl st in the same st to make a ring. Work 50 sc over the chain ring and sl st to finish. Fasten off. The loop hangs 1.25 in (3.2 cm) tall.
Appliqué
Poinsettia (red): Make a magic ring and work 10 sc into it. Join. (10 sc)
Ch 8. Sl st in 2nd ch from hook, sc in next ch, hdc in next ch, dc in next 2 ch, hdc in next ch, sc in last ch (7 sts). Sl st in next 2 sc of the ring. Repeat from * to * 4 more times for 5 pointed petals. Fasten off.
The flower measures 1.1 in (2.8 cm) across. Sew 5 gold seed beads in a tight cluster at the center.
Holly leaf (green, make 2): Ch 11.
- First side: Sc in 2nd ch from hook, hdc, dc, picot (ch 3, sl st in 3rd ch from hook), 2 dc, picot, 2 dc, picot, hdc, sc. Work 3 sc in the last ch.
- Second side: Working along the other side of the foundation, sc, hdc, dc, picot, 2 dc, picot, 2 dc, picot, hdc, sc.
Join with a sl st. (21 sts, 6 picots) Each leaf is 0.75 in (1.9 cm) long.
Berry (red, make 3): Make a magic ring, ch 2, and work 5 dc into the ring. Pull the ring tight and sl st to the first dc. Each berry is 0.25 in (0.6 cm) across.
Layering:
1. Pin the leaves at the top-left corner of the letter, one pointing up and one pointing down-left. The tips should extend 0.5 in (1.3 cm) past the stem edge.
2. Tuck the berries in at the lower left of the cluster.
3. Place the poinsettia on top, covering the leaf bases.
4. Sew each layer through the border stitches with matching thread.
Final Blocking
- Soak the letter in diluted liquid starch, then press out the excess in a towel.
- Cover your template with plastic wrap and pin the letter over it on the foam board.
- Pin the 5 corners first, then the counter, then the curves every 0.5 in (1.3 cm).
- Open each fan evenly with a pin tip.
- Let the letter dry overnight, then unpin. Check that it measures 3.75 x 4.75 in (9.5 x 12.1 cm).
Final Quality-Control Checklist
- The letter measures 3.75 x 4.75 in (9.5 x 12.1 cm).
- Both feet are 1 in (2.5 cm) wide and level.
- The counter is open and rounded, with 44 rsc.
- The outer border has 245 rsc and lies flat.
- All 6 fans are open and even.
- The hanging loop is centered and 1.25 in (3.2 cm) tall.
- The appliqué is secure, with no stitches showing on the front.
Troubleshooting
- The diagonal leg twists: Make sure you shifted on odd rows only, 5 times in total.
- The border ruffles: Skip 1 sc in every 12 on the long edges.
- The border cups: Add 1 sc per inch on the curves.
- The fans bunch up: On the next row, place your sc in the fan’s 2nd and 4th inner ch-1 sps.
- The letter is too wide: Go down a hook size and remake the test leg.
Care
Hand wash in cool water and lay flat to dry. Re-starch and pin the letter to its template whenever it softens.
Final Notes
The measurements build on each other:
1. A gauge of 4 loops and 6 rows per 1 in (2.5 cm) gives a 1 x 2 in (2.5 x 5.1 cm) test leg.
2. The test leg builds into a 3.5 x 4.5 in (8.9 x 11.4 cm) letter.
3. A 12-sc-per-inch border adds 0.125 in (0.3 cm) all around, for a 3.75 x 4.75 in (9.5 x 12.1 cm) ornament.
Check each stage before you move on.
Happy crocheting!