

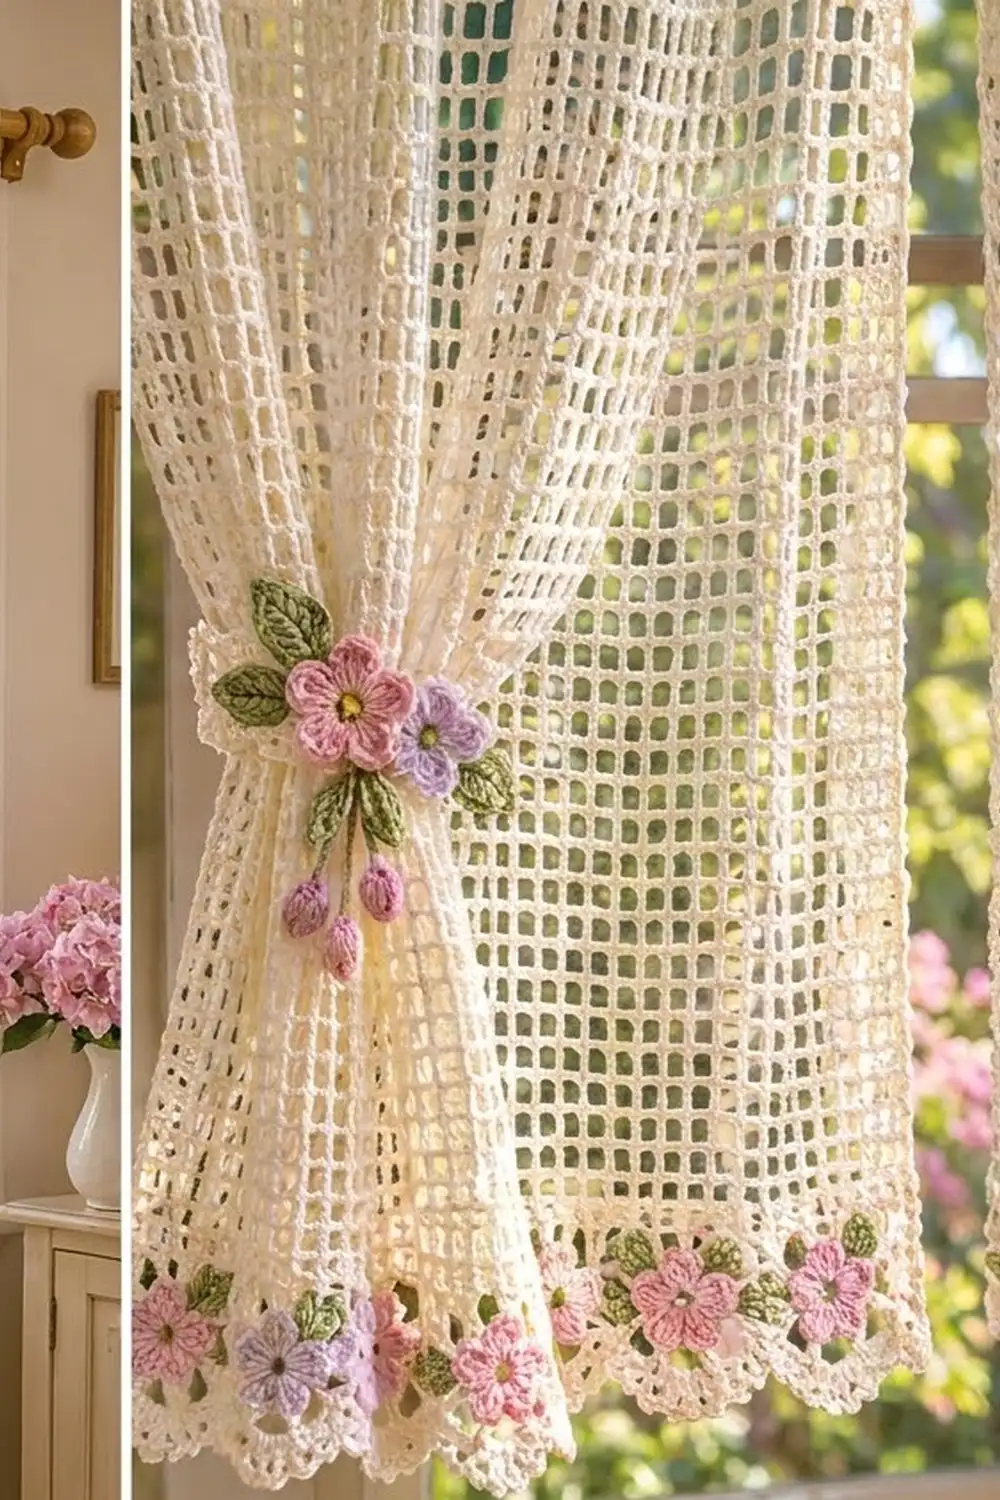
This curtain panel has a soft cottage look. The body is an open cream filet mesh of even square windows, so daylight passes straight through. A row of pink and lavender five-petal flowers runs along the lower band, with small green leaves between them. Picot-trimmed scallops finish the hem.
The palette is cream, rose pink, soft lavender, and sage green. Tab tops slide onto a standard curtain rod, and a matching flower tieback gathers each panel to the side.
This pattern uses US crochet terms. One finished panel measures about 24.5 in (62.2 cm) wide and 46 in (116.8 cm) long, not counting the tabs. The tab loops add about 2 in (5.1 cm) above the top edge.
Each panel is crocheted in one piece. You work the mesh from the bottom up, then add a solid header and seven tabs. Next you work the flower band and scallops along the foundation edge, then a single crochet edging up each side. The flowers and leaves are made separately and sewn on. Make two panels and two tiebacks for a window pair.
Finished Size and Construction
- Finished panel size: 24.5 in x 46 in (62.2 cm x 116.8 cm), plus 2 in (5.1 cm) tab loops
- Skill level: Easy to intermediate
- Terminology: US crochet terms
- Yarn weight: DK / light (#3) cotton
- Hook: 3.5 mm (US E-4)
- Number of pieces: 2 separate panels (not joined to each other) and 2 tiebacks, plus sewn-on flowers, leaves, and buds
- Layout: each panel is 40 mesh squares wide x 70 mesh rows tall
- Mesh square size: 0.6 in (1.5 cm)
- Size before border: 24 in x 43.2 in (61.0 cm x 109.7 cm), mesh body plus header
- Border depth: 2.8 in (7.1 cm) at the bottom; the side edging adds about 0.2 in (0.5 cm) per side
Materials
Choose a smooth DK cotton or cotton blend. Cotton keeps the mesh crisp and hangs well. The amounts below assume about 125 m per 50 g ball.
- Cream (main color): 260 g, about 650 m
- Rose pink: 20 g, about 50 m
- Lavender: 20 g, about 50 m
- Sage green: 20 g, about 50 m
These amounts cover two panels and two tiebacks. They include a margin of roughly 20% for your swatch and for small differences in tension.
Tools:
- 3.5 mm (US E-4) crochet hook
- Tapestry needle
- Stitch markers (at least 8)
- Scissors and a measuring tape
- Blocking mats and rust-proof pins
- Spray bottle with water
Abbreviations (US Terms)
- ch – chain
- sl st – slip stitch
- sc – single crochet
- hdc – half double crochet
- dc – double crochet
- sk – skip
- sp – space
- st(s) – stitch(es)
- RS / WS – right side / wrong side
- rep – repeat
Special stitches:
- Mesh: dc, ch 2, sk 2. Each mesh square is one dc post plus a ch-2 space, worked over 3 stitches.
- Picot: ch 3, then sl st into the sc you just made.
Gauge and Checkpoints
Gauge: 5 mesh squares x 5 mesh rows = 3 in (7.6 cm) square. In solid dc, 15 dc = 3 in (7.6 cm), which is 5 dc per inch. In sc, 5 sts and 4 rows = 1 in (2.5 cm).
Test first: Ch 20. Work Row 1 of the body to get 5 meshes, then work 4 more rows. After a light spray block, the swatch should measure 3 in (7.6 cm) square.
Checkpoints:
- After Row 10: 24 in (61.0 cm) wide and 6 in (15.2 cm) tall
- After Row 35: 21 in (53.3 cm) tall
- After Row 70: 42 in (106.7 cm) tall
- After the header: 43.2 in (109.7 cm) tall
- After the flower band: 45 in (114.3 cm) tall
- After the scallops: 46 in (116.8 cm) tall
If your piece is too big, switch to a 3.25 mm hook. If it is too small, switch to a 3.75 mm hook. Mesh stretches under its own weight, so always measure it lying flat.
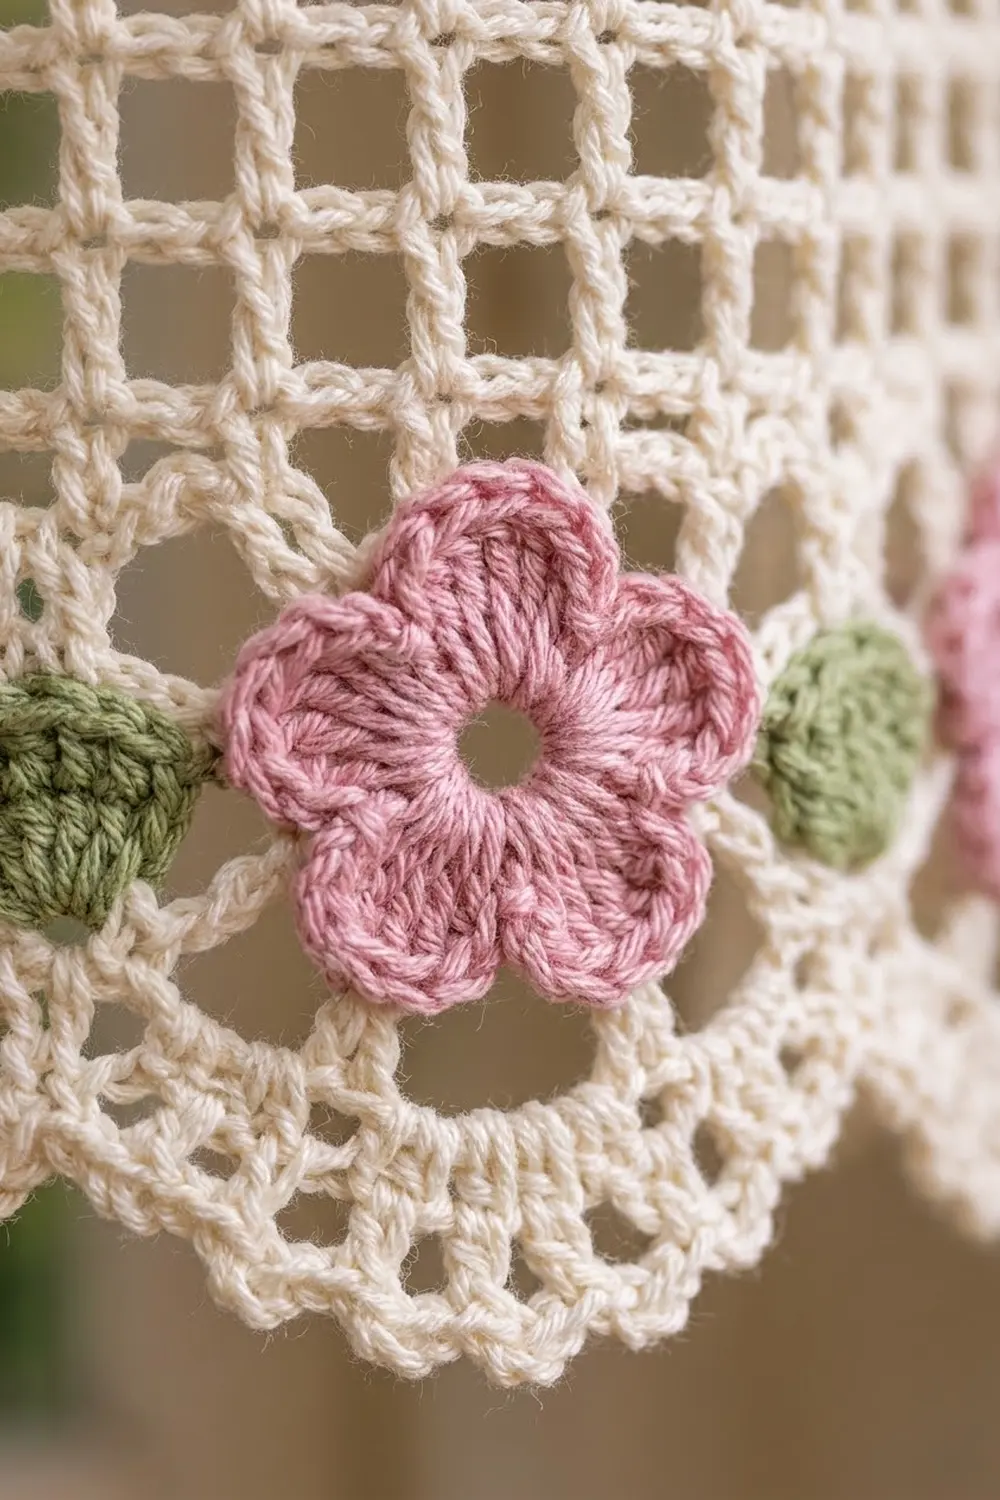
Panel Body (Filet Mesh)
With cream, ch 125.
Row 1 (RS): Dc in the 8th ch from the hook. The 7 skipped chains count as a dc, a ch 2, and 2 skipped chains. Ch 2, sk 2 ch, dc in the next ch. Rep from * across. (40 meshes; 41 dc posts*)
Rows 2–70: Ch 5 (counts as dc + ch 2), turn. Sk the first ch-2 sp, dc in the next dc. Ch 2, dc in the next dc. Rep from * across, working the last dc in the 3rd ch of the turning ch-5. (40 meshes; 41 dc posts*)
Keep your dc posts upright, and pull every ch-2 to the same size so the squares stay even.
Header and Tabs
Row 71 (conversion row): Ch 3 (counts as dc), turn. 2 dc in the next ch-2 sp, dc in the next dc. Rep from * across, working the last dc in the 3rd ch of the turning ch-5. Count: 41 dc (1 in each existing post) + 80 dc (2 in each space) = 121 dc*.
Row 72: Ch 3 (counts as dc), turn. Dc in each st across. (121 dc) Fasten off.
The panel should now measure 43.2 in (109.7 cm) tall.
Placing the tabs: You will make seven tabs, each 7 sts wide, with 12 sts between them. Check: 7 tabs x 7 sts = 49 sts, plus 6 gaps x 12 sts = 72 sts, for 121 sts total. Place markers in sts 1, 20, 39, 58, 77, 96, and 115.
Tab (make 7):
Row 1: Join cream in a marked st. Ch 1, sc in the same st and in the next 6 sts. (7 sc)
Rows 2–16: Ch 1, turn, sc in each st across. (7 sc)
Each tab measures 1.4 in (3.6 cm) wide and 4 in (10.2 cm) long. Fasten off, leaving a 10 in (25.4 cm) tail. Fold the tab to the WS and whipstitch its last row across the base of Row 72. This makes a loop about 2 in (5.1 cm) tall.
Make All Pieces
The flowers, leaves, buds, and tieback straps are made separately. The counts below are enough for two panels and two tiebacks.
Flower (make 13 pink and 13 lavender):
Rnd 1: Make a magic ring. Ch 1, 10 sc in the ring, sl st to the first sc. Pull the ring almost closed, leaving a small center hole. (10 sc)
Rnd 2: (Hdc, 3 dc, hdc) in the next sc, sl st in the next sc. Rep from * 4 more times. (5 petals*: 25 petal sts + 5 sl st)
Fasten off, leaving a long tail. The finished flower measures about 1.6 in (4.1 cm) across.
Leaf (make 26 in sage green): Ch 5. Sc in the 2nd ch from the hook, hdc in the next ch, dc in the next ch, sc in the last ch. Ch 1, then turn the piece to work along the other side of the chain: sc in the same ch, dc in the next ch, hdc in the next ch, sc in the last ch. Sl st to the tip. (8 sts) This makes a pointed oval about 0.8 in (2.0 cm) long.
Bud (make 4 in pink): Make a magic ring. Ch 2, 5 dc in the ring. Pull the ring tight and sl st to the top of the ch-2. Fasten off, leaving a tail.
Tieback strap (make 2 in cream): Ch 81.
Row 1: Sc in the 2nd ch from the hook and in each ch across. (80 sc)
Rows 2–4: Ch 1, turn, sc in each st. (80 sc)
At the end of Row 4, ch 12 and sl st to the corner to make a hanging loop. Fasten off. Join cream at the diagonally opposite corner and make a second ch-12 loop. The strap measures 16 in x 1 in (40.6 cm x 2.5 cm).
| Piece | Per panel band | Tiebacks (2) | Total |
|---|---|---|---|
| Pink flowers | 5 | 3 | 13 |
| Lavender flowers | 5 | 3 | 13 |
| Leaves | 9 | 8 | 26 |
| Pink buds | – | 4 | 4 |
Band layout (one panel, right to left):
P - L - V - L - P - L - V - L - P - L - V - L - P - L - V - L - P - L - V
P = pink flower   V = lavender flower   L = leaf
Joining the Appliqués
Nothing is crocheted together in this step. Sew the flowers and leaves to the solid band after the border is finished.
Placement: The band sits above 20 scallops, each 1.2 in (3.0 cm) wide. Center one flower over each pair of scallops. The first flower center is 1.2 in (3.0 cm) from the right edge, and each following center is 2.4 in (6.1 cm) farther along. The last one lands 1.2 in (3.0 cm) from the left edge. Center a leaf horizontally between each two flowers.
Sewing: Pin everything in place first. Using each flower’s own tail, sew through the back loops of Rnd 1 into the dc of band Row 2, one stitch at a time. Tack each petal tip down with one small stitch. Sew each leaf along its center line and tack both tips.
Tension: Keep your sewing stitches snug but not tight. If you pull too hard, the band will pucker and measure less than 24 in (61.0 cm).
Tiebacks: Sew 3 flowers to the center of each strap: pink, lavender, pink on one, and lavender, pink, lavender on the other. Tuck 4 leaves around each cluster. For each bud strand, join green behind the cluster, ch 15, fasten off, and sew a bud to the end. Make 2 strands per tieback. They hang about 3 in (7.6 cm) below the strap.
Size checkpoint: Lay the panel flat. The band should still measure 24 in (61.0 cm) across.
Border
Border gauge: 5 dc per inch across the band, and 3 sc in each dc row end on the sides. Each dc row is 0.6 in (1.5 cm) tall, and 3 sc at 5 sc per inch also cover 0.6 in (1.5 cm).
Bottom Border (Flower Band and Scallops)
Turn the panel upside down. With RS facing, join cream at the right corner and work into the underside of the foundation chain.
Row 1 (conversion row): Ch 3 (counts as dc). Work 1 dc at the base of each dc post and 2 dc in each ch-2 sp. Count: 41 dc (1 per post) + 80 dc (2 per space) = 121 dc.
Row 2: Ch 3, turn, dc in each st. (121 dc)
Row 3: Ch 3, turn, dc in each st. (121 dc)
The solid band now measures 1.8 in (4.6 cm) deep.
Row 4 (scallops): Ch 1, turn. Sc in the first st. Sk 2 sts, 7 dc in the next st, sk 2 sts, sc in the next st. Rep from * across. Count: 21 sc + 140 dc = 161 sts (20 scallops*).
Row 5 (picot edge): Ch 1, turn, sl st in the first sc. Sc in the next 2 dc, (sc in the next dc, picot) 3 times, sc in the next 2 dc, sl st in the next sc. Rep from * across. Each scallop gets 7 sc + 3 picots, for totals of 140 sc, 60 picots, and 21 sl st*.
Fasten off. The scallop rows add 1 in (2.5 cm), so the bottom border is 1.8 + 1 = 2.8 in (7.1 cm) deep.
Side Edging
With RS facing, join cream at the end of band Row 3, just above the scallops. Work 3 sc in each dc row end up the side: band Rows 3, 2, and 1, then body Rows 1–70, then header Rows 71–72.
Count per side: 3 + 70 + 2 = 75 rows x 3 sc = 225 sc. Fasten off. Work the other side the same way, starting at the header and ending at band Row 3. (225 sc)
Why the math works: The scallop repeat is 6 sts, plus 1 stitch to close: 121 = 6 x 20 + 1, so the scallops end evenly at both corners. Each side has 75 dc rows of 0.6 in (1.5 cm), which adds up to 45 in (114.3 cm). At 5 sc per inch, 225 sc also measure 45 in (114.3 cm), so the edging lies flat without stretching or rippling.
Final Blocking
- Weave in all ends along the dc posts so they stay hidden.
- Lay the panel RS up on blocking mats.
- Pin the width to 24 in (61.0 cm) across the body.
- Pin each long side straight every 3 in (7.6 cm), at 43.2 in (109.7 cm) from the top of the header to the top of the band.
- Pin the center picot of each scallop, spacing the points 1.2 in (3.0 cm) apart.
- Spray until damp. Don’t soak the panel, because wet cotton mesh stretches.
- Use your fingers to square up any uneven mesh.
- Let the panel dry completely before you unpin it. Block the tiebacks flat to 16 in x 1 in (40.6 cm x 2.5 cm).
Final Quality-Control Checklist
- 40 meshes across and 70 mesh rows
- 121 dc in each header row and each band row
- 7 evenly spaced tabs, each 7 sts wide
- 20 scallops with 3 picots each
- 225 sc on each side edge
- 10 flowers and 9 leaves per panel
- Each panel measures 24.5 in x 46 in (62.2 cm x 116.8 cm)
- The two panels match within 0.5 in (1.3 cm)
Troubleshooting
Mesh squares are tall rectangles: Your ch-2 is too tight. Loosen your chains.
The panel leans to one side: You missed the last dc in a turning chain. Count 41 posts every few rows.
Scallops end unevenly: Recount Row 3. It must have exactly 121 sts.
The sides ripple: Work 2 sc in a few row ends instead of 3.
The sides pull in: Go up one hook size for the edging.
Flowers cup: Rnd 1 was pulled too tight. Spray-block the flowers flat before you sew them on.
Tabs twist on the rod: Whipstitch across all 7 sts of each tab.
Care
Hand wash in cool water with mild soap. Lay flat to dry and reshape the mesh. Don’t hang the panel while it’s wet, or it will stretch.
Final Notes
Every measurement starts with a 0.6 in (1.5 cm) mesh square. Forty squares give you 24 in (61.0 cm) of width, and seventy rows give you 42 in (106.7 cm) of length. The header brings the panel to 43.2 in (109.7 cm), and the band and scallops finish it at 46 in (116.8 cm). The 121 stitches in the header and band divide evenly into 7 tabs and 20 scallops, and the 225 side stitches match the 45 in (114.3 cm) of dc rows on each side.
Happy crocheting!