

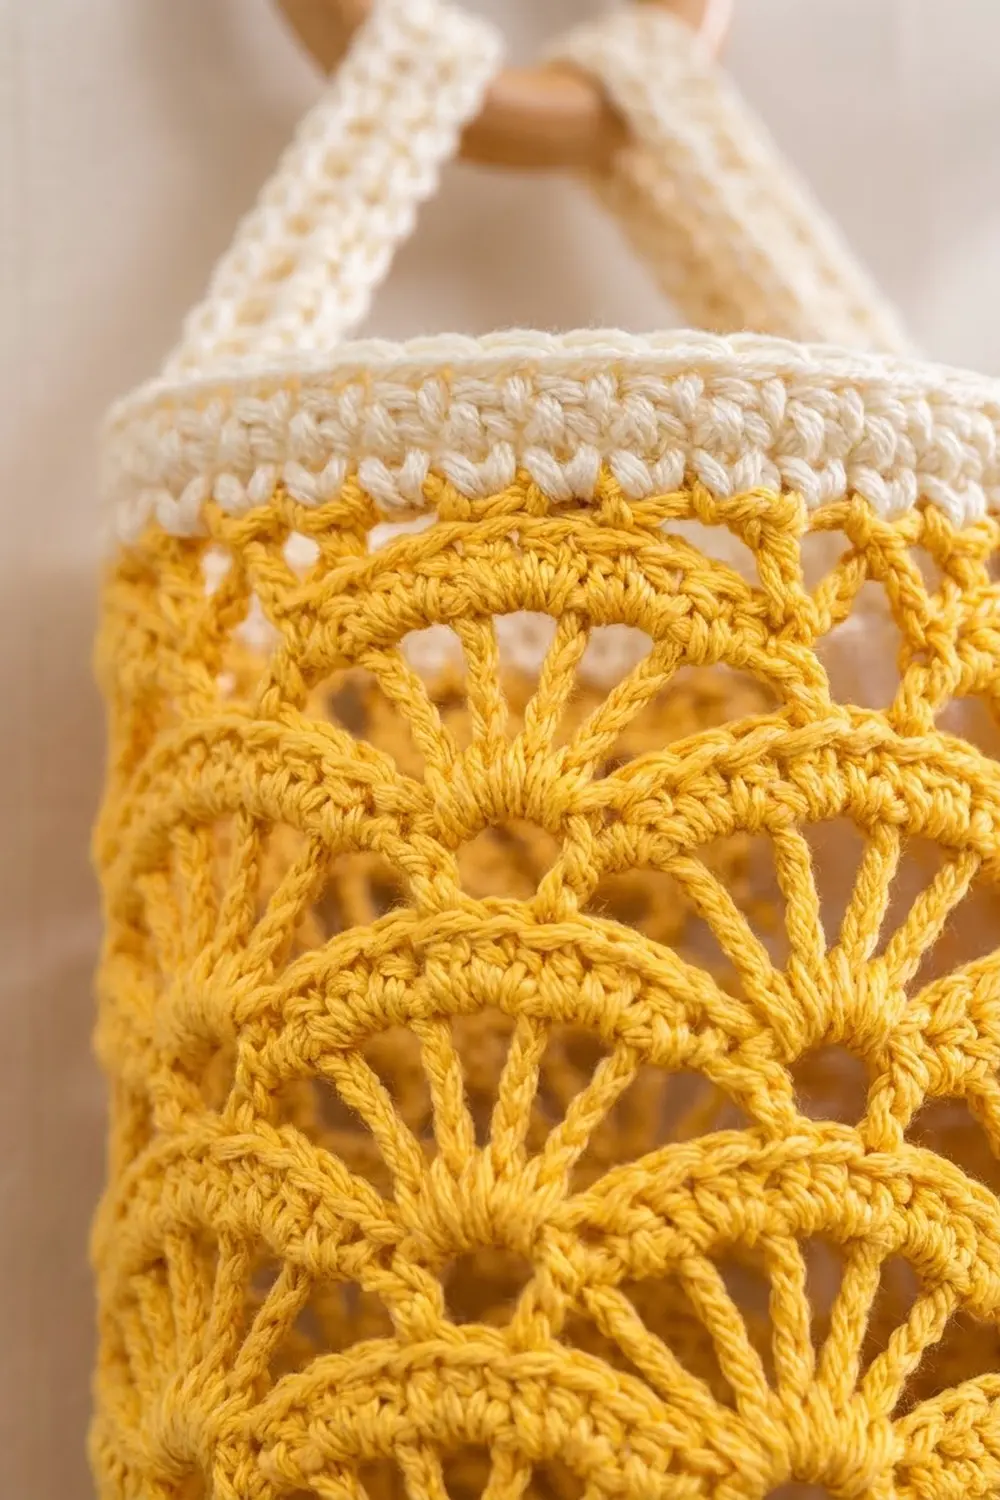
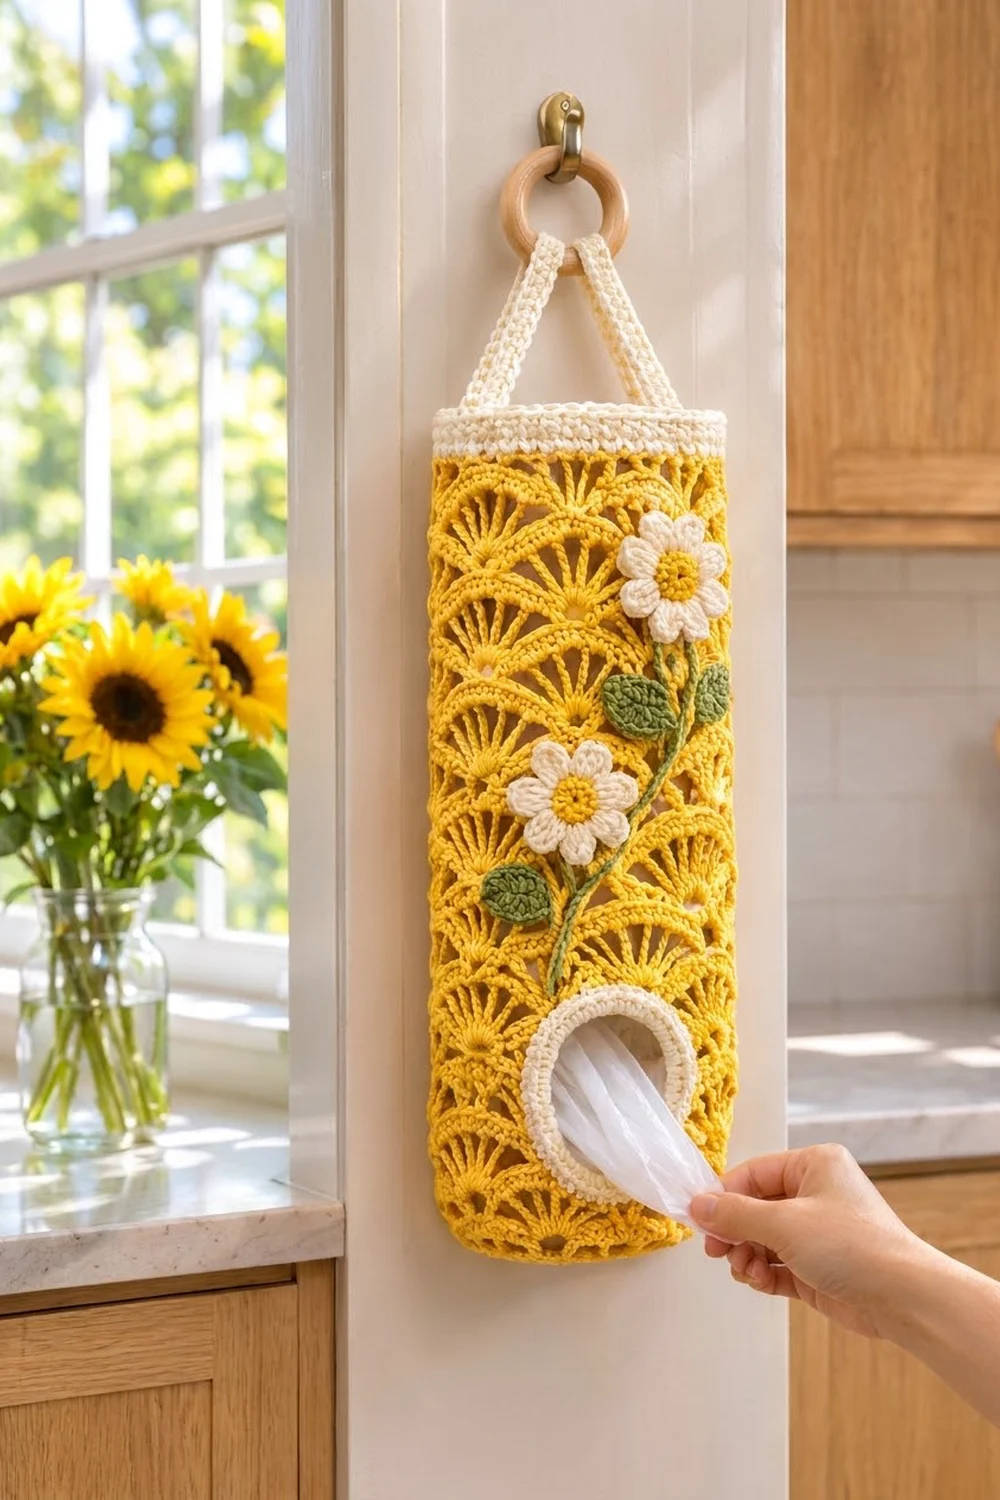
This cheerful bag holder keeps your plastic grocery bags tidy, and you only need one hand to pull them out. The body is an open fan lace in warm sunflower yellow. Each round of fans sits between the fans of the round below, so you get a pretty, brick-like pattern of arches.
Cream yarn is used for the solid top band, the two hanging straps and the padded ring around the pull-out hole. Two cream daisies with yellow centers climb a sage-green vine on the front. The style is farmhouse kitchen: bright, practical and easy to wash.
The pattern uses US crochet terms. The finished holder measures 8 in (20.3 cm) wide when laid flat and 18 in (45.7 cm) tall, with straps adding about 5 in (12.7 cm) above the band.
Construction is simple. You crochet a flat circle for the base, then work fan rounds straight up into a tube. For three rows near the bottom you work back and forth to leave an opening for the bags. Then you finish with the cream top band, the hole ring, the straps and the sewn-on appliqués.
Finished Size and Construction
- Finished size: 8 in (20.3 cm) wide flat × 18 in (45.7 cm) tall; circumference 16 in (40.6 cm)
- Skill level: Intermediate
- Terminology: US crochet terms
- Yarn weight: Worsted (#4) cotton or cotton blend
- Hook: 5.0 mm (H-8) for the body; 4.0 mm (G-6) for the appliqués
- Number of pieces: 1 body (straps worked on directly), plus 2 daisies, 4 leaves and 1 stem sewn on
- Layout: Single tube, no joining
- Piece size: Base 5.1 in (13.0 cm) across; fan section 16.5 in (41.9 cm) tall
- Size before border: 16.5 in (41.9 cm) tall
- Border depth: Top band 1.5 in (3.8 cm); hole ring 0.75 in (1.9 cm) wide
Materials
Pick a smooth worsted cotton. It holds the fan shape well, does not stretch much under the weight of the bags, and washes easily. The amounts below are based on cotton with about 170 m per 100 g.
- Sunflower yellow (A): 180 g / 306 m
- Cream (B): 45 g / 77 m
- Sage green (C): 15 g / 26 m
All quantities include a margin of roughly 15%.
Tools:
– 5.0 mm (H-8) and 4.0 mm (G-6) crochet hooks
– Wooden ring, 2.5 in (6.4 cm) across
– Tapestry needle
– 4 stitch markers
– Scissors and a measuring tape
– Rust-proof pins for blocking
Abbreviations (US Terms)
- ch – chain
- sl st – slip stitch
- sc – single crochet
- hdc – half double crochet
- dc – double crochet
- sc2tog – single crochet 2 together
- sp – space
- sk – skip
- rep – repeat
Special stitches:
– Fan: (dc, ch 1) 4 times, dc, all in the same stitch. Each fan has 5 dc and 4 ch-1 sps. The center dc is the 3rd dc.
– Half fan: (dc, ch 1) twice, dc in the same stitch. Each half fan has 3 dc. You only use it at the edges of the hole rows.
Gauge and Checkpoints
Base gauge: With the 5.0 mm hook, 15 dc = 4 in (10.2 cm).
Fan gauge: 1 fan repeat (fan + sc) = 1.6 in (4.1 cm) wide. 2 fan rounds = 1.5 in (3.8 cm) tall.
Band gauge: 16 sc and 18 rows = 4 in (10.2 cm).
The base is your gauge swatch, so work it first and measure before going on.
Checkpoints:
1. After Base Rnd 5: 5.1 in (13.0 cm) across.
2. After Fan Rnd 3: the tube is 16 in (40.6 cm) around and 2.25 in (5.7 cm) tall.
3. After Row 6: the hole is 3.2 in (8.1 cm) wide and 2.25 in (5.7 cm) tall.
4. After Fan Rnd 22: 16.5 in (41.9 cm) tall.
5. After the band: 18 in (45.7 cm) tall in total.
If your base is too big, go down half a hook size. If it is too small, go up half a size. Fix the size now, because one extra repeat of the fan pattern would add 1.6 in (4.1 cm) to the circumference.
Base
With A and the 5.0 mm hook, make a magic ring.
Rnd 1: Ch 3 (counts as dc throughout), 11 dc in ring, join to the top of ch-3. (12 dc)
Rnd 2: Ch 3, dc in the same st, 2 dc in each st around, join. (24 dc)
Rnd 3: Ch 3, 2 dc in next st, dc in next st, 2 dc in next st, rep around, join. (36 dc)
Rnd 4: Ch 3, dc in next st, 2 dc in next st, dc in next 2 sts, 2 dc in next st, rep around, join. (48 dc)
Rnd 5: Ch 3, dc in next 2 sts, 2 dc in next st, dc in next 3 sts, 2 dc in next st, rep around, join. (60 dc)
The circle should lie flat and measure 5.1 in (13.0 cm) across.
Fan Body
There are no more increases from here. The fans will turn upward and make the wall of the tube. Do not turn at the end of a round unless the pattern tells you to.
Fan Rnd 1: Ch 1, sc in the first st, sk 2 sts, fan in the next st, sk 2 sts, sc in the next st. Rep from * 8 more times. Then sk 2, fan in the next st, sk 2, and join to the first sc. (10 fans, 10 sc)
Each repeat uses 6 base stitches, and 10 × 6 = 60.
Fan Rnd 2: Ch 4 (counts as dc + ch 1). Work (dc, ch 1) 3 times and dc, all in the same sc, to make the first fan. Sc in the center dc of the next fan, fan in the next sc. Rep from * 8 more times. Sc in the center dc of the last fan and join to the 3rd ch of the beginning ch-4. (10 fans, 10 sc)
Fan Rnd 3: Sl st in the next ch-1 sp, the next dc, the next ch-1 sp and the next dc, so you are at the center dc. Ch 1 and sc in the same dc. Fan in the next sc, sc in the center dc of the next fan. Rep from * 8 more times. Fan in the last sc and join to the first sc. (10 fans, 10 sc)
Number the sc of Rnd 3 from 0 to 9, starting with the joining sc. Each sc 0 to 9 has a fan after it.
Dispenser Hole (Rows 4–6)
Row 4 (RS): Ch 4 and work (dc, ch 1, dc) in sc 0 to make a half fan. Sc in the center dc of the next fan. Fan in the next sc, sc in the center dc of the next fan. Rep from * 6 more times, which puts fans on sc 1 to sc 7. To end the row, work (dc, ch 1) twice and dc in sc 8 to make a half fan. Turn. (2 half fans, 7 fans, 8 sc)
The fan after sc 8, sc 9 and the fan after sc 9 are left unworked. That opening is 12 stitch-widths, or 3.2 in (8.1 cm).
Row 5 (WS): Ch 1 and sc in the first dc. Fan in the next sc, sc in the center dc of the next fan. Rep from * 6 more times. Fan in the last sc, then sc in the 3rd ch of the turning ch-4. Turn. (8 fans, 9 sc)
Row 6 (RS): Work as for Row 4, but begin in the first sc. Do not turn. (2 half fans, 7 fans, 8 sc)
Close the gap: Ch 11, then sl st in the 3rd ch of the ch-4 at the start of Row 6.
Rejoining the Round
Fan Rnd 7: Ch 1 and sc in the same st. Fan in the next sc, sc in the center dc of the next fan. Rep from * 6 more times. Fan in the next sc, then sc in the last dc of Row 6. Now work across the chain: sk 2 ch, fan in the next ch, sk 2 ch, sc in the next ch, sk 2 ch, fan in the next ch, sk 2 ch. Join to the first sc. (10 fans, 10 sc)
The chain section uses 4 skipped pairs plus 3 worked stitches, which accounts for all 11 chains.
Fan Rnds 8–22: Work even-numbered rounds as Rnd 2 and odd-numbered rounds as Rnd 3. Each round has 10 fans and 10 sc. Fasten off after Rnd 22, which is worked as Rnd 2.
The body should measure 16.5 in (41.9 cm) tall: 22 fan rounds × 0.75 in (1.9 cm).
Border: Top Band and Dispenser Ring
Border gauge: 16 sc = 4 in (10.2 cm). The band has 60 sts, so it measures 15 in (38.1 cm) around. That is slightly less than the 16 in (40.6 cm) body, so the opening pulls in a little and the bags stay put.
Top Band
Band Rnd 1: With the 5.0 mm hook, join B with a sl st in the first ch-1 sp of any fan. Ch 2 (counts as hdc). Sc in the next ch-1 sp, sc in the center dc, sc in the next ch-1 sp, hdc in the next ch-1 sp, dc in the next sc, then hdc in the first ch-1 sp of the next fan. Rep from * around, but end the last repeat after the dc. Join to the top of the ch-2. (60 sts)
This round levels the work: hdc and sc on the fan tops, and dc in the dips between fans. There are 6 sts per repeat, and 6 × 10 = 60.
Band Rnds 2–6: Ch 1, sc in each st around, join. (60 sc)
When the tube is flattened, that is 30 sts on the front and 30 on the back, or 15 sts per quarter. The band is 1.5 in (3.8 cm) deep.
Straps
Flatten the holder with the hole centered on the front. Mark the 2 side folds.
Strap (make 2): Join B in the band stitch at one side fold. Ch 1 and sc in the same st and the next 3 sts. (4 sc)
Work in rows: ch 1, turn, sc in each of the 4 sts. Continue until the strap measures 7 in (17.8 cm), about 32 rows. Fasten off, leaving a 10 in (25.4 cm) tail.
Wrap the end of each strap 1 in (2.5 cm) over the wooden ring, front to back, and whipstitch it down. Each strap is 1 in (2.5 cm) wide.
Dispenser Ring
Ring Rnd 1: With the RS facing, join B at the top-right corner of the hole. Work sc evenly around the hole:
– 11 sc across the top, one in the free loop of each chain
– 5 sc down the side (2 sc per dc row-end and 1 sc in the sc row-end)
– 11 sc evenly across the bottom edge
– 5 sc up the other side
Join. (32 sc)
Ring Rnd 2: Ch 1. Sc in each st around, working sc2tog at each of the 4 corners. Join. (28 sc)
Ring Rnd 3: Work as Rnd 2. (24 sc)
Fasten off. The rounds build inward, so the decreases keep the ring flat and turn the rectangular opening into a circle about 2 in (5.1 cm) across. The ring is 0.75 in (1.9 cm) wide.
Appliqués
Use the 4.0 mm hook for all appliqués.
Daisy (make 2):
– Rnd 1: With A, make a magic ring and work 8 sc in it. Join. (8 sc)
– Rnd 2: Ch 1, then 2 sc in each st. Join and fasten off. (16 sc)
– Rnd 3: Join B in any st. Ch 6. Working back down the chain: sc in the 2nd ch from the hook, then hdc, dc, hdc and sc in the next 4 ch. Sk the next center st and sl st in the following st. Rep from * around. (8 petals)
Each daisy measures about 3 in (7.6 cm) across.
Leaf (make 4): With C, ch 7. Sl st in the 2nd ch from the hook, then work sc, hdc, dc and hdc in the next 4 ch. Work 3 sc in the last ch. Working along the other side of the chain, work hdc, dc, hdc, sc and sl st. Fasten off. Each leaf is 1.25 in (3.2 cm) long.
Stem: With C, ch 41. Sl st in the 2nd ch from the hook and in each ch across. Fasten off. (40 sl st)
The stem is about 10 in (25.4 cm) long.
Placement:
1. Pin the stem in a gentle S-curve, starting just above the hole ring.
2. Sew the lower daisy left of center, 8 in (20.3 cm) from the base.
3. Sew the upper daisy right of center, 13.5 in (34.3 cm) from the base, at the top of the stem.
4. Space the leaves along the stem: one pair under the upper daisy, one near the lower daisy and one in between.
Final Blocking
- Weave in all the ends along solid stitches.
- Wet the holder and gently squeeze out the water. Do not wring it.
- Stuff a rolled towel inside so the tube is 16 in (40.6 cm) around.
- Lay it flat at 8 in (20.3 cm) wide and 18 in (45.7 cm) tall.
- Open each fan with your fingertips so the arches look even.
- Pin the hole ring into a circle and pin the daisy petals flat.
- Let it dry completely before hanging.
Final Quality-Control Checklist
- Base is 5.1 in (13.0 cm) across and lies flat
- Every fan round has 10 fans and 10 sc
- Hole is centered on the front between the straps
- Ring round counts are 32, 28 and 24, and the ring lies flat
- Band is 60 sts and 1.5 in (3.8 cm) deep
- Straps are even in length and firmly sewn around the wooden ring
- Appliqués are sewn through the fan stitches, not just caught on the surface
- Total height is 18 in (45.7 cm)
Troubleshooting
- The base cups: Your tension is too tight. Go up a hook size for the base only.
- The base ruffles: Check that you have exactly 12 more sts on each round.
- Fans lean or look off-center: Count the slip stitches at the start of each odd round. You need to land on the center dc.
- The hole is too small: Loosen your tension on the ch-11, or work Ring Rnd 3 without decreases.
- The ring ripples: Add 1 extra sc2tog to Rnd 3.
- The band flares: Work Band Rnd 1 with the smaller hook.
- The straps stretch: Go down to the 4.0 mm hook for the straps.
Care
Hand wash or machine wash on a cold, gentle cycle inside a laundry bag. Reshape and lay flat to dry.
Final Notes
The measurement chain is the key to this pattern:
– A 60-stitch base at 5.1 in (13.0 cm) gives you 10 fan repeats.
– 10 repeats of 1.6 in (4.1 cm) give you a 16 in (40.6 cm) tube.
– 22 fan rounds give you 16.5 in (41.9 cm) of height.
– The 1.5 in (3.8 cm) band brings the holder to 18 in (45.7 cm).
Check each link as you go and the finished holder will come out the right size. Fill it with bags, hang it from its wooden ring, and enjoy a tidier kitchen.
Happy crocheting!