

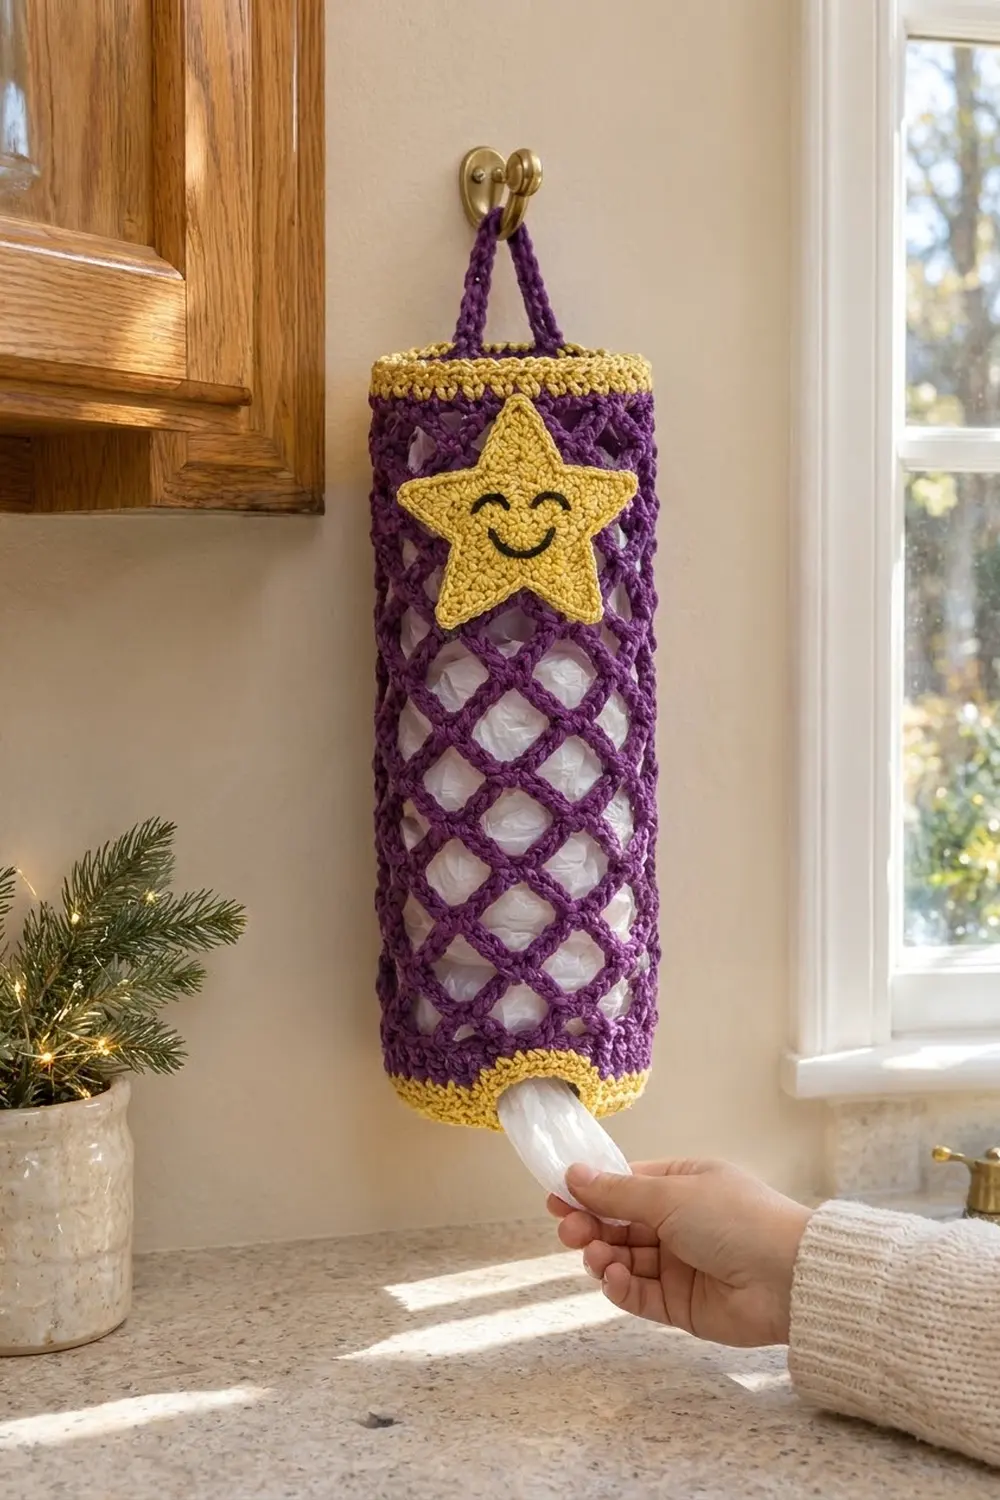
This cheerful bag holder turns a pile of plastic grocery bags into a tidy kitchen accessory. It is a tall tube of open purple diamond mesh with sunny yellow bands at the top and bottom. A happy yellow star with an embroidered smile sits on the front.
The colors are a strong grape purple, a warm mustard yellow, and a little black for the face. The mesh shows the bags inside and stretches to hold a lot. The solid bands keep the top and base firm.
The pattern uses US crochet terms. The finished holder is about 5.7 in (14.5 cm) across and about 16.2 in (41.1 cm) tall. With the hanging strap it measures about 20.2 in (51.3 cm) overall.
Here is how it’s made. You start at the bottom with a yellow ring that leaves a pull-out opening, then increase to a flat base and work a short side band. Next you switch to purple for the diamond mesh, work a yellow top band, and add the strap. The star is made separately, embroidered, and sewn on.
Finished Size and Construction
- Finished size: 5.7 in (14.5 cm) diameter; 18 in (45.7 cm) circumference; body 16.2 in (41.1 cm) tall; 20.2 in (51.3 cm) including the strap
- Skill level: Easy
- Terminology: US crochet terms
- Yarn weight: Worsted (#4)
- Hook: 5.0 mm (H-8)
- Number of pieces: 2 (one tubular body and one star appliqué)
- Layout: Single tube worked in joined rounds from the bottom up; star sewn to the front
- Piece size: Body 18 in (45.7 cm) around; star 3.75 in (9.5 cm) wide
- Size before top band: 14.9 in (37.8 cm) tall
- Top band depth: 1.3 in (3.3 cm); bottom side band 0.9 in (2.3 cm)
Materials
Use a smooth, sturdy worsted-weight cotton or cotton blend. It holds its shape under the weight of the bags and shows stitch definition clearly. The amounts below assume about 180 m (197 yd) per 100 g.
- Purple: 45 g, about 80 m (88 yd)
- Yellow: 40 g, about 70 m (77 yd)
- Black: 1 g, about 2 m (2.2 yd), for embroidery
The quantities include a margin of about 25% for your gauge swatch and small differences in tension.
Tools:
– 5.0 mm (H-8) crochet hook
– Tapestry needle
– 2 stitch markers
– Scissors
– Measuring tape
– Rust-proof pins
Abbreviations (US Terms)
- ch – chain
- sl st – slip stitch
- sc – single crochet
- hdc – half double crochet
- tr – treble crochet
- sc2tog – single crochet 2 together
- MR – magic ring
- st(s) – stitch(es)
- rnd(s) – round(s)
Special stitch – sc2tog: Insert the hook in the next stitch and pull up a loop. Insert it in the following stitch and pull up a loop (3 loops on hook). Yarn over and pull through all 3 loops.
Joining-tr finish: On every mesh round after the first, you finish with “ch 3, tr in first sc” instead of a final ch 7. The ch 3 plus the tr is about as long as a ch-7 loop. It also leaves your hook in the middle of the last loop, ready to start the next round.
Gauge and Checkpoints
Gauge: 16 sc and 18 rnds = 4 in (10.2 cm) in yellow sc.
Work the base before you commit to the whole tube, because it is your gauge test.
- Checkpoint 1 (after base Rnd 9): The opening is about 1.9 in (4.8 cm) across. The base lies as a shallow dish about 5.7 in (14.5 cm) across.
- Checkpoint 2 (after bottom side band): The flattened tube measures 9 in (22.9 cm) edge to edge.
- Checkpoint 3 (after mesh Rnd 7): The mesh section is about 7 in (17.8 cm) tall when lightly stretched.
- Checkpoint 4 (before top band): The body is about 14.9 in (37.8 cm) tall.
If the base is bigger than 5.7 in (14.5 cm), go down one hook size. If it is smaller, go up one size. The mesh is forgiving in height, but the circumference controls whether the bands fit. Get the base right first.

Pattern
Part 1: Base and Bottom Band (Yellow)
Rnd 1: Ch 24 and join with a sl st to the first ch to form a ring, taking care not to twist it. Ch 1, then sc in each ch around. Join with a sl st to the first sc. (24 sc)
This ring makes the pull-out opening.
Rnd 2: Ch 1. Sc in next 3 sts, 2 sc in next st 6 times. Join. (30 sc)
Rnd 3: Ch 1. Sc in next 4 sts, 2 sc in next st 6 times. Join. (36 sc)
Rnd 4: Ch 1. Sc in next 5 sts, 2 sc in next st 6 times. Join. (42 sc)
Rnd 5: Ch 1. Sc in next 6 sts, 2 sc in next st 6 times. Join. (48 sc)
Rnd 6: Ch 1. Sc in next 7 sts, 2 sc in next st 6 times. Join. (54 sc)
Rnd 7: Ch 1. Sc in next 8 sts, 2 sc in next st 6 times. Join. (60 sc)
Rnd 8: Ch 1. Sc in next 9 sts, 2 sc in next st 6 times. Join. (66 sc)
Rnd 9: Ch 1. Sc in next 10 sts, 2 sc in next st 6 times. Join. (72 sc)
Check Checkpoint 1 now.
Rnds 10–13: Ch 1, sc in each st around, join. (72 sc in each rnd)
These 4 even rnds turn the edge upward and form the 0.9 in (2.3 cm) yellow side band. Fasten off yellow and check Checkpoint 2.
Part 2: Diamond Mesh (Purple)
Mesh Rnd 1: Join purple with a sl st in any st. Ch 1 and sc in the same st. Ch 7, skip 3 sts, sc in next st 17 times. Ch 3, skip the last 3 sts, and tr in the first sc. (18 loops)
Stitch check: 18 sc anchors, each followed by 3 skipped sts, is 18 × 4 = 72, which uses every stitch of Rnd 13.
Mesh Rnds 2–13: Ch 1 and sc around the post of the tr just made. Ch 7, sc in next ch-7 loop 17 times. Ch 3, tr in first sc. (18 loops in each rnd)
Each sc lands in the center of a loop from the round below, so the loops shift by half a loop each round. That offset is what forms the diamonds. Check Checkpoint 3 after Mesh Rnd 7.
Mesh Rnd 14: Ch 1 and sc around the tr post. Ch 7, sc in next ch-7 loop 17 times. Ch 7, then sl st in the first sc. (18 full loops)
Ending with a full ch 7 gives you 18 complete loops to work the top band into. Fasten off purple and check Checkpoint 4.
Part 3: Star Appliqué (Yellow)
Rnd 1: Work 10 hdc in a MR. Join with a sl st to the first hdc. (10 hdc)
Rnd 2: Ch 1, 2 hdc in each st around, join. (20 hdc)
The center now measures about 1.3 in (3.3 cm) across. Each of the 5 points is worked in rows over 4 sts.
Point Row 1: Ch 1, sc in next 4 sts, turn. (4 sc)
Point Row 2: Ch 1, sc in each st, turn. (4 sc)
Point Row 3: Ch 1, sc2tog twice, turn. (2 sts)
Point Row 4: Ch 1, sc in each st, turn. (2 sc)
Point Row 5: Ch 1, sc2tog. (1 st)
Sl st down the side of the point, 1 sl st in each of the 5 row ends, so you end at Rnd 2. Then repeat Point Rows 1–5 over the next 4 sts of Rnd 2. Make 5 points in total, which uses all 20 sts. Each point stands about 1.1 in (2.8 cm) tall.
Rnd 3 (edging): Join at any valley. For each point, work 5 sc up the side (1 per row end), 3 sc in the tip, and 5 sc down the other side. That is 13 sc per point. Join. (65 sc)
The edging gives the star the crisp outline seen in the photo. The star measures about 3.75 in (9.5 cm) wide. Fasten off, leaving a 16 in (40.6 cm) tail for sewing.
Face: Use black yarn and backstitch.
– Eyes: Make 2 short arches that curve upward, like upside-down U’s, each about 0.5 in (1.3 cm) wide. Place them 0.5 in (1.3 cm) apart, just above the center.
– Smile: Make one wide upturned curve about 1 in (2.5 cm) wide, 2 rnds below the eyes.
Weave in the black ends on the back.
Top Band and Strap (Border)
Border gauge: The band uses the same 16 sc = 4 in (10.2 cm) gauge as the base, so 72 sts equals 18 in (45.7 cm).
Top Rnd 1 (conversion rnd, yellow): Join yellow in any ch-7 loop. Ch 1, then work 4 sc in each ch-7 loop around. Skip the sc between loops. Join. Count: 18 loops × 4 sc = 72 sc.
Top Rnds 2–6: Ch 1, sc in each st around, join. (72 sc in each rnd)
The band is 1.3 in (3.3 cm) deep. Fasten off.
Why the math works: The bottom band has 72 sts. The mesh grew from 72 sts as 18 loops of 4 sts each. Working 4 sc back into each loop gives 72 sts again. Both bands are the same 18 in (45.7 cm) around, so the tube hangs straight without flaring or pulling in. When the tube is laid flat, each half has 36 sts, or 9 in (22.9 cm).
Strap (purple): Lay the tube flat with the joining seams at center back. Count the sts of Top Rnd 6 from the join.
1. Join purple with a sl st in st 32.
2. Ch 36, skip 8 sts (sts 33–40), and sl st in st 41.
3. Turn. Sc in each of the 36 ch.
4. Sl st in st 32 and fasten off.
The strap ends sit 2.25 in (5.7 cm) apart. The strap is about 9 in (22.9 cm) long and makes a hanging loop about 4 in (10.2 cm) high.
Attach the star: Pin the star at center front, opposite the strap. Its top 2 points should overlap the lower 0.25 in (0.6 cm) of the top band. Whipstitch around the edging with the yellow tail, catching the mesh strands and the band. Don’t pull tight, or the mesh will pucker.
Final Blocking
- Weave in all remaining ends along solid stitches, never through open mesh.
- Spray the holder lightly with water until damp.
- Slide a rolled towel or a 5.7 in (14.5 cm) wide bottle inside the tube.
- Even out the diamonds so each loop is the same size and lines up straight up the tube.
- Pin the star flat and smooth its points out to 3.75 in (9.5 cm).
- Let it dry fully on the form, then remove it.
Final Quality-Control Checklist
- The base has 72 sts and the opening is 1.9 in (4.8 cm) across.
- Every mesh round has exactly 18 loops.
- Top Rnd 1 has 72 sc (18 × 4).
- The diameter is 5.7 in (14.5 cm) at both bands.
- The body is about 16.2 in (41.1 cm) tall.
- The strap is centered at the back and its ends are firmly anchored.
- The star is 3.75 in (9.5 cm) wide and sewn flat, opposite the strap.
- The eyes and smile are even and the ends are secured on the back.
Troubleshooting
- The base ruffles: Your tension is loose. Go down a hook size or tighten your stitches.
- The base cups too much: Your tension is tight. Go up a hook size.
- The diamonds are crooked: You missed a loop or put 2 sc in the same loop. Count 18 loops every round.
- The top band flares: You worked 5 sc into some loops. Use exactly 4 per loop.
- The star points curl: Block it pinned flat, and check that Point Row 3 used sc2tog twice.
- The strap stretches: Work a second row of sl sts along the strap for extra firmness.
Care
Hand wash in cool water with mild soap. Reshape and lay flat to dry. Cotton yarn can also go through a gentle machine cycle inside a mesh laundry bag.
Final Notes
The measurement chain runs like this:
- 24-st opening, 1.9 in (4.8 cm) across
- Base increased to 72 sts, 18 in (45.7 cm) around
- 18 mesh loops of 4 sts each
- Top band back to 72 sts
- Body 16.2 in (41.1 cm) tall
- Strap adds a 4 in (10.2 cm) loop
- Star 3.75 in (9.5 cm) wide
If you check each count as you go, your holder will hang straight and look just like the photo.
Happy crocheting!