

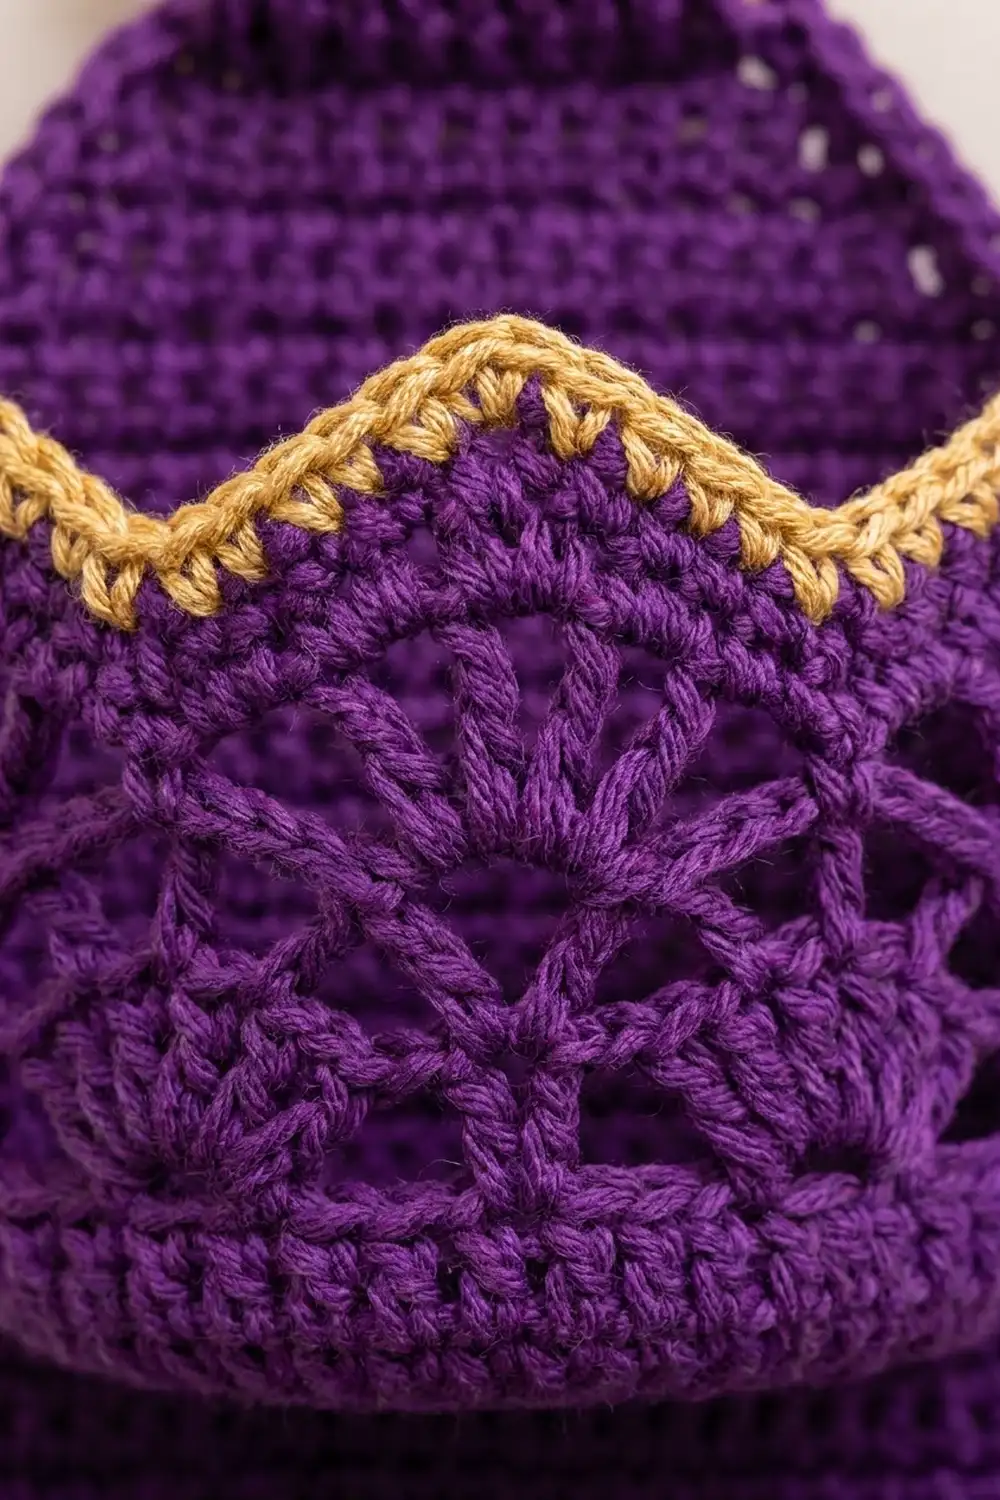
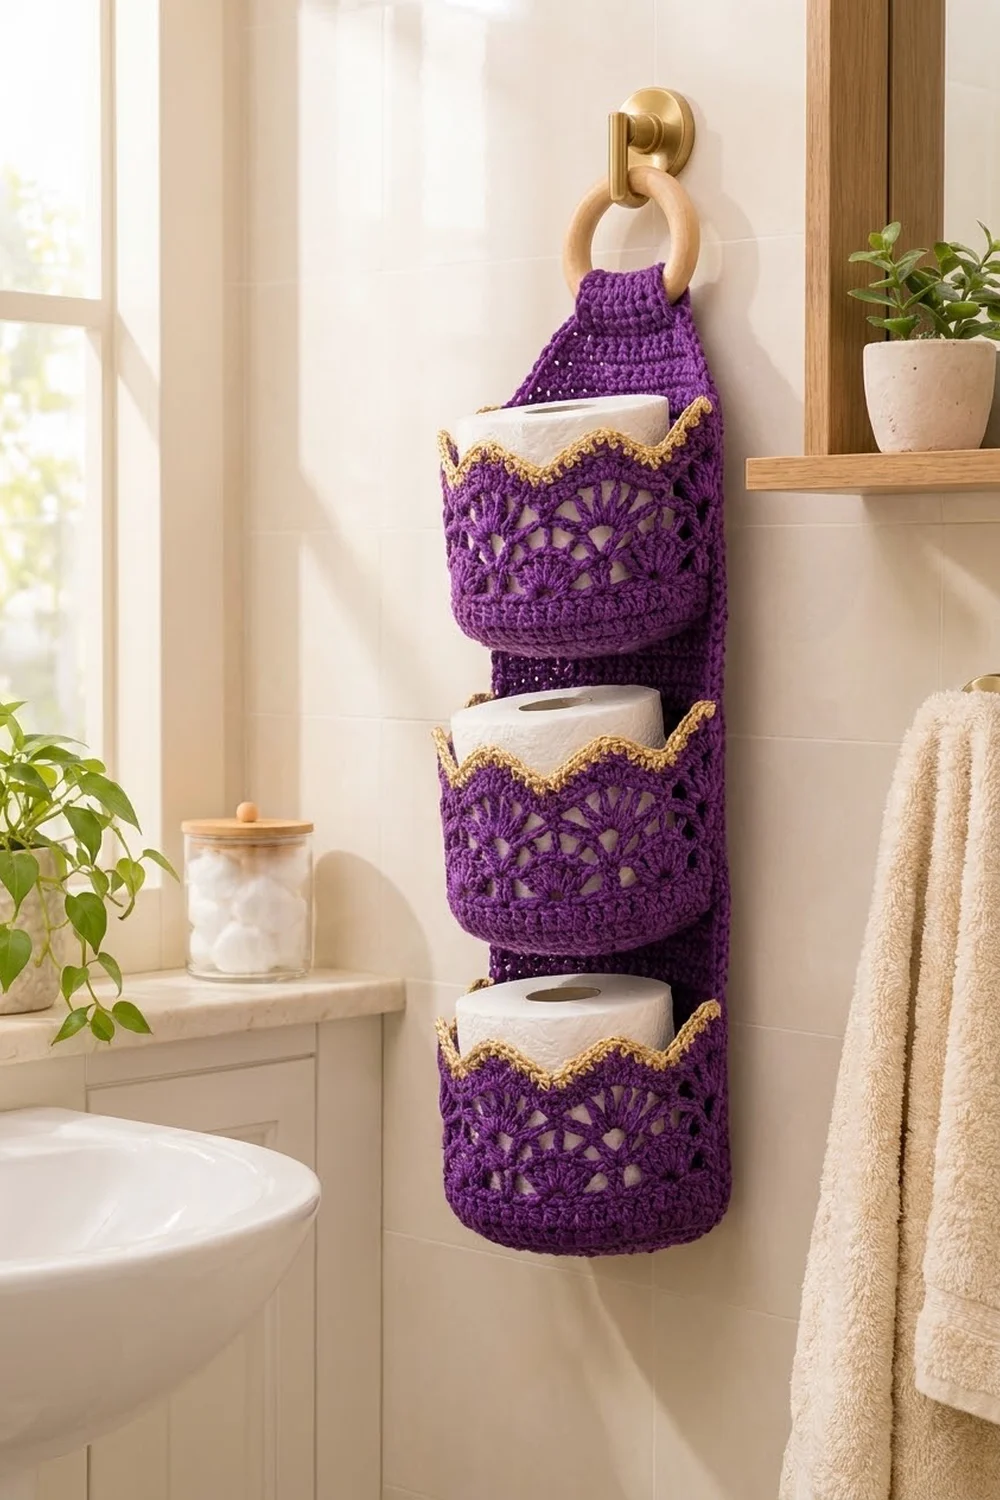
This hanging holder has three deep, round pockets stacked on a long back panel. Each pocket has a solid base, a band of lacy fans, and a scalloped rim. The rim is edged with gold crab stitch, so each pocket looks like it’s wearing a small crown.
The sample is worked in deep violet worsted yarn with a gold accent and hangs from a wooden ring. Each pocket holds one standard roll, and the top of the roll shows just above the rim.
The pattern uses US terms. Laid flat before the tab is folded, the panel measures 6.5 x 26 in (16.5 x 66.0 cm). Hung on the ring, the holder is about 24 in (61.0 cm) tall, not counting the ring. Each pocket is 4.75 in (12.1 cm) across and 4 in (10.2 cm) tall at the points.
You work one flat panel in single crochet rows that taper into a tab. Then you make three pockets in joined rounds: a circle base, solid walls, fan lace, and a two-color rim. Finally, you sew the pockets on, add a border, and fold the tab over the ring.
Finished Size and Construction
- Finished size: panel 6.5 x 26 in (16.5 x 66.0 cm) flat; hangs about 24 in (61.0 cm) tall
- Skill level: Intermediate
- Terminology: US
- Yarn weight: worsted (#4)
- Hook: 5.0 mm (H-8)
- Number of pieces: 4 (1 back panel + 3 pockets), plus a wooden ring
- Layout: 3 pockets stacked vertically on one panel
- Pocket size: 4.75 in (12.1 cm) base diameter; walls 4 in (10.2 cm) tall at the points and 3.5 in (8.9 cm) at the valleys
- Panel size before border: 6 x 25.5 in (15.2 x 64.8 cm)
- Border depth: 0.25 in (0.6 cm)
Materials
Use a firm worsted cotton or cotton blend. Cotton holds the pocket shape and handles bathroom humidity well. Fuzzy acrylic hides the fans and lets the pockets sag.
- Color A, deep violet: 250 g / about 460 m (503 yd)
- Color B, gold or light tan: 20 g / about 37 m (40 yd)
These amounts assume about 185 m (202 yd) per 100 g and include a margin of about 10% for swatching and sewing.
Tools:
- 5.0 mm (H-8) hook
- Wooden ring, 3 in (7.6 cm) outer diameter
- Tapestry needle
- 6 locking stitch markers
- Measuring tape, scissors, blocking mat and pins
Abbreviations (US Terms)
- ch – chain
- sl st – slip stitch
- sc – single crochet
- dc – double crochet
- sc2tog – single crochet 2 together
- inc – 2 sc in the same stitch
- BLO – back loop only
- sp – space
- st(s) – stitch(es)
- rev sc – reverse single crochet (crab stitch)
Special stitches:
- Fan: (dc, ch 1) 4 times, then 1 more dc, all in the same stitch or space. That’s 5 dc and 4 ch-1 sps. The 3rd dc is the center dc.
- V-st: (dc, ch 3, dc) in the same stitch.
- Rev sc: sc worked from left to right (for right-handers), which makes a corded, twisted edge.
Gauge and Checkpoints
Gauge: 16 sc and 18 rows = 4 in (10.2 cm) in sc rows on a 5.0 mm hook.
Make one pocket first. It uses every stitch in the pattern, and a roll of toilet paper tells you right away whether the size works.
- Pocket base after Rnd 10: 4.75 in (12.1 cm) across, lying flat.
- Wall after Rnd 14: 1 in (2.5 cm) above the base ridge.
- Wall after Rnd 19: about 3.5 in (8.9 cm).
- Finished pocket: 4 in (10.2 cm) at the points. A roll 4.25–4.5 in (10.8–11.4 cm) across should slide in with light resistance.
- Panel after Row 18: 6 x 4 in (15.2 x 10.2 cm).
- Panel after Row 90: 20 in (50.8 cm) long.
If it’s too big: use a 4.5 mm hook. A loose pocket lets the roll lean.
If it’s too small: use a 5.5 mm hook. Don’t add rounds, because the lace needs exactly 60 stitches.
Pocket (Make 3)
Use Color A. Work in joined rounds with the right side facing and don’t turn. Start each round with ch 1 and join with a sl st to the first sc, unless the round says otherwise.
Base
Rnd 1: 6 sc in a magic ring. (6 sts)
Rnd 2: Inc in each st around. (12 sts)
Rnd 3: (Sc in next st, inc) 6 times. (18 sts)
Rnd 4: (Sc in next 2 sts, inc) 6 times. (24 sts)
Rnd 5: (Sc in next 3 sts, inc) 6 times. (30 sts)
Rnd 6: (Sc in next 4 sts, inc) 6 times. (36 sts)
Rnd 7: (Sc in next 5 sts, inc) 6 times. (42 sts)
Rnd 8: (Sc in next 6 sts, inc) 6 times. (48 sts)
Rnd 9: (Sc in next 7 sts, inc) 6 times. (54 sts)
Rnd 10: (Sc in next 8 sts, inc) 6 times. (60 sts)
Solid Walls
Rnd 11: Sc in the BLO of each st around. (60 sts) The unused front loops of Rnd 10 form a ridge around the bottom edge.
Rnds 12–14: Sc in each st around. (60 sts)
Fan Lace
The lace repeat is 10 sts, so the 60 sts make 6 repeats.
Rnd 15: Ch 1, *sc in next st, skip 4 sts, fan in next st, skip 4 sts; rep from * 5 more times. Join to the first sc. (6 sc, 6 fans)
Rnd 16: Ch 6 (counts as dc + ch 3), dc in the same sc, ch 3, sc in the center dc of the next fan, ch 3, *V-st in next sc, ch 3, sc in the center dc of the next fan, ch 3; rep from * 4 more times. Join to the 3rd ch of the beginning ch-6. (6 V-sts, 6 sc, 12 ch-3 sps)
Rnd 17: Sl st into the first V-st sp, ch 4 (counts as dc + ch 1), (dc, ch 1) 3 times and dc in the same sp, ch 2, skip the ch-3 sp, sc in next sc, ch 2, skip the ch-3 sp, *fan in the next V-st sp, ch 2, skip the ch-3 sp, sc in next sc, ch 2, skip the ch-3 sp; rep from * 4 more times. Join to the 3rd ch of the beginning ch-4. (6 fans, 6 sc, 12 ch-2 sps) These fans sit between the Rnd 15 fans.
Rnd 18: Sl st in the next ch-1 sp, the next dc, the next ch-1 sp, and the center dc. Ch 1, sc in the same dc, ch 3, V-st in next sc, ch 3, *sc in the center dc of the next fan, ch 3, V-st in next sc, ch 3; rep from * 4 more times. Join to the first sc. (6 V-sts, 6 sc, 12 ch-3 sps)
Rnd 19: Sl st in each of the next 3 ch, in the next dc, and into the V-st sp. Then work as for Rnd 17. (6 fans, 6 sc, 12 ch-2 sps) These fans line up above the Rnd 15 fans.
Scalloped Rim
Rnd 20 (conversion round): Ch 1. Repeat 6 times: sc in the first 2 dc and the 2 ch-1 sps between them (4 sc), 3 sc in the center dc, sc in the next 2 ch-1 sps and 2 dc (4 sc), 2 sc in the ch-2 sp, skip the sc, 2 sc in the next ch-2 sp. Join and fasten off Color A.
Count: each repeat has 9 sc worked one per fan position, plus 2 extra at the point, plus 4 sc in the ch-2 sps, for 15 sts. The whole round is 54 + 12 + 24 = 90 sts. The 3-sc groups make the peaks and the skipped sc makes the valleys.
Rnd 21: Join Color B in any st, ch 1, rev sc in each st around. Join. (90 sts) Fasten off and weave in the ends.
Checkpoint: the pocket is 4 in (10.2 cm) tall at the peaks and 3.5 in (8.9 cm) at the valleys, with 6 gold points.
Back Panel
Use Color A. Work in rows. The turning ch 1 doesn’t count as a stitch.
Row 1: Ch 25, sc in 2nd ch from hook and in each ch across. (24 sts)
Rows 2–90: Ch 1, turn, sc across. (24 sts)
Checkpoint: 6 x 20 in (15.2 x 50.8 cm).
Shoulder Taper
Rows 91–99: Ch 1, turn, sc2tog, sc across to the last 2 sts, sc2tog. You lose 2 sts each row: 22, 20, 18, 16, 14, 12, 10, 8, then 6 sts in Row 99. The taper is 2 in (5.1 cm) tall.
Hanging Tab
Rows 100–115: Ch 1, turn, sc across. (6 sts) Don’t fasten off. You’ll start the border from this loop.
Checkpoint: the tab is 1.5 in (3.8 cm) wide and about 3.5 in (8.9 cm) long. The whole panel is 25.5 in (64.8 cm) long.
Make All Pieces
- Color A: 1 back panel, plus Rnds 1–20 of each of the 3 pockets
- Color B: Rnd 21 of each of the 3 pockets
Layout on the right side of the panel, from top to bottom:
      [ ring ]
      [ tab  ]
     /  taper \
    |  free    |  Rows 80–90
    | POCKET 3 |  base on Row 61
    | POCKET 2 |  base on Row 32
    | POCKET 1 |  base on Row 3
    |__________|  Rows 1–2
Joining
Mark 3 rows on the panel:
- Row 3: about 0.5 in (1.3 cm) from the bottom
- Row 32: about 6.9 in (17.5 cm) from the bottom
- Row 61: about 13.3 in (33.8 cm) from the bottom
The bases are 29 rows, or 6.4 in (16.3 cm), apart.
Find the back of the pocket. Pick any gold valley. Mark the Rnd 10 stitch directly below it, then count 10 sts on each side. These 20 sts are the back third of the base (60 ÷ 3 = 20).
Sew the base. Thread a long Color A tail. Line up the 20 base sts with the center 20 sts of the marked row. That leaves 2 panel sts free at each edge (24 – 20 = 4). Whipstitch through each free front loop of the base and the matching panel st, one stitch to one stitch, 20 in all. Keep the stitches snug but not tight. If the panel puckers, take them out and sew more loosely.
Tack the rim. The back third of the rim has 3 valleys: one at the center and one at each side. Pin them level, then tack each one to the panel with 3 small stitches. Also tack the top of Rnd 14 at both sides so the walls don’t flare.
Repeat for all 3 pockets.
Checkpoint: each pocket stands out about 4.75 in (12.1 cm) from the panel, and the panel is still 6 in (15.2 cm) wide with no gathering.
Border
Border gauge: 4 sc per 1 in (2.5 cm) along every edge.
The pockets sit 2 sts in from each edge, so the border goes on cleanly after joining.
Rnd 1: With the loop from Row 115, ch 1 and work around the panel in this order:
- Tab top: 3 sc in the first st, sc in the next 4 sts, 3 sc in the last st. (10 sts, both corners included)
- Tab side: 14 sc across 16 row ends. Skip 1 row end after every 7 sc.
- Taper side: 12 sc across 9 row ends. Work 1 sc in each row end, plus 1 extra in every 3rd row end.
- Body side: 80 sc across 90 row ends. Skip every 9th row end.
- Bottom: 3 sc in the first st, sc in the next 22 sts, 3 sc in the last st. (28 sts, both corners included)
- Second side: 80 sc on the body, 12 sc on the taper, 14 sc on the tab.
Join. The total is 10 + 14 + 12 + 80 + 28 + 80 + 12 + 14 = 250 sts.
Rnd 2: Ch 1, sl st loosely in each st around. (250 sts) Fasten off.
Why the math works:
- The body is 20 in (50.8 cm) tall, and 20 x 4 = 80 sc.
- The tab is about 3.5 in (8.9 cm) tall, so it takes 14 sc.
- Each taper edge runs on a diagonal about 3 in (7.6 cm) long, so it takes 12 sc.
- The corners are counted only once, inside the bottom and tab-top counts.
- Adding 0.25 in (0.6 cm) on each side turns 6 x 25.5 in (15.2 x 64.8 cm) into 6.5 x 26 in (16.5 x 66.0 cm).
Attach the ring: pass the tab through the ring from front to back, fold it down behind the taper, and sew the last 6 rows to the wrong side.
Final Blocking
- Dampen the whole holder lightly with a spray bottle, or steam it from above without touching the yarn.
- Pin the panel face up to 6.5 x 26 in (16.5 x 66.0 cm), keeping the sides straight.
- Put a roll, or a 4.5 in (11.4 cm) towel-wrapped can, in each pocket so it dries round.
- Pin each gold peak upward to sharpen the zigzag.
- Let it dry completely, at least 12 hours.
Final Quality-Control Checklist
- Rnds 20 and 21 have 90 sts each, with 6 even peaks.
- The Rnd 19 fans sit directly above the Rnd 15 fans.
- All 3 pockets match in height and width.
- Each base is sewn 1:1 across 20 sts, with 2 free sts on each side.
- The panel is 6.5 in (16.5 cm) wide with straight sides.
- The border has 250 sts and lies flat.
- The tab is sewn firmly and the ring doesn’t twist.
- Ends are woven in at least 2 in (5.1 cm).
Troubleshooting
- The base cups before Rnd 11. Your increases are too tight. Go up one hook size for the base.
- The fans drift. Each V-st belongs in an sc, and each sc belongs in a center dc. Recount to 6 repeats.
- The rim is wavy, not pointed. Skip the valley sc in Rnd 20 and work exactly 3 sc in each center dc.
- The roll won’t fit or falls through. Compare the base to the 4.75 in (12.1 cm) checkpoint and change hook size.
- The panel sides ruffle. You have too many border sc. Keep to 80 per body side.
- The pockets droop forward. Add more tacks at Rnd 14 and use cotton yarn.
Care
Hand wash in cool water. Lay it flat to dry with rolls in the pockets to hold their shape.
Final Notes
The measurement chain is short:
- A 60-stitch base is 4.75 in (12.1 cm) across.
- 6 lace repeats build a 4 in (10.2 cm) pocket with a 90-stitch rim.
- The 24-stitch panel is 6 in (15.2 cm) wide.
- The 250-stitch border brings the panel to 6.5 x 26 in (16.5 x 66.0 cm).
- Each pocket is sewn 1:1 across 20 stitches.
If every checkpoint matches, the finished holder will too.
Happy crocheting!