

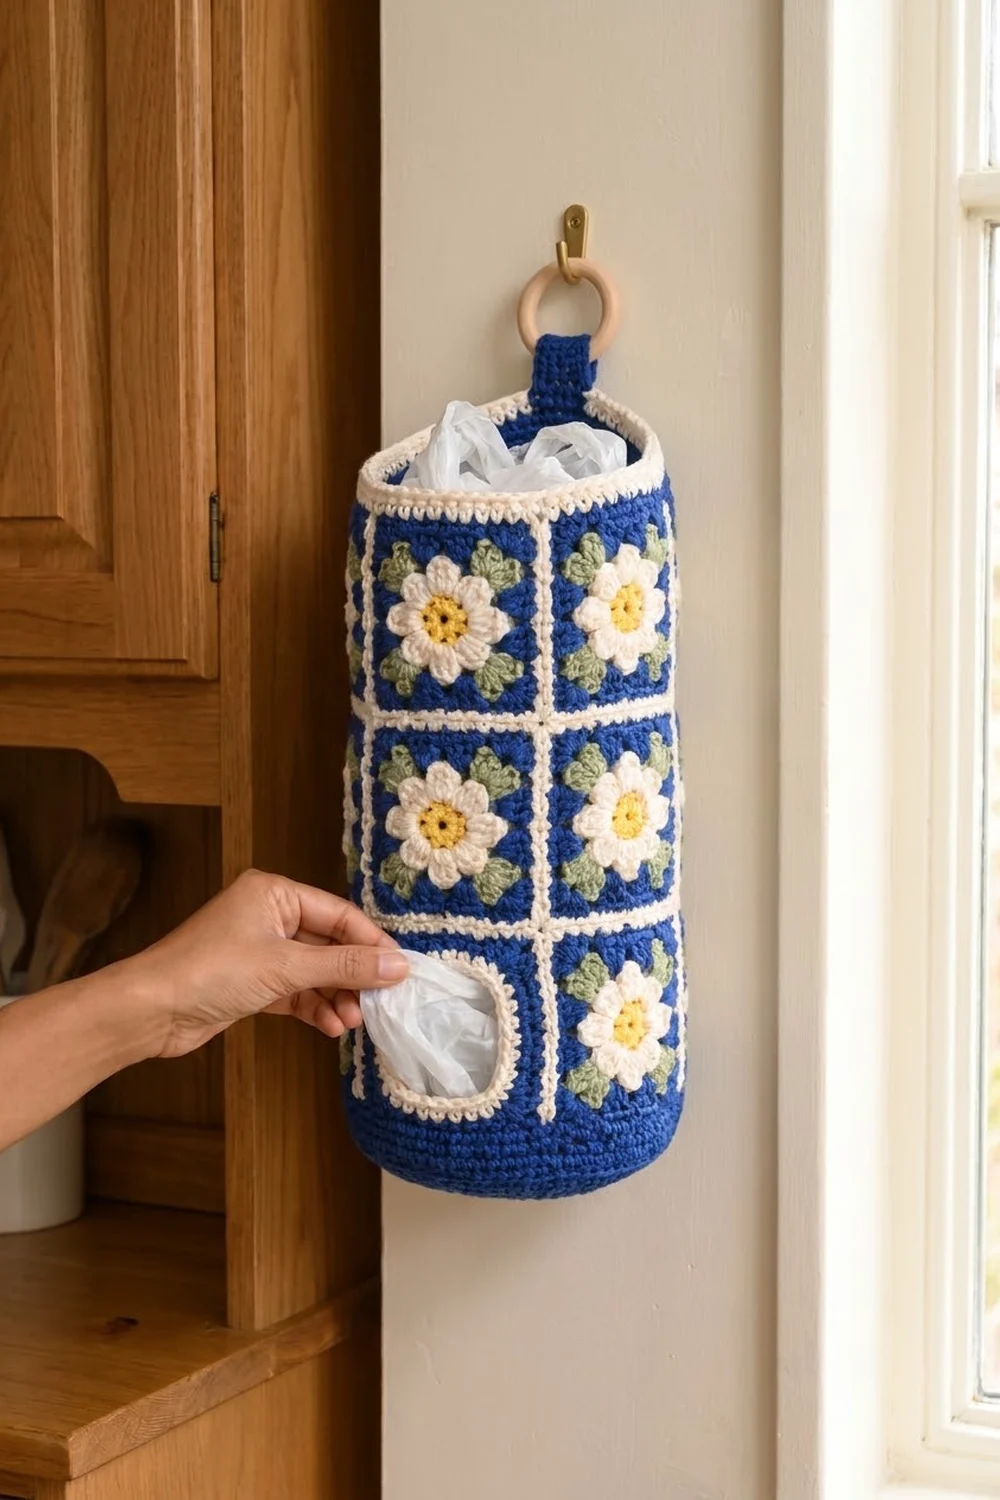
Plastic bags tend to pile up in a kitchen drawer. This hanging holder keeps them in one place. You push bags in at the top and pull them out through a rounded opening near the bottom.
The Daisy Pantry Bag Holder is a tall tube of flower granny squares. Each square has a sunny yellow center, eight cream petals, and sage-green leaves on a deep royal-blue background. Cream joining seams outline every square like a window frame. A solid blue base, a cream rim and a blue hanging tab finish the look.
This pattern uses US crochet terms. The finished holder is about 18 in (45.7 cm) around, which is about 5.7 in (14.5 cm) across when round. The body is about 15.7 in (39.9 cm) tall, and the domed base adds about 1 in (2.5 cm).
You will make 11 flower squares and 1 opening panel, and join them into a tube that is 4 squares around and 3 squares high. Then you work a blue base band downward and close it, a cream rim upward, and finally a short tab that wraps around a wooden ring.
Finished Size and Construction
- Finished size: 18 in (45.7 cm) circumference; 15.7 in (39.9 cm) body height
- Skill level: Intermediate
- Terminology: US crochet terms
- Yarn weight: Worsted (#4), cotton or cotton blend
- Hook: 5 mm (H-8)
- Number of pieces: 12 squares (11 flower squares + 1 opening panel)
- Layout: 4 squares around × 3 squares high, joined into a tube
- Piece size: 4.5 in × 4.5 in (11.4 cm × 11.4 cm)
- Size before border: 18 in (45.7 cm) around × 13.5 in (34.3 cm) tall
- Border depth: blue base band 1.3 in (3.3 cm) plus the domed base; cream rim 0.9 in (2.3 cm)
Materials
Use cotton or a cotton blend in worsted weight. Cotton holds its shape when the holder is full of bags and keeps the stitch texture crisp. Choose a yarn that gives about 170 m per 100 g.
- Royal blue: 150 g (255 m)
- Cream: 100 g (170 m)
- Sage green: 40 g (68 m)
- Yellow: 20 g (34 m)
These quantities include a margin of about 15 percent, so a small change in tension won’t leave you short.
Tools:
– 5 mm (H-8) crochet hook
– Tapestry needle
– 8 stitch markers
– Wooden ring, 1.5 in (3.8 cm) across
– Scissors and a tape measure
– Blocking mat and pins
Abbreviations (US Terms)
- ch – chain
- sl st – slip stitch
- sc – single crochet
- hdc – half double crochet
- dc – double crochet
- sc2tog – single crochet 2 together
- sp – space
- st(s) – stitch(es)
- rep – repeat
- RS / WS – right side / wrong side
Cluster (cl): *Yarn over, insert hook in the space, pull up a loop, yarn over and draw through 2 loops; rep from * 2 more times in the same space, then yarn over and draw through all 4 loops on the hook.
Beginning cluster (beg cl): Ch 2, then work the cluster with only 2 dc repeats (draw through all 3 loops at the end).
Gauge and Checkpoints
Gauge: 16 sc × 18 rounds = 4 in (10.2 cm) in sc, which works out to 4 sts and 4.5 rounds per inch.
Make one flower square first and measure it before making the rest. Checkpoints for one square:
- After Rnd 1: 1.25 in (3.2 cm) across
- After Rnd 2: 2.5 in (6.4 cm) across, tip to tip
- After Rnd 5: 3.75 in (9.5 cm) per side
- After Rnd 6: 4 in (10.2 cm) per side
- After Rnd 7: 4.5 in (11.4 cm) per side
If your square measures more than 4.75 in (12.1 cm), use a 4.5 mm hook. If it measures less than 4.25 in (10.8 cm), use a 5.5 mm hook. A difference of 0.25 in (0.6 cm) per square becomes 1 in (2.5 cm) around the tube, so it is worth checking.

Flower Square (Make 11)
Rnd 1 (yellow): Make a magic ring. Ch 3 (counts as dc), work 15 dc in the ring. Pull the ring partly closed so a small hole stays open in the center. Join with sl st to top of ch-3. Fasten off. (16 dc)
Rnd 2 (cream): Join cream with sl st in any dc. (Hdc, 2 dc, hdc) in next dc, sl st in next dc; rep from * 6 more times, (hdc, 2 dc, hdc) in last dc, sl st in joining sl st. Fasten off. (8 petals, 8 sl sts)*
Each petal comes from 1 stitch and each sl st anchors between petals, so the 16 stitches give exactly 8 rounded petals.
Rnd 3 (green): Fold the petals forward. Join green with sl st in any sl st between petals, working from the back. Ch 4, keeping the chain behind the next petal, sl st in next sl st between petals; rep from * 7 more times, working the last sl st in the joining sl st. (8 ch-4 sps)*
Rnd 4 (green): Sl st in first ch-4 sp. (Beg cl, ch 3, cl) in same sp, ch 2, cl in next sp, ch 2; (cl, ch 3, cl) in next sp, ch 2, cl in next sp, ch 2; rep from * 2 more times. Join with sl st to top of beg cl. Fasten off. (12 cl, 4 corner ch-3 sps, 8 ch-2 sps)*
The pairs of clusters in the ch-3 spaces become the green leaves at the corners.
Rnd 5 (blue): Join blue in any corner ch-3 sp. Ch 3 (counts as dc), (2 dc, ch 2, 3 dc) in same sp; 3 dc in each of next 2 ch-2 sps, (3 dc, ch 2, 3 dc) in next corner sp; rep from * 2 more times, 3 dc in each of next 2 ch-2 sps. Join with sl st to top of ch-3. (48 dc: 12 per side, plus 4 corner ch-2 sps)*
Rnd 6 (blue): Ch 1, sc in same st and in next 11 dc, 3 sc in corner sp; sc in next 12 dc, 3 sc in corner sp; rep from * 2 more times. Join. Fasten off. (60 sc)*
Count this round as 48 sc worked 1 per dc, plus 12 corner sc (3 per corner). Each side has 16 sts counting both corner center stitches.
Rnd 7 (cream): Join cream in any corner center sc. Ch 1, 3 sc in same st; sc in next 14 sts, 3 sc in next corner center st; rep from * 2 more times, sc in next 14 sts. Join and fasten off. (68 sc)*
Count this round as 60 sc worked 1 per stitch, plus 8 extra sc (2 extra at each corner). Each side has 18 sts counting both corner center stitches: 4 × 18 − 4 shared corners = 68.
Opening Panel (Make 1)
Foundation (cream): Ch 36 and join with sl st into a ring, making sure the chain is not twisted.
Rnd 1 (cream): Ch 1, sc in each ch. Join and fasten off. (36 sc)
Rnd 2 (blue): Join blue in any sc. Ch 3 (counts as dc), (dc, ch 2, 2 dc) in same st; dc in next 8 sts, (2 dc, ch 2, 2 dc) in next st; rep from * 2 more times, dc in next 8 sts. Join. (48 dc: 12 per side, plus 4 corner ch-2 sps)*
The 36 stitches divide into 4 groups of 9, which is 1 corner stitch and 8 side stitches each. Each side ends with 2 + 8 + 2 = 12 dc, the same as Rnd 5 of the flower square.
Rnd 3 (blue): Work as Rnd 6 of the flower square. (60 sc)
Rnd 4 (cream): Work as Rnd 7 of the flower square. (68 sc; 18 per side)
The ring stretches into a rounded-square opening about 2.75 in (7.0 cm) across, edged in cream. The panel should measure 4.5 in (11.4 cm) per side, like the flower squares.
Make All Pieces
- Flower squares: 11 (yellow Rnd 1, cream Rnd 2, green Rnds 3–4, blue Rnds 5–6, cream Rnd 7)
- Opening panel: 1 (cream Rnd 1, blue Rnds 2–3, cream Rnd 4)
Columns go around the tube: A (front), B (left), C (back), D (right). F means flower square and O means opening panel.
        A    B    C    D
Top:    F    F    F    F
Mid:    F    F    F    F
Bottom: O    F    F    F
Weave in all ends and lightly steam-block each square to 4.5 in (11.4 cm) before joining.
Joining
Method: Hold 2 squares with their WS together and use cream to sc through both loops of both squares. This makes a raised cream ridge on the RS, which forms the frame lines around each square.
Stitch-to-stitch logic: Each side has 18 stitches, from corner center to corner center. Work 1 sc through each matching pair, which gives 18 sc per square edge. Do not add any stitches at the corners.
- Columns: For each column, join top to middle and middle to bottom. (18 sc per seam)
- Side seams: Join column A to B, B to C and C to D along the long edges. (54 sc per seam: 3 squares × 18)
- Close the tube: Join column D to column A. (54 sc)
Where 4 corners meet, work the stitch through both corner center stitches so no gap opens.
Tension: Keep the joining stitches loose and even. A seam should be as long as the square edge, 4.5 in (11.4 cm). If a seam is tight, the tube will pucker.
Size checkpoint: The flattened tube should measure 9 in (22.9 cm) wide, which is 18 in (45.7 cm) around, and 13.5 in (34.3 cm) tall.
Border
Border gauge: 4 sc per inch around, and 4.5 rounds per inch in height.
Each open edge of the tube has 4 squares × 18 sts = 72 sts. The 2 corner stitches at each seam belong to different squares, so each one is a separate stitch to work into. No stitches are added at the seams. 72 sts ÷ 4 sts per inch = 18 in (45.7 cm), so the border matches the tube exactly.
Base Band and Closed Base (blue)
With the bottom edge facing, join blue in the first st of square A.
Rnd 1: Ch 1, sc in each st. (72 sc: 18 per square) Join.
Rnds 2–6: Ch 1, sc in each st. Join. (72 sc) The band should measure 1.3 in (3.3 cm).
Rnd 7: Ch 1, sc in next 7 sts, sc2tog; rep from * 7 more times. Join. (64 sc)*
Rnd 8: Sc in next 6, sc2tog, rep around. (56 sc)
Rnd 9: Sc in next 5, sc2tog, rep around. (48 sc)
Rnd 10: Sc in next 4, sc2tog, rep around. (40 sc)
Rnd 11: Sc in next 3, sc2tog, rep around. (32 sc)
Rnd 12: Sc in next 2, sc2tog, rep around. (24 sc)
Rnd 13: Sc in next st, sc2tog, rep around. (16 sc)
Rnd 14: Sc2tog 8 times. (8 sc)
Fasten off, leaving a tail. Thread the tail through the front loops of the last 8 sts, pull tight and secure.
A flat circle needs 6 decreases per round. Using 8 decreases per round gives the gently domed base. Place a marker at each decrease group if that helps you count.
Top Rim (cream)
With the top edge facing, join cream in the first st of square A.
Rnds 1–4: Ch 1, sc in each st. Join. (72 sc: 18 per square) The rim should measure 0.9 in (2.3 cm).
Fasten off.
Hanging Tab (blue)
Find the 18 rim stitches above square C. With the RS facing, join blue in the 7th of these stitches.
Row 1: Ch 1, sc in same st and next 5 sts. Turn. (6 sc)
Rows 2–18: Ch 1, sc in each st. Turn. (6 sc)
The tab should be 1.5 in (3.8 cm) wide and 4 in (10.2 cm) long. Fasten off, leaving a 12 in (30.5 cm) tail. Slide the wooden ring onto the tab and fold the tab toward the inside of the holder. Whipstitch Row 18 to the inside of rim Rnd 1. The finished loop stands about 2 in (5.1 cm) above the rim.
Final Blocking
- Weave in all remaining ends on the WS.
- Roll a towel into a cylinder about 5.7 in (14.5 cm) across and slide it inside the holder.
- Mist the holder evenly until it is damp but not wet.
- Gently shape the squares so the seams run straight, and straighten the cream rim.
- Press the opening panel flat so the opening stays a rounded square.
- Leave it to dry completely, then remove the towel.
Final Quality-Control Checklist
- All 12 squares measure 4.5 in (11.4 cm) per side.
- Each flower square has 8 petals and 12 green clusters.
- Each square ends with 68 sts, 18 per side.
- The seams are straight with no gaps where 4 corners meet.
- The tube measures 18 in (45.7 cm) around and 13.5 in (34.3 cm) tall before the border.
- Base Rnds 1–6 and rim Rnds 1–4 each have 72 sts.
- The base closes neatly with no hole.
- The tab is centered above square C, opposite the opening.
Troubleshooting
Petals look ruffled: You probably worked more than 1 petal per stitch. Rnd 1 must have exactly 16 dc.
Green chains show from the front: Keep the ch-4 loops firmly behind the petals and anchor them in the sl sts.
Squares are different sizes: Measure the opening panel against a flower square. If it is larger, rework Rnd 2 with a hook one size smaller.
Tube puckers at the seams: The joining is too tight. Rework it with a hook one size larger.
Base is flat instead of domed: Check that you made 8 decreases per round, not 6.
Rim ruffles: Your rim stitches are looser than the squares. Use a hook one size smaller for the rim.
Care
Hand wash in cool water and lay flat with a towel inside to dry. Reshape while damp. Do not tumble dry.
Final Notes
Every measurement in this pattern builds from the one before it. Each square measures 4.5 in (11.4 cm) and has 18 sts per side. Four squares around make 72 sts and 18 in (45.7 cm). Three squares high make 13.5 in (34.3 cm). The 1.3 in (3.3 cm) base band and the 0.9 in (2.3 cm) rim bring the body to 15.7 in (39.9 cm). If your first square matches the gauge, the rest of the holder will come out to the right size.
Happy crocheting!