

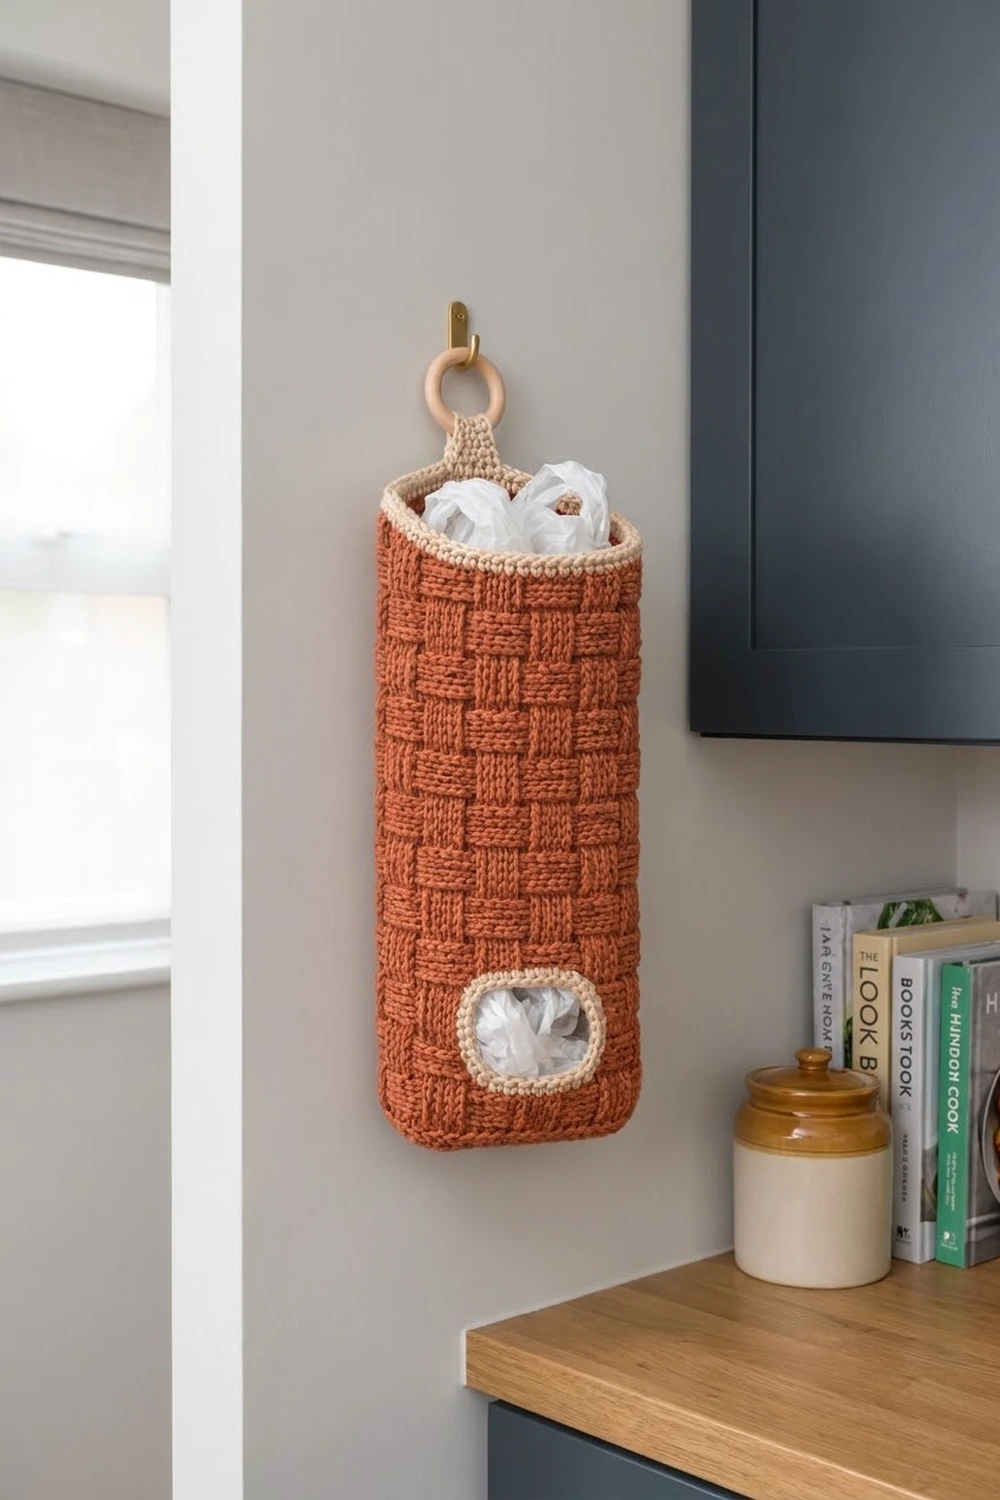
The Terracotta Weave Bag Holder is a tall, sturdy dispenser that keeps loose plastic bags in one tidy place. You push bags in through the top and pull them out one at a time through the opening near the bottom.
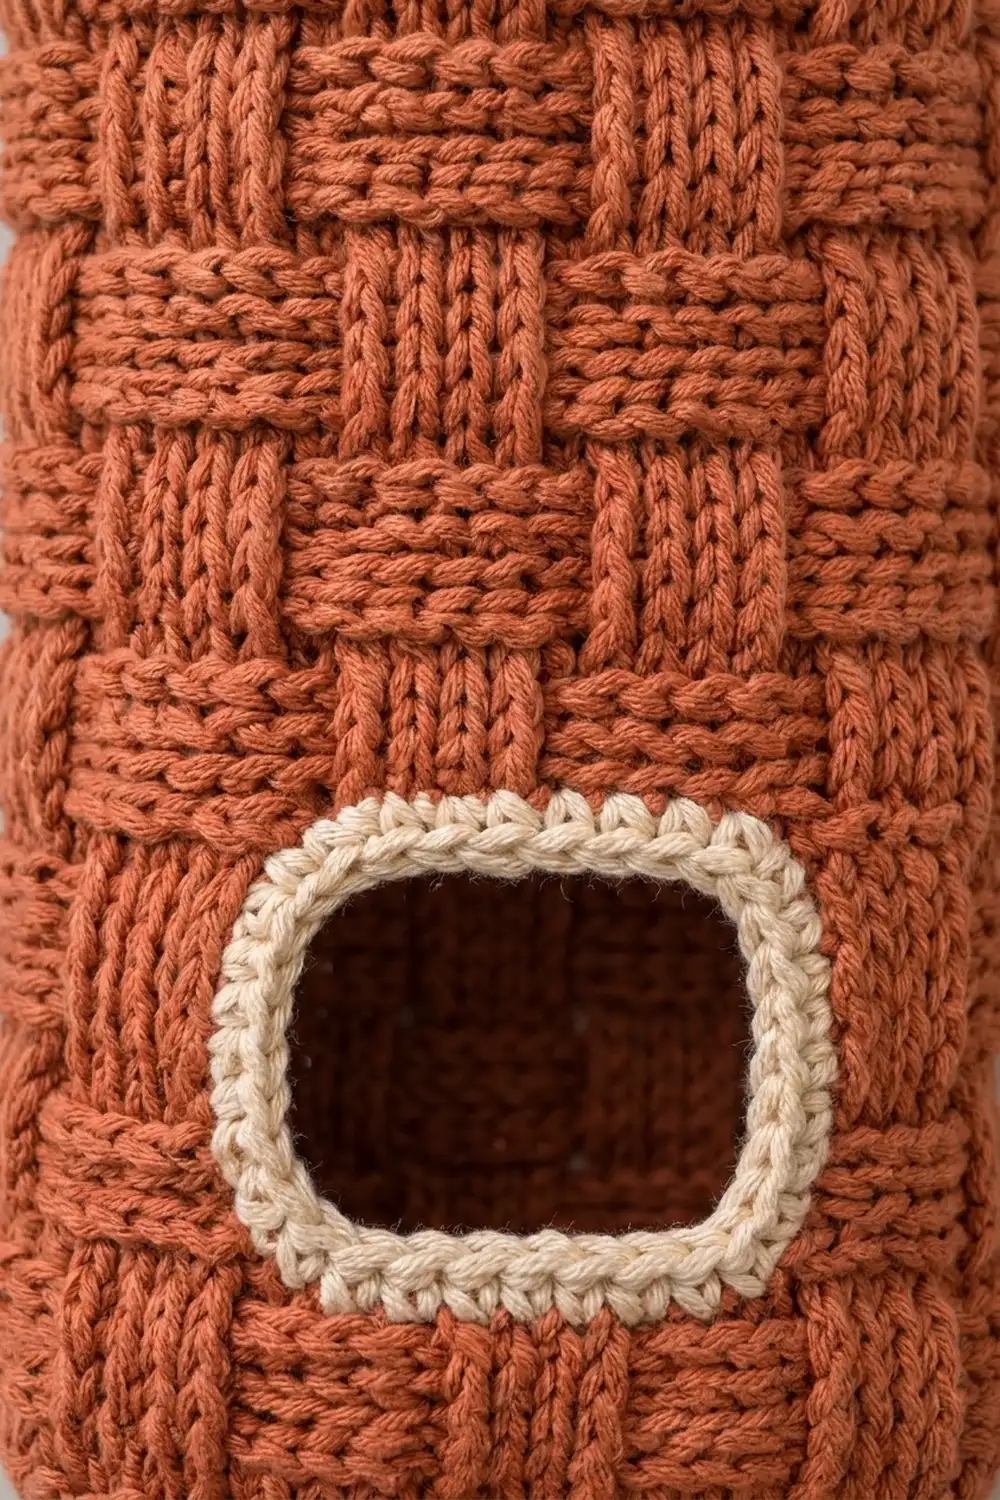
The body is worked in a warm brick-orange yarn with a deep basketweave texture. Cream single crochet trims the top rim, the hanging tab and the dispensing opening. A natural wooden ring and a simple wall hook complete the look.
This pattern uses US crochet terms. The finished holder measures about 7 in (17.8 cm) wide when lying flat and about 13.75 in (34.9 cm) tall, not counting the hanging tab.
You make it in one piece from the bottom up. First you crochet a single crochet oval base. Then you build the tube in basketweave rounds of front-post and back-post double crochet. For four rows, the tube is worked back and forth to leave the opening. Last, you add the cream rim, the hanging tab and the trim around the opening.
Finished Size and Construction
- Finished size: 7 in (17.8 cm) wide flat × 13.75 in (34.9 cm) tall
- Circumference: 14 in (35.6 cm)
- Skill level: Intermediate (post stitches, working in rows and rounds)
- Terminology: US
- Yarn weight: Worsted (#4)
- Hook: 5.0 mm (H-8)
- Number of pieces: 1
- Layout: Single seamless tube with an oval base, worked in the round
- Piece size: Body 7 in (17.8 cm) wide × 13 in (33.0 cm) tall before trim
- Size before border: 13 in (33.0 cm) tall
- Border depth: Top rim trim about 0.7 in (1.8 cm); opening trim about 0.5 in (1.3 cm)
Materials
Pick a smooth, firm worsted yarn in cotton or a cotton-acrylic blend. Plain, tightly plied yarn shows the basketweave texture most clearly. Avoid fuzzy or very soft yarns, because they hide the blocks and let the tube sag.
- Color A (brick/rust orange): 250 g, about 450 m (492 yd)
- Color B (cream): 30 g, about 54 m (59 yd)
These quantities include a safety margin of about 15%. Post-stitch basketweave uses much more yarn than plain double crochet.
Tools:
- 5.0 mm (H-8) crochet hook
- Wooden ring, 2 in (5.1 cm) diameter
- Tapestry needle
- 4 stitch markers
- Scissors
- Measuring tape
- Wall hook for hanging
Abbreviations (US Terms)
- ch – chain
- sl st – slip stitch
- sc – single crochet
- dc – double crochet
- BLO – back loop only
- FPdc – front post double crochet
- BPdc – back post double crochet
- sc2tog – single crochet 2 together
- st(s) – stitch(es)
- RS / WS – right side / wrong side
Special stitches:
- FPdc: Yarn over and insert the hook from front to back to front around the post of the stitch below. Complete as a dc. This stitch sits raised on the side facing you.
- BPdc: Yarn over and insert the hook from back to front to back around the post. Complete as a dc. This stitch sits recessed on the side facing you.
Pattern rounds:
- Round A: *FPdc in next 4 sts, BPdc in next 4 sts; repeat from * around.
- Round B: *BPdc in next 4 sts, FPdc in next 4 sts; repeat from * around.
Basketweave sequence: work 2 rounds of A, then 2 rounds of B, and repeat.
Gauge and Checkpoints
Gauge: 16 sts and 9 rounds = 4 in (10.2 cm) in basketweave. In sc, 16 sts and 18 rounds = 4 in (10.2 cm).
Use the base and the first rounds of the body as your test piece. Measure at each checkpoint before going on:
- After Rnd 3 (base): Oval about 6.5 in × 2 in (16.5 × 5.1 cm), 56 sts.
- After Rnd 7: Height from the base edge about 1.5 in (3.8 cm). Width when flat 7 in (17.8 cm).
- After Rnd 13 (opening finished): Height about 4.25 in (10.8 cm). Opening about 3 in (7.6 cm) wide × 2 in (5.1 cm) tall.
- After Rnd 33: Height about 13 in (33.0 cm).
- After the trim: Height about 13.75 in (34.9 cm).
If the flat width is more than 7 in (17.8 cm), change to a 4.5 mm hook. If it is less, use a 5.5 mm hook. Do not change the stitch count, because the basketweave repeat needs a multiple of 8. If only the height is off, add or remove rounds in pairs at the end of the body so the blocks stay complete.
Base
Use Color A. Do not turn between rounds. Join each round with a sl st to the first st.
Rnd 1: Ch 22. Work 3 sc in the 2nd ch from the hook, then sc in the next 19 ch, and 3 sc in the last ch. Rotate to work along the opposite side of the chain and sc in the next 19 ch. Join. (44 sts)
Rnd 2: Ch 1. Work 2 sc in each of the next 3 sts, sc in the next 19 sts, 2 sc in each of the next 3 sts, and sc in the next 19 sts. Join. (50 sts)
Rnd 3: Ch 1. (2 sc in next st, sc in next st) 3 times, sc in next 19 sts; repeat from * once more. Join. (56 sts)*
Number the stitches in Rnd 3 from 1 to 56, starting with the first stitch of the round:
- Sts 1–9: first curved end
- Sts 10–28: front side
- Sts 29–37: second curved end
- Sts 38–56: back side
Body
Rnd 4: Ch 1, sc BLO in each st around. Join. (56 sts) The unused front loops make a crisp fold line at the bottom edge.
Rnd 5: Ch 2 (does not count as a st here or in later rounds), dc in each st around. Join. (56 sts)
Rnds 6–7: Ch 2, work Round A. Join. (56 sts: 7 repeats)
Fasten off at the end of Rnd 7. Place markers in sts 13 and 24 of Rnd 7. The 12 sts from 13 to 24 make the bottom edge of the opening. They are centered on the front side.
Dispensing Opening (worked in rows)
Rows 8–11 are worked back and forth over the 44 sts from st 25, around the back, to st 12. On WS rows, work the opposite post stitch to the one you want to see, so the blocks still look correct on the RS.
Row 8 (RS, B-type): Join Color A with a sl st around the post of st 25. Ch 2, then work BPdc in next 4, FPdc in next 4 5 times, BPdc in next 4. Turn. (44 sts)
Row 9 (WS, B-type): Ch 2, then work FPdc in next 4, BPdc in next 4 5 times, FPdc in next 4. Turn. (44 sts)
Row 10 (RS, A-type): Ch 2, then work FPdc in next 4, BPdc in next 4 5 times, FPdc in next 4. Turn. (44 sts)
Row 11 (WS, A-type): Ch 2, then work BPdc in next 4, FPdc in next 4 5 times, BPdc in next 4. Turn. (44 sts)
Rnd 12 (RS, B-type): Ch 2, then work BPdc in next 4, FPdc in next 4 5 times, BPdc in next 4. Ch 12, skip the opening, and join with a sl st to the first st of the round. (44 sts + 12 ch = 56)
Rnd 13 (B-type): Ch 2, then work BPdc in next 4, FPdc in next 4 5 times, BPdc in next 4. Dc in each of the 12 ch. Join. (44 post sts + 12 dc = 56)
From now on the round begins at st 25. Because 24 is a multiple of 8, Round A still starts with an FPdc block there. Over the 12 dc above the opening, the post stitches simply continue the block order in Rnd 14.
Upper Body
Rnds 14–15: Ch 2, work Round A. Join. (56 sts)
Rnds 16–17: Ch 2, work Round B. Join. (56 sts)
Rnds 18–33: Repeat Rnds 14–17 four more times. (56 sts) Fasten off Color A.
Counting Rnds 6–33, the body has 14 rows of blocks. Rnd 4 plus 29 dc-height rounds give about 13 in (33.0 cm) of height before the trim.
Border: Rim, Hanging Tab and Opening Trim
Border gauge: 16 sc = 4 in (10.2 cm), the same as the body’s stitch gauge. That is why the trim works one sc into each body stitch with no increases.
Top Rim
Rnd 34: Join Color B in any st. Ch 1, sc in each st around. Join. (56 sts)
Rnds 35–36: Ch 1, sc in each st around. Join. (56 sts) Do not fasten off if the join is at the center of the back; otherwise, fasten off.
Why the math works: The body has 56 sts, which is 14 in (35.6 cm) at 4 sts per inch. Each trim round also has 56 sts at the same gauge, so the rim stays 14 in (35.6 cm) around. Each flat side therefore still measures 28 sts, or 7 in (17.8 cm). The 3 sc rounds add about 0.7 in (1.8 cm), bringing the total height to about 13.75 in (34.9 cm).
Hanging Tab
Flatten the holder with the opening facing you. On the back rim, find the 7 center sts (original sts 44–50).
Row 1: Join Color B in the first of these sts. Ch 1, sc in each of the 7 sts. Turn. (7 sts)
Rows 2–3: Ch 1, sc in each st. Turn. (7 sts)
Row 4: Ch 1, sc2tog, sc in next 3, sc2tog. Turn. (5 sts)
Rows 5–14: Ch 1, sc in each st. Turn. (5 sts)
Leave a 12 in (30.5 cm) tail. Fold Rows 9–14 over the wooden ring toward the inside of the holder. Whipstitch Row 14 to the back of Row 8. The tab is about 3.1 in (7.9 cm) long before folding, and about 1.75 in (4.4 cm) shows above the rim.
Opening Trim
Rnd 1: Join Color B at the right corner of the bottom edge. Work these sc around the opening:
- 12 sc in the free tops of Rnd 7, sts 13–24
- 8 sc up the side, 2 in each of 4 row-ends
- 12 sc in the free loops of the ch-12
- 8 sc down the other side
Join. (40 sts)
Rnd 2: Ch 1. Sc2tog, sc in next 10, sc2tog, sc in next 6; repeat from * once more. Join. (36 sts)*
Why the math works: The 4 decreases fall at the corners, where the inner edge of the trim is shortest. This pulls the corners into soft curves and gives the opening its rounded-rectangle shape without rippling. The finished opening is about 2.25 in (5.7 cm) wide × 1.25 in (3.2 cm) tall.
Fasten off and weave in all ends on the inside.
Final Blocking
- Lightly spray the holder with water until it is evenly damp. Do not soak it.
- Fill it loosely with crumpled towels or plastic bags to make a smooth tube.
- Flatten it gently so the width is 7 in (17.8 cm) and the opening is centered on the front.
- Straighten the base fold line and line up the block columns.
- Pat the cream rim and the opening trim flat. Leave the post stitches raised; do not press them.
- Let it dry fully, standing upright or lying on its back.
- Remove the filling and hang it on the ring.
Final Quality-Control Checklist
- Each round has 56 sts, and Rows 8–11 have 44 sts.
- The blocks alternate cleanly, with 4 sts and 2 rounds per block.
- The opening is centered on the front, with 12 sts along both the top and bottom edges.
- The opening trim has 36 sts and its corners lie flat.
- The rim has 3 sc rounds of 56 sts each.
- The tab is centered on the back and firmly sewn around the ring.
- The holder measures 7 in × 13.75 in (17.8 × 34.9 cm).
Troubleshooting
- Blocks look blurred: You worked the wrong post stitch on a WS row. Check Rows 9 and 11 against the RS look.
- The tube twists: Join every round with a sl st instead of working in a spiral.
- The opening gapes or puckers: Rework Trim Rnd 1 with exactly 2 sc per row-end.
- The rim flares: Go down a hook size for the cream rounds only.
- The base cups upward: Check that Rnd 3 has 56 sts and that Rnd 4 is worked in BLO.
- The tab stretches: Add a second sewn row, or tighten your tension on the tab rows.
Care
Hand wash in cool water and lay flat to dry, reshaping it to 7 in (17.8 cm) wide. Shake out crumbs from the bags regularly.
Final Notes
The measurement chain is:
- The base grows to 56 sts, which is 14 in (35.6 cm) around and 7 in (17.8 cm) flat.
- The body has 29 dc-height rounds on a sc fold round, about 13 in (33.0 cm) tall.
- A 12-st opening is worked over 4 rows and closed with a ch-12 bridge.
- 3 cream rim rounds of 56 sts bring the height to 13.75 in (34.9 cm).
- A 5-st tab wraps a 2 in (5.1 cm) ring.
If your gauge matches at each checkpoint, every later count will line up.
Happy crocheting!