

The Daisy Pantry Bag Holder keeps your stash of plastic grocery bags tidy, in plain sight and easy to grab. You stuff bags in at the top and pull them out one at a time through a neat round opening at the bottom.
The body is a soft teardrop shape in heathered sage-teal moss stitch. A cream shell band and rim finish the top. Three little daisy squares in cream, white and yellow sit across the front like a window box. The look is calm farmhouse kitchen: practical, but pretty enough to hang on a hook.
This pattern uses US crochet terms. The finished holder measures about 12 in (30.5 cm) tall and 12 in (30.5 cm) wide at its widest point, narrowing to 9 in (22.9 cm) across the top. The handle adds a loop that rises about 4.5 in (11.4 cm) above the rim.
Construction overview: You work the body bottom-up in continuous joined rounds. You start at the dispensing opening, increase in single crochet to make a rounded base, switch to moss stitch for the body, then decrease and finish with the shell band and rim. Next you make the handle as a flat strip and sew it on. Last, you make three daisy squares, join them into a strip, outline the strip and sew it to the front.
Finished Size and Construction
- Finished size: 12 in (30.5 cm) tall × 12 in (30.5 cm) wide, laid flat
- Top opening: 9 in (22.9 cm) wide, laid flat
- Bottom opening: 3 in (7.6 cm) wide, laid flat
- Skill level: Intermediate
- Terminology: US
- Yarn weight: Worsted (#4)
- Hook: 5 mm (H-8)
- Number of pieces: 1 body, 1 handle, 3 daisy squares
- Layout: 3 squares in one horizontal row (3 × 1), centered on the front
- Square size: 2.75 in (7.0 cm)
- Square size before last round: 2.5 in (6.4 cm)
- Daisy strip before border: 8.25 × 2.75 in (21.0 × 7.0 cm)
- Strip border depth: 0.25 in (0.6 cm), 1 round
- Strip after border: 8.75 × 3.25 in (22.2 × 8.3 cm)
Materials
Yarn: Use a worsted-weight cotton or cotton-acrylic blend, about 200 m per 100 g. Cotton holds the shape well and stands up to frequent use. A heathered or tweed teal gives the speckled look in the photo.
- Color A, sage-teal heather: 130 g / 260 m
- Color B, cream: 50 g / 100 m
- Color C, white: 5 g / 10 m
- Color D, golden yellow: 3 g / 6 m
These quantities include a margin of about 15% for your gauge swatch and for tension differences.
Tools:
– 5 mm (H-8) crochet hook
– Tapestry needle
– 4 stitch markers
– Scissors
– Measuring tape
– Rust-proof pins and a blocking mat
Abbreviations (US Terms)
- ch – chain
- sl st – slip stitch
- sc – single crochet
- hdc – half double crochet
- dc – double crochet
- sc2tog – single crochet 2 together
- sk – skip
- sp – space
- st(s) – stitch(es)
- RS – right side
- BLO – back loop only
Special stitches
- Moss stitch (in the round): You work this over an even number of stitches. Each ch-1 counts as a stitch. Every round, work (sc, ch 1) into the ch-1 space and skip the sc. Each new sc sits on top of a ch-1 from the round below.
- Shell: 5 dc in the same stitch.
- Petal: (sl st, ch 2, 2 dc, ch 2, sl st) in the same stitch.
Gauge and Checkpoints
- Single crochet: 16 sts and 18 rounds = 4 in (10.2 cm)
- Moss stitch: 16 sts (8 sc + 8 ch-1) and 16 rounds = 4 in (10.2 cm)
Test one piece first. Make one daisy square before you start the body. It should measure 2.5 in (6.4 cm) after Round 4 and 2.75 in (7.0 cm) after Round 5. If it does, your sc gauge is right for the whole project.
Checkpoints:
– After body Round 13: 16 sts measure 4 in (10.2 cm) along the edge, and the full circumference is 24 in (61.0 cm).
– After Round 37: the body is 12 in (30.5 cm) wide when laid flat. The moss section is 6 in (15.2 cm) tall.
– After Round 42: the top is 9 in (22.9 cm) wide when laid flat.
– Handle: 10 in (25.4 cm) long and 1.75 in (4.4 cm) wide.
If your work is too big, go down 0.5 mm in hook size. If it is too small, go up 0.5 mm. Don’t change the stitch counts. Every measurement in this pattern comes straight from 4 sts per inch.
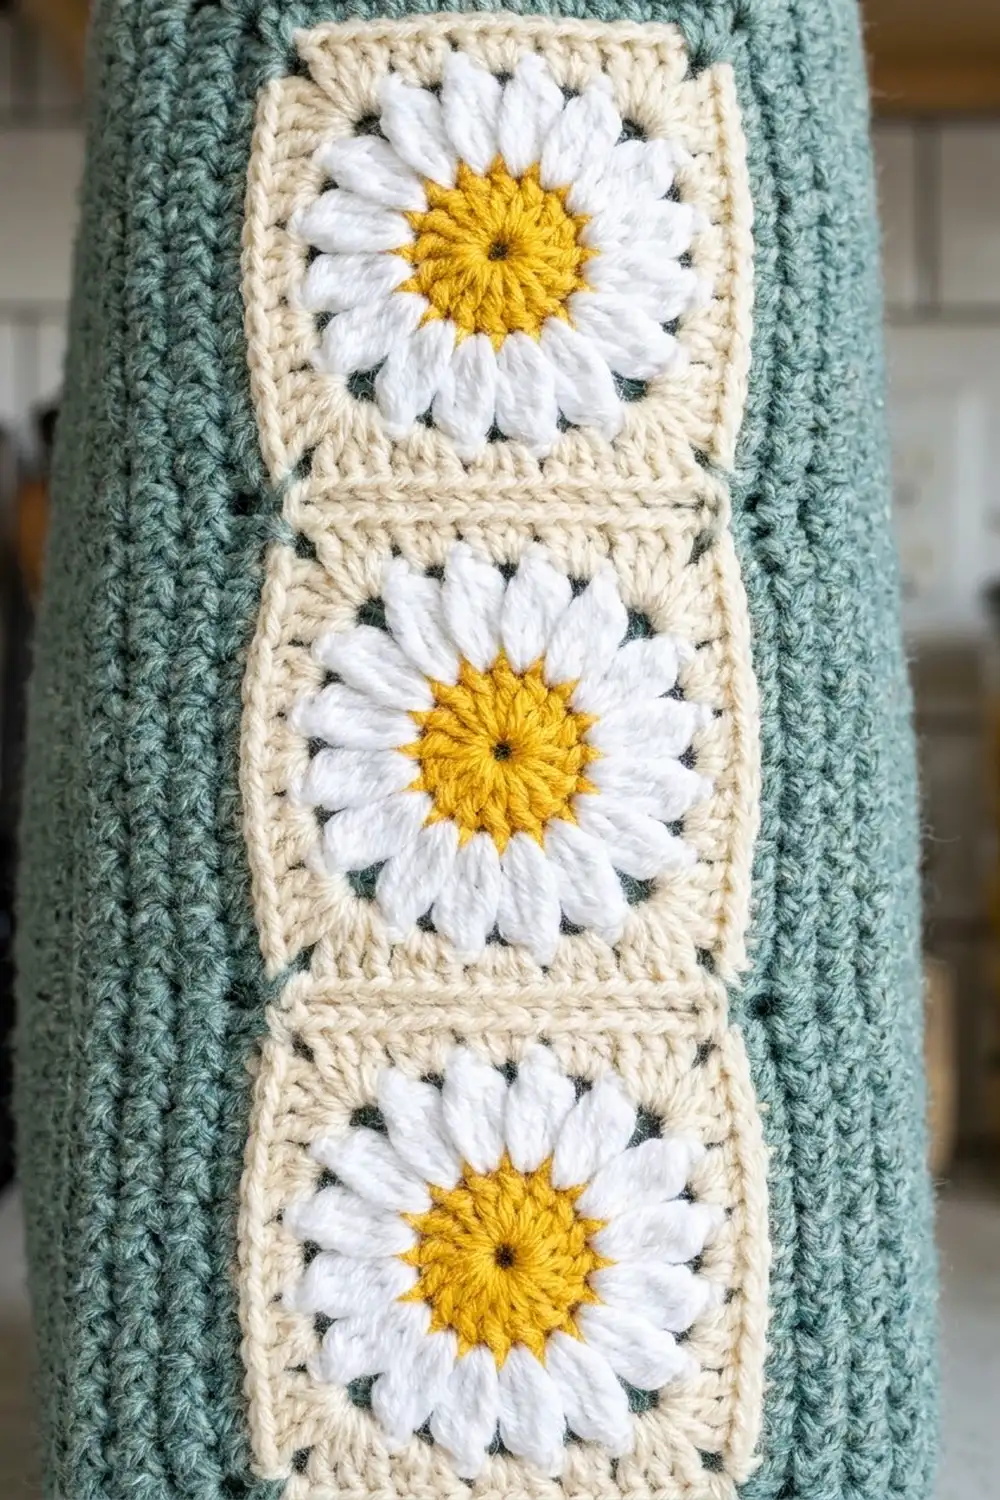
Body
The body is worked in joined rounds with the RS always facing you. The beginning ch 1 never counts as a stitch.
Base (Color A, single crochet)
Foundation: Ch 24 and join with a sl st to the first ch to form a ring. Take care not to twist the chain.
Rnd 1: Ch 1, sc in each ch around, join. (24 sc)
This chain ring becomes the dispensing opening: 24 sts make a 6 in (15.2 cm) circumference, which is 3 in (7.6 cm) when laid flat.
Rnd 2: Ch 1, sc in next 3 sts, 2 sc in next st 6 times, join. (30 sc)
Rnd 3: Ch 1, sc in next 4 sts, 2 sc in next st 6 times, join. (36 sc)
Rnds 4–13: Continue the same way. Each round, work one more sc before each increase, so there are 6 increases per round and each round is 6 sts larger than the one before.
- Rnd 4: 42 sc
- Rnd 5: 48 sc
- Rnd 6: 54 sc
- Rnd 7: 60 sc
- Rnd 8: 66 sc
- Rnd 9: 72 sc
- Rnd 10: 78 sc
- Rnd 11: 84 sc
- Rnd 12: 90 sc
- Rnd 13: 96 sc
Six increases per round is slightly fewer than a flat circle needs, so the base curves gently into a shallow bowl. That curve gives the rounded teardrop bottom. Checkpoint: 96 sts = 24 in (61.0 cm) around. The base is about 2.9 in (7.4 cm) deep, measured from the opening edge.
Body (Color A, moss stitch)
Rnd 14 (set-up): Ch 1, sc in next st, ch 1, sk next st 48 times, join. (48 sc + 48 ch-1 = 96 sts)
Rnd 15: Sl st into the first ch-1 sp, ch 1, (sc, ch 1) in ch-1 sp, sk next sc 48 times, join. (96 sts)
Rnds 16–37: Repeat Rnd 15. (96 sts each round)
Checkpoint: The body is 12 in (30.5 cm) wide when laid flat, and Rnds 14–37 measure 6 in (15.2 cm) tall.
Shaping the shoulders
Rnd 38 (decrease): Ch 1. Treat every sc and every ch-1 sp as one stitch. Sc in next 2 sts, sc2tog over next 2 sts 24 times, join. (72 sc)
This round turns 96 sts into 72 by removing 24, one per repeat. That pulls the top in and makes the gathered pear shape.
Rnd 39 (set-up): Ch 1, sc in next st, ch 1, sk next st 36 times, join. (36 sc + 36 ch-1 = 72 sts)
Rnds 40–42: Work in moss stitch as in Rnd 15. (72 sts each round) Fasten off Color A.
Checkpoint: The top is 9 in (22.9 cm) wide when laid flat. The moss section above the decrease measures 1 in (2.5 cm).
Shell band (Color B)
Rnd 43: Join Color B with a sl st in any st. Ch 1, sc in the same st, sk 2 sts, shell in next st, sk 2 sts, sc in next st 12 times. On the last repeat, skip the final sc and join to the first sc. (12 shells + 12 sc = 72 sts)
Rnd 44: Sl st into the first 3 dc to reach the center of the first shell. Ch 1, sc in the same st, shell in next sc, sc in center dc of next shell 12 times. On the last repeat, skip the final sc and join. (12 shells + 12 sc = 72 sts)
Each new shell sits on top of a sc from the round below, between two shells. Offsetting the shells like this creates the row of small star-shaped holes seen in the band. Each repeat is 6 sts (5 dc + 1 sc), and 6 × 12 = 72.
Rim (Color B)
Rnds 45–46: Ch 1, sc in each st around, join. (72 sc each round) Fasten off.
The shell band and rim together measure about 1.75 in (4.4 cm).
Bottom opening edging (Color B)
Turn the body upside down. Join Color B in any free loop on the underside of the foundation chain.
Rnd 1: Ch 1, sc in each free loop around, join. (24 sc)
Rnd 2: Ch 1, sc in each st around, join. (24 sc) Fasten off.
The two cream rounds firm up the opening so bags slide out without stretching it. The opening stays at 3 in (7.6 cm) wide when laid flat.
Handle (Color A)
Row 1: Ch 8, sc in 2nd ch from hook and in each ch across, turn. (7 sc)
Rows 2–45: Ch 1, sc in each st across, turn. (7 sc each row) Fasten off and leave a long tail for sewing.
Checkpoint: 10 in (25.4 cm) long × 1.75 in (4.4 cm) wide.
Lay the body flat with the bottom opening facing forward. Place markers on Rnd 46 at the left and right fold points. Counting the first st of the round as st 1, these are st 1 and st 37, exactly opposite each other on a 72-st round.
Overlap each handle end 1 in (2.5 cm) onto the inside of the rim, centered on a marker. Sew it securely with a box stitch through Rnds 43–46.
Daisy Squares
Make 3. Each square uses Colors D, C and B.
Rnd 1 (Color D): Make a magic ring. Ch 1, 8 sc in ring, pull the ring closed and join. (8 sc) Fasten off.
Rnd 2 (Color C): Join in any sc. Work a petal in each sc around and join to the first sl st. (8 petals) Fasten off.
Checkpoint: The flower measures about 1.75 in (4.4 cm) across.
Rnd 3 (Color B): Work behind the petals. Join with a sc around the post of any Rnd 1 sc, inserting the hook from the back. Ch 3, sc around post of next Rnd 1 sc, ch 3 7 times, join. (8 sc, 8 ch-3 sps)
Rnd 4: Sl st into the first ch-3 sp. Ch 3 (counts as dc), (2 dc, ch 2, 3 dc) in the same sp for the first corner. Work 3 hdc in next sp, (3 dc, ch 2, 3 dc) in next sp, 3 hdc in next sp 3 times, join. (36 sts + 4 ch-2 corners; 9 sts per side)
Checkpoint: 2.5 in (6.4 cm) square.
Rnd 5: Ch 1, sc in each st, and work (sc, ch 2, sc) in each corner sp, join. (44 sc; 11 sc per side, including the 2 corner sc on that side) Fasten off.
Checkpoint: 11 sc ÷ 4 sts per inch = 2.75 in (7.0 cm).
Make All Pieces
- Body: 1, in Colors A and B
- Handle: 1, in Color A
- Daisy squares: 3 squares, which use 3 g of Color D, 5 g of Color C and about 15 g of Color B in total
Layout (3 × 1):
[Daisy] [Daisy] [Daisy]
Joining
Lay two squares side by side with the RS facing up. Using Color B and a tapestry needle, whipstitch through the BLO of the facing edges.
Start in the ch-2 corner space and match stitch to stitch: 11 sc to 11 sc, ending in the opposite ch-2 corner space. Join the third square the same way. Joining through the back loops leaves a flat ridge on the front that looks like a frame line between the squares.
Tension: Pull each stitch just snug, so the seam lies flat and is the same length as the square’s edge. If you pull too tightly, the strip will bow inward.
Checkpoint: The strip measures 8.25 × 2.75 in (21.0 × 7.0 cm).
Border
Border gauge: 4 sc per inch, the same as the squares.
Rnd 1 (Color B): Join in any st along a long side. Ch 1. Work sc in each sc around, and work (sc, ch 1, sc) in each of the 4 outer corner ch-2 sps. Do not work any stitches into the corner spaces where two squares meet at a seam. Join and fasten off.
Counts:
– Each long side: 3 squares × 11 sts = 33 sts, plus 1 new corner sc at each end = 35 sc
– Each short side: 1 square × 11 sts = 11 sts, plus 1 new corner sc at each end = 13 sc
– Total: 35 + 35 + 13 + 13 = 96 sc + 4 ch-1 corners
Why the math works: Each square’s 11 sts already include its own corner stitches, so the long side starts at exactly 33. The seam spaces are skipped, so nothing is added at the joins. The only new stitches are the two sc in each outer corner, and they belong one to each side.
- 35 sc ÷ 4 = 8.75 in (22.2 cm)
- 13 sc ÷ 4 = 3.25 in (8.3 cm)
These match the strip size plus 0.25 in (0.6 cm) of border on each edge.
Attach the strip: Center the strip on the front of the body, below the shell band. The top edge sits 1.5 in (3.8 cm) below Rnd 43. On the 12 in (30.5 cm) wide front, that leaves about 1.6 in (4.1 cm) of teal on each side. Pin it in place and whipstitch all the way around the outer edge with Color B, catching only the front layer of the body.
Final Blocking
- Weave in all ends inside the body, following stitches of the same color.
- Wet block the daisy strip before you attach it: soak, press out the water, pin it to 8.75 × 3.25 in (22.2 × 8.3 cm) and let it dry.
- Once the strip is sewn on, mist the whole holder lightly with water.
- Stuff the holder with a rolled towel to shape the teardrop and the rounded base.
- Lay it flat. Check that it is 12 in (30.5 cm) wide at the widest point and 9 in (22.9 cm) at the top.
- Pin the shells open along the rim so the star holes show.
- Let it dry completely before hanging.
Final Quality-Control Checklist
- Body Rnd 37 has 96 sts and Rnd 42 has 72 sts.
- The shell band has 12 shells in each round, and the star holes are evenly spaced.
- The bottom opening is 3 in (7.6 cm) wide and both cream rounds lie flat.
- The handle is sewn on at st 1 and st 37, exactly opposite each other.
- Each square measures 2.75 in (7.0 cm) and has 8 even petals.
- The strip border has 35/13/35/13 sc and is centered and level on the front.
- All ends are woven in and hidden on the inside.
Troubleshooting
- The base ruffles: You probably added extra increases. Recount; there should be exactly 6 per round.
- The base comes up tall and pointed: Your tension is tight. Go up a hook size for Rnds 2–13 only.
- The moss stitch spirals: Make sure you join every round and that each sc goes into a ch-1 sp, never into a sc.
- The shells don’t fit: Rnd 42 must have exactly 72 sts, because 72 ÷ 6 = 12 repeats.
- The bottom opening stretches out: Work Rnd 2 of the edging with a hook 0.5 mm smaller.
- The petals are cupping: Block the flowers flat, or use ch 1 instead of ch 2 at each end of the petal.
- The strip puckers on the bag: Sew with looser stitches and catch only one strand of the body yarn.
Care
Hand wash in cool water and lay flat to dry, stuffed lightly so it keeps its shape. Do not tumble dry.

Final Notes
Every measurement in this pattern comes from one gauge, 4 sts per inch:
- The 24-st opening makes a 3 in (7.6 cm) dispenser hole.
- Growing to 96 sts gives a body 12 in (30.5 cm) wide.
- Decreasing to 72 sts gives a top 9 in (22.9 cm) wide, which fits exactly 12 shells.
- Each 11-st square is 2.75 in (7.0 cm), and three of them make 33 sts.
- One border round brings the strip to 8.75 × 3.25 in (22.2 × 8.3 cm), which sits neatly on the front.
Check your gauge once, confirm each checkpoint as you go, and the holder will come out right the first time.
Happy crocheting!