

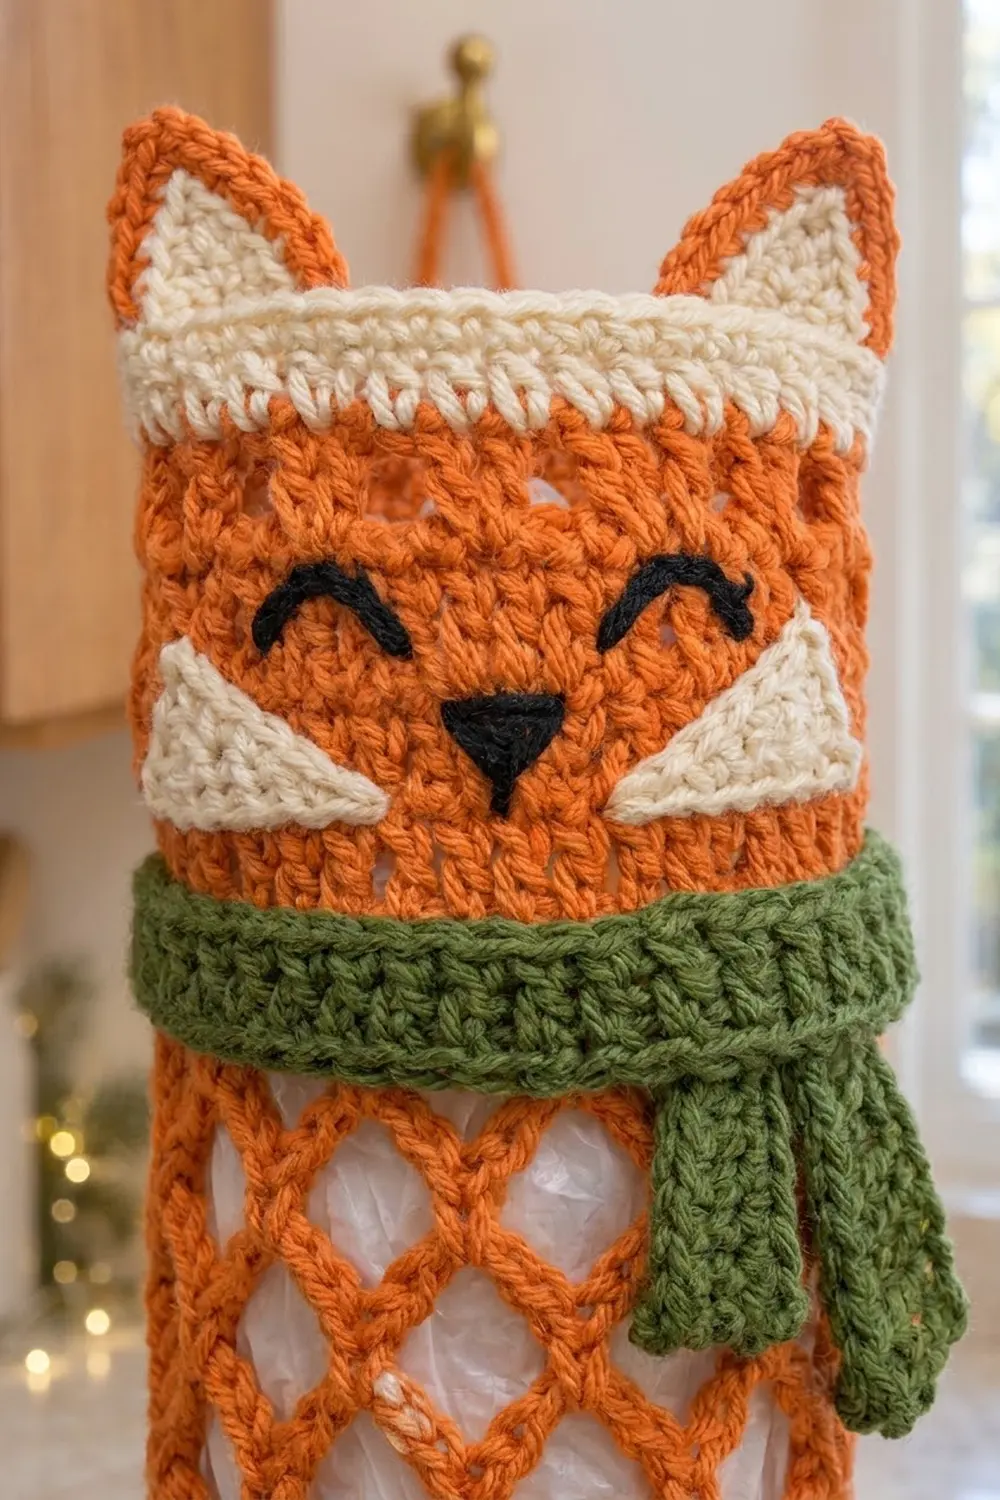
This cheerful fox keeps grocery bags tidy and within reach. It is a tall hanging tube with an open diamond mesh in bright orange, a solid orange face, and cream bands at the top and bottom. A green ribbed scarf with two tails wraps the neck, and two pointed ears stand up from the top edge.
The colors are pumpkin orange, warm cream, sage green, and a little black for the sleepy eyes and nose. The style is cozy and a little whimsical, ideal for a farmhouse kitchen.
The pattern uses US crochet terms. The finished holder measures 6 in (15.2 cm) wide laid flat and 16 3/4 in (42.5 cm) tall from the bottom edge to the top edge, or about 18 in (45.7 cm) including the ears. The hanging strap rises another 3 1/2 in (8.9 cm) above the top edge.
The body is one seamless tube worked from the bottom up: a single crochet foundation, a chain-5 diamond mesh, then solid single crochet for the face. Cream border bands go on both open ends. The ears, cheeks, scarf, tails, and strap are small flat parts sewn on at the end, and the face is embroidered. Bags go in the top and pull out of the bottom.
Finished Size and Construction
- Finished size: 6 in (15.2 cm) wide flat x 16 3/4 in (42.5 cm) tall, plus ears
- Circumference: 12 in (30.5 cm)
- Skill level: Easy
- Terminology: US
- Yarn weight: Worsted (#4), cotton or cotton blend
- Hook: 5.0 mm (H-8)
- Number of pieces: 1 main body (a single piece), plus 8 small sewn-on parts (2 ears, 2 cheeks, scarf band, 2 scarf tails, strap)
- Layout: one vertical tube, open at both ends
- Piece size (body before border): 6 in (15.2 cm) wide flat x 14 3/4 in (37.5 cm) tall
- Border depth: 4 rounds, 1 in (2.5 cm) at each end
Materials
Choose a smooth worsted cotton. Cotton keeps its shape under a full load of bags and shows the stitches clearly.
- Orange (Main Color, MC): 90 g, about 155 m (170 yd)
- Cream (Color A, CA): 25 g, about 45 m (50 yd)
- Green (Color B, CB): 20 g, about 35 m (38 yd)
- Black (Color C, CC): 2 g, about 4 m (4 yd), yarn or 6-strand embroidery floss
These amounts include about 15 percent extra for your gauge swatch and yarn tails.
Tools:
– 5.0 mm (H-8) crochet hook
– Tapestry needle
– Locking stitch markers
– Measuring tape
– Scissors
– Rolled towel or cardboard tube for blocking
– Pins
Abbreviations (US Terms)
- ch – chain
- sl st – slip stitch
- sc – single crochet
- dc – double crochet
- sk – skip
- st(s) – stitch(es)
- BLO – back loop only
- sc2tog – single crochet 2 together
- sc3tog – single crochet 3 together
- rnd(s) – round(s)
- RS – right side
Special stitch – mesh join (ch 2, dc): At the end of a mesh round, ch 2, then dc in the first sc of the round. The ch 2 plus the dc equal the length of a ch-5 loop, and your hook ends up in the middle of that loop, ready to start the next round.
Gauge and Checkpoints
Gauge: 16 sc and 16 rnds = 4 in (10.2 cm), worked in the round. That is 4 sc and 4 rnds per inch.
Mesh gauge: Each mesh round adds about 3/4 in (1.9 cm) of height when laid flat and unstretched.
Check your gauge on the real piece first: work Rnd 1 and 4 mesh rounds, then measure.
Checkpoints:
– After Rnd 1: circumference 12 in (30.5 cm), 6 in (15.2 cm) flat.
– After Rnd 15 (end of mesh): 10 3/4 in (27.3 cm) from the foundation edge.
– After Rnd 31 (end of body): 14 3/4 in (37.5 cm).
– After both borders: 16 3/4 in (42.5 cm).
Too big? Go down 0.5 mm. Too small? Go up 0.5 mm. Don’t change the stitch count. The 48-stitch round is built on 12 mesh repeats of 4 stitches.
Body
Work in joined rounds with the RS facing, keeping the join at center back. Stitch 1 sits just left of center back, so the front center falls between sts 24 and 25.
Foundation: With MC, ch 48. Sl st to the first ch to form a ring, taking care not to twist.
Rnd 1: Ch 1, sc in each ch around, sl st to first sc. (48 sc; 24 per side flat)
Diamond Mesh
Rnd 2: Ch 1, sc in first sc, ch 5, sk 3 sts, sc in next st; repeat from * 10 more times, ch 2, sk last 3 sts, dc in first sc. (12 sc, 12 loops)
Rnds 3–14: Ch 1, sc around the post of the joining dc, ch 5, sc in next ch-5 loop; repeat from * 10 more times, ch 2, dc in first sc. (12 sc, 12 loops each round)
Rnd 15: Ch 1, sc around the post of the joining dc, ch 5, sc in next ch-5 loop; repeat from * 10 more times, ch 5, sl st in first sc. (12 sc, 12 full ch-5 loops)
Each sc sits in the center of a loop below, so the loops stack into diamonds.
Checkpoint: 10 3/4 in (27.3 cm). That is Rnd 1 at 1/4 in (0.6 cm) plus 14 mesh rounds at 3/4 in (1.9 cm) each, or 10 1/2 in (26.7 cm).
Solid Face
Rnd 16 (conversion): Ch 1, sc in same sc as join, 3 sc in next ch-5 loop, sc in next sc, 3 sc in next ch-5 loop; repeat from * 10 more times, sl st to first sc. (12 sc worked 1-per-existing-sc + 36 sc worked into loops = 48 sc)
Rnds 17–31: Ch 1, sc in each st around, sl st to first sc. (48 sc each round)
Fasten off.
Checkpoint: Rnds 16–31 are 16 rounds, or 4 in (10.2 cm). The body measures 14 3/4 in (37.5 cm) tall and 6 in (15.2 cm) wide flat.
Ears (make 2)
Inner ear: With CA, ch 8.
– Row 1: Sc in 2nd ch from hook and in each ch across, turn. (7 sc)
– Row 2: Ch 1, sc2tog, sc in next 3 sts, sc2tog, turn. (5 sc)
– Row 3: Ch 1, sc in each st across, turn. (5 sc)
– Row 4: Ch 1, sc2tog, sc in next st, sc2tog, turn. (3 sc)
– Row 5: Ch 1, sc in each st across, turn. (3 sc)
– Row 6: Ch 1, sc3tog. (1 st) Fasten off.
Edging: Join MC at the right end of Row 1. Work 5 sc evenly up the side (1 per row end, Rows 1–5), then (sc, ch 2, sc) in the tip, then 5 sc down the other side. (12 sc + ch-2 tip) Leave the base without edging and leave a long tail.
Each ear measures about 2 in (5.1 cm) wide at the base and 1 3/4 in (4.4 cm) tall.
Cheeks (make 2)
With CA, ch 6.
– Row 1: Sc in 2nd ch from hook and in each ch across, turn. (5 sc)
– Row 2: Ch 1, sc2tog, sc in next st, sc2tog, turn. (3 sc)
– Row 3: Ch 1, sc in each st across, turn. (3 sc)
– Row 4: Ch 1, sc3tog. (1 st) Fasten off, leaving a tail.
Each cheek is a small triangle about 1 1/4 in (3.2 cm) wide and 1 in (2.5 cm) tall.
Scarf
Band: With CB, ch 53.
– Row 1: Sc in 2nd ch from hook and in each ch across, turn. (52 sc)
– Rows 2–6: Ch 1, sc in BLO of each st across, turn. (52 sc)
Fasten off. The band is 13 in (33.0 cm) long and 1 1/2 in (3.8 cm) tall, with horizontal ridges.
Long tail: With CB, ch 17.
– Row 1: Sc in 2nd ch from hook and in each ch across, turn. (16 sc)
– Rows 2–3: Ch 1, sc in BLO of each st across, turn. (16 sc)
Fasten off. The long tail measures 4 in (10.2 cm) x 3/4 in (1.9 cm).
Short tail: Work the same as the long tail, but start with ch 15. (14 sc) The short tail measures 3 1/2 in (8.9 cm) x 3/4 in (1.9 cm).
Strap
With MC, ch 41.
– Row 1: Sc in 2nd ch from hook and in each ch across, turn. (40 sc)
– Row 2: Ch 1, sc in each st across. (40 sc)
Fasten off, leaving a long tail. The strap is 10 in (25.4 cm) long.
Border
The border is two cream bands, one at each open end. The border gauge matches the body: 4 sc per inch, so 24 sc span one 6 in (15.2 cm) side of the flattened tube.
Top Border
Rnd 1: Join CA at center back in Rnd 31. Ch 1, sc in BLO of each st around, sl st to first sc. (48 sc; 24 front + 24 back)
Rnds 2–4: Ch 1, sc in each st around, sl st to first sc. (48 sc; 24 per side)
Fasten off.
Bottom Border
Turn the body upside down and work into the free loops of the foundation chain.
Rnd 1: Join CA at center back. Ch 1, sc in each free loop around, sl st to first sc. (48 sc; 24 per side)
Rnds 2–4: Ch 1, sc in each st around, sl st to first sc. (48 sc; 24 per side)
Fasten off.
Why the math works: The body has 48 stitches, which is 12 mesh repeats x 4 stitches, or 2 sides x 24 stitches. The borders don’t increase or decrease, so each band keeps the 12 in (30.5 cm) circumference and the tube hangs straight. Four rounds at 4 rounds per inch give 1 in (2.5 cm) per band. Body 14 3/4 in (37.5 cm) + 1 in (2.5 cm) + 1 in (2.5 cm) = 16 3/4 in (42.5 cm).
Assembly and Face
Flatten the tube with the join at center back. Count stitches across the front from the side fold.
- Scarf band: Wrap the band around the neck, covering Rnds 16–20, with the lower edge overlapping the last mesh round by 1/4 in (0.6 cm). Overlap the ends by 1 in (2.5 cm) on the front right, just inside the side fold. Whipstitch the overlap, then tack the band down at both side folds.
- Scarf tails: Sew the top ends of both tails under the band overlap, with the long tail in front, so they hang down the right side over the mesh.
- Cheeks: Sew one cheek over sts 15–19 and one over sts 30–34, with the top edges along Rnd 26 and the points angled down toward the center.
- Eyes: With CC, backstitch a smiling arc 3 sts wide (3/4 in, 1.9 cm) across Rnds 27–28, one centered on st 20 and one on st 29. The eye centers are 2 1/4 in (5.7 cm) apart.
- Nose: With CC, satin stitch an inverted triangle 1/2 in (1.3 cm) wide, centered between sts 24 and 25 on Rnds 25–26.
- Ears: Pin each ear to the inside of the front top border, with the bases spanning sts 13–19 and sts 30–36 and 1/2 in (1.3 cm) of each ear hidden inside. About 1 1/4 in (3.2 cm) stands above the top edge. Whipstitch through the border only.
- Strap: Sew 1 in (2.5 cm) of each strap end to the inside of the back top border, at sts 6 and 43. The ends are 2 3/4 in (7.0 cm) apart, and the strap arches about 3 1/2 in (8.9 cm) above the edge.
Weave in all ends.
Final Blocking
- Roll a towel into a firm cylinder about 3 3/4 in (9.5 cm) across, or wrap a towel around a cardboard tube.
- Lightly mist the holder with cool water and slide it over the cylinder so the mesh stretches gently and evenly.
- Straighten the diamond columns so they run straight up and down.
- Lay the ears, scarf tails, and strap flat and pin them in shape.
- Measure: 6 in (15.2 cm) flat width and 16 3/4 in (42.5 cm) height.
- Let it dry completely before hanging.
Final Quality-Control Checklist
- 48 sc in Rnd 1, Rnd 16, Rnd 31, and every border round
- 12 loops in each mesh round, with the diamonds lined up vertically
- Body 14 3/4 in (37.5 cm) before the borders and 16 3/4 in (42.5 cm) after
- Both bands 1 in (2.5 cm) deep
- Ears, cheeks, eyes, and nose mirror each other around the front center
- Scarf covers the line where the mesh meets the solid section
- Strap sewn securely through two layers of the back border
- All ends woven in on the inside
Troubleshooting
- Mesh twists in a spiral: Each round must start with the sc around the joining dc post. Check that you haven’t started in the wrong spot.
- Mesh too long: Your chains are loose. Go down 0.5 mm for the mesh rounds only.
- Conversion round puckers: Work 3 sc in each loop, not 4, and check that you have 48 sts.
- Borders flare: Your border tension is looser than the body. Go down 0.5 mm for the cream bands.
- Bags fall out the bottom: Weave a length of CA through Rnd 2 of the bottom border and tie it snugly.
Care
Hand wash in cool water with mild soap. Press out the water with a towel and dry flat over a rolled towel; do not tumble dry.

Final Notes
Here is how the measurements build: 16 sc = 4 in (10.2 cm), so 48 sts make a 12 in (30.5 cm) tube that lies 6 in (15.2 cm) flat. The foundation round and 14 mesh rounds give 10 3/4 in (27.3 cm). Sixteen solid rounds add 4 in (10.2 cm), and two 1 in (2.5 cm) borders bring the holder to 16 3/4 in (42.5 cm). Check each step and your fox will hang straight and smile from the kitchen wall.
Happy crocheting!